
Last Updated on August 23, 2018 by HodgePodgeDays
Every year at the Just So Festival, we venture into the woods to make clay faces. Barefoot Ceramics run the clay face making sessions and you are basically given a lump of clay and the instruction to go find a tree and let your imagination run wild. The clay faces in the woods are always worth visiting, there are some really creative creations stuck to the trees by the end of the weekend.
A few months ago I bought some clay and I’ve been trying to make a few different things with it. With two boys to entertain for a day last week, I thought they might like to try making some clay faces too.

It’s important that you have permission from whoever owns the trees you want to stick your clay faces onto if you can. They might not like having a clay face stuck to their trees.
We found some nice barky trees which I knew would be fine to make our faces on. A tree with good crinkly bark is usually best, it gives the clay something to grip onto. We used air drying clay which when used indoors dried within about 24 hours. I’ve no idea about how it would work outside, but clay faces are never meant to be a permanent feature. I would fully expect the faces to melt off the tree over time, especially in the rain.

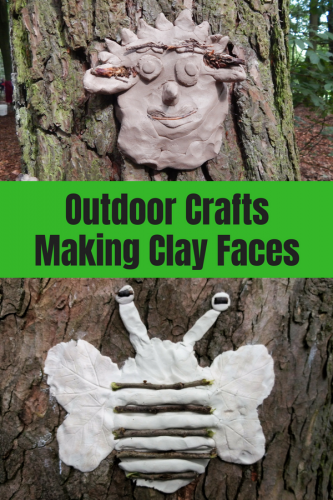
How to make clay faces in the woods
You will need:
A nice barky tree
A handful of clay
Maybe some leaves, twigs, stones, seeds etc
How to make your clay faces:
Take your handful of clay and squish it around a bit until it is soft. Find a spot on your tree where you think a face might look good and dust it off a bit with your hand so any loose bits of dust or dirt come off.
Decide what kind of face you might want to make. It could be an animal, an alien, a gargoyle or whatever you fancy.
I like to make a base for my face, by working about a quarter of my clay into the bark to give something for my face to stick to. Once you’ve done this you can start to build and sculpt your clay face.
I decided to make a bee. I made the shape of the body and wings, then added clay stripes and twig stripes. The wings I made by pressing a veiny leaf into the clay to make the pattern.
The boys made a dog and a centipede.


You can do whatever you want. I’ve made lots of clay faces over the years and sometimes I have a fixed idea about what I want to make, sometimes I start and a face just evolves. Really the most important thing is to have fun and just explore what you can do with the clay, your hands and the bits of nature you might find on the floor nearby.
Great post.