Kids Crafts: Disney Pixar Cars 3 Aquabeads Playset

Despite the recent sunshine, we have had a couple of rainy days. Over half term we had a rainy afternoon and decided to spend it doing some crafts. I had put aside Disney Pixar Cars 3 Aquabeads Playset for a rainy day, so we decided to crack it open and make our own Lightning McQueen!

Kids Crafts: Disney Pixar Cars 3 Aquabeads Playset

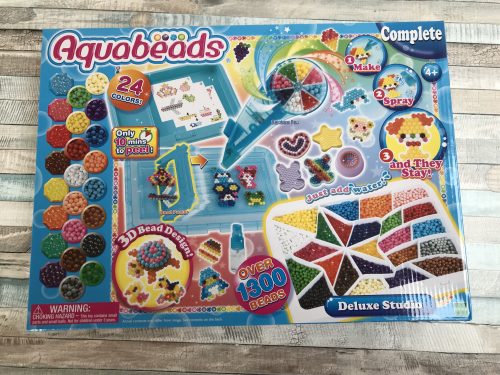
The Disney Pixar Cars 3 Aquabeads Playset contains a table tray, a bead palette, four templates, a sprayer, a bead peeler and 7 different colours of beads. The set is suitable for ages 4+ and it was just the thing for my 7 year old. Aquabeads (and any bead craft) can be quite fiddly for little fingers, but this is what makes them excellent for fine tuning hand-eye co-ordination and working their fine motor skills.

Kids Crafts: Disney Pixar Cars 3 Aquabeads Playset

There are four templates to follow in the set; Lightning McQueen, Cruz Ramirez, Mack and Jackson Storm. The templates each show two sections of car, one is the main body and the other is a section which you make separately and then stick on with water once they’re both dry. This makes them into 3D characters.

Kids Crafts: Disney Pixar Cars 3 Aquabeads Playset

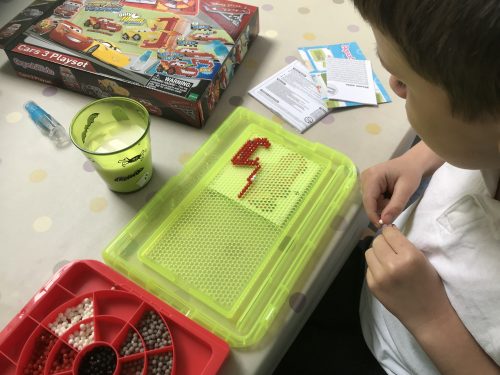
The boy look his time making Lightning McQueen. He struggled a bit to put the individual beads on the board, so I lent him my rainbow bead pen from my Aquabeads Deluxe Studio set and then he just rocketed through. He spent around 40 minutes carefully putting all the beads on the board with the template underneath. Then he sprayed it with water and we left it to dry for the afternoon.

Kids Crafts: Disney Pixar Cars 3 Aquabeads Playset

The instructions say that you can peel the beads from the board after ten minutes; but we find if you leave them for longer, then they set a little better. Once they were dry and peeled from the board we then sprayed Lightning McQueen all over and fixed the 3D part to his front; then we left him to dry a little longer.

He was pleased with how his Lightning McQueen turned out. He was easy to make and Aquabeads are a really lovely rainy-day craft for both kids and adults alike.

The Disney Pixar Cars 3 Aquabeads Playset costs around £20 and is available from a wide range of retailers including Hobbycraft.

Disclosure: We were sent the Disney Pixar Cars 3 Aquabeads Playset to craft with in exchange for this blog post. All images and opinions are our own.

Kids Crafts: Aquabeads Hanging Decorations

A few weeks ago we were sent an Aquabeads Deluxe Studio to craft with. As you know I love crafting. I was interested to see what the Aquabeads would be like to craft with. I’m a firm believer in getting to grips with the basics of a craft before letting my imagination run wild with things; so I sat down and followed the instructions faithfully. I made some lovely Aquabeads hanging decorations using the templates in the Aquabeads Deluxe Studio.

Kids Crafts: Aquabeads Hanging Decorations

The Aquabeads Deluxe Studio costs £29.99 and contains everything you need to get started with Aquabeads crafts including 1300 jewel and solid beads in 24 colours. The set includes a tool case with bead palette; 1 bead peeler, 5 easy trays in a range of shapes, a rainbow bead pen so you can arrange your beads easily and a sprayer to set them. The instruction booklet is really useful and worth reading a couple of times before you get started.

Kids Crafts: Aquabeads Hanging Decorations

I began by unpacking the whole set and filling the bead tray with the beads included. You can buy extra beads if you need to, but there are plenty of beads included to get you started. It’s quite simple to use, it’s be designed to be used by children, so it should be within my capabilities.

I decided to start with the star shaped easy tray, which I just filled with coloured beads using the rainbow bead pen. This was really quick and easy to use and I completed the star within a couple of minutes. I sprayed it liberally with water and left it to set and dry. The instructions say to leave it for an hour to set. It was still a bit sticky so I left it a while longer before removing it from the tray.

Kids Crafts: Aquabeads Hanging Decorations

I then used one of the templates to make a crown, which seemed quite topical since it’s the Royal Wedding this coming weekend. I used some of the jewel beads in the crown and they’re lovely. The light shines through them and they’d be perfect to use in sun-catchers and Christmas crafts. The easy peeler makes it so easy to remove the beads from the board.

Kids Crafts: Aquabeads Hanging Decorations

I wasn’t sure what to do with my finished creations; but I liked the way the light shone through the jewel beads, so I decided to make them into Aquabeads hanging decorations. This is really simple to do, all you need is a needle and thread. The beads don’t all melt together and there are small gaps between them where you can thread a fine needle through.

To turn my Aquabeads creations into hanging decorations, all I did was thread a needle and cotton through the topmost gap and knot the ends of the thread together. It’s as simple as that really.

Kids Crafts: Aquabeads Hanging Decorations

I enjoyed playing about with the Aquabeads Deluxe Studio set and getting to grips with it. I will definitely be putting together some more Aquabeads crafts, so watch this space!

Kids Crafts: Simple Aquabeads Hanging Decorations

If you enjoyed this, you might also like to try making these button decorations.

Disclosure: We were sent the Aquabeads Deluxe Studio to craft with in exchange for this blog post. All images and opinions are our own.