Easter Crafts: 3 Ideas for Eggcellent Painted Eggs

When I got an email from school reminding me that entries for the Easter Egg Painting competition needed to be handed in this week, I went into a slight panic. Although we love doing crafts together, he can be a bit easily distracted if something isn’t done and dusted in one session. We chatted about what we could do and between us we came up with three easy ideas for painted eggs.

This was very much a two-day job. We needed to paint our hard-boiled eggs a few days in advance so they could dry properly, then finish them off another day.

We had decided to make ladybird, a strawberry and a flowering cactus painted eggs. We’ve painted stones and ladybirds and strawberries before, so I knew we could probably do them easily.

I hard-boiled three eggs and left them to cool overnight. The next day the boy painted two of them red and one green; we left them to dry overnight. I’d left them in the little painting bowls we used, so I needed to turn them so they’d dry evenly.

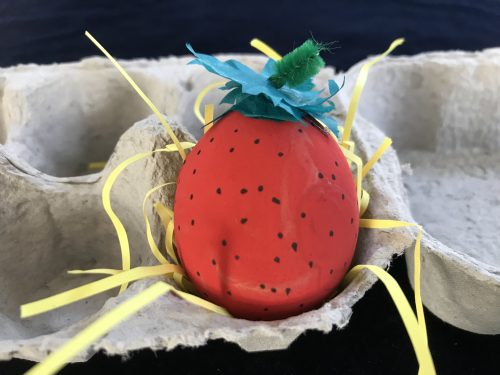
Painted Eggs – A Strawberry

We started off with the strawberry which he had painted red. While he used a black marker pen to draw dots on for seeds, I cut out some green tissue paper for the leaves and made a pipecleaner stem which I bent at the bottom. Using a glue gun I glued the leaves and stem to the top of the strawberry and left it to dry. To present it, we nestled it in an egg try on top of some shredded yellow paper for straw.
Easter Crafts: Three Ideas for Eggcellent Painted Eggs

Painted Eggs – A Flowering Cactus

Next we moved on to our flowering cactus. This was quite simple. While I made a pink flower out of a couple of scraps of pink tissue paper, he drew X’s all over to look like cactus prickles. Once he’d finished, I used the hot glue gun to stick the tissue paper on top. Then we turned an empty cardboard kitchen roll tube into a plant pot for the cactus. We cut it down and taped up the bottom so the egg wouldn’t fall out. We then filled the pot with tissue paper and then nestled the cactus on top.

Easter Crafts: Three Ideas for Eggcellent Painted Eggs

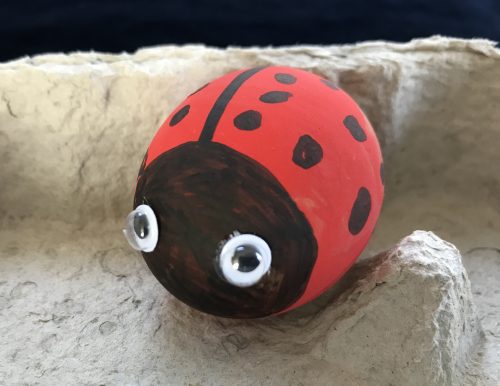
Painted Eggs – A Ladybird

Finally we painted up the ladybird. I drew the line down its back and made a circle for its face, he coloured the face in black and added the spots. Then I used the hot glue gun to fix some googly eyes to its face and it was done.
Easter Crafts: Three Ideas for Eggcellent Painted Eggs

I think these are really simple to do and they look great too. My son and I enjoyed working on them together. I could probably have easily used PVA glue instead of the glue gun; but it was quicker and the glue dries much faster. Plus I wanted to try out my new toy (I have the burnt fingers to show for it too)!

If you enjoyed this, you might also like these other Easter Crafts:

Easter Crafts: 3 Ideas for Eggcellent Painted Eggs

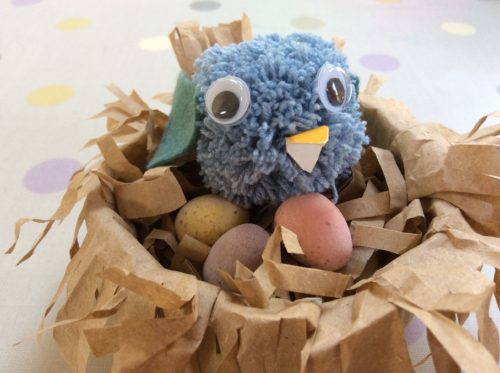
Craft Tutorial: Pom Pom Bird in a brown paper nest

This month I’ve been tinkering about with Easter crafts. I loved making my Easter Bunny Bunting, but after consulting with my son, he suggested making a birds nest with some birds in it. He loves topping up the bird feeders and watching the birds in the garden, so making a little next for him to enjoy indoors seemed a nice idea.

I explored a few different options for making the nest, but eventually decided on making one out of brown paper. Like all of my crafts, this is really easy and I think it looks pretty cute. My son is pretty happy with the result too.

Craft Tutorial: Pom Pom Bird in a brown paper nest

Making a brown paper nest

You will need:
An empty takeaway soup container or similar
Brown paper
A stapler
Bostik Glu Dots
ScissorsCraft Tutorial: Pom Pom Bird in a brown paper nest

Method:
Take your takeaway soup container and cut it down to a height you like, mine was about 4cm deep.

Take the brown paper (my brown paper was leftover packing from a parcel I’d received) and fold it roughly over the container and staple into place. It doesn’t matter if it’s not neat as you want it to look a bit rough, like a birds nest.

With another piece of brown paper, cut it into a circle which is approx 10cm wider than your container. Using the Bostik Glu Dots, stick the paper inside the container, pressing it into the inside edges and over the side. Cut a fringe into the overlapping paper so it looks like twigs sticking out from the nest.

Shred with some scissors some more brown paper to make a comfy nest base for your birds.

Craft Tutorial: Pom Pom Bird in a brown paper nest

Making a Pom Pom Bird

You will need:
Wool
A pom pom maker, or your own homemade cardboard pom pom maker
Googly eyes
Orange paper for the beak
Scissors
Some felt for the wings
Bostik Glu Dots

Craft Tutorial: Pom Pom Bird in a brown paper nest

Method:
Make your pom pom bird as big or as small as you want (if you’re not sure how to make pom poms, there’s a video you can watch here). 

Using the Bostik Glu Dots, glue a pair of googly eyes on your bird. Cut out a small beak shape of your orange or yellow card and glue the beak on too.

Cut out two wing shapes out of your felt material. I cut two curvy triangular shapes and stuck those to the side of the pom pom bird to give it its wings.

Once you’re happy with your pom pom bird, pop it in the nest and you’ve finished. I added a few mini eggs to keep it company, but I doubt they’ll last for long.

Craft Tutorial: Pom Pom Bird in a brown paper nest

Note: I am a Bostik craft blogger and I was sent the materials to create this craft from Craft Merrily. 

Craft Tutorial: How to make Easter Bunny Bunting

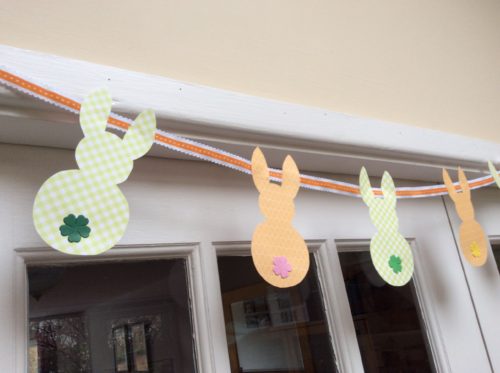
This month I’ve been thinking about Easter crafts. Now that Lent is in full swing, a few Easter craft items have started to steadily make their way home from school. We’re not adverse to a bit of egg painting ourselves, but when my box of Bostik Bloggers Easter craft goodies arrived from Craft Merrily, I took one look and decided to make some Easter Bunny Bunting.

Easter Craft – Easy Easter Bunny Bunting

To make the bunting you will need:

A length of pretty ribbon
Some patterned craft paper
A piece of cardboard to make the stencil
A Bostik fine & wide glu pen
Some little paper flowers or small buttons
Scissors

Easter Craft Tutorial: Easy Easter Bunny Bunting

Using the downloadable template (click here to download as a pdf), draw a rabbit shape onto a piece of cardboard, cut it out and use it as a stencil.

On your colourful craft paper, draw around your stencil. I managed three bunnies on this piece of paper.

Easter Craft Tutorial: Easy Easter Bunny Bunting

Cut our your bunny shapes. I was using a piece of ribbon about a metre long for my bunting, so I estimated I’d need around six bunny shapes, evenly spaced along the ribbon.

Easter Craft Tutorial: Easy Easter Bunny Bunting

Using small paper flower shapes, or little buttons if you prefer, glue them onto the bunnies bum to look like a little tail.

Easter Craft Tutorial: Easy Easter Bunny Bunting

Then glue the bunnies onto the ribbon, space them equally and leave them to dry overnight if possible.

Easter Craft Tutorial: Easy Easter Bunny Bunting

Hang your Easter bunny bunting wherever you like. I chose a bright and sunny spot in my kitchen. Where would you hang yours?

Easter Craft Tutorial: Easy Easter Bunny Bunting

I’m really pleased with how my Easter bunny bunting has turned out. Now I’ve got my bunny template, I can make all kinds of bunny themed crafts with it. What Easter craft will you be creating this year?

If you enjoyed this, you might also like these other Easter Crafts:

Craft Tutorial: How to make Easy Easter Bunny Bunting

Note: I am a Bostik craft blogger and I was sent the materials to create this craft from Craft Merrily.