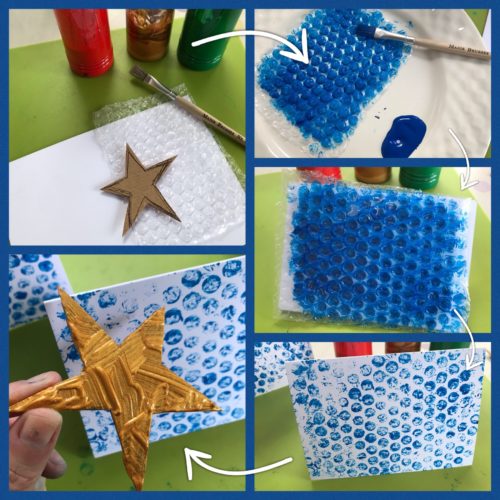
I’ve been playing around with some printing techniques I learned recently and together with my son we’ve made some fun Christmas cards with bubble wrap which are just a bit different to the usual. These Bubble Wrap Printed Christmas Cards are simple to do, but really look the part.
A little while ago I went to a gelatine monotype printing workshop with my friend Sarah at Crafts and Makes in Didsbury. The workshop was run by John Pinder and he taught us some basic printing techniques. I really enjoyed the workshop, but I’ve not yet had the time to make a gelatine plate to print on.
At the workshop we played about printing with different textures. One thing I especially liked was bubble wrap, it makes such a pretty pattern that I knew I could create something similar at home with some poster paint and blank card. The results are pretty good and would be good fun for kids to do in the run up to Christmas. Imagine Uncle David’s face when he opens his Christmas card to see this masterpiece?

These Bubble Wrap Printed Christmas Cards are really simple to do, you might need to help/supervise/stop smaller children painting their faces/walls/the cat, but you probably do that anyway when you do crafts.
Bubble Wrap Printed Christmas Cards
You will need:
Some blank greetings cards
Bubble wrap
Thick cardboard
Selection of post paints
A paintbrush
How to make your Bubble Wrap Printed Christmas Cards:
Firstly, put newspaper down on the table you’re using, this could get messy. Cut a piece of bubble wrap to the size of the front of your greetings card. Squirt a blob of whatever paint colour you want for your background onto a plate and using the paintbrush apply an even layer of paint all over the bubbly side of the bubble wrap.

Carefully lay the painted side of the bubble wrap onto the card and press it down all over. Peel it back, there will be enough paint on it to print another one or two cards. Ideally, leave the cards to dry before printing the next stage. Mine took about 20 minutes.
While you’re waiting for your cards to dry, take your thick cardboard and draw some simple festive shapes. I did a wonky star and a Christmas Tree. Cut out your cardboard templates. Once your bubble wrap background is dry, liberally cover one side of your Christmas shapes with paint. Press the painted side of your shape on the front of the card, carefully removing it so the edge don’t smudge too much.
To print the next card you’ll need to add more paint to the shape. Leave your cards to dry. If you feel it needs it, you could touch up the shape with some extra paint. Leave them to dry properly, maybe overnight, and then write them and send them to your favourite person.
If you enjoyed this, you might also like to try making –


