Crafts: How to make a Christmas Button Wreath

If you’re looking for a simple but quite beautiful Christmas craft, then this is probably it. These lovely Christmas button wreath decorations are really simple to make and look great hanging on a tree. Not to mention, if you’re making them with the kids, then it’s excellent for their fine motor skills!

A few years ago I made a selection of button Christmas decorations, and each year when I hang them on the tree, I continue to be impressed by them. They’re so simple to make, but look really quite cool.

Crafts: How to make a Christmas Button Wreath

I have billions of buttons, so one quiet afternoon, I decided to try my hand at a simple Christmas button wreath decoration. I thought it would look pretty good on the tree and I was not wrong. They really are simple to make and you can make it as colourful or traditional as you want. Here’s how I made mine.

How to make a Christmas button wreath

You will need:
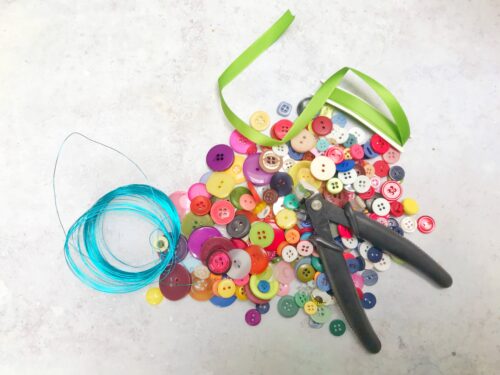
70-100 buttons in whatever colours you want
A length of craft or jewellery wire
Wire cutters (optional)
Ribbon for a bow and for hanging

Making your Christmas button wreath –

Start off by cutting a length of wire approximately 25cm long. Put a little bend in one end to stop the buttons slipping off.

buttons

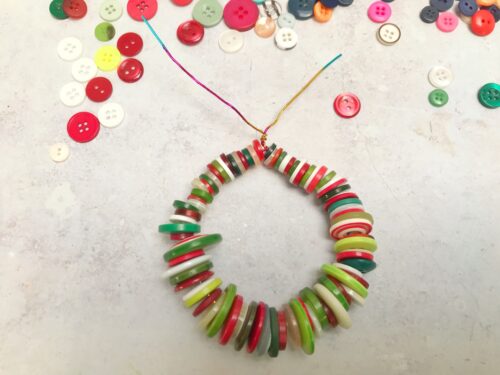
Next you can start threading the buttons onto the wire. I did this in red-green-white order, but you can use whatever colours in whatever order you want. My Christmas colour palette is very traditional, but yours can be as colourful as you like.

Once you’re threaded your buttons onto the wire and you’re happy with how they look (I tried to put the smaller buttons at each end and the larger ones in the middle), it’s time to tie it off.

Crafts: How to make a Christmas Button Wreath

Take both ends of the wire and twist them together so the buttons can no longer slip off. Twist them together tightly, you may need to snip off the excess wire with your wire cutters. If you can, tuck the ends under and between the buttons so they are out of the way.

Gently pull the wire and buttons into a circle shape to make the wreath, this shouldn’t take very much effort at all.

Crafts: How to make a Christmas Button Wreath

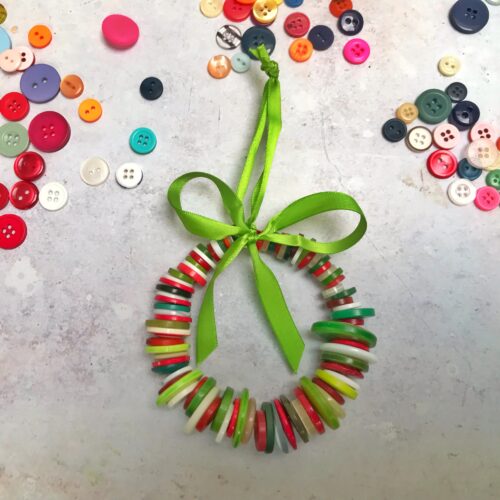
Next take a length of ribbon and tie it around the top of the wreath, tucking in the ends of the twisted wire. Tie the ends of the ribbon with a firm knot to make a hanging loop. Take another length of ribbon and tie a nice bow at the top of the wreath. It should now be ready to hang on your tree.

If you enjoyed this, you might also like to try –

Crafts: How to make a Christmas Button Wreath

Subscription Box Review: Willow and Wild Box

AD/Gifted. The boy and I love our after school craft sessions. We try to craft and create together at least once a week. Sometimes I do struggle to come up with something new to do with him, but this week we received a Willow and Wild Box full of crafts, recipes, gardening and outdoor activities to enjoy together.

The Willow and Wild Box is a monthly subscription box designed for 3 – 8 year olds. It’s packed full of gardening, craft, cooking and outdoor activities and it’s delivered straight to your door. Every box is inspired by nature, with the aim of getting children exploring the outdoors and learning about how things grow, the changing seasons, healthy eating, and life-cycles.

Subscription Box Review: Willow and Wild Box

Willow and Wild offer two types of subscriptions, the ‘Letterbox’ subscription and a ‘Bumper Box’. The boxes include at least two craft projects, vegetable and flower seeds with step by step planting and growing instructions; an outdoor activity, a recipe card and much more! If you don’t have a garden, that’s no problem either,  all the seeds they send can be grown in containers, or on a windowsill. The bumper boxes include a selection of extra craft and growing activities.

They offer four different subscription terms, 3 months (£27 for 3 months, £9 per box), 6 months (£51 for 3 months, £8.50 per box) and 12 months (£87 for 3 months, £7.25 per box), as well as the month by month box which costs £9.75. Obviously the longer your subscription, the better value the boxes are.

Subscription Box Review: Willow and Wild Box

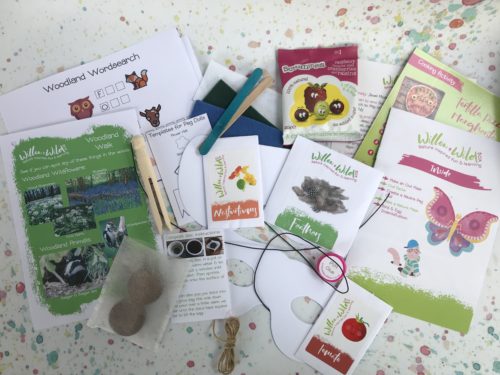
We received the April box which was packed with things to do. In the box was a range of nature based activities…

  • Make an owl mask
  • Fascinating Owl facts
  • Make a leaf and flower mask
  • Make a nature peg doll
  • Go on a woodland walk spotter for your nature journal
  • Ideas for games to play in the woods
  • Spot the difference
  • Woodland word search puzzle
  • Bird and egg identification
  • Tomato and Nasturtium seeds
  • Tomato sauce and tomato pizza recipe cards

Although my son was at the upper end of the age range these boxes are aimed at, he really loved getting his own personalised post. The box was small enough to slip through your average letterbox, so I was not expecting it to contain as much as it did do.

We went through the box and decided to get cracking with the crafts, exploring the garden, we found a selection of leaves to decorate the peg doll and masks. We had a happy hour sat at the kitchen table quietly making some nature crafts from the Willow and Wild box.

Subscription Box Review: Willow and Wild Box

There is lots in the box to entertain. If you can sit down and properly go through the box when it arrives and plan to do different activities on different days, you’ll get lots out of it. The Willow and Wild box is a great starting point if you’re wanting to incorporate more nature activities into your week. The boxes contain everything you need, so they would be ideal for taking with you on weekends away.

We really liked our Willow and Wild Box; it’s just the thing if you’re in need of a bit of inspiration. The box is small, but really packed with a good variety of things to do. This would make a lovely gift for a creative child. It’s age appropriate; my 8 year old got an awful lot out of it and would very much like a subscription, we will have to see what the birthday fairy brings!

For more information about Willow and Wild subscription boxes, visit their website.

Disclosure: We were sent this for review purposes. All images an opinions are our own.

23 Places to Craft with kids in Manchester

Children love doing crafts, but it can sometimes be a messy business. We do quite a lot of crafts at home. Sometimes it’s nice to go somewhere else to do a craft; especially if it’s a craft beyond your own skill as a crafty parent. Even better, someone else gets to do the tidying up! I’ve picked out 23 places to craft with kids in Manchester; there are probably many, many more, so if I’ve missed any, please do comment below.

21 Places to Craft with kids in Manchester

23 Places to Craft with kids in Manchester

Minikin Emporium, Sale – I love this place. We’ve been going since my boy was a baby and we’ve made so many lovely things there. They also do imprint jewellery, which is such a lovely memento.

Love To Craft MCR – This is a lovely craft pop up which runs sessions for kids and adults alike at various locations in South Manchester. They also do parties and have lots of kids craft ideas on their website.

The Art Garden at The Haworth, Accrington – The Art Garden is a craft cafe based in The Haworth Art Gallery in Accrington. It’s the most wonderful place, with lots going on for crafty types of all ages; but their messy and sensory play is brilliant fun!

Emily’s Paint A Pot – located in Manchester’s Arndale Centre, Emily’s Paint A Pot is a lovely place to drop in to spend an hour or two decorating pots together.

Bean & Brush Family Art Cafe, Sale – located in the heart of Sale, Bean and Brush is an interesting Art Cafe where you can try your hand at anything from painting pots to decopatch. The studio is stocked with all manner of pots and projects, so you can let your artistic side run wild. Create unique pieces for yourself or personalised gifts for friends!

21 Places to Craft with kids in Manchester

Pottery Corner, Chorlton – this is a lovely pottery painting place on fashionable beech Road in Chorlton. We’ve been to paint pots and to have our handprints done in clay. They run adult workshops and children’s parties too!

Brooklyn Pottery, Stockport – Pop in for some pottery painting, book a party or just go along for an afternoon with friends or family and paint some pots for friends or family.

Create It! Cheadle – this bright and cheerful craft cafe in Cheadle, offers Paint-a-Pot and decoupage activities for all the family. Whether you fancy a spot of ceramic painting or gluing and sticking with their fantastic Decopatch selection; you’ll find a great range of pottery pieces to paint; from useful items like plates and bowls to fun, decorative pieces like figurines, piggy banks and lanterns!

Kidz Kreationz, Altrincham – With Saturday Art Club and After School Sessions, Kidz Kreationz is the arty place in Altrincham for kids to hang out.

The Star Tree Studio, Littleborough – The Star Tree Studio in Littleborough provides high quality, fun, educational, art, craft & creative activities for children aged 6 months to 12 years old. They organise baby, toddler and pre-schooler creative classes as well as art and craft birthday parties. It’s a gorgeous place to drop into for a spot of art.

John Rylands Library, Manchester – this historic library runs all kinds of children’s craft activities throughout the year. For something a little different, a visit to John Rylands is a must if you’re in the city centre.

Cheshire Workshops, Tattenhall – Based in Cheshire, this craft workshop runs a range of craft workshops for children and adults alike.

Hatworks, Stockport – The Hatworks in Stockport has an ever changing selection of crafts for adults and children. This quirky museum has lots to offer, check out their website before you visit to see what’s on!

Sew Creative, Altrincham – If you’ve been inspired by the Sewing Bee, then you can learn to sew at one of the sewing classes held at Sew Creative in Altrincham.

A Place to Potter, Heaton Park Garden Centre – The Place to Potter is a cosy and creative hub specialising in pot painting, slime making, bear building and birthday parties! They also host workshops during the school holidays and toddler/pre-school sessions during the week. Check out the website for more info.

Brookside Pottery at Brookside Garden Centre, Poynton – Paint at pot as you watch the steam trains go by. This little pottery painting workshop in Poynton is great for birthday parties and crafty afternoons. Booking advisable!

Manchester Crafts & Design Centre – This gorgeous building is packed with independent craft makers and they also run a number of craft workshops, many of which are suitable for children.

Ordsall Hall, Salford  – Ordsall Hall in Salford is a great place to visit with kids, and they have lots of things going on, like arts and crafts workshops for adults and children. Have a look on their website to see what’s on.

Elizabeth Gaskell House – from Crafternoon tea for grown ups, to half term craft sessions for kids, there’s always something going on at this beautiful historic house in Manchester.

Whitworth Art Gallery – This wonderful art gallery in Manchester has an ever changing array of events and arts and crafts activities for all the family. For a delightfully different day out, keep an eye on the website for what’s coming up.

Fired Paint a Pot Café, Bury – Fired paint a pot is a friendly family focused pottery painting café and creative hub just 5 minutes walk from The Rock in Bury.

Paint A Pot, Radcliffe – this independent family run craft and ceramics studio in Radcliffe stock a wide variety of pottery from plates and cups; to fantasy figures with a choice of paint, foam clay and decopatch to decorate your items.

Bents Garden Centre – I love Bents, it has a superb craft shop and they do run regular craft activities and workshops for both adults and children alike. Keep an eye on their website for what’s on!

Have I missed anywhere? Is there somewhere near you which hosts family arts and craft activities on a regular basis? Please comment below so I can add them in.

23 Places to Craft with kids in Manchester

Kids Crafts: Make a Popsicle Stick Scottish Thistle

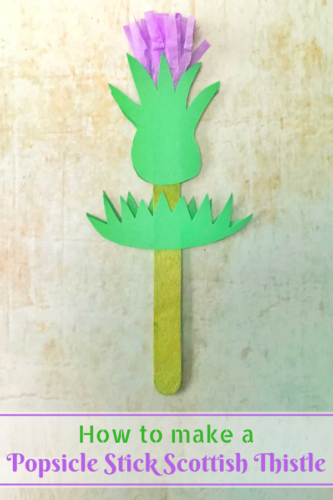
Celebrate Burns Night or St Andrews Day with this simple popsicle stick Scottish thistle craft for kids!

Kids Crafts: Make a Popsicle Stick Scottish Thistle

Every year on 25th January the good people of Scotland (and beyond) celebrate Burns Night. Burns Night is the annual celebration of  the birth of  the famous Scottish poet, Robert Burns who was born in 1759.

Burns Night celebrations typically involve the eating of haggis, neeps and tatties; drinking drams of whisky and lots of speeches and singing. It’s also a good opportunity to do some crafts with the children and talk to them about his poetry.

This is a super-simple craft which is really great to do with kids. They might need a bit of help with the cutting out, but the result is really effective.

How to make a Popsicle Stick Scottish Thistle

You will need:

Some green paper or card, card is better
Green popsicle sticks or straws
Purple tissue paper
A glue stick
Two pegs (optional)
A pencil
Scissors

Kids Crafts: Make a Popsicle Stick Scottish Thistle

How to make your Popsicle Stick Scottish Thistle:

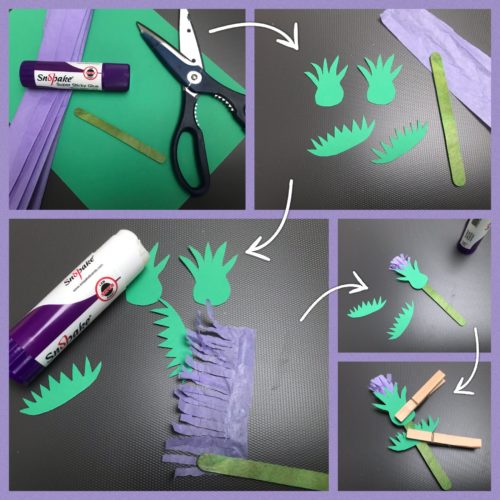
Using a pencil, draw the outline of your thistle leaves and thistle head on your green card and carefully cut it out. I drew one of each, cut them out and drew around them again as templates for the other side. An adult might want to help with this part.

Take a strip of the purple tissue paper about 10cm long and cut a fringe about 2/3 of the way down the width of the paper at regular intervals. Using the glue stick, glue along the edge which hasn’t been cut and carefully wrap this around the top of the popsicle stick.

Using the glue, stick the green thistle head at the top of the stick so it covers the base of the tissue paper, stick the other head on the other side. Put a peg on the head to press the green card into place.

Glue the thistle leaves in place about halfway down the stick and hold those in place with another peg. Leave the glue to dry for 15 minutes or so, remove the pegs and your Scottish thistle is ready to be admired. You don’t need the pegs if you don’t have them. I just find they’re good at holding things in place while the glue sets.

It’s as simple as that. They look great, we’ve made a few and stuck them around our kitchen. They’re a simple craft which you can do for Burns Night, St Andrews Day or for just celebrating Scotland!

If you enjoyed this, you might also like these other blog posts:

Kids Crafts: Make a Popsicle Stick Scottish Thistle

Kids Crafts: Bubble Wrap Printed Christmas Cards

I’ve been playing around with some printing techniques I learned recently and together with my son we’ve made some fun Christmas cards with bubble wrap which are just a bit different to the usual. These Bubble Wrap Printed Christmas Cards are simple to do, but really look the part.

A little while ago I went to a gelatine monotype printing workshop with my friend Sarah at Crafts and Makes in Didsbury. The workshop was run by John Pinder and he taught us some basic printing techniques. I really enjoyed the workshop, but I’ve not yet had the time to make a gelatine plate to print on.

At the workshop we played about printing with different textures. One thing I especially liked was bubble wrap, it makes such a pretty pattern that I knew I could create something similar at home with some poster paint and blank card. The results are pretty good and would be good fun for kids to do in the run up to Christmas. Imagine Uncle David’s face when he opens his Christmas card to see this masterpiece?

Kids Crafts: Bubble Wrap Printed Christmas Cards

These Bubble Wrap Printed Christmas Cards are really simple to do, you might need to help/supervise/stop smaller children painting their faces/walls/the cat, but you probably do that anyway when you do crafts.

Bubble Wrap Printed Christmas Cards

You will need:

Some blank greetings cards
Bubble wrap
Thick cardboard
Selection of post paints
A paintbrush

How to make your Bubble Wrap Printed Christmas Cards:

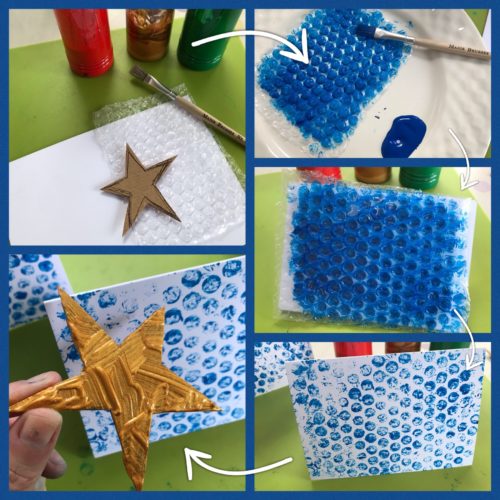
Firstly, put newspaper down on the table you’re using, this could get messy. Cut a piece of bubble wrap to the size of the front of your greetings card. Squirt a blob of whatever paint colour you want for your background onto a plate and using the paintbrush apply an even layer of paint all over the bubbly side of the bubble wrap.

Kids Crafts: Bubble Wrap Printed Christmas Cards

Carefully lay the painted side of the bubble wrap onto the card and press it down all over. Peel it back, there will be enough paint on it to print another one or two cards. Ideally, leave the cards to dry before printing the next stage. Mine took about 20 minutes.

While you’re waiting for your cards to dry, take your thick cardboard and draw some simple festive shapes. I did a wonky star and a Christmas Tree. Cut out your cardboard templates. Once your bubble wrap background is dry, liberally cover one side of your Christmas shapes with paint. Press the painted side of your shape on the front of the card, carefully removing it so the edge don’t smudge too much.

To print the next card you’ll need to add more paint to the shape. Leave your cards to dry. If you feel it needs it, you could touch up the shape with some extra paint. Leave them to dry properly, maybe overnight, and then write them and send them to your favourite person.

If you enjoyed this, you might also like to try making –

Kids Crafts: Bubble Wrap Printed Christmas Cards

Crafts: Chinese New Year Red Envelopes

During Chinese New Year children are traditionally given red envelopes, or red packets containing money as a gift. The red envelopes are a symbol of good luck and the amount of money in your Chinese New Year Red Envelopes should end with an even number; though it’s important that the money should not be given in fours, or the number four should not appear in the amount, such as in 40, 400 and 444.

2019 is the Chinese Year of the Pig. Chinese New Year falls on 5th February and in Manchester there are already plans afoot for a parade and celebrations across Chinatown and beyond. Chinese New Year is a glorious, colourful celebration in what I think is the gloomiest month of the year.

Crafts: Chinese New Year Red Envelopes

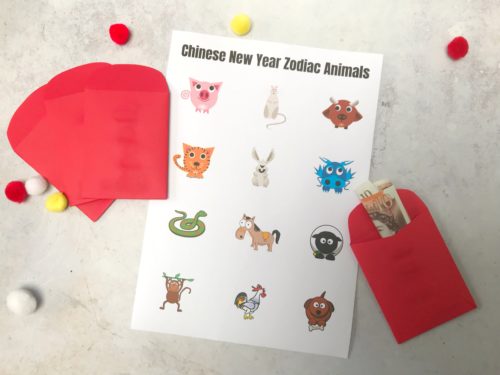
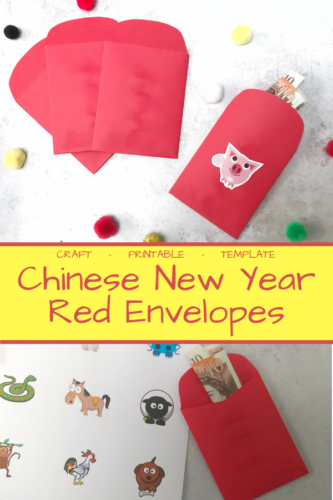
To celebrate Chinese New Year, I’ve created this simple template to make your own Chinese Red Envelopes. You can decorate your envelope however you like; perhaps with some Chinese writing, or with gold glitter. I’ve kept it simple by creating a sheet with all the animals of the Chinese Zodiac so you can print them out and stick them to the envelopes.

Click here to download the envelope template.

Click here to download the Chinese Zodiac animals.

Crafts: Chinese New Year Red Envelopes

Make your own Chinese Red Envelopes

You will need:

Bostik Fine & Wide Glu Pen
Chinese Red Envelopes template printed on red paper
Scissors
Chinese Zodiac Animals print out

How to make your Chinese Red Envelopes:

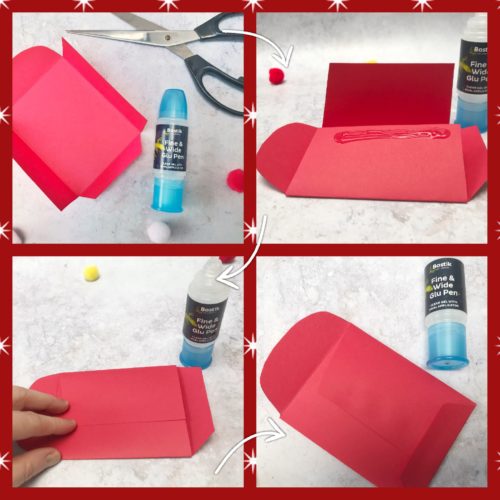
Print your envelope templates out on red paper. Using a pair of scissors cut around the template.

Fold along the lines of the template and using the Bostik Fine & Wide Glu Pen, fold the two side flaps into the centre and glue them together. Fold the bottom flap up and glue that into place. Put your envelope under a book or something which will keep it flat while the glue dries.

Crafts: Chinese New Year Red Envelopes

Once the glue is dry, cut out your Chinese Zodiac animal and glue that into place, slip some money into the envelope, tuck the top flap inside and it’s ready to gift for Chinese New Year.

Remember, you can decorate your Chinese New Year Red Envelopes however you want. My calligraphy isn’t great, but if yours is you could try your hand at writing some Chinese characters on the envelope. Gold glitter would also make this envelope look fabulous.

Here are some more Chinese New Year Crafts you might enjoy –

Crafts: Chinese New Year Red Envelopes

Kids Crafts: Simple Hand Print Christmas Wreath

I’m all about the Christmas wreaths at the moment and wanting to make a Hand Print Christmas Wreath before my son’s hands grow too big, this week we set our minds to making this lovely hand print wreath.

My son has just turned 8 years old and he’s growing so fast. A few days ago we were looking at some clay hand prints he did as a baby and we were marveling at how much he has grown. His hands are shaped like his father’s hands, square, stout and strong. In a year or two his hands will be the same size as mine. It’s going too fast, too fast.

Kids Crafts: Simple Hand Print Christmas Wreath

Wanting to preserve his hand print a little, this easy to make Hand Print Christmas Wreath is a lovely thing to do with children. Here’s what we did…

Make a Simple Hand Print Christmas Wreath

You will need:

A paper plate
A pencil
Scissors
Coloured paper, preferably two colours.
Glue, I used a Bostik Wide & Fine Glu Pen
Some ribbon

Kids Crafts: Simple Hand Print Christmas Wreath

How to make your Hand Print Christmas Wreath:

To begin with, take your paper plate and in the centre of the plate  draw around your child’s hand. Then carefully, making sure not to cut across the plate (because you’ll be making a ring out of it) cut out the hand shape, this will be your template.

Now carefully trim around the inner ring of the plate, so you have a nice ring to glue your hand prints too later. Cut a small slit in the top of the ring and thread a piece of ribbon through, knot the ribbon. This is how you will hang your wreath once it’s finished.

Kids Crafts: Simple Hand Print Christmas Wreath

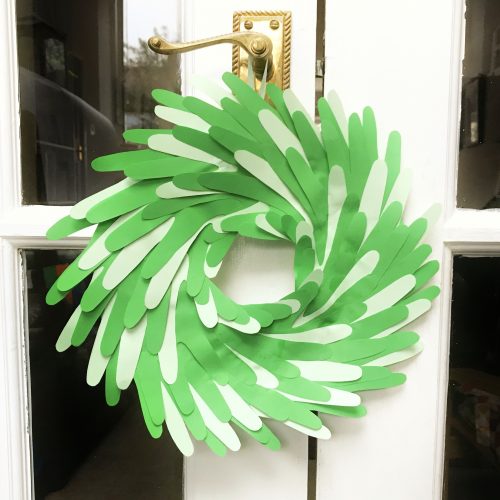
Take your hand print template and draw around it on your coloured paper. I think I ended up using 8 pale hand prints and 22 darker hand prints, but the more you have, the better the effect I think.

When you’ve got all your hand shapes cut out, it’s time to sit down with the glue. Put a layer of glue all over the plate ring and then place your first hand print on it. Don’t press it down yet as you’ll have to slip another hand shape under it, and then under that.

Put a small dollop of glue on the palm of each hand shape and work around the ring layering the hands under each other. This will make sense when you’re doing it. If you’re using two colours of paper, make sure they are evenly distributed.

Once you’ve worked your way around the ring and the hand shapes are all overlapping each other pretty evenly, then you can press the shapes down onto the ring. Leave the glue to dry for a few hours. Once it’s dry it’s ready to be hung up. If you wanted you could add some embellishments, like little red pom poms or something.

Kids Crafts: Simple Hand Print Christmas Wreath

So there we have it, one very simple Hand Print Christmas Wreath – a great way to remember your children’s little hands. It’s a handmade Christmas decoration which will look great year after year.

If you enjoyed this, you might also like to try –

Kids Crafts: Simple Hand Print Christmas Wreath

Christmas Crafts: Paper Plate Holly Wreath

I love a good wreath at Christmas. We always buy a nice foliage one from our local Community Farm and have it on the front door. Inside the house we have a few more delicate wreaths on some of the internal doors, it just makes the place look more festive. I really enjoy making wreaths with my son. Once you’ve got your paper plate base sorted, you just let your imagination run wild. This week we’ve made a Paper Plate Holly Wreath and we’re really quite pleased with it.

Christmas Crafts: Paper Plate Holly Wreath

I had the idea for this Paper Plate Holly Wreath, but I knew that I’d probably be the one who would be spending some time cutting out the individual holly leaves and my son (with direction) would be doing much of the sticking. I sat down with a giant mug of tea and Say Yes to the Dress on TV and got cutting. I’ve no idea how many holly leaves I cut out, but it was about two A4 sheets worth.

Now that I’ve seen the finished Paper Plate Holly Wreath, I am really pleased with it. I think it looks really effective and I’ll be pleased to have it hanging in my kitchen this Christmas.

How to make a Paper Plate Holly Wreath

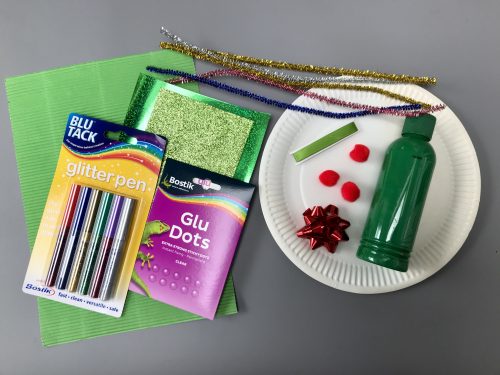
You will need:

A paper plate
Scissors
Green paint
Paint brush
A pencil
Ribbon
3 or 4 different kinds of green card or foam
Bostik Glu Dots
Red embellishments – mini pom poms, beads, paper shapes etc

Christmas Crafts: Paper Plate Holly Wreath

How to make your Paper Plate Holly Wreath:

With a pair of scissors, cut the middle out of your paper plate so it looks like a ring. Near the top of your wreath, cut a small slit where you can thread your ribbon through later.

Paint the wreath all over, front and back with green paint and leave it to dry. If you’re impatient like me, you can use a hairdryer to speed up the process. Your ring might need a second coat of paint on the front if you think it’s a bit patchy looking. This process does take a bit of time, so factor that in if you’re crafting with slightly impatient kids.

While your paint is drying, take the piece of cardboard which you cut out of the paper plate and draw a holly leaf on it. It needs to be about 5cm long, but you can make your leaves as big or small as you want really. Cut out your leaf shape, this is now your template.

I found whatever green card I had in my craft cupboard, which was a nice piece of corrugated card, some shiny card and some glittery card. I also found a piece of glittery foam. Using the pencil I then drew around my holly leaf template all over the back of each piece of card. Try and do this so you get minimal waste when you cut them out.

Once you’ve drawn all your holly leaves, you need to cut them out. This takes a little bit of time, so do factor that in.
Christmas Crafts: Paper Plate Holly Wreath

Once you’ve got a big pile of leaves, it’s time to stick them onto your wreath. Before you start sticking, thread your piece of ribbon through the slit you cut earlier and tie a knot in the ends securely.

Take a Bostik Glu Dot and stick it to the back of each leaf, towards one end if you can. Then stick your leaves however you like all over your wreath. We chose to stick the corrugated leaves all around the outside of the wreath. I suggested he try to stick them in pairs, like holly leaves often are and I think he did a good job.

With the other types of holly leaf, we arranged them in an attractive way around the inner circle of the wreath. Ben then stuck them in place. All the holly wreath needed now was berries. Using the red embellishments; mini pom poms, paper shapes and stick on gems, we decorated some of the leaves with red “berries”. I find stick on gems a bit tricky, so I always use a glu dot on them to make sure they stick.

Your wreath is now complete. It looks pretty impressive yes?

Christmas Crafts: Paper Plate Holly Wreath

Check out my other craft tutorials here!

If you enjoyed this wreath craft, you might also like to try these –

I am a Bostik Craft Blogger and I was sent the materials to create this craft from Craft Merrily. I have not been compensated for this post. 

Crafts: Make your own Space Themed Felt Busy Box

Over the summer holidays my son turned into the snack king. He seemed to be constantly hungry and as a result, we went through an awful lot of fruit, bread sticks and little pieces of cheese (he grew an inch over the summer, so we know where all those snacks went). I was throwing another empty box of cheese triangles into the recycling bin when I wondered if there might be a better use for this handy little box, so I put it to one side and got thinking. A few days later I’d hatched a plan to make a Space themed felt busy box.

A busy box is a box with a lid which you put together for children to play with when they’re out and about. Big fun in a little box if you will. Busy boxes usually have felt inside, with felt figures, shapes or characters to play with. I knew my son with his space themed bedroom, love of the night sky and slight obsession with Tim Peake would enjoy a space themed busy box. If I’m honest, I enjoyed making it for him too.

Crafts: Make your own Space Themed Felt Busy Box

Make your own Space Themed Felt Busy Box

You will need:
An empty cheese triangle box
Black paint
Bostik White Glu
Black felt
Coloured felt
Bostik Glu Dots
Scissors
Blu Tack Glitter Pens

How to make your own Space Themed Felt Busy Box:
Take your empty cheese triangle box. I used a large one which had a double layer of triangles in. Paint the box inside and out with black paint, leave to dry. You might want to give it a second coat if you think it needs it.

Crafts: Make your own Space Themed Felt Busy Box

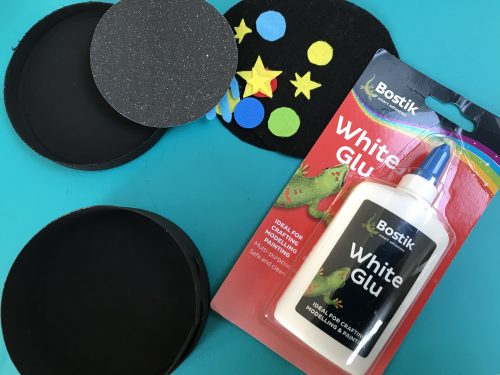
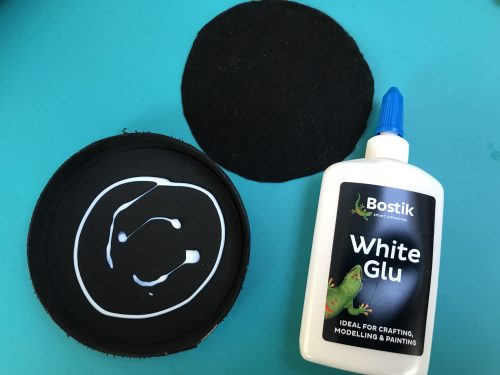
Once dry, use a pencil to draw around the box base and lid on the black felt and cut out your black circles. Check they fit in the box, you might need to trim them a little. Using the Bostik White Glu, glue one circle in the lid and another in the base, press in place and leave them until the glue is dry.

Crafts: Make your own Space Themed Felt Busy Box

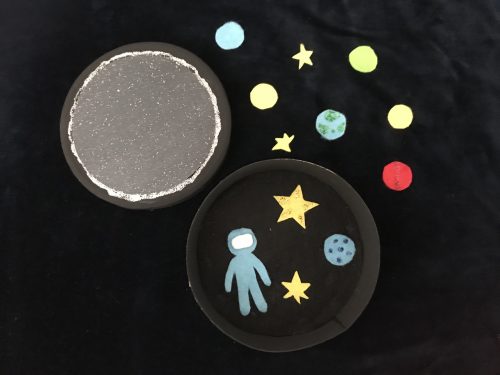
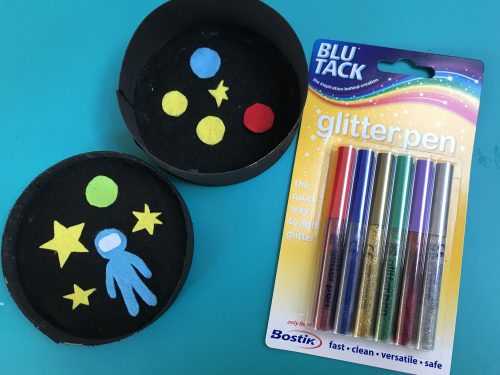
Meanwhile, with the coloured felt, cut out some space themed shapes. I made an astronaut with a visor which I stuck in with a Bostik Glu Dot. Then I cut out some planets and stars. I did all of this freehand which you can probably tell from the shape of my stars. I used some Blu Tack Glitter Pens to decorate some of the felt shapes. Put these aside and leave them to dry.

Crafts: Make your own Space Themed Felt Busy Box

I decorated the lid with a piece of shimmery card and a silver glitter pen. You could leave your lid plain black or you could stick on some paper stars, or whatever you want to do. The only limit is your imagination.

A busy box is a great way to entertain children on journeys or waiting for appointments, or if they just want or need a little focused quiet time. It can be good for developing their fine motor skills, it’s a great little sensory learning tool and can help develop their language and storytelling skills. It’s also great for sparking their imaginations. We really enjoy this kind of play and busy boxes can be made in all kinds of different themes.

Crafts: Make your own Space Themed Felt Busy Box

Check out my other craft tutorials here!

I am a Bostik Craft Blogger and I was sent the materials to create this craft from Craft Merrily. I have not been compensated for this post. 

Crafts: Make Your Own String Art Greeting Cards

Last year I went to a string art craft class and properly fell in love with this kind of craft. We took blocks of wood, nailed a pattern into it and wove coloured thread around the nails. I loved it and promised myself I’d try it at home. More than a year later I still haven’t done it. Instead I’ve been dabbling in a smaller kind of string art. I’ve been making little greetings cards with them.

They’re quite simple to do and I’m usually really pleased with how they turn out. This week I needed a get well soon card for a family friend, so I got my kit out and set to work. An hour of pretty restful sewing later, I had a nice card to send to a nice person.

Crafts: Make Your Own String Art Greeting Cards

Make Your Own String Art Greeting Cards

You will need:
One blank card and envelope
A pin
Coloured embroidery thread
A template shape
One pencil
A needle
Sellotape
Coloured paper
A glue stick

How to make your own String Art Greeting Cards:
Take your blank card and think about what shape you want to make with your string art. I chose a star shape and used a star shape cookie cutter I had. Using my pencil I drew around the cookie cutter on the inside of the card so the pencil wouldn’t show on the outside.

Crafts: Make Your Own String Art Greeting Cards

Once I was happy with my shape, I took my pin and pierced the card around the edge of my pencil shape at regular intervals. I went with about half a centimetre intervals.

The next step is the thread your needle with your chosen embroidery thread. Although I originally chose yellow, I eventually chose purple thread. Embroidery thread is usually made up of six strands, I separated a length so I threaded two strands onto my needle.

With a small piece of sellotape, I stuck the end of my thread to the inside of the card and started sewing the star.

It’s better if you choose a regular pattern of holes to sew, rather than just doing it randomly. For this card I went almost diagonally across and moved two holes clockwise each time I moved across the star (if that makes sense). After a while my star started to take shape and I was happy with the pattern it was making.

Once you come to the end of each thread, sellotape the end to the inside of the card and start a new thread. Use as much or as little embroidery thread as you need and think is best. It just depends how it looks and if you think it needs more.

Once you are happy with how the string art looks, turn your card over and make sure any loose ends are taped down. The back might look a bit messy, which is why we cover it with some coloured or patterned paper.

Cut the coloured paper to size and stick it over the back of the string art star (or other shape) you’ve made with the glue stick. Leave it to dry and it’s ready to be written and sent to the lucky recipient.

Crafts: Make Your Own String Art Greeting Cards

String art greeting cards are really easy to do and great for doing when you just need to sit and do something without having to think too hard about it. Sting art was so big in the 1970’s and it’s really due a revival. It’s a brilliant craft and I urge you to give this mini version a try.

If you liked this, you might also like to try these crafts –

Crafts: Make Your Own String Art Greeting Cards