Kids Crafts: Bubble Wrap Printed Christmas Cards

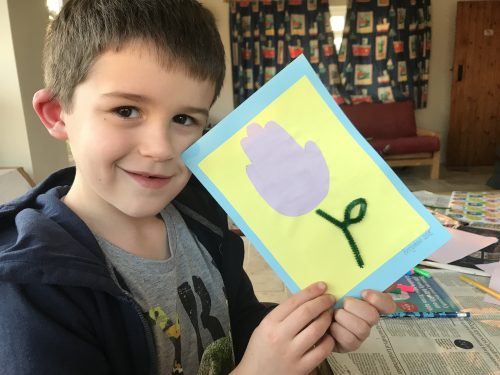
I’ve been playing around with some printing techniques I learned recently and together with my son we’ve made some fun Christmas cards with bubble wrap which are just a bit different to the usual. These Bubble Wrap Printed Christmas Cards are simple to do, but really look the part.

A little while ago I went to a gelatine monotype printing workshop with my friend Sarah at Crafts and Makes in Didsbury. The workshop was run by John Pinder and he taught us some basic printing techniques. I really enjoyed the workshop, but I’ve not yet had the time to make a gelatine plate to print on.

At the workshop we played about printing with different textures. One thing I especially liked was bubble wrap, it makes such a pretty pattern that I knew I could create something similar at home with some poster paint and blank card. The results are pretty good and would be good fun for kids to do in the run up to Christmas. Imagine Uncle David’s face when he opens his Christmas card to see this masterpiece?

Kids Crafts: Bubble Wrap Printed Christmas Cards

These Bubble Wrap Printed Christmas Cards are really simple to do, you might need to help/supervise/stop smaller children painting their faces/walls/the cat, but you probably do that anyway when you do crafts.

Bubble Wrap Printed Christmas Cards

You will need:

Some blank greetings cards
Bubble wrap
Thick cardboard
Selection of post paints
A paintbrush

How to make your Bubble Wrap Printed Christmas Cards:

Firstly, put newspaper down on the table you’re using, this could get messy. Cut a piece of bubble wrap to the size of the front of your greetings card. Squirt a blob of whatever paint colour you want for your background onto a plate and using the paintbrush apply an even layer of paint all over the bubbly side of the bubble wrap.

Kids Crafts: Bubble Wrap Printed Christmas Cards

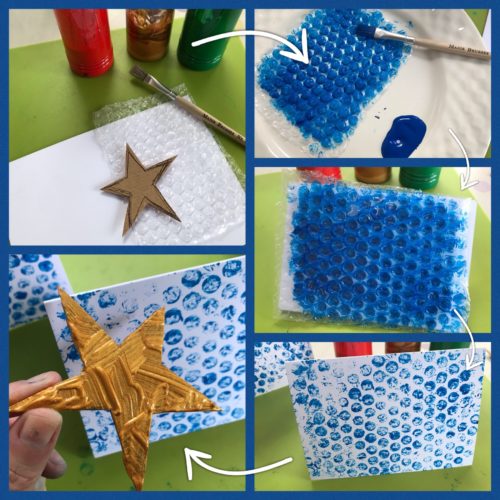
Carefully lay the painted side of the bubble wrap onto the card and press it down all over. Peel it back, there will be enough paint on it to print another one or two cards. Ideally, leave the cards to dry before printing the next stage. Mine took about 20 minutes.

While you’re waiting for your cards to dry, take your thick cardboard and draw some simple festive shapes. I did a wonky star and a Christmas Tree. Cut out your cardboard templates. Once your bubble wrap background is dry, liberally cover one side of your Christmas shapes with paint. Press the painted side of your shape on the front of the card, carefully removing it so the edge don’t smudge too much.

To print the next card you’ll need to add more paint to the shape. Leave your cards to dry. If you feel it needs it, you could touch up the shape with some extra paint. Leave them to dry properly, maybe overnight, and then write them and send them to your favourite person.

If you enjoyed this, you might also like to try making –

Kids Crafts: Bubble Wrap Printed Christmas Cards

Crafts: Make Your Own String Art Greeting Cards

Last year I went to a string art craft class and properly fell in love with this kind of craft. We took blocks of wood, nailed a pattern into it and wove coloured thread around the nails. I loved it and promised myself I’d try it at home. More than a year later I still haven’t done it. Instead I’ve been dabbling in a smaller kind of string art. I’ve been making little greetings cards with them.

They’re quite simple to do and I’m usually really pleased with how they turn out. This week I needed a get well soon card for a family friend, so I got my kit out and set to work. An hour of pretty restful sewing later, I had a nice card to send to a nice person.

Crafts: Make Your Own String Art Greeting Cards

Make Your Own String Art Greeting Cards

You will need:
One blank card and envelope
A pin
Coloured embroidery thread
A template shape
One pencil
A needle
Sellotape
Coloured paper
A glue stick

How to make your own String Art Greeting Cards:
Take your blank card and think about what shape you want to make with your string art. I chose a star shape and used a star shape cookie cutter I had. Using my pencil I drew around the cookie cutter on the inside of the card so the pencil wouldn’t show on the outside.

Crafts: Make Your Own String Art Greeting Cards

Once I was happy with my shape, I took my pin and pierced the card around the edge of my pencil shape at regular intervals. I went with about half a centimetre intervals.

The next step is the thread your needle with your chosen embroidery thread. Although I originally chose yellow, I eventually chose purple thread. Embroidery thread is usually made up of six strands, I separated a length so I threaded two strands onto my needle.

With a small piece of sellotape, I stuck the end of my thread to the inside of the card and started sewing the star.

It’s better if you choose a regular pattern of holes to sew, rather than just doing it randomly. For this card I went almost diagonally across and moved two holes clockwise each time I moved across the star (if that makes sense). After a while my star started to take shape and I was happy with the pattern it was making.

Once you come to the end of each thread, sellotape the end to the inside of the card and start a new thread. Use as much or as little embroidery thread as you need and think is best. It just depends how it looks and if you think it needs more.

Once you are happy with how the string art looks, turn your card over and make sure any loose ends are taped down. The back might look a bit messy, which is why we cover it with some coloured or patterned paper.

Cut the coloured paper to size and stick it over the back of the string art star (or other shape) you’ve made with the glue stick. Leave it to dry and it’s ready to be written and sent to the lucky recipient.

Crafts: Make Your Own String Art Greeting Cards

String art greeting cards are really easy to do and great for doing when you just need to sit and do something without having to think too hard about it. Sting art was so big in the 1970’s and it’s really due a revival. It’s a brilliant craft and I urge you to give this mini version a try.

If you liked this, you might also like to try these crafts –

Crafts: Make Your Own String Art Greeting Cards

Kids Crafts: How to make Tulip Handprint Cards

This month Craft Merrily have set the Bostik Bloggers the task of creating a flower craft. We decided we would make tulip handprint cards. They’re really simple to make and would make a lovely card to give for a lot of different occasions such as Easter, Mother’s Day or for a birthday. The handprint adds a lovely personal touch too.

Kids Crafts: How to make Tulip Handprint Cards

We went away with some friends for a week, so I planned a few crafts for us to entertain the kids with while we were away. These tulip handprint cards were one of them. The children were all so pleased with their cards and I like to think the recipients were too.

How to make Tulip Handprint Cards

You will need:
1 piece of A4 card, I used pale blue
2 pieces of different coloured paper, I used yellow and pink
1 green pipecleaner
Bostik White Glu
A pencil
An envelope which will fit your A5 card

Kids Crafts: How to make Tulip Handprint Cards

How to make Tulip Handprint Cards
Fold your A4 piece of card in half. Cut out a large rectangle of coloured paper (we used yellow) and stick it onto one side of your card with Bostik White Glu.

Take a pencil and draw around a child’s hand, carefully cut out the hand shape. A grown up might need to help with any cutting out, especially the trickily shaped handprint. Stick this near the top of the rectangle.

Shape your green pipecleaner into the shape of a flower stem, you could make a loop about half way to make it look like a leaf if you want. Glue it on the card below the flower.

I sandwiched it under a glass dish and left the glue to dry overnight. I’ve no idea why I used a glass dish, it was just close to hand I guess. It worked though.

Kids Crafts: How to make Tulip Handprint Cards

Once the glue is dry, write your card and put it in the envelope ready to delight the lucky recipient!

It’s pretty cute isn’t it?

Check out my other craft tutorials here!

Kids Crafts: How to make Tulip Handprint Cards

I am a Bostik Craft Blogger and I was sent the materials to create this craft from Craft Merrily. 

Pretty prints and greeting cards from Shepherd Illustration

Shepherd Illustration specialise in wildlife illustration, art prints, screen print tees and greeting cards. They have a pretty, quirky, contemporary and unique style which is pleasing to the eye and looks great in any home. It’s always nice to send cards and gifts which you know are pretty unique and special. Something not mass produced and something which a small artist has produced and developed with care. This week I’ve been looking at the beautiful cards and gifts on Etsy made by Shepherd Illustration.

Shepherd Illustration is owned by Lauren Shepherd who is a motion graphics designer and illustrator based in Newcastle-Upon-Tyne. Her illustrations are predominately drawn in black fine liner pen with some gold detail. Most of her illustrations are of wildlife and wildflowers with others featuring anatomical drawings of parts of the body.

Pretty prints and greeting cards from Shepherd Illustration

I was very taken by this goose print. The three geese tied together reminded me of our three-person family and I have plans to frame it nicely and have it on the wall of my office at home. The description on her Etsy store does suggest that this print would be great on a nursery wall, especially if your family of two has recently become three and I quite agree.

I like both the simplicity and the detail of this A5 print which has been printed on high quality 300gsm recycled white card and individually signed and numbered. This print costs just £7.50 and would make a lovely gift for a new baby.

Pretty prints and greeting cards from Shepherd Illustration

This cuddly baby sloth is really detailed, even down to his claws. This would make a lovely gift for a first wedding anniversary (which is paper). This sloth print is also available as a greeting card. 

I love giraffes and I was pleased to find the giraffe greeting card in my illustration package. Again the detail is stunning, even down to the little gold heart on the neck of the giraffe. 

Lauren Shepherd describes herself as a “dachshund mom” so it’s not surprising that they do feature in some of her illustrations. Again these are drawn in black fine liner pen with accent details highlighted in gold.

Pretty prints and greeting cards from Shepherd Illustration

The greeting cards from Shepherd Illustration are priced at just £2.50. I always think that if you’re sending a card then it’s worth sending a good quality one. I often keep good cards I receive and keep them on my desk because they make me smile. These are the kind of cards which will make me smile. 

Shepherd Illustration have a good range of art prints, screen print tees and greeting cards available in their Etsy store and on their website. Something for all occasions, from new baby, birthdays and bereavement, all in their unique, understated style.

Note: Shepherd Illustration sent us these prints and greeting cards for review purposes. All images and opinions are our own.