Toy Review: Clementoni Mind Designer Robot

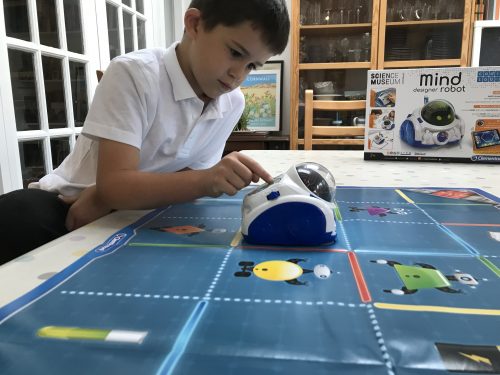
My almost 8 year old absolutely adores science and we are very keen to encourage this at home. We are firm believers in learning through play, if you have fun learning then whatever you’re learning usually sticks. This week we’ve been putting the Clementoni Mind Designer Robot through its paces. This clever little robot can help with all kinds of things, from spacial awareness, maths, reasoning and geometry. It’s a clever piece of kit and no mistake.

Toy Review: Clementoni Mind Designer Robot

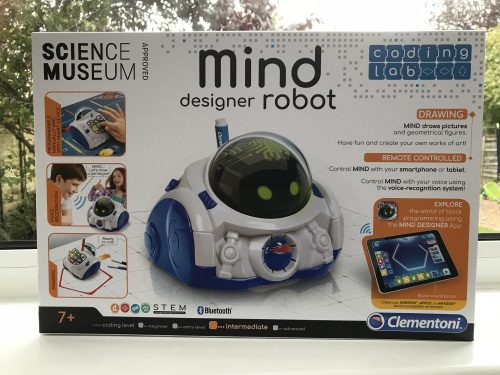
The Clementoni Mind Designer Robot costs £49.99 and in the box you will find:

  • MIND – Educational Digital Robot
  • A double-sided “board”
  • Transparent disc (to position the pens)
  • Three felt tip pens
  • 10 sheets of A3 paper
  • List of voice commands
  • Instruction manual

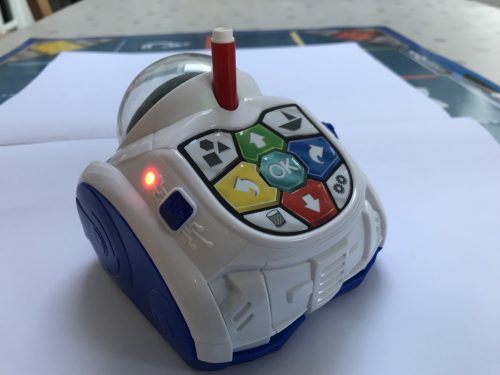
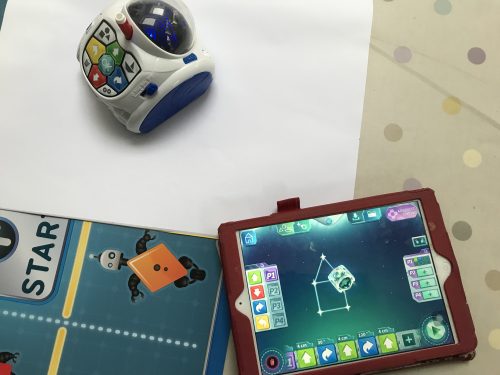
MIND is pretty simple to set up. You will need 4 AA batteries and one of those little screwdrivers to open the battery compartment. You will also need a tablet, we have an iPad which worked well. There’s a free app to download which you can use to operate MIND.

MIND has a control keypad in his back, a mode selector and microphone. You can programme him to move and draw shapes and he can memorise a sequence of up to 40 commands.

When we were first getting to grips with MIND we were mostly using the app mode and the voice commands to get it to draw geometric shapes. This is a good way to get used to how it works (and as a parent I can’t tell you how good it is to tell someone to do something and it actually gets done).

Toy Review: Clementoni Mind Designer Robot

We moved on to the educational mode. For this you need the double-sided board, which isn’t actually a board, but a huge A1 glossy piece of paper. The yellow board features the Number Challenge. You choose your level; easy, medium or difficult. We chose the easy level. In this game, MIND needs to be programmed with the directions it needs to move in to get to the correct square on the board. There will be simple sums to complete along the way.

On the blue board you need to find you way around a maze, collecting objects MIND says you need along the way. This is a great exercise in logic, reasoning, strategy and spacial awareness.

Toy Review: Clementoni Mind Designer Robot

It’s a remarkably simple piece of kit. Once you have read the instructions and got the hang of it, it’s great fun and really, really educational. I know for my son playing with MIND will really cement some maths and give it a practical application. For me it’s the thinking ahead and in steps which I think will make a big difference to him. He tends to rush at things and this may help him to take a step back and approach things in a slower, more methodical way.

When I told my husband that the Clementoni Mind Designer Robot cost £49.99 he was impressed; he thought it would cost nearly double that. We really, really liked it and I hope that my son will play with it a lot.

Toy Review: Clementoni Mind Designer Robot

Things to remember about the Clementoni Mind Designer Robot:
  • You DO need a tablet to use alongside this
  • You DO need 4 AA batteries
  • If you are giving this as a gift, it’s probably worth carefully taking it out of the box and playing with it, downloading the app and figuring out how it works before you wrap it up. If you know what you’re doing beforehand, you can save an hour of setting up and instruction manual reading on Christmas morning. Trust me on this one.

It’s a big present to buy for someone, but it does have a lot of different functions. It’s enjoyable to play with, even on the basic drawing geometrical shapes mode and I really like that there’s lots of learning to be had with this. The best thing is that it doesn’t feel like learning and gives a child a practical application for their maths etc.

The Clementoni Mind Designer Robot costs £49.99, is suitable for ages 7+ and is available from a wide range of retailers including Smyths Toys.

We were sent the Clementoni Mind Designer Robot for review purposes. All images and opinions are our own.

Learning: Ocean Slime Baff Activity Box

A few weeks ago we had a really fun afternoon playing with a dinosaur sensory Gelli Baff activity box which we put together. We had so much fun with it, the boy made several requests to do something similar; so I went back to my local toy shop and bought some Slime Baff, which is similar to the Gelli Baff but made of slime. We invited some friends around and had some Ocean Slime Baff Activity Box fun!

Learning: Ocean Slime Baff Activity Box

The Slime Baff is available in a range of colours (red, green and blue) but I opted for blue which seemed about the right shade to create a lovely blue ocean with. It’s safe for children and should be fine for sensitive skin. It also has a pleasant fragrance.

A packet of Slime Baff costs £5.99 and there’s enough for one bath in the pack. I used the whole pack in our box of slime. I wanted a fairly thick, gloopy slime for the sensory box, but you could experiment with using less for a looser slime.

Learning: Ocean Slime Baff Activity Box

HOW TO CREATE A Ocean slime SENSORY ACTIVITY BOX

You will need:
One plastic storage box. I used an IKEA Trofast Storage box
Slime Baff
Warm water
Selection of plastic fish and ocean life and maybe some shells

How to make your ocean slime sensory activity box:
In your clean plastic box pour in six pints of warm water, you can add more if you need to later. Pour in the Slime Baff powder and stir it in. It should turn to slime fairly quickly. If the texture is too thick for you, add some more warm water and stir until you’re happy with it.

Learning: Ocean Slime Baff Activity Box

Grab your plastic fish figures and shells and put them in the box, let your imagination run wild.

Once you’ve finished playing with your ocean slime sensory activity box, pour it into the sink and add more hot water until it slides down the plughole.

TIPS:

Although Slime Baff doesn’t stain (or shouldn’t), you might want to wear an apron to protect your clothes.

I put the washing up bowl nearby so any figures he’d played with could go in there and be rinsed off afterwards. Some of the goo did cling to them quite a bit.

We played with this in the kitchen which was fine because if there was mess it could be mopped up. If you’re playing with this in a carpeted room I’d but a wipe clean cloth down under the box to minimise the mess.

Children might like to use tools in the sensory box. The slime really lends itself to scooping and pouring, so if you have some small plastic cups, they might be quite fun to include too.

The slime really clings to your skin, so keep an old towel close by to wipe hands on. You can wash the slime off your hands with soap and water. It is very slippy stuff, so be careful if any gets on the floor too.

Learning: Ocean Slime Baff Activity Box

WHAT DID WE LEARN?

Like with the dinosaur sensory activity, this was a good way of expanding his vocabulary and exploring new ways to describe things. We founds words such as; slimy, wobbly, gooey, warm, cold, soft, stretchy and floppy which all described the Slime Baff well.

We closed our eyes and felt around for sea creatures in the goo. When we found them we had to try to feel to guess what we had. We had a selection of shells in the slime too. We tried to figure out what they were by feeling the shape, size and ridges of the shells. This was a great game and one we all really enjoyed.

For a more interesting tactile sensory experience you can make the Slime Baff up with quite warm water and children can explore the different temperatures as the slime cools while they play with it.

He mostly enjoyed just playing with the ocean slime sensory activity box, and who can blame him. It was great fun, perfect messy play for slime loving kids!

Learning: Ocean Slime Baff Activity Box

Learning: Dinosaur Sensory Gelli Baff Activity Box

A few weeks ago I spotted a packet of Gelli Baff in my local toy shop and decided to treat my son to a Gelli Baff bath. It was brilliant fun and we all ended up having a go. It’s really tactile so I thought it would be something we could use for some sensory play. Today it’s been too grey and wet to go to the park, so I assembled some stuff and we had an hour or so of dinosaur sensory activities.

Learning: Dinosaur Sensory Gelli Baff Activity Box

The Gelli Baff is available in a range of colours but I opted for “slime green” which seemed about the right shade to create a dinosaur swamp with. Gelli Baff comes with a sachet of dissolver, so when you’ve finished it just washes down the plughole like water. It’s safe for children and fine for sensitive skin. It also has a pleasant fragrance.

A packet of Gelli Baff costs £5.99 and there’s enough for one bath in the pack. But if you want to use it for sensory play you can probably get a minimum of five trays of goop out of a packet.

How to create a Dinosaur Sensory Activity box

You will need:
One plastic storage box. I used an IKEA Trofast Storage box
Gelli Baff
Warm water
Selection of dinosaurs and dino accessories

Learning: Dinosaur Sensory Gelli Baff Activity Box

How to make your dinosaur sensory activity box:
In your clean plastic box pour in six pints of warm water, you can add more if you need to later. Weigh out 30g of the Gelli Baff powder and stir it in. It should turn to jelly fairly quickly. If the texture is too firm for you, add some more warm water until you’re happy with it.

Grab your dinos and put them in the box, let your imagination run wild.

Learning: Dinosaur Sensory Gelli Baff Activity Box

Once you’ve finished playing with your dinosaur sensory activity box you can sprinkle over the dissolving powder and then just pour it down the sink.

Tips:

Although Gelli Baff doesn’t stain (or shouldn’t), you might want to wear an apron to protect your clothes.

My son LOVED this activity and decided he wanted to make a pond for the dinosaurs to drink out of and swim in. We used a small plastic bowl, this definitely added an extra dimension to his play.

I put the washing up bowl nearby so any dinosaurs he’d played with could go in there and be rinsed off afterwards. Some of the goo did cling to them a bit. I’m a big fan of tidy as you go and this helped.

We played with this in the kitchen which was fine because if there was mess it could be mopped up. If you’re playing with this in a carpeted room I’d but a wipe clean cloth down under the box to minimise the mess.

Children might like to use tools in the sensory box; we used some normal teaspoons to dig the goo out for the pond.

Learning: Dinosaur Sensory Gelli Baff Activity Box

What did we learn?

My son loves dinosaurs, so for him this was a really good way of stretching his imagination by creating a habitat for his dinosaurs. For me it was a good way of expanding his vocabulary and exploring new ways to describe things.

We founds words such as; squishy, wobbly, gooey, warm, cold, soft and grainy which all described the Gelli Baff well.

We also closed our eyes and felt around for tiny dinos in the goo. When we found them we had to try to feel to guess what kind of dinosaur we had. This was a great game and one he really enjoyed.

For a more interesting tactile sensory experience; make the Geli Baff up with quite warm water and children can explore the different temperatures as the gelli cools while they play with it.

He mostly enjoyed just playing with the dinosaur sensory activity box, and who can blame him?

Learning: Dinosaur Sensory Gelli Baff Activity Box

If you enjoyed this post, you might also like to try Growing Egg and Cress Heads.