Recipe: Healthy & Hearty Double Bean Soup

I’ve been making this soup for the last couple of years, it doesn’t have an especially inspiring name, but it is so flipping lovely. I make it when I’m starting to feel rundown, or when the weather is changing for the worse and I need a winter warmer. It’s a simple soup, but one even my teenager really loves.

I call it double bean soup because I use two tins of beans in it, usually butter beans or cannellini, sometimes white kidneys beans or occasionally I’ll throw in a tin of chickpeas. My favourite combo is butter beans and cannellini though.

It’s got a hearty vegetable base, and it’s so packed with good stuff, you can stretch it out a little if need be by adding more stock and seasoning, but it makes a big pot, a really big pot, perfect for lunch for a crowd or freezing for future rainy days.

Double bean soup

This simple soup is pretty quick to throw together, but it does benefit from a gentle simmer once you get going. There’s a fair amount of chopping, but once that’s done and dusted, the hardest part is opening the tins of beans.

Double Bean Soup

Ingredients:

1 tablespoon of olive oil
1 large onion, finely diced
3 sticks of celery, finely diced
2 or 3 medium carrots, finely diced
1 courgette, finely diced (optional)
3 large cloves of garlic, more if you fancy it
1 tin of butter beans
1 tin of cannellini beans, or whatever white beans you like
2 tablespoons of tomato purée
500mls of vegetable stock
Salt & pepper
Dried Italian herbs, about a heaped teaspoon
Paprika, about half a teaspoon
1 teaspoon of red wine vinegar
Pesto to serve
Optional additions – chopped fresh or frozen spinach, chopped fresh parsley

How to make double bean soup –

Swirl some olive oil to a large pan or soup pot. Add your finely diced onions, celery, carrots and courgettes, cook until they’re soft but not brown, this might take around 20 mins.

Throw in your crushed garlic and cook that out for a few minutes. Add your two tins of beans, tomato purée and hot stock. You can always add more stock later, but 500mls should be enough to get the soup party started.

Set your soup pan to a gentle simmer and add salt and pepper, dried herbs, paprika and the red wine vinegar. Leave it to simmer for about half an hour. At this point, add a generous spoon of your favourite green pesto and stir through.

Now is the time to have a taste to check you’re happy with the seasoning. If you’re not, please add more of whatever you think it needs. Occasionally I might add a pinch of sugar if it feels too acidic, but usually I end up adding more pepper and that’s about it. If you’re adding chopped spinach, throw that in now and stir until it’s wilted and it all looks good.

To serve, pour into soup bowls, top with a bit more pesto and/or chopped parsley and serve with crusty bread.

It’s a big bowl of health and vitality, and just the thing to serve on a chilly autumnal day.

If you enjoyed this recipe, you might also like this Norwegian inspired cauliflower cheese soup.

Double bean soup

Recipe: Black Forest Shortbread Biscuits

Shortbread is one of my favourite things to make. I love plain shortbread, but I also love slightly fancier shortbread, like my Cranachan shortbread. This month, after seeing some in a shop, I decided to try my hand at making a batch of Black Forest shortbread. Chocolate and cherries are a classic combination at any time of the year and I had a feeling they’d turn out pretty well.

Shortbread is a fairly simple thing to make, best made by hand rather than in a food mixer, and it’s softer and crumblier the less you handle it, so it’s great if you are short on time.

Black Forest Shortbread Biscuits

Black Forest Shortbread Biscuits

Ingredients:
225g butter
130g caster sugar
300g plain flour
25g cocoa powder
Half a teaspoon of vanilla extract
100g chopped glacé or cocktail cherries
100g milk chocolate chips or chunks

To decorate:
100g milk chocolate
Sprinkles, I used decorative shimmer sugar crystals

Black Forest Shortbread Biscuits

How to make Black Forest Shortbread Biscuits:
Pre-heat your oven to 180°. You’ll need to have a couple of baking trays covered with greaseproof paper ready.

In a mixing bowl, thoroughly beat the butter and sugar together. Once fluffy, add the vanilla extract and your chopped cherries and chocolate chunks. Then, little by little add the plain flour and the cocoa powder. Mix with a wooden spoon as best you can. Try not to overwork it too much or the dough will go gluey.

I find the following method tidier and it stops you manhandling the dough too much. Once the shortbread dough is almost mixed, tip it out onto a large sheet of greaseproof paper; bring the dough together with your hands and then fold the paper in half with the mixture sandwiched in between.

With a rolling-pin, roll it out so it’s about 5mm thick and cut into rounds. I used a glass for this and carefully lifted each shortbread biscuit onto the baking tray. You should get around 18 shortbread biscuits out of the dough.

Bake in the pre-heated oven for 12-15 minutes. Keep an eye on the shortbread, with the cocoa powder it’s harder to see when they’re done. If you can, lift one gently and check it’s cooked underneath. Once they’re baked, remove from the oven and leave to cool on a rack.

Black Forest Shortbread Biscuits

Whilst the shortbread biscuits are cooling, melt the chocolate. I usually ping it in the microwave in short bursts, stirring every 30 seconds until it’s the right consistency, it takes less than two minutes, but go carefully! Once melted, dip each shortbread into the chocolate and half coat it, put your biscuit back on the greaseproof paper and sprinkle with your chosen sprinkles. I had some shimmer sugar crystals, so I used them. Try to resist eating your shortbread until the chocolate has set. Pop them in the fridge to set if you’re in a hurry.

These are a really delicious treat. They’re lovely even before they’re dipped in chocolate, but that really does take it to the next level.

Black Forest Shortbread Biscuits

If you enjoyed this, you might also like – 

Great Bakes: Coffee and Rum Bundt Cake

September is my birthday month, and while it’s nice to be a bit spoilt, I do usually end up baking my own cake, which is fine. I can never much be bothered to decorate a cake for myself, so I usually end up making something simple, and equally simple to decorate. This year I had some rum leftover from my visit to the Manchester Rum Festival, so I decided to make a coffee and rum bundt cake, drizzled with the best ever chocolate ganache, but more of that later.

It’s a pretty straightforward bake, and would be fine or even excellent baked in sandwich tins and turned into a standard looking cake, maybe filled with coffee buttercream. But I have a bundt tin and it makes anything I bake it it look super-fancy, so I used that. Here’s how I made my coffee and rum bundt birthday cake.

Coffee and Rum Bundt Cake

Coffee and Rum Bundt Cake

Ingredients

250g caster sugar
250g softened butter
4 eggs
250g self-raising flour
1 heaped teaspoon baking powder
1 teaspoon of vanilla extract
2 heaped teaspoons of instant coffee dissolved into 1 tablespoon of boiling water
2 tablespoons of your favourite rum, white, dark, spiced, it’s up to you

For the chocolate ganache –

200g chocolate, I used milk chocolate
300mls double cream
2 tablespoons of caster sugar
Splash of rum (optional)

Coffee and Rum Bundt Cake

How to make your Coffee and Rum Bundt:

Pre-heat the oven to 190° and liberally grease your bundt tin with melted butter.

Beat your butter and sugar together in a mixing bowl until light and fluffy. Add the vanilla, eggs, flour, baking powder, coffee and rum, and give them a really good mix.

Pour the mixture into your bundt tin. Smooth the top of the batter and bake in the pre-heated oven for 30 minutes. Once baked through, remove from the oven and leave to cool in the tin for at least 15 minutes.

Once cool, turn out onto a suitable plate or cake stand and make up the ganache to drizzle over. Do not even attempt to drizzle the icing on until the cake is fully cooled.

To make your ganache, chop up the chocolate and put it in a large, heatproof bowl. Pour the cream into a saucepan with the sugar and bring to a simmer over a medium heat, stirring all the time until the sugar is melted. Turn up the heat and bring to the boil, then quickly remove from the heat. Pour the hot cream over the chocolate and whisk until it is smooth and glossy. If you’re using rum, you can add a small splash at this point.

You will have lots of ganache, so drizzle it over your cake, be as generous as you want. You will likely have quite a lot left over, and that’s fine, because it is flipping fantastic over ice cream, or just spooned into your greedy face, my greedy face specifically!

It’s such a quick and easy bake, making the ganache was the trickiest part of it, and even that was straightforward. And everyone liked it so much, they all had two slices! Happy birthday me!

If you enjoyed this, you might also like to try;

Coffee and Rum Bundt Cake

Recipe: Cheesy Sloppy Joe Garlic Bread Melts

Since the pandemic, Sloppy Joes have been a regular speedy meal in our house. They’re quick to make, brilliant for batch cooking and freezing for a rainy day and perfect for sneaking extra veg into. It was only a matter of time before I started using the Sloppy Joe mix for other things, like these cheesy Sloppy Joe garlic bread melts.

For the uninitiated, Sloppy Joes are basically a savoury mince that you serve in a burger bun. They’re messy to eat, but really quite delicious, but even so, they seem to be a bit of a challenge to our English palates. If you’re at all curious, I’d say give them a try, we did and we’ve never really looked back!

Cheesy Sloppy Joe Garlic Bread Melts

These cheesy Sloppy Joe garlic bread melts are really simple to make, it’s well worth doubling up on your sloppy Joe mix just so you can make these with the leftovers. They’re great party food and make an excellent meal served with salad, or potato wedges, or whatever you think best. They’re quick and easy to throw together, and as popular as sloppy Joes were before, these are even better!

Cheesy Sloppy Joe Garlic Bread Melts

Ingredients
8 garlic bread slices
Sloppy Joe mix – see the recipe here
Grated Cheddar cheese

How to make Cheesy Sloppy Joe Garlic Bread Melts

These are pretty simple to throw together. Firstly, it helps if you can heat up your Sloppy Joe mix at the start. Then lay out your garlic bread slices on a baking sheet and bake in the oven, following the instructions on the packet. After about half way through the cooking time, remove them from the oven and put around a heaped tablespoon of the Sloppy Joe mix on top of each bread slice. Top with as much grated Cheddar cheese as you want, in this instance more is definitely better.

Cheesy Sloppy Joe Garlic Bread Melts

Put the slices back in the oven and cook until the cheese is all bubbly and golden. Remove them from the oven, leave to cool for a moment, and then eat with whatever you like; salad, chips, wedges, whatever you fancy! I served mine with coleslaw, and because I’m occasionally fancy, a generous sprinkle of finely chopped fresh parsley.

Cheesy Sloppy Joe Garlic Bread Melts

These are seriously delicious, they’re a little bit dirty and great for feeding a hoard of teens or as an alternative to pizza night.

If you liked this, you might also like to try these pizza hot dogs, this chilli cheese hot dog bake or these meatball pizza puffs – delicious!

Cheesy Sloppy Joe Garlic Bread Melts

Recipe: Easy Veggie Mince Sloppy Joes

During those long lockdown days, I fell deeply out of love with cooking. Having a house full of people who weren’t legally allowed to go out meant that I was head chef for rather longer than I liked. As a result, the meals I produced became lazier, which is not always a bad thing.

My now 12 year old had discovered American YouTube at around that time, so my need to cook less often happily coincided with him making requests for simpler, American style food, like Sloppy Joes.

If you’re not sure what a Sloppy Joe is, it’s essentially savoury mince served in a burger bun, sometimes with a slice of processed burger cheese, sometimes not. It does sound a bit odd, but actually it turns out it’s a great way to launder extra veg into our family without them realising. It’s also pretty cheap to make and very quick to throw together after a long day of toil.

It’s now a pretty regular treat meal. My son goes nuts for it. I think it’s quite nice, but often prefer to top a jacket spuds with the mince than eat it like a burger, but that’s also fine.

Easy Veggie Mince Sloppy Joes

I’m vegetarian, so I make our version with veggie mince, and you can very easily make it vegan if you want to. My meat eating son never notices that it’s fake meat, but if meat is what you need, then just swap the veggie mince for lean beef mince and that would work really well too. Just make sure you brown it separately before adding it to the veg mix.

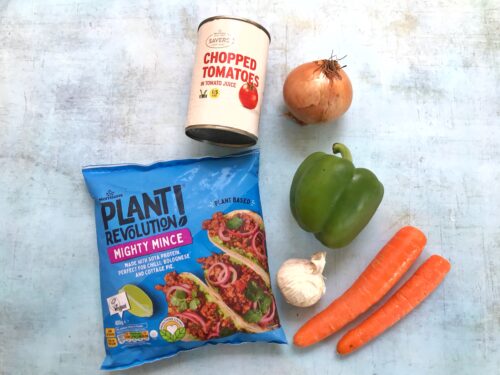
Although I’ve not yet made this in the slow cooker, it is the kind of recipe that would work well I think. I always think veggie mince gets more flavour in the slow cooker. I tend to use the Morrisons Plant Based Mince, it holds its texture pretty well and has a good flavour which works well in tacos and Sloppy Joes, but use whatever your preferred veggie mince brand is.

Easy Veggie Mince Sloppy Joes

Ingredients:

1 tablespoon olive oil
2 medium carrots, finely diced, or grated
1 pepper, finely diced
1 finely chopped medium sized onion
A stick of celery, finely chopped
2 cloves minced garlic
400g veggie mince
1 tin of chopped tomatoes
200mls passata
1 tablespoon of tomato purée
1 tablespoon mushroom ketchup (this is optional)
Generous splash of red wine vinegar
1 teaspoon of sugar
1 teaspoon of dried mixed herbs
1/2 teaspoon dried thyme
1 veggie stock cube
Salt and pepper to taste
Chilli or hot sauce, optional
Burger buns, oven bottom rolls work well for this
Burger cheese slices, optional

Easy Veggie Mince Sloppy Joes

How to make your veggie mince Sloppy Joes

In a deep frying pan with a lid, heat your oil and cook your diced vegetables, but not your garlic, gently until soft. Stir often and add a splash of water if you feel the pan is too dry. Once the veg is soft, add the garlic and stir in.

Add the veggie mince, chopped tomatoes, passata and the rest of the seasonings, stir well and put the lid in your pan leaving it to simmer gently for half an hour. Check if you’re happy with the seasoning, you can add more salt, pepper or whatever until you’re happy.

I like to use mushroom ketchup, as it adds a real depth of flavour to veggie mince dishes. It can be hard to get hold of, so you can maybe try Worcestershire sauce or soy sauce instead.

We like our Sloppy Joes to have a little bit of warmth, so you might want to add some of your favourite chilli sauce to give it a kick. It’s fine if not though, we don’t go wild with the hot sauce, but it is better for a little bit of it.

Easy Veggie Mince Sloppy Joes

Sloppy Joes are quite messy to eat, so before you serve it’s worth checking to see how wet your mixture is. You don’t want it too liquid, it’s best and less messy to eat when it’s a fairly dry consistency. I usually remove the lid towards the end of cooking just to let some of the liquid evaporate off. Likewise, if it’s too dry for your tastes, you can always add a splash of water to loosen it up.

To serve, split your burger buns, pile in a respectable amount of the Sloppy Joe mixture and if you like, top with a cheese slice. Serve with fries, or salad, or both!

Like I said earlier, savoury mince dishes are great for hiding veg in. I usually dice a carrot and then finely grate a carrot into the mix. You can add more peppers if you like, or mushrooms and courgettes work well too.

It’s a simple meal, but a popular one for good reason. This panful makes a hearty amount for three and there’s always enough for lunch the next day. It also freezes like a dream, so it’s worth doubling up and freezing some for a rainy day!

Recipe: Easy Veggie Mince Sloppy Joes

Recipe: No Churn Raspberry Ripple Ice Cream

I am really into making my own ice cream at the moment. It’s such a simple thing to do, but it’s so rich and delicious, my whole family can’t get enough of it. Recently I made an Irish coffee flavoured ice cream, which was amazing. But this week, with a punnet of fresh raspberries calling me from the fridge, I decided to whip up a batch of no churn raspberry ripple ice cream.

The recipe is a really simple one and takes very little time to throw together. It’s great to get the kids involved with too, my son really loves whipping the cream for me.

Recipe: No Churn Raspberry Ripple Ice Cream

No Churn Raspberry Ripple Ice Cream

Ingredients:

500ml double cream
1 tin of sweetened condensed milk
1 teaspoon of vanilla extract
150g fresh raspberries
100g icing sugar, sifted

Recipe: No Churn Raspberry Ripple Ice Cream


How to make raspberry ripple ice cream:

Before you start making the ice cream, make your raspberry ripple. Pop your fresh raspberries in a microwavable dish and cook for around 90 seconds, or until they’ve collapsed and are soft and pulpy. Push the raspberries through a sieve, so you’re removing the raspberry seeds. Pour the raspberry juice into your sifted icing sugar and mix well. Leave them to cool fully. You can speed this up by popping it in the fridge for a little while.

To make the ice cream, whip the cream in a bowl until it forms stiff peaks, this will take a few minutes with an electric whisk, if you’re doing it by hand, it might take a little while. Once you have achieved stiff peaks, gently fold in the condensed milk and vanilla extract until it is well combined. Whip the mixture for 30 seconds to make sure it’s mixed properly.

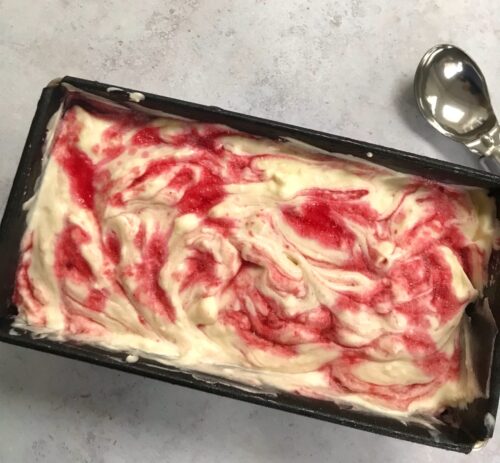
Pour about half the ice cream into a loaf tin, then spoon over around half of the cooled raspberry puree and swirl through with a skewer or a knife. Top with the rest of the ice cream mixture and repeat the swirling process with the rest of the raspberry puree. If you like, drizzle a little more of the raspberry puree artistically over the top. Pop it in the freezer for 6 hours, or overnight if you can.

Recipe: No Churn Raspberry Ripple Ice Cream

To serve, remove it from the freezer about ten minutes before you want to serve it. It should scoop pretty well once it’s been at room temperature for a short while. If you’ve got any raspberry puree left over, that’s great drizzled over the top too!

This raspberry ripple ice cream is so lovely. It’s a real blast from the past from my childhood and an ice cream which I know I’ll be making again and again!

Recipe: No Churn Raspberry Ripple Ice Cream

7 things to do with Wild Garlic

I love cooking with wild garlic, and it’s a nice thing to do with my son, both collecting it and making delicious things with. Over the years we’ve made many tasty things, so I thought I’d share some of our favourite things to make with wild garlic. They’re in no particular order, some are quick and simple to make, some take a few hours, but all of them are very tasty indeed.

When you go foraging it’s important not to pick too much of anything. Take just what you need and save the rest for the wildlife or other foragers. If you’re foraging for wild garlic, you don’t need much anyway. It’s pretty pungent and a few leaves go quite a long way. I tend to try to pick the younger leaves in spots where I think (hope) dogs haven’t been. I always wash my wild garlic leaves before I use them anyway. You can find out more about wild garlic here.

Recipe: Wild Garlic and Parmesan Scones

7 things to do with Wild Garlic

Wild garlic and parmesan scones

These wild garlic and parmesan scones are so delicious. They’re everything you want from a savoury scone. I sprinkle a pinch of sea salt on the top which makes them extra delicious. This is such a great recipe, we can’t get enough of these simple scones, which are great for a quick lunch, or warmed with soup.

Wild garlic hummus

This simple hummus recipe is a real treat. Gently garlicky and full of good stuff. My son really loves this and gets me to make it a couple of times a week during wild garlic season.

Easy Recipe: Quick Wild Garlic Hummus

Wild garlic macaroni cheese

This is a really simple recipe. It’s my standard go to macaroni cheese recipe, but with shredded wild garlic leaves scattered through it. It’s a really simple way of making something fairly basic into something fantastic.

Cheesy wild garlic quiche

This is a lovely quiche. Cheese and onion quiche is my favourite, but the addition of wild garlic really makes it something special. It’s a fine thing to serve to guests over for lunch, or just to keep to yourself if you’re a massive quiche fan, which I am!

Cheesy wild garlic quiche

Easy wild garlic pesto

Pesto is such a versatile thing to have in the fridge. This gentle wild garlic pesto is great stirred through pasta, or drizzled on pizza. Or in any way you’d normally use pesto.

Wild garlic pesto twists

If you’ve got a couple of tablespoons of wild garlic pesto going spare, then these cheese and wild garlic pesto twists are a simple but excellent way to use this lovely pesto.

Recipe: Wild Garlic and Parmesan Focaccia

Wild garlic and parmesan focaccia

This is the most delicious bread I’ve made. If you can get your hands on some lovely fresh wild garlic, it’s well worth making yourself. It’s like the best garlic bread you’ve ever had. I love this recipe!

Wild garlic is such a fantastic ingredient. It’s getting easier to come by now, many shops and deli’s are now stocking it in springtime. I hope this had given you some ideas about how to use any wild garlic you come across. Happy cooking!

Recipe: “Let Them Eat Swede” Coronation Cake

It’s a rare day I get political on this blog. But we live in financially tough times, and I can’t in all good conscience be totally fine with spending millions on a coronation, when thousands of people in the UK are choosing between heating and eating. While children go to bed hungry, I think it’s rather obscene to spend so much money giving a very rich man a golden hat. Not everyone will share my views on that, and that’s fine. It’s not worth falling out over.

In February, Conservative Environment Secretary, Thérèse Coffey declared “let them eat turnips”, as a more local answer to the empty shelves we’ve been finding in our supermarkets this year. Whatever the cause, the effect has been obvious when we’ve visited our local shops. Shortages of salad veg, peppers and tomatoes have had our government urging us to eat the root veg we grow here in abundance. Whilst I’m very keen on eating local and the fewer food miles the better, it’s still a tone-deaf, Marie Antoinette style statement from our government and an unwelcome diversion from the real issues.

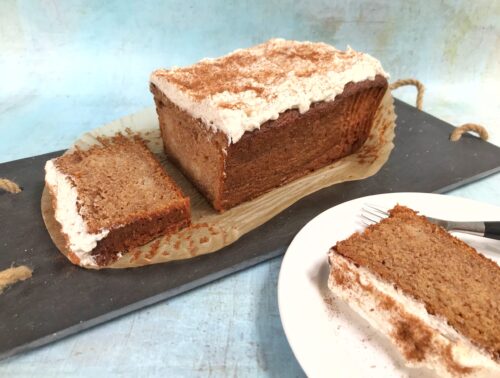
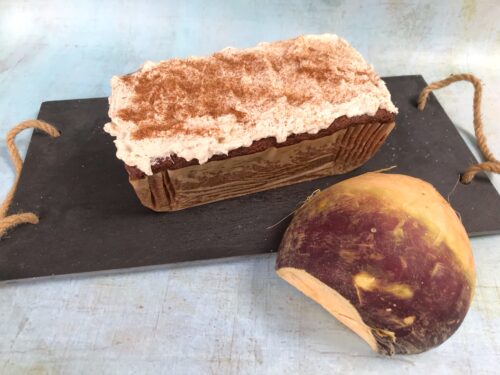
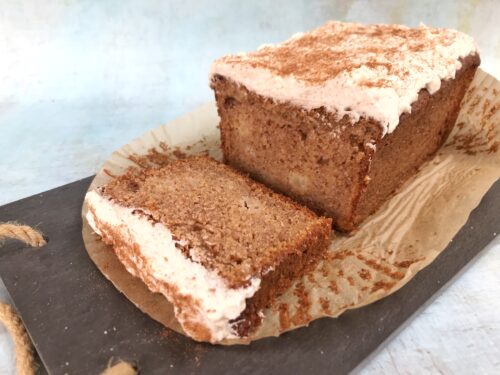
In response to both of these recent pieces of news, I decided to bake a “Let Them Eat Swede” Coronation Cake. It’s like the carrot cake we all know and love, but made with the most humble of root vegetables, the swede. Personally, I really love swede. I like it best in carrot and swede mash, it’s cheap and really helps to bulk out a meal and bump up the amount of veg you can get into your family. It’s no substitute for a tomato though, that much is obvious.

Recipe: "Let Them Eat Swede" Coronation Cake

The great thing about swede is, it cooks quite quickly for a root vegetable. Once the cake is baked, the swede sort of melts into it, so I don’t think anyone would easily guess the secret ingredient. If you try it, let me know if you could tell it had swede in it.

“Let Them Eat Swede” Coronation Cake

Ingredients
150ml vegetable oil
200g soft brown sugar
3 medium eggs
1 lemon, finely grated and zested
200g coarsely grated swede
2 tablespoons of apple sauce
2 heaped teaspoons of ground cinnamon
250g self-raising flour
1 level teaspoon bicarbonate of soda

For the frosting
50g unsalted butter, softened
85g icing sugar, sifted
Half a teaspoon of ground cinnamon
180g soft cheese
Cinnamon sugar to dust the top with (optional)

Recipe: "Let Them Eat Swede" Coronation Cake

Method

Preheat oven to 180°c or gas mark 4. Grease and line a large loaf tin, I use loaf tin liners which are so much easier. In a large mixing bowl, beat the oil, soft brown sugar, and eggs until smooth. I used my hand mixer, but a wooden spoon works just as well.

Stir in the lemon zest, lemon juice, cinnamon, apple sauce and the grated swede. Tip in the sifted flour and bicarbonate of soda and fold in gently until it’s all mixed together well. Pour the cake batter into the prepared tin and bake for around one hour until risen and golden. If you’re not sure, insert a skewer into the centre of the cake and if it comes out clean, then it’s cooked.

Leave the cake to cool fully on a wire rack for a few hours, or overnight. The cake has to be fully cool before you pile the frosting on top, or it’ll melt.

Recipe: "Let Them Eat Swede" Coronation Cake

To make the frosting –

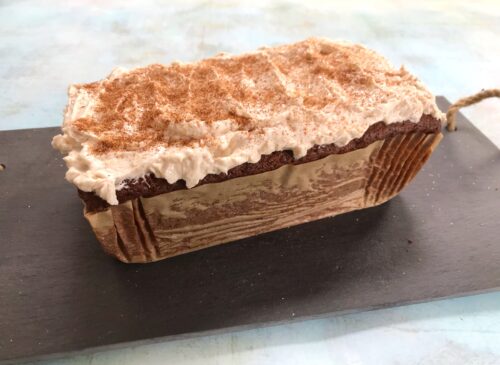
With an electric whisk, beat together the unsalted butter, cinnamon and icing sugar until it comes together and is smooth. This will take a little while, so persist with it. It will look unpromising and like breadcrumbs for a while. Once it is smooth, add the cream cheese and beat quickly until it’s soft and smooth. Do not over-beat the frosting, or the cream cheese may split and become runny. Spread over the top of the cake with a palette knife or an offset spatula. I’ve sprinkled cinnamon sugar over the top, but it might be mice to sprinkle chopped nuts, or more lemon zest if you like. I just made some decorative ripples, then popped the cake in the fridge for the frosting to firm up.

The swede cake without frosting would happily keep in a tin for a few days. With the frosting it’ll need to be kept in the fridge, or the cream cheese frosting might go off.

Recipe: "Let Them Eat Swede" Coronation Cake

It’s a really simple cake to make. To be honest, I made it mostly to amuse myself, but it turned out so well, I decided to share the recipe here too. It’s got to be better than a broad bean quiche, right?

If you liked this, you might also like to try this courgette cake.

Easy Recipe: Quick Wild Garlic Hummus

Over the weekend I visited Whalley Abbey for a walk. The grounds were covered in spring flowers and the trees were starting to blossom. Amongst the daffodil and crocus were some newly sprouted wild garlic, and once we came across an especially abundant patch, I decided to pick a few handfuls to make something nice with once I’d got home. The something nice turned out to be a batch of wild garlic hummus, and it’s a recipe I’m sure will become a firm favourite this spring.

As an aside, I’ve been slightly confused for several years now about the spelling of hummus. Is it hummus or houmous? Apparently hummus is the most common spelling, which is for more Arabic style hummus. But houmous is for humous with a more Mediterranean vibe. See, every day is a school day!

Easy Recipe: Quick Wild Garlic Hummus

Anyway, back to the wild garlic hummus. I made this delicious batch, partly thinking that it wouldn’t be popular with my 12 year old, but he tucked into it as soon as he got home from school. Thankfully there was enough left to have with our evening meal (aubergine filo pie and salady bits, if you’re interested), but I’m already fielding requests for more!

As you’re using wild garlic in your recipe, you don’t need to add the usual garlic cloves to your hummus. It is a bit gentler than your standard hummus, which I like. I’d be tempted to throw in a bit of parsley next time, if I have any. I am a bit mad for fresh parsley though, and there are very few things which can’t be improved by a generous sprinkle of fresh parsley leaves.

Recipe: Wild Garlic Hummus

Ingredients:
50g Wild Garlic, well washed and patted dry
1 tin of chickpeas, drained, but do save a couple of tablespoons of the liquid
1 lemon, zested and juiced
2 tablespoons of tahini (you can add more if you want to)
3 tablespoons of olive oil
Salt and pepper to taste

Easy Recipe: Quick Wild Garlic Hummus

How to make your wild garlic hummus:
Make sure you wash your foraged wild garlic well and pat it dry. I tend to make hummus in my Nutribullet, because it’s just the right size and does the job really well. If you don’t have one, then your usual food processor is absolutely fine too.

Put everything in the food processor and blend it. You might need to stop it and poke it down with a spoon so the blades can blend it all evenly. You might need to add a little of the chickpea liquid you set aside if it’s too firm, or a bit more olive oil if you like.

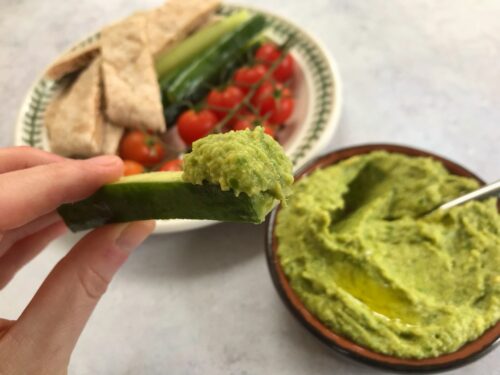
Taste it and check if it needs any more salt or pepper and add more if you think it needs it. Once it’s fully blended, it’s ready to serve. If you like, you can add a little drizzle of olive oil over the top of your hummus, just to give it a bit of extra shine.

We ate it greedily on toast, but also dipped crackers into it and had a large dollop on our salad. It will keep for a few days in the fridge in an airtight container, but if your house is anything like my house, it’ll disappear in a matter of hours!

If you liked this, you might also like to try these other wild garlic recipes –

Easy Recipe: Quick Wild Garlic Hummus

Recipe: No Churn Irish Coffee Ice Cream

I’m not sure there are much better ways to finish a meal than with a nice Irish coffee. That warming whiskey laced coffee drink is just caffeinated perfection. We were given a bottle of whiskey for Christmas, but we’re not the whiskey drinking house we once were, so it’s sat looking forlorn for weeks now. It was time it got used, so this week I whipped up a batch of deliciously creamy Irish Coffee Ice Cream. It’s a no-churn recipe, it takes all of five minutes to throw together and it is so simple. What’s not to like?

Recipe: No Churn Irish Coffee Ice Cream

This Irish Coffee ice cream is so deliciously rich and creamy, a little goes a long way! If you’re tempted to slosh a bit more whiskey in, you do this at your peril, as adding too much alcohol could prevent it from freezing. Better to stick to 3 tablespoons in the ice cream and drizzle a bit of extra whiskey over the top of your scoop if you think it needs a bit more kick.

Irish Coffee Ice Cream

Ingredients:

500ml double cream
1 tin of sweetened condensed milk
3 heaped teaspoons of instant coffee dissolved into 1 tablespoon of hot water, left to cool
1 teaspoon of vanilla extract
3 tablespoons of whiskey, whatever you have to hand

Recipe: No Churn Irish Coffee Ice Cream

How to make Irish Coffee Ice Cream:

Before you start making the ice cream, make your coffee solution. You need a tablespoon of boiling water and three heaped teaspoons of instant coffee. Mix them together and leave them to cool fully. You can speed this up by popping it in the fridge for a little while.

To make the ice cream, whip the cream in a bowl until it forms stiff peaks, this will take a few minutes with an electric whisk, if you’re doing it by hand, it might take a little while. Once you have achieved stiff peaks, gently fold in the condensed milk, vanilla extract, coffee and whiskey until it is well combined. Whip the mixture for 30 seconds to make sure it’s mixed properly.

Recipe: No Churn Irish Coffee Ice Cream

Pour into a loaf tin, smooth the top and pop it in the freezer for 6 hours, or overnight if you can.

To serve, remove it from the freezer about ten minutes before you want to serve it. It should scoop pretty well once it’s been at room temperature for a short while.

Recipe: No Churn Irish Coffee Ice Cream

Serve it however you like. I like to serve it in a pretty glass, or as an affogato style pudding, with a shot of espresso and a shot of whiskey poured over the top. Just the right kind of dessert for St Patrick’s Day, or any day really. Why limit ourselves?

Recipe: No Churn Irish Coffee Ice Cream

If you enjoyed this recipe, you might also like to try –

Recipe: No Churn Irish Coffee Ice Cream