How To Make a Puffy Paint I Love You To The Moon and Back Card

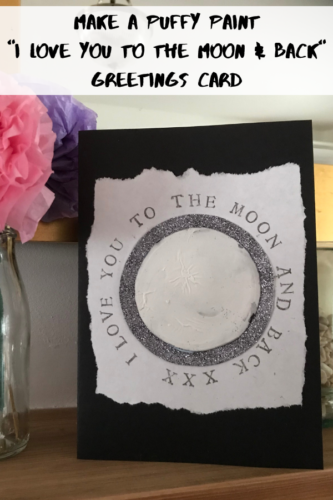
Over Easter I’ve been playing about with puffy paint. You can buy puffy paint, but you can easily make your own by mixing PVA glue and shaving foam, and that’s what I did. I played about making a few things with it, but by far my favourite was this I Love You To The Moon and Back Card.

The puffy paint is really fun to play around with and as long as you give it ample time to dry, it’s a really versatile thing to craft with. This, I Love You To The Moon and Back Card I made with the puffy paint, is probably one of my favourite things that I’ve made in a while. It’s a lovely card to give to a loved one.

How To Make a Puffy Paint I Love You To The Moon and Back Card

How to make an I Love You To The Moon and Back Card

You will need:

PVA Glue
Shaving Foam
Black card, two pieces
White card
Glittery paper
White paper
Letter stamps and ink (or neat writing)

How To Make a Puffy Paint Love You To The Moon and Back Card

First of all you’ll need to mix up a batch of puffy paint. In a large bowl mix 1 part glue and 3 parts shaving foam together. If you want to colour your puffy paint you can add a few drops of coloured paint, but for the moon we need a nice white puffy paint.
How To Make a Puffy Paint I Love You To The Moon and Back Card

Draw a circle using a pencil on your one piece of black card and dollop some of the puffy paint on it, spread the paint about so it covers the circle. Try and make it a bit more textural; the surface of the moon isn’t smooth, so your puffy paint replica shouldn’t be either. Leave the puffy paint to dry, preferably overnight.

Once it is dry, cut out the circle of the moon and put to one side.

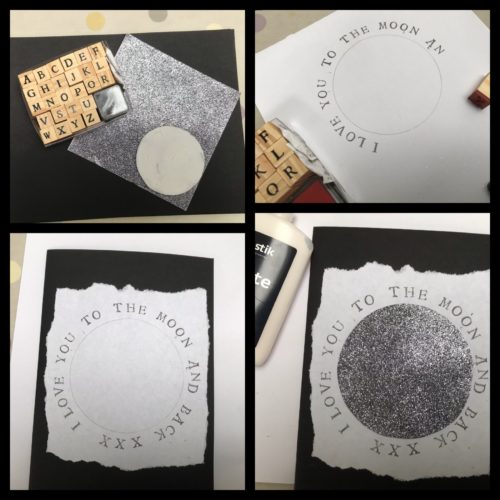
Take a piece of white paper and draw a circle a little bit wider than your moon shape. Using the letter stamps and ink, stamp your message around the circle. I stamped “I LOVE YOU TO THE MOON AND BACK XXX”

Take your glittery card and cut it to the same size as your circle and stick it on there. I then carefully tore the paper around the ink stamped letters. Fold your A4 piece of black card in half and glue the torn paper square onto the front of the card. Then take your moon circle and glue it to the middle of the glittery circle.

Carefully press it down, making sure not to squash the puffy paint. Leave it alone so that the glue can dry. Once it is dry, you can either write your message inside with a nice silver pen, or glue some white paper inside to write on.

It’s such a lovely card to give to someone. It’s really unusual and despite the number of steps, it’s actually really simple.

If you enjoyed this, you might also like to try making these cards…

How To Make a Puffy Paint I Love You To The Moon and Back Card

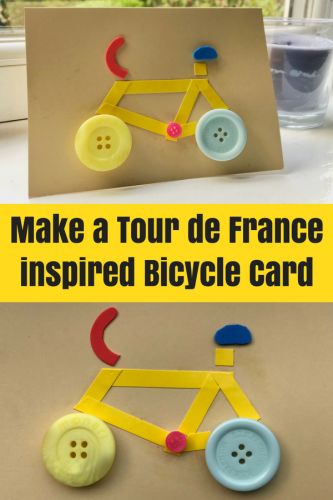
Crafts: Make a Tour de France inspired Bicycle Card

This year’s Tour de France takes place from Saturday July 7th to Sunday July 29th 2018. This is the 105th Tour de France and it is made up of 21 stages, covering a total distance of 3,351 kilometres. The Tour de France is a real spectacle, especially for fans of cycling. One of the sponsors of this year’s event is Bostik, and as a Bostik Craft Blogger I’ve been asked to put together a craft to mark the 2018 Tour de France!

I admit to being a bit out of my depth talking about the Tour de France. I know very little about cycling, other than how to ride a bike. But I do know how to stick some buttons onto some card, so I will play to my strengths and tell you how I made this Tour de France inspired bicycle card.

Crafts: Make a Tour de France inspired Bicycle Card

How to make a Tour de France inspired Bicycle Card

You will need:
A blank greetings card and envelope
Two large buttons and one small one
Some coloured card
Some small coloured foam pieces
Bostik Foam Pads
Bostik White Glu
A pair of scissors

Crafts: Make a Tour de France inspired Bicycle Card

To make your Tour de France inspired Bicycle Card:

Decide where best to stick your two large buttons on the card. These will be the wheels of your bike. I fixed mine on with four little foam pads. Take the smaller button and stick that on where the chain goes, again using a foam pad.

Carefully using some scissors, cut out some thin lengths of card for the frame of the bike. It will take a few minutes to get the measurements and angles right. Glue the coloured card onto your greetings card with the Bostick White Glu. Press the edges down and leave the card to dry a little while. You could also make the frame out of pipecleaners if you’d like.

While the coloured card is drying, carefully cut out the shape of a pair of handlebars and a cycling seat out of the coloured foam. Glue these pieces into position and leave the card to dry. Your card is now ready to write and send off to anyone who is mad about bikes.

Unless, unless when you’ve finished it and put all your craft stuff away you realise you’ve forgotten the pedals. In which case you can either deem them non-essential, or you can draw them on with a pen. Failing that you could unpack all of your craft stuff and stick on a couple of small rectangular foam pieces where the pedals should be. I’ve left them off because my bike is fine without them. Obviously.

Crafts: Make a Tour de France inspired Bicycle Card

If you enjoyed this, you might also like these tulip handprint cards.
Disclosure: We are Bostik Bloggers and we were sent a box of craft items to use to create this post.

Crafts: Making simple bunting cards

As a crafter I count myself as an enthusiastic complete amateur. I think often, especially with the crafts I make, simple is often better. I needed to make some fairly quick and simple cards to thank some people who have helped me out lately and I thought I’d make some bunting cards. 

I was sent some card making goodies from Create & Craft TV. They sell online as well as running a popular crafting TV channel – if you’ve not seen it and are interested, you can watch it on their website at http://www.createandcraft.tv/tvschedule as well as on Sky, Freeview etc.

Create & Craft TV

My bunting cards are really simple and quick to make, they’re great for kids to make too and they can create all kinds of designs depending on what kind of scrap paper triangles you use.

Create & Craft TV

You will need –
Blank cards
Scrap paper cut into bunting triangles
Foiled & Die Cut Sentiments
A black felt tip
Glue, I used Pritt Stick

To make your really easy bunting cards –
With your felt tip, draw a slightly downward curved line across your card. Cut your scrap paper into small triangles, mine were about 2cm long. Glue your triangles along the line and decorate with a sentiment, draw a little picture, add whatever embellishments you want.

I kept mine really simple as I think the bunting looks effective enough without too many other things on the card.

Create & Craft TV

As you can see from the two cards I made, the less wiggly line of the two worked better and for future bunting cards I will use a straighter curved line.

Create & Craft TV

There are a full range of craft products on the Create & Craft TV website including papercraft, sewing, baking, jewellery, knitting and much more. I know if you’re anything like me when it comes to craft products, I’m always on the lookout for interesting and versatile new things to use. 

I am particularly taken with the big book of Hunkydory Sentiments, all die cut and foiled ready for popping out and using on your cards. The book contains 620 individual sentiments in a range of styles and colours and I know I’ll be using them for lots of cards this year. 

You can never have too many blank cards to hand and the pack sent to me by Create & Craft TV were great quality and included a mixture of finishes. I was impressed with the variety of card making kit which I received and it’s got my creative juices flowing again.

I enjoyed creating my really simple bunting cards, they’re ideal if you want to make and send a homemade card but you’re short on time or confidence to do anything more elaborate. But honestly, I always think simple is better and I’m pleased with how they’ve turned out.

Note: I was send some papercraft products from Create & Craft TV to make some cards with. All images and opinions are my own.

Crafts: Making Valentine’s Day cards with toddlers

This week I volunteered to run the crafts table at playgroup. It’s not something I’ve done before because the room is full of people much more creative than I could ever be. I figured we could make Valentine’s Day cards and that wouldn’t be too difficult.

I got my husband, who has a printers and stationers in Didsbury to cut and score some blank cards for us, and I cut out several hundred red and pink hearts. Throw in some glitter pens and some PVA glue and you have the ingredients for toddler fun.

Crafts: Making Valentine's Day cards with toddlers
Setting up – hearts and glue
Crafts: Making Valentine's Day cards with toddlers
Let’s get sticking!
Crafts: Making Valentine's Day cards with toddlers
Getting busy – sticky, glittery fingers!
Crafts: Making Valentine's Day cards with toddlers
Result! Just one of the beautiful works of art.

I really enjoyed making these Valentine’s Day cards with the children. I think they enjoyed it too, it’s always good to share the love, whatever age you are.