Easter Crafts: Easy Felt Easter Egg Decorations

Last week I met my craft club friends for an evening of Easter egg painting. It was a really chilled evening and we all went home clutching an Easter tree (branches in a tall vase) and half a dozen painted Easter eggs. I think my tree looks really quite sweet, so I decided to make some Felt Easter Egg Decorations to go on it too.

The Felt Easter Egg Decorations are really simple to make and you can decorate them however you want. They’re fun to make for children and adults, my son was especially interested in using my hot glue gun, but you can use PVA and patience if you don’t have a glue gun.

Easter Crafts: Felt Easter Egg Decorations

How to make Felt Easter Egg Decorations

You will need:

Egg shaped template on card
A pencil
Felt
Ribbon
Needle and thread
Scissors
A hot glue gun or PVA glue
Decorations such as sequins, stars, gems, or whatever you have

How to make your Felt Easter Egg Decorations:

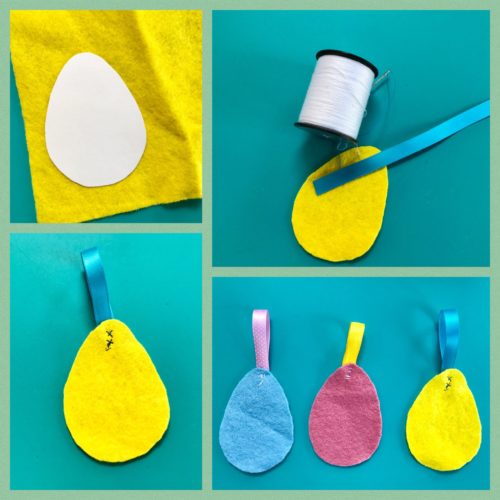
Firstly, make your egg shape template. I did this by drawing around a small glass to make a circle, then sketching the circle into an egg shape. You can easily print off an egg shape off the internet if that’s easier. Copy the shape onto card, cut it out and you’ve got a durable egg shaped template for any future egg based craft projects.
Easter Crafts: Felt Easter Egg Decorations

With a pencil, draw around the egg shape onto some coloured felt and carefully cut it out with a pair of scissors. Take about 6cm of ribbon and fold it in half length-ways. With the needle and thread, sew the ends together and stitch it to the back of your felt Easter egg. It doesn’t much matter if you can see the stitches, you can always stick a decoration or two over the top, like I have done.

Once your ribbon loop is securely stitched, you can decorate your egg. I have quite a decent selection of random things like sequins, stars, gems and other decorations. Using the hot glue gun we decided what would look good where, and glued them on. If you don’t have a hot glue gun, a dab of PVA glue should stick things perfectly well to the felt Easter egg, although you will need to leave the glue to dry for an hour or so.

Easter Crafts: Felt Easter Egg Decorations

I think our felt eggs are really sweet looking and they look lovely on our Easter tree! How would you decorate yours?

If you enjoyed this, you might also like these other crafts:

Easter Crafts: Felt Easter Egg Decorations


Easter Crafts: 3 Ideas for Eggcellent Painted Eggs

When I got an email from school reminding me that entries for the Easter Egg Painting competition needed to be handed in this week, I went into a slight panic. Although we love doing crafts together, he can be a bit easily distracted if something isn’t done and dusted in one session. We chatted about what we could do and between us we came up with three easy ideas for painted eggs.

This was very much a two-day job. We needed to paint our hard-boiled eggs a few days in advance so they could dry properly, then finish them off another day.

We had decided to make ladybird, a strawberry and a flowering cactus painted eggs. We’ve painted stones and ladybirds and strawberries before, so I knew we could probably do them easily.

I hard-boiled three eggs and left them to cool overnight. The next day the boy painted two of them red and one green; we left them to dry overnight. I’d left them in the little painting bowls we used, so I needed to turn them so they’d dry evenly.

Painted Eggs – A Strawberry

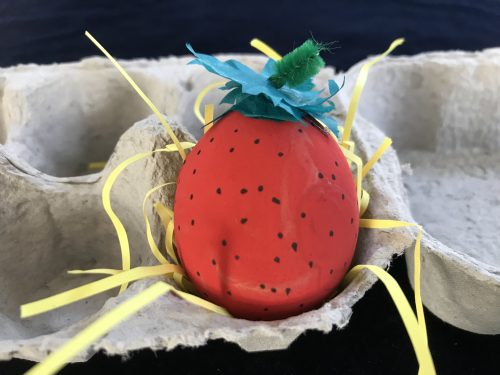
We started off with the strawberry which he had painted red. While he used a black marker pen to draw dots on for seeds, I cut out some green tissue paper for the leaves and made a pipecleaner stem which I bent at the bottom. Using a glue gun I glued the leaves and stem to the top of the strawberry and left it to dry. To present it, we nestled it in an egg try on top of some shredded yellow paper for straw.

Easter Crafts: Three Ideas for Eggcellent Painted Eggs

Painted Eggs – A Flowering Cactus

Next we moved on to our flowering cactus. This was quite simple. While I made a pink flower out of a couple of scraps of pink tissue paper, he drew X’s all over to look like cactus prickles. Once he’d finished, I used the hot glue gun to stick the tissue paper on top. Then we turned an empty cardboard kitchen roll tube into a plant pot for the cactus. We cut it down and taped up the bottom so the egg wouldn’t fall out. We then filled the pot with tissue paper and then nestled the cactus on top.

Easter Crafts: Three Ideas for Eggcellent Painted Eggs

Painted Eggs – A Ladybird

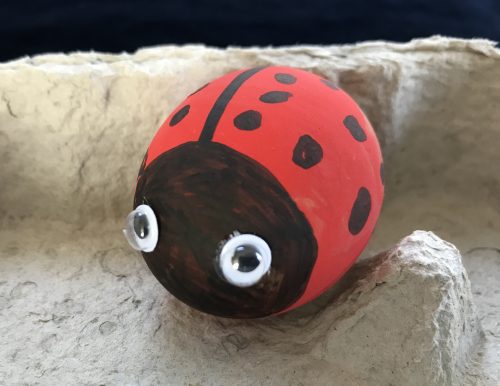
Finally we painted up the ladybird. I drew the line down its back and made a circle for its face, he coloured the face in black and added the spots. Then I used the hot glue gun to fix some googly eyes to its face and it was done.

Easter Crafts: Three Ideas for Eggcellent Painted Eggs

I think these are really simple to do and they look great too. My son and I enjoyed working on them together. I could probably have easily used PVA glue instead of the glue gun; but it was quicker and the glue dries much faster. Plus I wanted to try out my new toy (I have the burnt fingers to show for it too)!

If you enjoyed this, you might also like these other Easter Crafts:

Easter Crafts: 3 Ideas for Eggcellent Painted Eggs

Easter Crafts for Kids (and grown-ups too!)

Easter has “crafts” written all over it. There are so many Easter crafts to make, from Easter cards to Easter bonnets and beyond. Easter has the benefit of having a long Bank Holiday weekend as well as a couple of weeks off school for the holidays. That means there are an awful lot of hours to keep the kids occupied, crafting is a great way to fill an hour or two, especially if they just need a bit of quiet time, concentrating on a task and creating something lovely.

We got cracking with some Easter Crafts over the weekend. We all sat down and decorated these Egg Mosaic Baubles from Baker Ross. The pack contains everything you need to decorate four of the polystyrene eggs, including the eggs, a selection of sticky squares, ribbon and plastic pins.

Easter crafts

It’s quite fiddly to peel the backing off each individual square, so I peeled them off in rows or blocks, stuck them on the back of my hand and peeled them off as I needed them. The small boy didn’t like the idea of doing neat rows, so he stuck his on randomly, which I really like, and for some reason it made me think of Tetris the computer game.

Once the eggs were covered in the mosaic stickers I pinned the ribbons in place and hung them on a plant. I think they’re quite lovely and the certainly brighten the place up. The small boy is always so proud of his crafts and can’t wait to show them off to anyone who will look.

Later that day I was flicking through a craft magazine when I saw something I recognised. The Spring Blossom Tree kit from Baker Ross. Inspired, I got the kit out of our crafts box and made my first (and rather lovely) blossom tree.

easter crafts

The instructions are really clear and easy to understand. The tree, blossom and stand are all made from foam pieces, you stick the glittery blossom onto the plain coloured blossom and stick that onto the tree, and the stand just slots together. It’s very simple and very effective. I’m a sucker of cherry blossom, whether it’s made of foam or not.

We’ve got lots more Easter crafts and things to do over the next few weeks, so do keep an eye on our Instagram feed for new ideas and inspiration!