Crafts: Make Your Own Ladybird Flower Pot

This summer has been an absolute belter. We have loved having some actual summer for a change, but it hasn’t been that great for the garden. My lawn is brown and my plants are looking a bit sorry for themselves. We’ve been trying to keep them watered as well as we can using waste water from the bath and shower, but they could do with a really good drink. We’ve been doing a few garden crafts, such as these pretty cupcake case flowers and we’ve been painting some pots for inside the house, like this Ladybird Flower Pot.

Crafts: Make Your Own Ladybird Flower Pot

The ladybird flower pot does take a couple of craft sessions to do, mainly so paint can dry properly in between coats, but it’s worth it, it’s a very pretty pot and would make a nice gift with a little plant in it.

How to make a Ladybird Flower Pot

You will need – 
A small terracotta pot
Red paint
Black paint
A paintbrush
A pencil with a rubber on the top
Bostik White Glu
Bostik Glu Dots
A black foam circle
Googly eyes
A black pipecleaner
Sticky tape

How to make your ladybird flower pot:
Firstly, paint the outside of your plant pot all over with red paint, leave it to dry. It might need a few coats of red paint, so make sure you leave time for the coats to dry.

Crafts: Make Your Own Ladybird Flower Pot

Once the red paint is dry, take a fine paintbrush and paint a black line from the top to the bottom as neat as you can. Taking the pencil with the rubber top, dip the rubber into the black paint and carefully dab spots around the pot. Do as many or as few as you want. Leave the pot to dry, the black spots may take a little while to dry off.

Once all the paint is dry, paint the whole pot with PVA glue, this will stop the paint from running off if the pot gets wet. It won’t make it 100% waterproof, but it will be splash-proof at least.

Crafts: Make Your Own Ladybird Flower Pot

Once the glue has dried, make a pair of ladybird antennae out of your pipecleaner. Fix your googly eyes onto the circle of black foam with a glu dot, this will be your ladybird’s face. Stick the antennae to the back of the foam face with sticky tape and then stick the face onto the plant pot with some of the white glu. Leave it to dry.

Crafts: Make Your Own Ladybird Flower Pot

Once it’s all dry you can put a little plant in your pot. What a lovely, cheery little gift to give someone, or to keep for yourself.

If you enjoyed this, you might also like these bee and butterfly crafts.

Crafts: Make Your Own Ladybird Flower Pot

Disclosure: We are Tots100 Bostik Bloggers and we were sent a box of craft items to use to create this post.

Easter Crafts: 3 Ideas for Eggcellent Painted Eggs

When I got an email from school reminding me that entries for the Easter Egg Painting competition needed to be handed in this week, I went into a slight panic. Although we love doing crafts together, he can be a bit easily distracted if something isn’t done and dusted in one session. We chatted about what we could do and between us we came up with three easy ideas for painted eggs.

This was very much a two-day job. We needed to paint our hard-boiled eggs a few days in advance so they could dry properly, then finish them off another day.

We had decided to make ladybird, a strawberry and a flowering cactus painted eggs. We’ve painted stones and ladybirds and strawberries before, so I knew we could probably do them easily.

I hard-boiled three eggs and left them to cool overnight. The next day the boy painted two of them red and one green; we left them to dry overnight. I’d left them in the little painting bowls we used, so I needed to turn them so they’d dry evenly.

Painted Eggs – A Strawberry

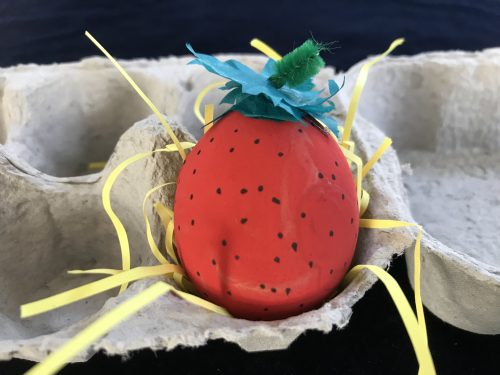
We started off with the strawberry which he had painted red. While he used a black marker pen to draw dots on for seeds, I cut out some green tissue paper for the leaves and made a pipecleaner stem which I bent at the bottom. Using a glue gun I glued the leaves and stem to the top of the strawberry and left it to dry. To present it, we nestled it in an egg try on top of some shredded yellow paper for straw.

Easter Crafts: Three Ideas for Eggcellent Painted Eggs

Painted Eggs – A Flowering Cactus

Next we moved on to our flowering cactus. This was quite simple. While I made a pink flower out of a couple of scraps of pink tissue paper, he drew X’s all over to look like cactus prickles. Once he’d finished, I used the hot glue gun to stick the tissue paper on top. Then we turned an empty cardboard kitchen roll tube into a plant pot for the cactus. We cut it down and taped up the bottom so the egg wouldn’t fall out. We then filled the pot with tissue paper and then nestled the cactus on top.

Easter Crafts: Three Ideas for Eggcellent Painted Eggs

Painted Eggs – A Ladybird

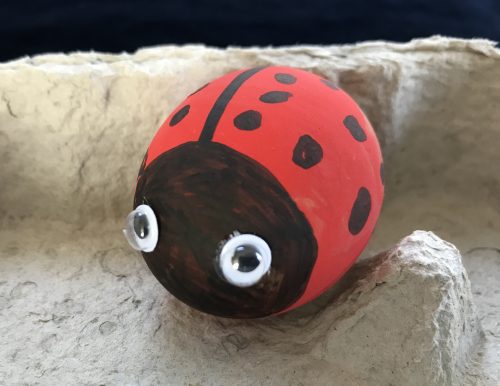
Finally we painted up the ladybird. I drew the line down its back and made a circle for its face, he coloured the face in black and added the spots. Then I used the hot glue gun to fix some googly eyes to its face and it was done.

Easter Crafts: Three Ideas for Eggcellent Painted Eggs

I think these are really simple to do and they look great too. My son and I enjoyed working on them together. I could probably have easily used PVA glue instead of the glue gun; but it was quicker and the glue dries much faster. Plus I wanted to try out my new toy (I have the burnt fingers to show for it too)!

If you enjoyed this, you might also like these other Easter Crafts:

Easter Crafts: 3 Ideas for Eggcellent Painted Eggs