8 Brilliant Ladybug Craft Ideas for Kids

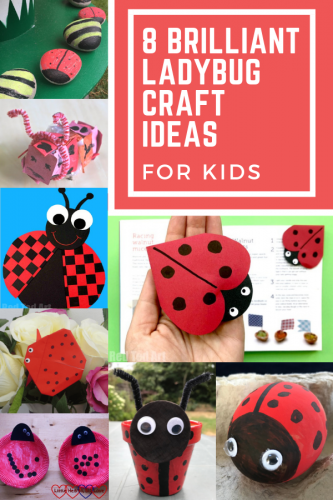
If you’ve ever been on a nature hunt with children, there’s one thing guaranteed to bring them joy; it’s finding a ladybird going about its business. Ladybirds a adorable little insects who dedicate their lives to eating up all the greenfly and aphids we try so hard to keep off our rose bushes. They’re also pretty fun to make when crafting. Here are 8 brilliant ladybug craft ideas you can do with kids.

This origami Ladybug Corner Bookmark from Red Ted Art is an adorable little craft to make with kids. Littler ones might need some help with the folding but will enjoy decorating it and using it when reading their bedtime stories. The corner bookmark is a great idea and one which could be easily adapted to create any number of bookish creatures and critters.

8 Brilliant Ladybug Craft Ideas for Kids

There’s more Ladybird origami from ET Speaks From Home, who has some very simple step by step instructions to follow and the ladybird looks great tucked into a vase of flowers.

For ladybird crafts around Easter, what about these ladybird painted eggs? I think they look very sweet and they’re really fun for kids to paint too.

The Gingerbread House came up with a great idea to paint rocks as ladybirds and bees and use them for insect naughts and crosses. Painting the rocks is really simple and using them in a game is just so clever.

8 Brilliant Ladybug Craft Ideas for Kids

Another ladybug craft from Red Ted Art is this very cute ladybug paper weaving craft. Paper weaving was always one of my favourite crafts at primary school and I love this cute little bug. She’d be a lovely cheery little critter to make on a rainy day!

Over on Little Hearts Big Love, there are some super-cute paper plate ladybirds. This simple and sweet little craft is prefect for pre-schoolers who are just dotty about these spotty insects.

If you prefer your ladybugs to have a bit of shake, rattle and roll, Play & Learn Everyday have these up-cycled ladybug shakers which just look like so much fun.

Crafts: Make Your Own Ladybird Flower Pot

Over the summer we painted an old terracotta pot to look like a ladybird. It was a really fun way to brighten up and old pot and it looked great too. Here’s how you can make your own ladybird flower pot.

Everyone loves labybugs don’t they? What’s your favourite ladybug craft?
8 Brilliant Ladybug Craft Ideas for Kids

Check out my other craft tutorials and round ups here!

Crafts: Make Your Own Ladybird Flower Pot

This summer has been an absolute belter. We have loved having some actual summer for a change, but it hasn’t been that great for the garden. My lawn is brown and my plants are looking a bit sorry for themselves. We’ve been trying to keep them watered as well as we can using waste water from the bath and shower, but they could do with a really good drink. We’ve been doing a few garden crafts, such as these pretty cupcake case flowers and we’ve been painting some pots for inside the house, like this Ladybird Flower Pot.

Crafts: Make Your Own Ladybird Flower Pot

The ladybird flower pot does take a couple of craft sessions to do, mainly so paint can dry properly in between coats, but it’s worth it, it’s a very pretty pot and would make a nice gift with a little plant in it.

How to make a Ladybird Flower Pot

You will need – 
A small terracotta pot
Red paint
Black paint
A paintbrush
A pencil with a rubber on the top
Bostik White Glu
Bostik Glu Dots
A black foam circle
Googly eyes
A black pipecleaner
Sticky tape

How to make your ladybird flower pot:
Firstly, paint the outside of your plant pot all over with red paint, leave it to dry. It might need a few coats of red paint, so make sure you leave time for the coats to dry.

Crafts: Make Your Own Ladybird Flower Pot

Once the red paint is dry, take a fine paintbrush and paint a black line from the top to the bottom as neat as you can. Taking the pencil with the rubber top, dip the rubber into the black paint and carefully dab spots around the pot. Do as many or as few as you want. Leave the pot to dry, the black spots may take a little while to dry off.

Once all the paint is dry, paint the whole pot with PVA glue, this will stop the paint from running off if the pot gets wet. It won’t make it 100% waterproof, but it will be splash-proof at least.

Crafts: Make Your Own Ladybird Flower Pot

Once the glue has dried, make a pair of ladybird antennae out of your pipecleaner. Fix your googly eyes onto the circle of black foam with a glu dot, this will be your ladybird’s face. Stick the antennae to the back of the foam face with sticky tape and then stick the face onto the plant pot with some of the white glu. Leave it to dry.

Crafts: Make Your Own Ladybird Flower Pot

Once it’s all dry you can put a little plant in your pot. What a lovely, cheery little gift to give someone, or to keep for yourself.

If you enjoyed this, you might also like these bee and butterfly crafts.

Crafts: Make Your Own Ladybird Flower Pot

Disclosure: We are Tots100 Bostik Bloggers and we were sent a box of craft items to use to create this post.