Christmas Gifts: Make your own Rosemary Herb Oil

I love fresh herbs, I chop them and throw them into almost everything. I have a few herb plants in my garden which I am forever bothering with a pair of scissors. Rosemary, thyme and bay are standards in my kitchen. During the summer months we can’t grow enough parsley, coriander and basil to meet our needs. We are herb addicts and herb oil is a big part of that.

One of the things I like to do is make my own herb oils. They’re lovely to cook with and drizzle over things and they’re ridiculously easy to make too. Now is exactly the right time of year to be making a few bottles of herb oils to give to foodie friends and family for Christmas and they look really pretty too.

Make your own Rosemary Herb Oil

Because I’ve been busy making rosemary oil, below you’ll find the recipe for that below. But you can use the exact same technique with any woody herb. You can even do it with chillis, which you prick with a pin all over and push into the bottle to steep in the oil.

How to make Rosemary Herb Oil

You will need:

A decorative glass bottle
Some springs of rosemary (or other woody herb)
Olive oil (enough to fill the bottle

Make your own Rosemary Herb Oil

How to make herb oil:

In a small saucepan, pour in the amount of oil you need and warm gently. You don’t want the oil to be hot or bubbling, just warm enough to encourage the oils out of the herbs.

Take your sprigs of rosemary (or whatever woody herb you’re using) and using a rolling pin, roll over the sprigs a couple of times. This will crush the leaves slightly to encourage the herb oils to permeate the oil. Poke your sprigs into your clean and sterilised glass bottle.

If you’re not sure how to sterlise your bottle, I usually put it in the dishwasher on the hottest setting, then put it in a low oven for half an hour. Carefully remove the bottle and leave it to cool a little, so you can handle it, but no so it’s cold.

With the slightly crushed sprigs in the glass bottle, carefully (very carefully) pour the warmed oil into the bottle and seal it shut. Put to somewhere to cool and leave it for a couple of weeks before using the rosemary oil.

Uses for rosemary oil

  • For roasting chicken or lamb
  • For roasting vegetables
  • Adding extra flavour to soups and stews
  • For dipping bread into

You can happily recreate this using thyme or marjoram, or with pricked chillis as I suggested earlier. They really do make a pretty gift for a foodie, especially if you write a pretty label for the bottle.

If you enjoyed this, you might like to try making your own parma violet gin.

Make your own Rosemary Herb Oil

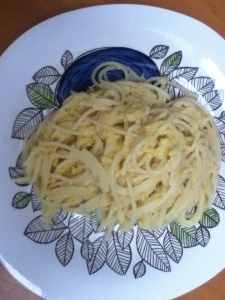
Spaghetti with Yellow Courgette Sauce

This is an old family favourite and perfect for batch making and freezing when you’ve grown a glut of courgettes (of any colour) or they are extra cheap in the shops. We grow our own so this is a summer staple for us and a cheeky way of getting veg into a toddler without him realising.

I admit it’s not pretty but it tastes delicious and you can make is as healthy or naughty as you want.

Here’s what I do…

Grate (in the food processor, life’s too short) 2-3 courgettes per person and then ping in the microwave or just cook on the hob until soft. Season generously with salt, pepper and dried chilli flakes then whizz up in the blender until smooth.

Return to the hob and reheat. Stick some spaghetti on to cook and grate some cheese (this is the healthy/naughty part) and add it to the sauce, stir until melted through. Use your judgement and taste as you go, you can always add more, but I added a dollop of soft cheese with garlic and herbs, cheddar and Parmesan. Melt through and taste for seasoning and cheesiness. Once the spaghetti is cooked drain and stir the sauce through and serve.

image

Yes it really is as easy as that. When dealing with a glut we freeze before we add the cheese as it seems to freeze better. It really is delicious, though admittedly it’s slightly prettier with green courgettes.

If you try it let me know what you think.

Frugal Finds: Ravishing Roasted Tomatoes

Like most people these days we live on a budget. We try to eat like kings on a
paupers pay packet, so when I spotted some really good looking vine tomatoes on the Aldi Super Six offer I couldn’t resist. All at the pocket-friendly price of 69p, I greedily bought 6 packets. 

My plan was to roast them to go with a meal of quiche and salad. Now that is a lot of roasted tomatoes for one meal for three people, but being the frugalista I am, I had grand plans for the leftovers.

This is a great way to take care of a glut of tomatoes if you grow your own, or to take advantage if you stumble across a bargain in the green grocers or Aldi.

Frugal Finds: Ravishing Roasted Tomatoes

Roasted Tomatoes
Halve and remove the core from your tomatoes, lay them cut side up in a roasting tin, season with salt and pepper, I sprinkled over fresh thyme and oregano, but dried herbs would be fine. Nestle in some cloves of garlic, still in their skins, drizzle over some olive oil and roast in a hot oven for about 40 minutes or until they’ve semi-collapsed and oozing with their juices.

At this point they’re done. I love them on hot buttered toast fresh from the oven but I had other plans for my hot tray of loveliness.

As I’d roasted so many – two trays worth, I tipped the tomatoes and their juices, skin and all in the food processor, I squeezed the garlic from it’s skin and blitzed the lot. After checking the seasoning I decanted the roasted tomato sauce into storage containers. I’ve now got a litre of gorgeous roasted tomato sauce sat in the fridge waiting for another day.

So for my minimal effort I’ve got the following meals from my roasted tomatoes:

  • Sneaky, cheeky lunch of roast tomatoes on toast
  • Side dish to go with our evening meal of quiche and salad
  • Spaghetti and meatballs in roasted tomato sauce
  • Homemade pizza using the sauce as a tomato base
  • Tomato and mozzarella risotto
  • Plus a batch of sauce for the freezer for a rainy day

That’s not bad for £4.14 worth of tomatoes, a few herbs, some garlic and not a lot of effort. It really is worth trying, in our house tomatoes form the basis of a lot of meals and the deep, more intense flavour of the roasted tomatoes is something else.

What would you use the sauce for?

Easy Recipe: Knock-Out Gnocchi for veggies

I’m at times a lazy cook but I draw the line at stabbing at the plastic film of a ready meal. After a busy day, my boys just want a decent meal in their belly and I want to cook it quick so I can open the wine. Gnocchi is really quick to make a meal with and always satisfies.


Easy Recipe: Knock-Out Gnocchi for veggies

So tonight I cooked a very adaptable, use what’s hanging around in the fridge, gnocchi dish. I urge you to try it as it’s simple, satisfying and delicious but don’t feel tied to the ingredients, mix it up and feel free to stick whatever you fancy in.

My Knock-Out Gnocchi…

Slice a large onion, red or white your choice and gently sizzle in a drizzle of olive oil. Chop a large red pepper, add to the onions and gently fry until they’re both soft but not coloured. Crush a clove of garlic and add to the pan with some salt and pepper. Throw in a handful of halved cherry tomatoes and some fresh thyme. I added some dried oregano too (because I love it, but add whatever herbs you want, dried or fresh, whatever you like). Cook with the lid on until the tomatoes have relaxed then remove from the pan and set aside.

Fling a very generous glug of olive oil into the pan, get the oil hot and throw in a bag of fresh gnocchi (if you’re using the off the shelf stuff rather than from the fridge section, then I’d give that a quick boil in some water). The aim is to get the gnocchi to develop a bit of a roast potato style crust so keep the pan hot, hot, hot and stir often. Season with salt and pepper and be patient, it will take a little while (but not forever I promise, remember I’m lazy and greedy).

Once your gnocchi has developed a sexy crust, tip your onion and pepper mix back into the pan and mix together. Add about half a jar of pesto and stir. Warm everything through for a minute and plate up. Serve with crusty bread and some salad. A large glass of red wouldn’t go amiss either.

This time I cooked it we had some leftover peas in the fridge, so they went in and we had some rocket growing it’s socks off in the garden, so some of that was stirred through until wilted with a few leftover leaves popped on top for garnish. Don’t be afraid to freestyle with this recipe. It’s very forgiving but the crusty gnocchi are a must!

Clean plates all round and compliments to the chef. Aces.

Vegetarian Recipe: Skinny Homity Pie

I had a falling out with my kitchen around Christmas time. The turkey gave me the evil eye, the sprouts turned on me and quite frankly the stuffing can get stuffed. So ever since then my usual culinary enthusiasm has been somewhat lacking. Perhaps it was the change of season or the pile of leftover new potatoes glaring at me from the fridge, but inspiration struck and I decided to do my take on the Cranks classic – Homity Pie.

Skinny Homity Pie

I’m not a massive fan of thick pastry, unless it’s covered in jam and cream with a big cherry on the top. So for a while I’d been musing about a homity pie made with filo. So I looked up the Cranks recipe, carefully read it, closed the book and put it back on the shelf. I was going to experiment and see if I could make it a bit healthier but just as tasty.

Skinny Homity Pie

Ingredients:
1 onion, finely diced
Olive oil
1 clove of garlic, crushed
1 tablespoon of fresh thyme (or dried if you don’t have fresh)
Enough sliced cooked potatoes to half fill your pie dish
2 eggs
2 teaspoons of mustard
3 or 4 pieces of shop bought filo pastry
50g grated Cheddar cheese
Salt and pepper

Method:

Sweat one onion in a dab of olive oil, when soft add a crushed clove of garlic and as much fresh thyme as you fancy (I used a lot, thyme and onions are the best of friends and I have a huge thyme plant in the garden).

Slice up a pile of cooked potatoes; I used new potatoes because that’s what I had.

Whisk up 2 eggs, some salt and pepper and a goodly dollop of your favourite mustard.

Grab your favourite quiche or pie dish, give it a light coating of oil, lay a piece of filo in the dish, oil that piece of filo and artfully drape another on top, repeat the process until you’ve got 3 or 4 pieces of filo piled up, greased and ready to go.

Mix your sliced spuds and the unctuous onion mix together, spread a layer in the bottom of your dish, sprinkle a handful of cheese over and drizzle your mustardy egg over, layer the remaining spuds, pour over your leftover egg and top with another handful of grated cheese.

I baked it in the oven for 25 minutes at 220 degrees or until it looks golden and gorgeous.

I served it with a huge green salad and some oven roasted tomatoes. It was a huge hit with the boys, impressive as the toddler is (oh joy) going though a picky phase. This Homity Pie is monumentally easy to do, half quiche, half homity pie and it’s a real family favourite!

For more simple and tasty family recipes, click here.Vegetarian Recipe: Skinny Homity Pie