Five Natural Christmas Decorations for your home

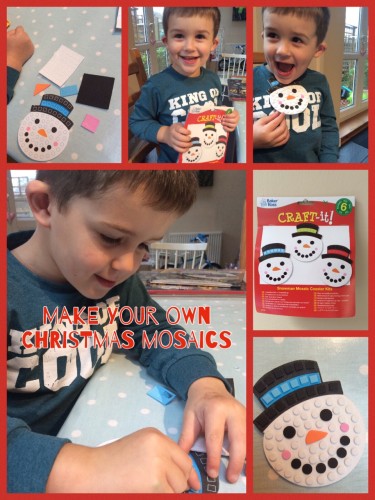
Christmas naturally lends itself to crafts. This year I’ve felt like shunning some of the glitter and plastic and decorating the house with more natural Christmas decorations. Not only to they look pretty good, they help make the house smell a bit more festive. Here’s a rundown of five natural Christmas decorations we’ve made this Christmas.

Five Natural Christmas Decorations for your home

A Pomander

Pomanders have been used from the medieval period as a way of perfuming the air. They are oranges, studded with cloves and tossed in aromatic spices, when dried they give off a deliciously festive smell. They are easy to make and if you’re looking for something especially mindful to make, then I can hand on heart say that making a pomander is pretty perfect for that.

Five Natural Christmas Decorations to make at home

They’re very easy to do and a popular thing to make with children. They’re best made ahead of time to give them time to dry out. I used this Pomander kit from Steenburgs which costs £3.50 and there are enough cloves and spices for two pomanders. It’s excellent value and works out cheaper than buying everything you need at a supermarket (I did a few sums on the back of an envelope).

To make them you tie a long length of ribbon around the orange like you would tie up a parcel. Using a skewer or another sharp pointy object, pierce little holes into the orange peel and push the cloves into the holes. The closer the cloves are the better. Once your pomander is covered in cloves, toss it in a mixture of cinnamon and orris root powder and leave it is a warm place for around a month to dry out.

Five Natural Christmas Decorations to make at home

They’re lovely to make and my craft group are getting together next week to drink wine and make Christmas pomanders.

A Dried Orange Garland

Dried citrus slices are a common sight at Christmas time. Whether they’re hanging from a tree, adorning a wreath or part of a garland, they give a natural splash of colour. It’s really easy to dry out orange slices (or other citrus fruit slices).

Five Natural Christmas Decorations to make at home

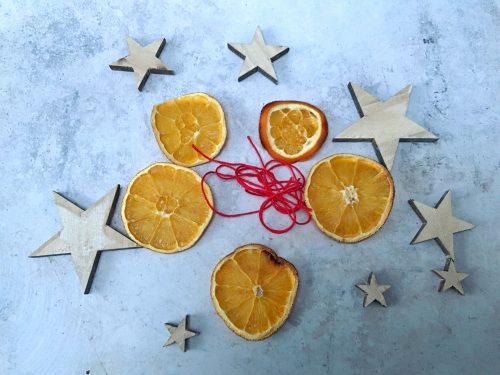
To make your dried orange slices, all you need to do is slice them as thinly as you can, lay them out on a cake cooling rack and pop them in an oven at 120°. Turn them over every 20 minutes or so and bake until they’ve pretty much dried out. This will take 2-3 hours. They will continue to dry out for a few days after you’ve taken them out of the oven, so don’t worry if they’re not completely dry.

You will need:
Dried oranges, sliced thinly
Red embroidery thread
A needle
Star Anise
A glue gun

For this craft I took some red embroidery thread and a large needle. I made a hanging loop at one end and then threaded the needle through one side of the dried pith, round the back and out of the front of the other side of the pith. I continued this with each slice so the thread was behind each orange slice. Once I’d threaded them all on the red thread, I made a hanging loop at the other end.

Five Natural Christmas Decorations to make at home

Using my glue gun I glued some star anise onto alternate orange slices and hung the garland where lights could shine through them. Once the tree is up they’ll be hung on the tree in front of fairy lights. You can make your garland as long or as short as you wish, mine was five slices long.

A Dried Orange Decoration

These are lovely, and if you’re drying citrus slices for the garland, then it’s worth saving a few to make these pretty little things to hang on your tree.

Five Natural Christmas Decorations to make at home

You will need: 
Dried orange slices
Ribbon
Star Anise
Glue gun

Take your dried orange slice and carefully make a small slit in the pith with a knife. Thread a piece of ribbon through, make a loop and tie a knot in it.

Using the glue gun, glue a piece of star anise to the centre of the orange slice, leave it to dry for a minute and then it’s ready to be hung up in front of a twinkly tree light and admired.

Tied Cinnamon Sticks

These are a Christmas classic. Three cinnamon sticks tied together with a nice ribbon and hung on the tree. For each one, take three cinnamon sticks and a piece of ribbon, tie the ribbon tightly around the sticks and knot the ribbon, then tie a nice bow. I then took some invisible thread, threaded it through the ribbon and tied the thread so it could be hung from a tree. Simple but effective.

Five Natural Christmas Decorations to make at home

Cinnamon Stick Tealight Holder

If you love a glue gun, then this craft is for you. Using a nice clean jar which you know is big enough to generously hold a tealight, glue cinnamon sticks around the jar using your glue gun. Leave the glue to dry for a few minutes before using. You may want to finish it off nicely with a festive ribbon tied around it, it’s up to you. It’s simple, looks great and could be the start of a lovely natural centrepiece for the Christmas table.

Five Natural Christmas Decorations for your home

There are three lovely ideas for five natural Christmas decorations you could make. With some cinnamon sticks, star anise, cloves and a selection of citrus fruits, you could adorn your home with beautiful and natural Christmas decorations this year. What will you make?

If you enjoyed this, you might also like to try –

Five Natural Christmas Decorations to make at home

Crafts: Make Your Own Christmas STEM Toys

Christmas is a time for crafting and creating with the kids. We love doing Christmas crafts and we were excited when we heard that ex Blue Peter presenter and craft queen Konnie Huq, had partnered with the Institution of Engineering and Technology (IET) to create a selection of homemade STEM toys for Christmas.

Crafts: Make Your Own Christmas STEM Toys

Konnie Huq has put her Blue Peter powers to practice for a good cause, making Britain’s most popular Christmas toys at home for a fraction of the cost. The Christmas STEM toys she has created include –

  • Dissolving egg
  • Magnetic slime
  • Icosahedron bauble
  • Marble run
  • Balloon boat
  • Bouncy balls
  • Smartphone projector
  • Living gingerbread house
  • Kaleidoscope

Konnie has put together a set of free to download how-to instructions for all of the above crafts.

Konnie, who spent over ten years craft-making on Blue Peter, is supporting a campaign by the Institution of Engineering and Technology to inspire more children to consider careers in engineering. The toys are designed to make learning about science, tech, engineering and mathematics (STEM) more accessible and affordable. These handmade STEM toys – which include a dissolving egg, magnetic slime, a kaleidoscope and even a smartphone projector – are educational, as well as fun.

Making your own slime is so popular right now, but we thought we would try something a little different. We really liked the idea of building our own living gingerbread house.

Crafts: Make Your Own Christmas STEM Toys

Make your own living gingerbread house

You will need:
A number of plain sponges
Scissors
Toothpicks
Small plate
Seeds
Spray bottle (clean)

How to make a living gingerbread house
Choose one or two sponges to be your base. Fix them together with a cocktail stick, remember these are sharp so be careful of your fingers.

Choose more sponges to be the walls. Cut one sponge in half across the longest
side (i.e. make two regular rectangles, not two long strips) and fix those onto the shorter sides of your base with cocktail sticks. Fix two sponges onto the longer sides of the base.

Crafts: Make Your Own Christmas STEM Toys

Take two sponges and cut them down their long side on an angle so that they fit together to form the apex of a roof. Fix them together with cocktail sticks, put on the top of your structure and fix into place with more cocktail sticks. You should now have a house shape made of sponges. Put your house onto a plate.

If your house is a bit wobbly, you can secure it using a glue gun or some craft glue. If you have used glue, allow time for the glue to dry and set before you move on to the next stage.

Next, you need to cover the house with seeds. You can use mustard or cress but
there are many fast sprouting seeds, so the choice is yours. We chose cress.

Crafts: Make Your Own Christmas STEM Toys

Dab some water onto the roof of your house and spread the seeds onto the roof.
Pour a little water onto the plate so the sponge base can soak it up. Check the
sponge is nice and moist. Then sprinkle the seeds onto the base.

Leave your house in a warm, bright spot for the seeds to germinate. Spray the house with water using a spray bottle each day, and pour a little water over the house if it feels dry. In a few days the seeds should start to sprout, in a week they should be thriving.

Crafts: Make Your Own Christmas STEM Toys

It’s so easy and lots of fun to make too!

 Disclosure: We were sent a shopping voucher to buy the materials for this craft.

Christmas: Make your own Candy Cane Hearts

I love a bit of Christmas crafting and I’ve found a really simple, festive and delicious craft which will delight the whole family this Christmas. I’ve been making candy cane hearts to hang on my tree.

Christmas: Make your own Candy Cane Hearts

Candy canes have long been a symbol of Christmas. They were originally white sugar candy sticks made in Germany around 250 years ago. No one really knows how they ended up with a stripe and in the distinctive J shape, but some say they were shaped to look like a shepherd’s crook, to remind us of the shepherds that visited the baby Jesus on the first Christmas. Whatever the real story, all I know if they’re delicious and we always have a candy canes hanging from our Christmas tree.

You can get candy canes in all sizes, but I picked up a box of Swizzels Mini Candy Canes from B&M Stores for £1.99 and I knew exactly what I was going to make with them.

Make your own Candy Cane Hearts

You will need – 
Candy canes
A baking sheet
Baking paper
Ribbon

Method –
Place your baking paper on your baking sheet and arrange the candy canes into heart shapes. The mini candy canes are the right size for this, but if you’re using larger ones you can trim them down if you need to.

Christmas: Make your own Candy Cane Hearts

Making sure the two candy canes in each heart are touching; put them into a warm oven and watch very carefully. It should take about 5 minutes for the candy canes to warm up and start melting a little at the ends. At this point remove them from the oven and carefully push the ends and the joins together on the heart. Remember this is hot sugar and you don’t want to burn yourself.

Once the joins have been pushed together, leave them to cool for 15 minutes. Once they are cool, tie ribbon around them and hang them on your tree.

They’re so simple to make and they do look super-cute on the tree. I think I’m going to make a batch for the table on Christmas Day too.

How would you use your candy cane hearts?

Christmas: Make your own Candy Cane Hearts

Check out my other craft tutorials here!

Are we stuck in a rut with our Christmas Decorations?

I love decking the halls at Christmastime. One of my favourite things is spending the day unpacking boxes of Christmas decorations and with mulled wine warming and carols playing, decorating the house with my family.

We always get our tree from the local community farm. It’s always is slightly too big and sits in the corner of our living room. We decorate it with white lights, then it gets covered in red and gold baubles and other decorations. There’s no tinsel, but we use gold lametta to give the tree some extra twinkle and shine. We’ve got a wonky gold star which sits on the top of our tree. My son always gets lifted up to put the star, and the final flourish to our tree.

Christmas magic Christmas Decorations

There’s always a wreath on the door. Usually bought from the community farm, but failing that I’ve got a couple of spare wreaths I can use if I can’t find a good quality fresh one.

Although we don’t put the tree up until the weekend before Christmas, we do have some lovely lights which go up at the start of December. They’re very pretty coloured lights which hang in our window and we get lots of lovely comments on them every year.

We have a large kitchen diner which we don’t tend to decorate, other than with some lights. I’m very tempted to try to find a small thin tree to stand in the corner. It’s the room we spend most of Christmas Day in, so it would be nice it if was a bit more festive.

I feel like we’ve had this style of Christmas decorations for a long time. I wonder if this will be the year I finally decide that next year we do something different. Our style is very traditional, is it time to ring the changes?

I’ve no idea what kind of theme I might go for in the future. We’ve had 20 or more years of having a traditional Christmas style in our home. Whatever style we choose in the future would still need to feel warm and festive.

Are we stuck in a Christmas Decorations rut?

For all kinds of Christmas inspo, the Ultimate Christmas DIY Decorating Bible is a pretty good place to start. There are decorating tips as well as loads of brilliant Christmas craft ideas. Maybe a handmade Christmas is the way to go next year?

What’s your Christmas style? Is it time for me to make the change?

This is a collaborative post.

Christmas Decoration Trends 2016

Over the weekend I was invited to a Christmas preview event at Bents Garden Centre in Glazebury near Warrington. Bents is famous for their Christmas displays, decorations and products, so I went along to see what would be hot this coming festive season. So what are the Christmas Decoration Trends for 2016?

Christmas Decoration Trends 2016

Steampunk

Steampunk style decorations, particularly clocks are everywhere this year. From replacing the star on the top of the tree, being feature decorations, to festively attired wall hangings, the steampunk influence is everywhere. Using less gaudy metallic tones that you’d traditionally see on a Christmas tree, the muted tones of steampunk bring a more masculine, contemporary feel to your Christmas tree.

Christmas decoration trends

Woodland themes

The woodland theme will be everywhere this Christmas, appealing to both adults and children you’ll find foxes, owls, deer and other woodland creatures nestling in the branches of Christmas trees. Not to mention stand alone centrepieces featuring large owls and majestic stags. Embrace the woodland theme fully, or hint at it with a statement piece or two.

Christmas decoration trends

1950’s Nostalgia 

Christmas Decoration Trends 2016

Think white picket fences, big wreaths on brightly painted doors, and little 50’s style retro touches. We all have heirloom Christmas decorations we like to get out at Christmas or hang on the tree, I have some lovely original 1950’s decorations I carefully get out and display each year. This Christmas decoration trend is surely a recreation of that. Nostalgia for the Christmas trees belonging to our parents and grandparents.

Christmas Decoration Trends 2016

Muted Tones

In stark contrast to the traditional reds and golds of years gone by, this year soft pinks, eucalyptus, champagne and dusky golds are taking centre stage, and very restful they are too.  

Christmas decoration trends

Frosty, ephemeral tones are in and all over the place. They’re soft and feminine and the perfect antidote to the brash and brassy Christmas decorations you might have tired of. These soft, subtle tones ooze sophistication. 

Christmas decoration trends

Christmas is a time for expressing your own personal style. For pushing the boat out and making a statement about you and your home. I was enchanted by the woodland themes and the soft pinks, eucalyptus, champagne and dusky golds were beautifully restful. But I’m a traditional girl and I was very, very taken by the 1950’s nostalgia.

christmas decoration trends

Whatever your personal taste; traditional or contemporary, Bents Garden Centre is well worth a visit in the run up to Christmas. Their Christmas shop opens to the public on 12th October 2016, you never know, you might even spot Father Christmas whilst you’re there!

Bents Garden & Home, Warrington Road, Glazebury, Nr Warrington, Cheshire, WA3 5NT    

Christmas decoration trends

Christmas Crafts: Make a Baker Ross Reindeer Crown

We were sent this reindeer crown from Baker Ross for review purposes. All images and opinions are our own.

Now the weather has taken a decidedly wintery turn I’m starting to get into the Christmas spirit. This weekend was an especially cold one, the small boy had a nasty cold and we decided to stay in, cosy in front of the fire and have a lazy weekend. Keen to get cracking with some Christmas crafts we busied ourselves by making a reindeer crown using hand prints and we were pleased with the results.

reindeer crown

The reindeer crown kits are available from Baker Ross and come in packs of 4 or 16. The packs contain everything you need to make the crown, except for glue, though we used double sided sticky tape because it’s quicker and there’s less mess than with glue.

The instructions are really easy to follow. Draw around your hands and cut out your hand print shape. I did the cutting because the small boy is terrifying with scissors or anything with a blade. The instructions suggest you use glue to stick the cut our hand shapes onto the headband; but I used double sided sticky tape for this. The other pieces, the ears, the reindeer hair and the holly and berries are self-adhesive, so the small boy peeled the backing paper off these and stuck them onto the headband.

Once he had finished he very proudly wore it around the house for a few hours. I think these make a nice alternative to the paper cracker crowns we are forced to wear for Christmas dinner; so I might make myself one to wear on Christmas Day.

reindeer crown

There was some parental supervision required with the cutting out of the hand shapes; but other than that he did the rest himself. It was something he enjoyed doing, he likes peeling and sticking things. It was pretty simple, but it kept him interested and entertained for a while. Another good and fun Christmas activity from Baker Ross!

Christmas Crafts – Making Snowman Mosaics

It may still only be November but I’m already starting to feel a bit Christmassy, I think it’s probably down to all the planning ahead of time so I’m less stressed later. They must be talking about it at school too as the small boy is all excited and ready to get stuck into the festivities. We’ve been busy baking Christmas cakes and starting to think about presents and decorations. One wet afternoon we sat and made some snowman mosaic coasters which I’ve decided would also look great as Christmas decorations.

The snowman mosaic coaster kit from Baker Ross contains everything you’ll need – a pre-cut snowman with a selection of foam stickers to stick on and decorate your snowman. If like me you want to turn the finished snowman into a Christmas tree decoration you’ll need a bit of ribbon and some sticky tape too.

Snowman Mosaics

Popping the foam stickers out of their sheet and peeling the backing off them is quite fiddly for little fingers, so it’s good practice for the small boy who has recently turned five. He did very well and managed to do most of them himself, only asking me to help him with the white circles, probably because there were lots and lots of them. This is a great task to help with hand-eye co-ordination and to improve dexterity and finger strength, which can really help with learning to write.

It’s a really simple kit and the snowman mosaics look really effective, too good to just be used as coasters, which is why I’m going to attach some ribbon so we can hang them on the tree once that’s up.

The snowman mosaics kits are from Baker Ross and come in packs of 6 or 18. It’s a nice tidy activity to do, it doesn’t require any setting up or any mess, just have a bowl ready to put the bits of backing paper in and you’re sorted. In fact I’ve put one in my bag for when we go out, it’s something we can do together while we’re having lunch that doesn’t involve an ipad. 

The thing I liked most about making the snowman mosaics was the chance to chat. We were both industriously beavering away on our snowmen, chatting away about school, Christmas and his recent birthday, and occasionally bursting into happy song. It was a fun half hour on an otherwise grim November day.

Decking the halls with The Christmas Boutique

One of my favourite Christmas traditions is putting some carols on, mulling some wine and decorating the house for Christmas with my family. It’s one of my favourite Sunday afternoons in December and really gets us all in the mood for Christmas. This year, thanks to Christmas Boutique we can add to our collection of treasures to trim the tree with.

Like most families we have favourite things to put on the tree; we favour a traditional theme, reds, greens and golds, with white lights strung around the house. I love Nordic style decorations and have picked up a few, small but very treasured pieces on our pre-baby travels. I was thrilled a couple of years ago when they suddenly became fashionable and I could find the things I loved virtually everywhere. So sticking to that theme I chose some new treasures.

Christmas Boutique

The small boy is obsessed with penguins (who isn’t this year), so I chose a pair of cute felt penguins (£9.99) for the mantlepiece, you can hang them from tree, but we’ll put them  with other penguins and polar bears in our collection. The cute hanging Mr and Mrs Gingerbread (£4.99) fit right in with our scheme and I’m a little bit in love with the two fluffy moose in bobble hats (£8.99), which I’ll hang on the tree.

Christmas Boutique

I loved the look of these Christmas Sacks (£8.99 each) you can choose between a Father Christmas face or the Christmas Tree (above), they are nicely made with good stitching and they seem strong and durable. We’ll lend this to Father Christmas to fill with presents and leave under our tree.

My favourite thing was the Nativity set (£34.99). This set contains the baby Jesus, three Kings, Mary, Joseph, a stable & two animals. It’s made out of resin and the figures are nicely detailed and solid enough not to break easily if they’re picked up by little toddler hands. It arrived well packaged too, so after Christmas you just put the pieces back in their protective box which will keep them safe for next year.

The Christmas Boutique website has lots of interesting Christmas accessories and decorations to suit different tastes, the decorations I received were well made and of good quality and I would recommend checking them out, especially if you’re looking for something a little bit different, a little bit modern and a little bit stylish.

Note: The Christmas Boutique sent me a selection of products for review purposes. All images and opinions are my own.