Crafts: How to make a Christmas Button Wreath

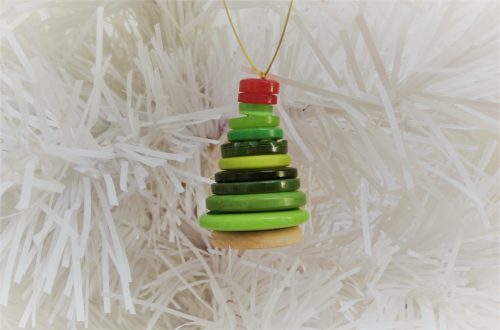
If you’re looking for a simple but quite beautiful Christmas craft, then this is probably it. These lovely Christmas button wreath decorations are really simple to make and look great hanging on a tree. Not to mention, if you’re making them with the kids, then it’s excellent for their fine motor skills!

A few years ago I made a selection of button Christmas decorations, and each year when I hang them on the tree, I continue to be impressed by them. They’re so simple to make, but look really quite cool.

Crafts: How to make a Christmas Button Wreath

I have billions of buttons, so one quiet afternoon, I decided to try my hand at a simple Christmas button wreath decoration. I thought it would look pretty good on the tree and I was not wrong. They really are simple to make and you can make it as colourful or traditional as you want. Here’s how I made mine.

How to make a Christmas button wreath

You will need:
70-100 buttons in whatever colours you want
A length of craft or jewellery wire
Wire cutters (optional)
Ribbon for a bow and for hanging

Making your Christmas button wreath –

Start off by cutting a length of wire approximately 25cm long. Put a little bend in one end to stop the buttons slipping off.

buttons

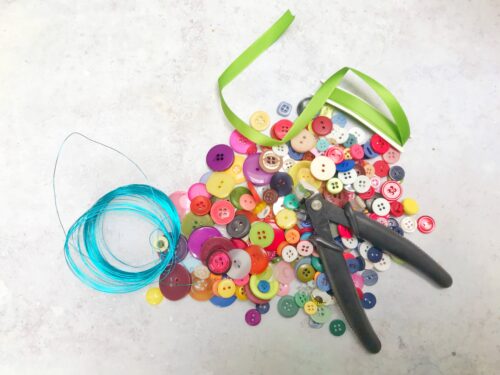
Next you can start threading the buttons onto the wire. I did this in red-green-white order, but you can use whatever colours in whatever order you want. My Christmas colour palette is very traditional, but yours can be as colourful as you like.

Once you’re threaded your buttons onto the wire and you’re happy with how they look (I tried to put the smaller buttons at each end and the larger ones in the middle), it’s time to tie it off.

Crafts: How to make a Christmas Button Wreath

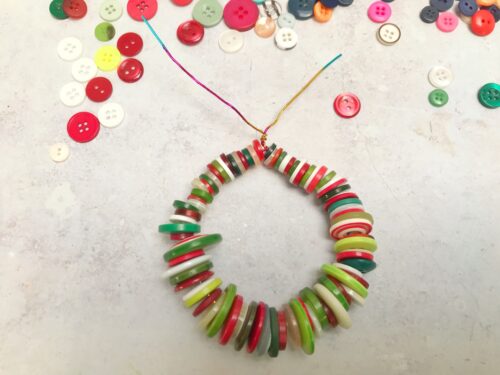
Take both ends of the wire and twist them together so the buttons can no longer slip off. Twist them together tightly, you may need to snip off the excess wire with your wire cutters. If you can, tuck the ends under and between the buttons so they are out of the way.

Gently pull the wire and buttons into a circle shape to make the wreath, this shouldn’t take very much effort at all.

Crafts: How to make a Christmas Button Wreath

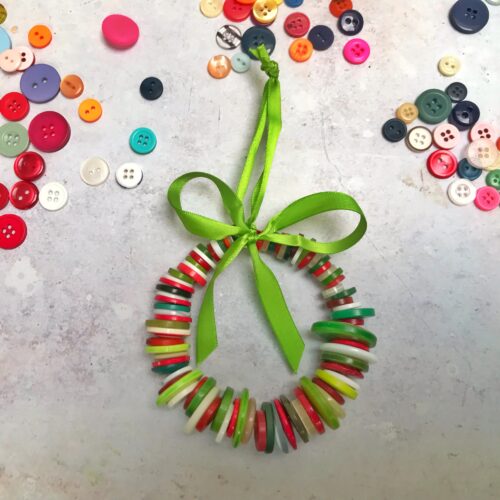
Next take a length of ribbon and tie it around the top of the wreath, tucking in the ends of the twisted wire. Tie the ends of the ribbon with a firm knot to make a hanging loop. Take another length of ribbon and tie a nice bow at the top of the wreath. It should now be ready to hang on your tree.

If you enjoyed this, you might also like to try –

Crafts: How to make a Christmas Button Wreath

Crafts: Make Your Own Christmas STEM Toys

Christmas is a time for crafting and creating with the kids. We love doing Christmas crafts and we were excited when we heard that ex Blue Peter presenter and craft queen Konnie Huq, had partnered with the Institution of Engineering and Technology (IET) to create a selection of homemade STEM toys for Christmas.

Crafts: Make Your Own Christmas STEM Toys

Konnie Huq has put her Blue Peter powers to practice for a good cause, making Britain’s most popular Christmas toys at home for a fraction of the cost. The Christmas STEM toys she has created include –

  • Dissolving egg
  • Magnetic slime
  • Icosahedron bauble
  • Marble run
  • Balloon boat
  • Bouncy balls
  • Smartphone projector
  • Living gingerbread house
  • Kaleidoscope

Konnie has put together a set of free to download how-to instructions for all of the above crafts.

Konnie, who spent over ten years craft-making on Blue Peter, is supporting a campaign by the Institution of Engineering and Technology to inspire more children to consider careers in engineering. The toys are designed to make learning about science, tech, engineering and mathematics (STEM) more accessible and affordable. These handmade STEM toys – which include a dissolving egg, magnetic slime, a kaleidoscope and even a smartphone projector – are educational, as well as fun.

Making your own slime is so popular right now, but we thought we would try something a little different. We really liked the idea of building our own living gingerbread house.

Crafts: Make Your Own Christmas STEM Toys

Make your own living gingerbread house

You will need:
A number of plain sponges
Scissors
Toothpicks
Small plate
Seeds
Spray bottle (clean)

How to make a living gingerbread house
Choose one or two sponges to be your base. Fix them together with a cocktail stick, remember these are sharp so be careful of your fingers.

Choose more sponges to be the walls. Cut one sponge in half across the longest
side (i.e. make two regular rectangles, not two long strips) and fix those onto the shorter sides of your base with cocktail sticks. Fix two sponges onto the longer sides of the base.

Crafts: Make Your Own Christmas STEM Toys

Take two sponges and cut them down their long side on an angle so that they fit together to form the apex of a roof. Fix them together with cocktail sticks, put on the top of your structure and fix into place with more cocktail sticks. You should now have a house shape made of sponges. Put your house onto a plate.

If your house is a bit wobbly, you can secure it using a glue gun or some craft glue. If you have used glue, allow time for the glue to dry and set before you move on to the next stage.

Next, you need to cover the house with seeds. You can use mustard or cress but
there are many fast sprouting seeds, so the choice is yours. We chose cress.

Crafts: Make Your Own Christmas STEM Toys

Dab some water onto the roof of your house and spread the seeds onto the roof.
Pour a little water onto the plate so the sponge base can soak it up. Check the
sponge is nice and moist. Then sprinkle the seeds onto the base.

Leave your house in a warm, bright spot for the seeds to germinate. Spray the house with water using a spray bottle each day, and pour a little water over the house if it feels dry. In a few days the seeds should start to sprout, in a week they should be thriving.

Crafts: Make Your Own Christmas STEM Toys

It’s so easy and lots of fun to make too!

 Disclosure: We were sent a shopping voucher to buy the materials for this craft.

Crafts: How to make Button Christmas Decorations

If you’re looking for a simple but quite beautiful Christmas craft, then by Jove I think I’ve got it! These lovely button Christmas decorations are really simple to do and look great hanging on a tree.

I belong to a craft group and we are always on the lookout for interesting things to make and do on our craft evenings. We spotted a picture of some button Christmas decorations and thought we would give them a try. All we needed were a huge box of buttons, some craft wire and a bit of patience to experiment.

Crafts: How to make Button Christmas Decorations

How to make a button Christmas Tree

You will need – 
A selection of buttons, mostly green in different shapes and sizes
Fine jewellery or craft wire

Method –
Sort a selection of buttons to make your tree. You’ll need something to be the tree trunk at the bottom, I used two wooden buttons. You will also need green buttons in decreasing sizes and in a variety of shades of green.

I found it best to find the right buttons and lay them out in order before threading them onto the fine wire.

Take a length of fine jewellery or craft wire, approximately 8 inches in length. Double up the wire and thread one end through one hole on your base button and the other end through the opposite hole. Do the same with all the buttons in your Christmas tree stack until your Christmas tree is complete.

Top your tree with a brightly coloured button, or a star-shaped button if you have one. If you’re happy with your tree, tie a knot on the last button and another knot in the ends of the jewellery or craft wire to create a hanging loop.

Crafts: How to make Button Christmas Decorations

How to make a button Bauble

You will need – 
A selection of buttons, in various colours, shapes and sizes
Fine jewellery or craft wire

Method –
Sort a selection of buttons to make your bauble. You’ll need to play about with your buttons a little to find a selection of matching buttons. You’ll need one fairly big central button, then some matching ones in various sizes and colours.

I found it best to find the right buttons and lay them out in order before threading them onto the fine wire.

Take a length of fine jewellery or craft wire, approximately 8 inches in length. Double up the wire and thread one end through one hole on your base button and the other end through the opposite hole. Do the same with all the buttons in your Christmas bauble stack until your bauble is complete.

If you’re happy with your bauble, tie a knot on the last button and another knot in the ends of the jewellery or craft wire to create a hanging loop. Easy.

These are a lovely, easy craft to make. One of my craft group friends also make a button Santa and a button snowman, but I’m all out of buttons ad I need to go and buy some more so I can make some more button Christmas decorations.

Check out my other craft tutorials here!

Crafts: How to make Button Christmas Decorations

Christmas Crafts: Make your own Glitter Tape Baubles

Christmas crafts are my favourite kinds of crafts. There’s something really lovely about sitting down with my son and making decorations for the tree, or little gifts for people. I’m always on the look out for new products to craft with and when I saw the Sellotape Glitter Tape I knew straight away they would be perfect to make some Glitter Tape baubles with.

Sellotape are currently celebrating their 80th anniversary and they very kindly sent me some craft goodies to have a little play with. I love this vintage style Limited Edition Sellotape tin too. Perfect for holding some little crafty bits and bobs once I’ve used all the tape!

Sellotape began life in 1937 and has been used in a wide variety of applications since then. It became a regular at the crafting table in the 1970s when it was used fairly extensively on Blue Peter. This iconic sticky tape is a year round essential, not only for wrapping presents, but for all manner of crafting and DIY jobs around the home.

Christmas Crafts: Make your own Glitter Tape Baubles

In my hamper of Sellotape goodies was an assorted pack of glitter tape. I really liked the different designs and it seemed a waste of something so glamorous to use the tape for just wrapping presents.

The glitter tape tears really easily, so you don’t need scissors or a dispenser to use it. It was beautiful and shimmery, so I thought I’d see how it worked on a bauble.

The tape sticks really well to the styrofoam ball, but slightly raises at the edges, which creates an effect I actually really quite like. But if the cracked ice on a frozen lake look isn’t your thing, then you could paint it all over with PVA glue to seal it all down.

Christmas Crafts: Make your own Glitter Tape Baubles

What I especially liked about this glitter tape was that the glitter stays on the tape. Not a speck of the sparkly stuff came off on my fingers, clothes or ended up shimmering on my face for three days. This sellotape glitter tape is really good stuff!

Make your own Glitter Tape Baubles

You will need:
A roll of sparkly glitter tape
One styrofoam ball
Ribbon
Brass paper fastener

How to make your Glitter Tape Baubles
The Sellotape glitter tape is easy to tear by hand. Tear small pieces of tape and stick in random places all over the styrofoam ball. Make sure the ball is completely covered in the tape; cup the ball in your hand and squeeze it to make sure the tape is in place.

Using the brass paper fastener; pierce the ribbon and create a hanging loop with your ribbon and press the fastener into the top of our bauble. Hang on your Christmas tree and enjoy.

Remember the tape does curl a little on the edges, but it doesn’t come off. I’ve had my bauble hung up for a couple of days and it looks the same.

Christmas Crafts: Make your own Glitter Tape Baubles

I really like my Glitter Tape Baubles, they’re a bit different and look quite stunning when the light catches them. I enjoyed working with the glitter tape, which does not shed and tears really easily. Watch this space for more Christmas craft ideas!

Christmas Crafts: Make your own Glitter Tape Baubles

We were sent a small hamper from Sellotape in return for this blog post. All images and opinions are our own.

Crafts: Making your own Christmas Stocking

Christmas is peak crafting season for me. I love making things, or trying to make things for the house and for my family. Alas my crafts often turn out a little wonky and rustic looking, but for me the thing I enjoy most is the act of crafting, not necessarily the result. This month tried my hand at making a Christmas stocking.

Crafts: Making your own Christmas Stocking

I was sent a box of craft materials to use and it was up to me to decide what I wanted to do. There were all kinds of things in the box, tinsel, a sewing kit, pine cones, glitter glue, decorative robins, string, hessian, and bells.

I began by cutting out a Christmas stocking shape out of the hessian, which I then hand sewed together. This took a little while as I’m not very quick when it comes to sewing by hand. Turning the stocking right side out, I sewed a piece of laced ribbon in a loop at the top to hang the stocking. I stitched the ribbon around the top of the stocking and down over the areas I’d hand sewn, in part to hide the stitched edge, in part because I was going for a really simple look.

I then sewed on some wire craft stars I’d made at my craft class the week before. I left them so they would dangle and sway on the stocking.

Crafts: Making your own Christmas Stocking

To make the wire craft stars I printed out a star shape of the right size. Then I bent some brown paper covered craft wire into a star shape using the template. Using PVA glue, I glued the wire star onto some decorative paper. I used a slightly aged page from a music book. I left the glue to dry overnight and then trimmed around the star. The result was quite effective and could be used in so many different ways. Perhaps as decorations or on Christmas cards.

Crafts: Making your own Christmas Stocking

My simple Christmas stocking was finished and just needed hanging by the fire ready for Father Christmas.

When you make your own Christmas stocking, once you’ve got your basic shape, it’s up to you how you embellish it. You can go wild, or stay simple like me. I really like my brown and cream stocking. My stitching leaves a little to be desired, but you can’t see that and it doesn’t really matter, as long as it holds when it’s full of Christmas goodies!

How would you decorate your Christmas stocking?

Christmas Crafts: Make a Baker Ross Reindeer Crown

We were sent this reindeer crown from Baker Ross for review purposes. All images and opinions are our own.

Now the weather has taken a decidedly wintery turn I’m starting to get into the Christmas spirit. This weekend was an especially cold one, the small boy had a nasty cold and we decided to stay in, cosy in front of the fire and have a lazy weekend. Keen to get cracking with some Christmas crafts we busied ourselves by making a reindeer crown using hand prints and we were pleased with the results.

reindeer crown

The reindeer crown kits are available from Baker Ross and come in packs of 4 or 16. The packs contain everything you need to make the crown, except for glue, though we used double sided sticky tape because it’s quicker and there’s less mess than with glue.

The instructions are really easy to follow. Draw around your hands and cut out your hand print shape. I did the cutting because the small boy is terrifying with scissors or anything with a blade. The instructions suggest you use glue to stick the cut our hand shapes onto the headband; but I used double sided sticky tape for this. The other pieces, the ears, the reindeer hair and the holly and berries are self-adhesive, so the small boy peeled the backing paper off these and stuck them onto the headband.

Once he had finished he very proudly wore it around the house for a few hours. I think these make a nice alternative to the paper cracker crowns we are forced to wear for Christmas dinner; so I might make myself one to wear on Christmas Day.

reindeer crown

There was some parental supervision required with the cutting out of the hand shapes; but other than that he did the rest himself. It was something he enjoyed doing, he likes peeling and sticking things. It was pretty simple, but it kept him interested and entertained for a while. Another good and fun Christmas activity from Baker Ross!

Christmas Crafts – Making Snowman Mosaics

It may still only be November but I’m already starting to feel a bit Christmassy, I think it’s probably down to all the planning ahead of time so I’m less stressed later. They must be talking about it at school too as the small boy is all excited and ready to get stuck into the festivities. We’ve been busy baking Christmas cakes and starting to think about presents and decorations. One wet afternoon we sat and made some snowman mosaic coasters which I’ve decided would also look great as Christmas decorations.

The snowman mosaic coaster kit from Baker Ross contains everything you’ll need – a pre-cut snowman with a selection of foam stickers to stick on and decorate your snowman. If like me you want to turn the finished snowman into a Christmas tree decoration you’ll need a bit of ribbon and some sticky tape too.

Snowman Mosaics

Popping the foam stickers out of their sheet and peeling the backing off them is quite fiddly for little fingers, so it’s good practice for the small boy who has recently turned five. He did very well and managed to do most of them himself, only asking me to help him with the white circles, probably because there were lots and lots of them. This is a great task to help with hand-eye co-ordination and to improve dexterity and finger strength, which can really help with learning to write.

It’s a really simple kit and the snowman mosaics look really effective, too good to just be used as coasters, which is why I’m going to attach some ribbon so we can hang them on the tree once that’s up.

The snowman mosaics kits are from Baker Ross and come in packs of 6 or 18. It’s a nice tidy activity to do, it doesn’t require any setting up or any mess, just have a bowl ready to put the bits of backing paper in and you’re sorted. In fact I’ve put one in my bag for when we go out, it’s something we can do together while we’re having lunch that doesn’t involve an ipad. 

The thing I liked most about making the snowman mosaics was the chance to chat. We were both industriously beavering away on our snowmen, chatting away about school, Christmas and his recent birthday, and occasionally bursting into happy song. It was a fun half hour on an otherwise grim November day.