Homemade Gifts: Peppermint Bark Buttons

Homemade treats make for really lovely gifts at Christmas. These Peppermint Bark Buttons are really fun to make and they’re delicious too.

I’ve been making variations of these chocolate buttons since I found a silicone mould in a charity shop for £1 a couple of years ago. They couldn’t be more simple; melt some chocolate, pour it in the mould and decorate however you want.

Homemade Gifts: Peppermint Bark Buttons

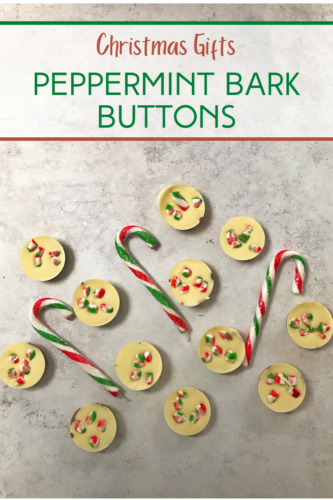
These are a slightly tidier looking version of the classic Peppermint Bark we all know and love. Peppermint Bark is just layers of melted chocolate mixed with some peppermint extract, which is then sprinkled with crushed candy canes. It’s simple, but these Peppermint Bark Buttons look a bit more sophisticated and are ideal for bagging up and giving as Christmas gifts.

Homemade Gifts: Peppermint Bark Buttons

Peppermint Bark Buttons

Ingredients:

200g of milk chocolate
A few drops of peppermint extract
200g of white chocolate
3 candy canes

How to make your buttons…

Boil some water and pour the water into your pan so it’s about 3cm deep. Carefully place a glass bowl in the pan making sure the bottom of the bowl doesn’t touch the water. This is called a bain marie.

Break or chop your chocolate up into small pieces and put it in the glass bowl. The water in the pan needs to be at a gentle simmer, not bubbling and boiling. Stir the chocolate until it is melted.

OR… you can melt your chocolate in the microwave, I do it in 30 second bursts and I stir in between to help melt the chocolate. If you microwave it for too long the chocolate will go all grainy and will be ruined, so be careful.

At this point you need to put a few drops of the peppermint extract in the melted milk chocolate and give it a good stir. I put in 5 drops and that was enough, so go carefully, you can always add more but you can’t take it away once it’s in there.

Using a spoon, scoop out about a teaspoon of the melted milk chocolate into each of the moulds. Try and put an equal amount in each. Gently shake the silicone tray so the chocolate settles. Pop the tray into the fridge while you crack in with the next steps.

Homemade Gifts: Peppermint Bark Buttons

Now melt your white chocolate either in the microwave or on the hob in a bain marie. Once it’s melted, grab your mould from the fridge and scoop another teaspoon of white chocolate over the top. Once you’ve finished, give the tray a shake and all the melted chocolate should level off.

Now you need to crush your candy canes. You can do this by putting them in a zip lock bag and smashing them up with a rolling pin. If like me for some reason your candy canes were soft and bendy, then you can just cut them into small chunks with a pair of scissors. Sprinkle your little candy cane pieces over the top and then put your buttons in the fridge to chill for at least two hours. I left mine overnight.

Homemade Gifts: Peppermint Bark Buttons

If you don’t have anything like my lovely button mould, then you could make little circles of melted milk chocolate on some baking parchment, then top with a similar amount of while chocolate and then sprinkle your crushed candy canes over that. I am sure they will look just as pretty.

Once they’re set you can put them in little cellophane bags and decorate with ribbons ready to give as sweet little gifts for loved ones.

If you liked this recipe, you might also like to try these fruit and nutty buttons.

Peppermint Bark Buttons

STEM Crafts: Learning with Jelly Bean Architecture

If you want to keep my 7 year old son entertained for an hour; give him a bowl of jelly beans, a packet of cocktails sticks, show him the rudiments and watch him build all kinds of wonderful things. Welcome to the wonderful world of jelly bean architecture.

STEM Crafts: Learning with Jelly Bean Architecture

I confess, jelly bean architecture is not an invention of mine. When we went to the Just So Festival last year, my son spent a happy hour or so building with jelly beans. It’s something that we’ve revisited at home a few times since and it’s great fun; not to mention wonderfully educational and developmental!

You need two things to start building – lots of jelly beans (we get cheap bags of them from the petrol station, there’s no need to go gourmet with these) and lots of cocktail sticks. You will also need the knack. The first few times you try to spear a jelly bean onto a cocktail stick, chances are you will stab your finger instead. The trick is to hold the jelly bean on a flat surface and carefully press down, piercing the hard sugary coating.

STEM Crafts: Learning with Jelly Bean Architecture

You should think of each jelly bean as a corner piece. You can probably fit up to four cocktail sticks into a single jelly bean. Whatever kind of structure you’re building, the only limit is your imagination.

We find it best to warm up by building some simple 3D shapes, pyramids and cubes are great. How many cubes can you stack on top of each other? Can you fit a pyramid on the top? Who will eat the last jelly bean? You can then move on to more complex structures. In the picture here Ben has built a fire station.

STEM Crafts: Learning with Jelly Bean Architecture

Jelly bean architecture is perfect for budding architects and structural engineers. Anyone who is interested in building and construction, 3D shapes, maths, anything like that, plus it’s tremendous fun! It’s probably the most enjoyable STEM craft we’ve done together.

STEM Crafts: Learning with Jelly Bean Architecture

Crafts: Make Your Own Christmas STEM Toys

Christmas is a time for crafting and creating with the kids. We love doing Christmas crafts and we were excited when we heard that ex Blue Peter presenter and craft queen Konnie Huq, had partnered with the Institution of Engineering and Technology (IET) to create a selection of homemade STEM toys for Christmas.

Crafts: Make Your Own Christmas STEM Toys

Konnie Huq has put her Blue Peter powers to practice for a good cause, making Britain’s most popular Christmas toys at home for a fraction of the cost. The Christmas STEM toys she has created include –

  • Dissolving egg
  • Magnetic slime
  • Icosahedron bauble
  • Marble run
  • Balloon boat
  • Bouncy balls
  • Smartphone projector
  • Living gingerbread house
  • Kaleidoscope

Konnie has put together a set of free to download how-to instructions for all of the above crafts.

Konnie, who spent over ten years craft-making on Blue Peter, is supporting a campaign by the Institution of Engineering and Technology to inspire more children to consider careers in engineering. The toys are designed to make learning about science, tech, engineering and mathematics (STEM) more accessible and affordable. These handmade STEM toys – which include a dissolving egg, magnetic slime, a kaleidoscope and even a smartphone projector – are educational, as well as fun.

Making your own slime is so popular right now, but we thought we would try something a little different. We really liked the idea of building our own living gingerbread house.

Crafts: Make Your Own Christmas STEM Toys

Make your own living gingerbread house

You will need:
A number of plain sponges
Scissors
Toothpicks
Small plate
Seeds
Spray bottle (clean)

How to make a living gingerbread house
Choose one or two sponges to be your base. Fix them together with a cocktail stick, remember these are sharp so be careful of your fingers.

Choose more sponges to be the walls. Cut one sponge in half across the longest
side (i.e. make two regular rectangles, not two long strips) and fix those onto the shorter sides of your base with cocktail sticks. Fix two sponges onto the longer sides of the base.

Crafts: Make Your Own Christmas STEM Toys

Take two sponges and cut them down their long side on an angle so that they fit together to form the apex of a roof. Fix them together with cocktail sticks, put on the top of your structure and fix into place with more cocktail sticks. You should now have a house shape made of sponges. Put your house onto a plate.

If your house is a bit wobbly, you can secure it using a glue gun or some craft glue. If you have used glue, allow time for the glue to dry and set before you move on to the next stage.

Next, you need to cover the house with seeds. You can use mustard or cress but
there are many fast sprouting seeds, so the choice is yours. We chose cress.

Crafts: Make Your Own Christmas STEM Toys

Dab some water onto the roof of your house and spread the seeds onto the roof.
Pour a little water onto the plate so the sponge base can soak it up. Check the
sponge is nice and moist. Then sprinkle the seeds onto the base.

Leave your house in a warm, bright spot for the seeds to germinate. Spray the house with water using a spray bottle each day, and pour a little water over the house if it feels dry. In a few days the seeds should start to sprout, in a week they should be thriving.

Crafts: Make Your Own Christmas STEM Toys

It’s so easy and lots of fun to make too!

 Disclosure: We were sent a shopping voucher to buy the materials for this craft.