How to make a Giant Butterfly Cake

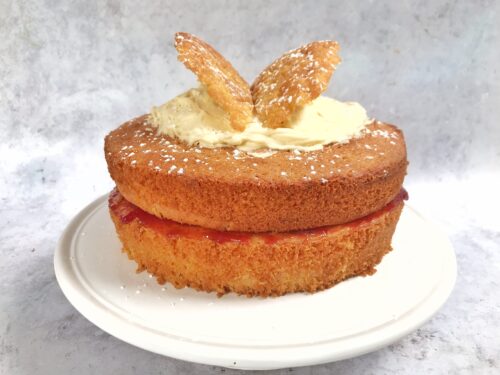
I’m a keen baker, but lack confidence in my decorating ability, so I tend to go for simple styles. Occasionally I’ll bake something incredibly pretty, like my lemon curd cake. It was so pretty, it was featured in BBC Good Food Magazine, which was nice. For my birthday this year, I was low on time and energy, but needed something tasty but pretty to share with my family. I’m quite big on whimsy, so I decided to bake a giant butterfly cake.

Here in the UK, butterfly cakes are a bit of a birthday tea staple. Little sponge buns, with their lids cut off, filled with buttercream, and the top put back on in the shape of butterfly wings. They’re incredibly simple, but they are quite a joyful little bun. Whilst I was wondering what to bake for my birthday, I thought an upgrade to my standard Victoria sponge, but with a butterfly cake top would be simple but really quite fun. I was not wrong.

How to make a Giant Butterfly Cake

I know my Victoria sponge cake recipe is a good one, but this re-working of it really made it extra brilliant. It was as light and airy as a butterfly wing, but the vanilla buttercream and butterfly wings really made it extra special.

Giant Butterfly Cake

Ingredients:
200 g caster sugar
200 g softened butter or margarine (I use Stork)
4 eggs, beaten
1 tsp vanilla extract
1.5 tbsp milk
200 g self-raising flour
1 tsp baking powder

Buttercream
200g butter, softened
200g icing sugar
A large slug of vanilla extract, approx. 10mls

To finish
1/3 of a jar of good quality raspberry jam
Icing sugar for dusting

How to make a Giant Butterfly Cake

Method:
Heat your fan oven to 190c. Grease two 20cm sandwich tins, I also lined the bottom of each tin with a circle of baking parchment. In a large bowl, beat your butter and sugar together until fluffy (I used a hand mixer). Add the eggs, milk and vanilla and combine, then add the flour and baking powder and mix together until you have a smooth batter.

Divide the mixture equally between the two tins. You can weigh them to make sure they’re fairly equal if you’d like. Bake in your pre-heated oven for around 20 mins until golden and they’re cooked through. Remove from the tins and leave to cool on a cooling rack.

Once your sponge layers are as cool as they can be, thickly spreading good quality raspberry jam between them and sandwich them together on a cake plate or stand.

To make the buttercream, sift your icing sugar to make sure there are no lumps. Then beat the softened butter and icing sugar together with the vanilla extract until it is fully combined and fluffy.

Take a sharp knife and carefully cut a circle out of the top cake layer. Don’t cut all the way through, you’re looking to create a small crater for the buttercream to sit in. Carefully remove your circle from the cake and set it aside.

You can either pipe or spoon your buttercream into your cake crater, it’s up to you. I used a spoon. Fill the crater and smooth the buttercream, I sort of made a small ravine in the middle so there was a dip where I’d be putting the butterfly wings.

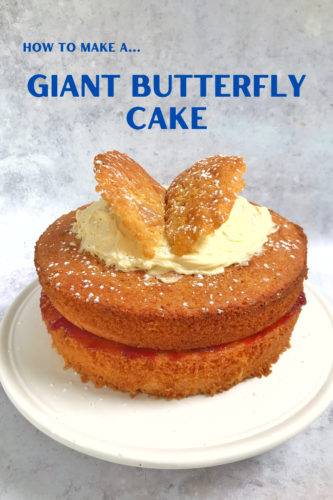
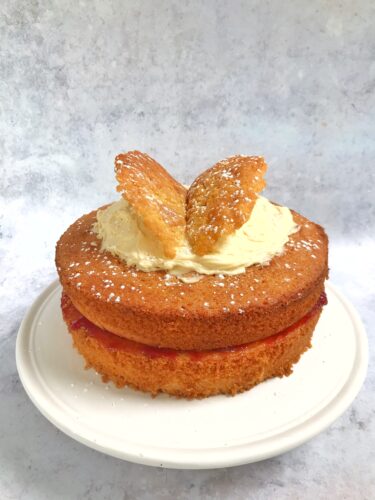
With a sharp knife, cut the circle of cake in half and place them onto the buttercream ravine. As this is much bigger than your average butterfly cake, I used my spoon to build up the buttercream underneath the wings to support them, which worked really well. Once you’re happy with how the wings look, you just need to sprinkle a tiny bit of icing sugar over the top, and it’s ready to be shared.

The cake did look awesome, everyone was oohing and ahhing over it, which is exactly the response I was going for. It’s a great, simple, fun bake and one I suspect I’ll be asked to make over and over.

How to make a Giant Butterfly Cake

How to make a really easy Volcano Birthday Cake

For my son’s 7th birthday he wanted me to make him a Volcano Birthday Cake. I am by no means an expert cake decorator, so I knew whatever I made would need to be really simple to put together. The great thing about making a volcano cake if you’re not an expert cake decorator, is if it looks a bit rough and rustic when you’ve finished, it all adds to the rugged volcanic charm.

A few years of watching The Great British Bake Off has given me a few ideas, so I sketched the plan and set to work. You will need six round sponge cakes. I also used my favourite kind of shop bought frosting – Morrison’s Chocolate & Brazilian Orange Frosting. It’s the best shop bought frosting I’ve ever tried and it’s well worth searching out. If you can’t find it, use whatever chocolate frosting you can get your hands on.

How to make an easy Volcano Birthday Cake

Here’s how I made my pre-historic Volcano Cake.

How to make a Volcano Birthday Cake

You will need:

6 round sponge cakes (I used 9 inch tins)
2 tubs of Morrisons Chocolate & Brazilian Orange Frosting
Dr Oetker Regal Ice Ready to Roll Icing pack of multi-coloured icing
Wooden skewers or long straws
Selection of small plastic dinosaurs
Fountain Sparkler candle
One cupcake per letter of name (eg Ben = 3 cupcakes)
Birthday candles
Wooden letters spelling name

How to build your cake:

On a large clean tray or board put a dollop of Morrisons Chocolate & Brazilian Orange Frosting and start to build your volcano on top of this. The frosting will help to anchor the cake in place.

Sandwich your six layers of cake on top of each other with a layer of the Morrisons Chocolate & Brazilian Orange Frosting in between each cake. Take your skewers or straws and push then down from the top of your volcano structure down through the six layers to the bottom, this will make the cake more stable.

Carefully using a knife, carve your cake structure into a volcano shape. It doesn’t have to be perfect, remember if it’s rustic it all adds to the charm. Dust as many loose crumbs off your cake as you can and then start to plaster the whole cake in the Morrisons Chocolate & Brazilian Orange Frosting. Once it’s completely covered, leave it to harden a little for an hour or so.

How to make an easy Volcano Birthday Cake

Taking the red and yellow icing from the Dr Oetker Regal Ice Ready to Roll Icing pack, cut each pack of icing in half. Set aside half of each pack and with the other halves, knead them together to make an orange coloured icing.

Here’s where you can get artistic. Roll pieces of the red, yellow and orange icing into rivulets of lava and press them into your volcano. Make sure there’s plenty of lava coming out of the top and running down the sides. You might want to pool some lava at the bottom of the volcano.

How to make an easy Volcano Birthday Cake

Taking your dinosaurs and a little of the chocolate orange frosting (to stick the dinosaurs in place) add some dinos to the scene. Again be artistic; get them caught in the lava, running away from it, have them in little family groups, whatever you want.

Take your cupcakes and top with some frosting; wedge a letter on the top of each one and using the frosting on the bottom of the cupcakes, stick them in place to spell out the name. Again you can have dinosaurs around the cakes, or looking like they’re eating them maybe.

How to make an easy Volcano Birthday Cake

To finish your cake, put the fountain sparkler candle in the top (so when you light it, it should sparkle and flame like a volcano.

My son was absolutely delighted with his volcano birthday cake, and his friends were pretty impressed too. It’s surprisingly simple to put together and it doesn’t have be perfect in order for it to be impressive. I dread to think what he’s going to ask for next year!

How to make an easy Volcano Birthday Cake

How to make a really easy Volcano Birthday Cake

If a volcano cake doesn’t cut it, what about this super-simple train birthday cake?

How to make a really easy Train Birthday Cake

Children’s birthday parties can be fairly hard work, with lots to remember, from party food, party bags, games, music, costumes and cake. I’m all for making life easy (and on a budget), so this year instead of buying an expensive cake we opted to make our own. The small boy wanted a train birthday cake to go with his train birthday party and who am I to argue?

Train birthday cake

To make this easy train birthday cake you will need:
Three rounds of sponge cake (as described below)
Half a jar of raspberry jam (approx), or strawberry if you prefer
Two tubs of Betty Crocker Vanilla Buttercream icing
Three tubes of smarties
Bigjigs trains (see below)
One cake board (or big enough plate)

Hubs is the baker of the household, so I asked him to make three layers of sponge cake. Use your favourite and foolproof sponge cake recipe (his used 8 eggs to give you an idea of the amount of sponge we made) you want to make three round sponge cakes baked in a 25cm tin. Once baked they need to be around an inch tall.

Once the cakes are cool, put a blob of the buttercream on the cake board and place the first layer of sponge on top of that, this helps to anchor the cake to the board and stops it sliding about. Spread a layer of jam on top of the first layer. Carefully turn the second layer upside down and gently spread the flat bottom with the buttercream and sandwich in top of the jam layer.

On the top of the second layer, spread evenly with more jam and then spread buttercream on the upturned bottom of the top layer of sponge, put that on top. You should have a three layered cake in front of you which from the bottom goes…
Blob of buttercream
Cake
Jam
Buttercream
Cake
Jam
Buttercream
Cake

With me so far? Good. Now you’ve got all your layers stacked carefully, spread the remaining buttercream over the top and sides of the cake. Don’t worry about it being prefect, if you aim for the rustic look it’ll be fine. I created a wavy effect with a palette knife and the sides were rough but fully covered. If you want you can make the buttercream smooth.

Bigjigs make a sort of pick and mix name train set, I bought mine from my local toy shop Giddy Goat Toys. I bought the carriage and the letters of his name for £2.25 each, which cost me just £9 in total. This was much cheaper than buying a proper train and carriages and much more personal.

I gave them a little wash, though they’d been in a sealed box, then using a little blob of the buttercream “glued” the removable letters onto the carriages and pressed the train into the thick buttercream in the top of the cake.

Tipping the smarties into a bowl I then wrote his age in smarties on the top of the cake, then I used the remaining smarties to edge around the bottom of the cake. I was pretty pleased with my efforts.

If you do this the night before the party and leave it out uncovered overnight, the buttercream should firm up slightly and make it easier to transport. On the morning of the party I wrapped it loosely in foil and it sat in my knee in the car on the way to the party. On arrival we unwrapped it and there were no buttercream smears on the foil and it still looked good. Phew.

The cake tasted really good, but hubs does make beautiful cakes. We had lots of lovely compliments about it. It sliced into approx 24 slices, which was more than enough for a kids party.

Our lovely and quite huge train birthday cake was a really big hit, a few people thought we’d bought it (ha, always a compliment) and the small boy was really, really pleased with it and proudly showed it off to his friends. It’s a really easy way to make a simple sponge birthday cake a little bit special.

Train birthday cake

How to make a really easy train birthday cake