How to make a Warhammer Purity Seal Cake

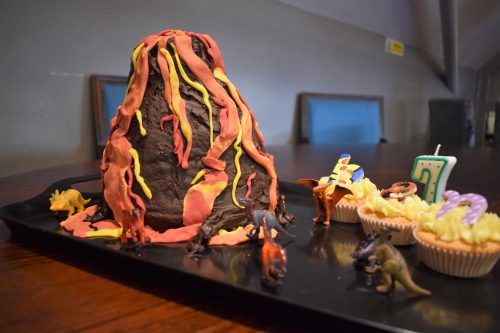
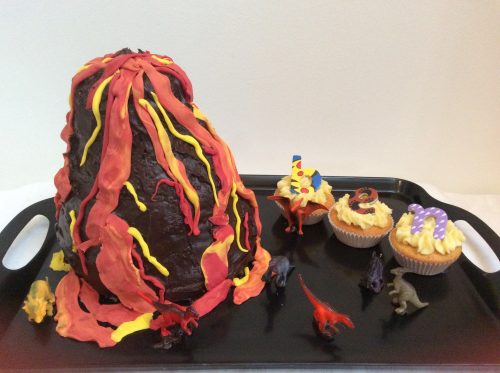
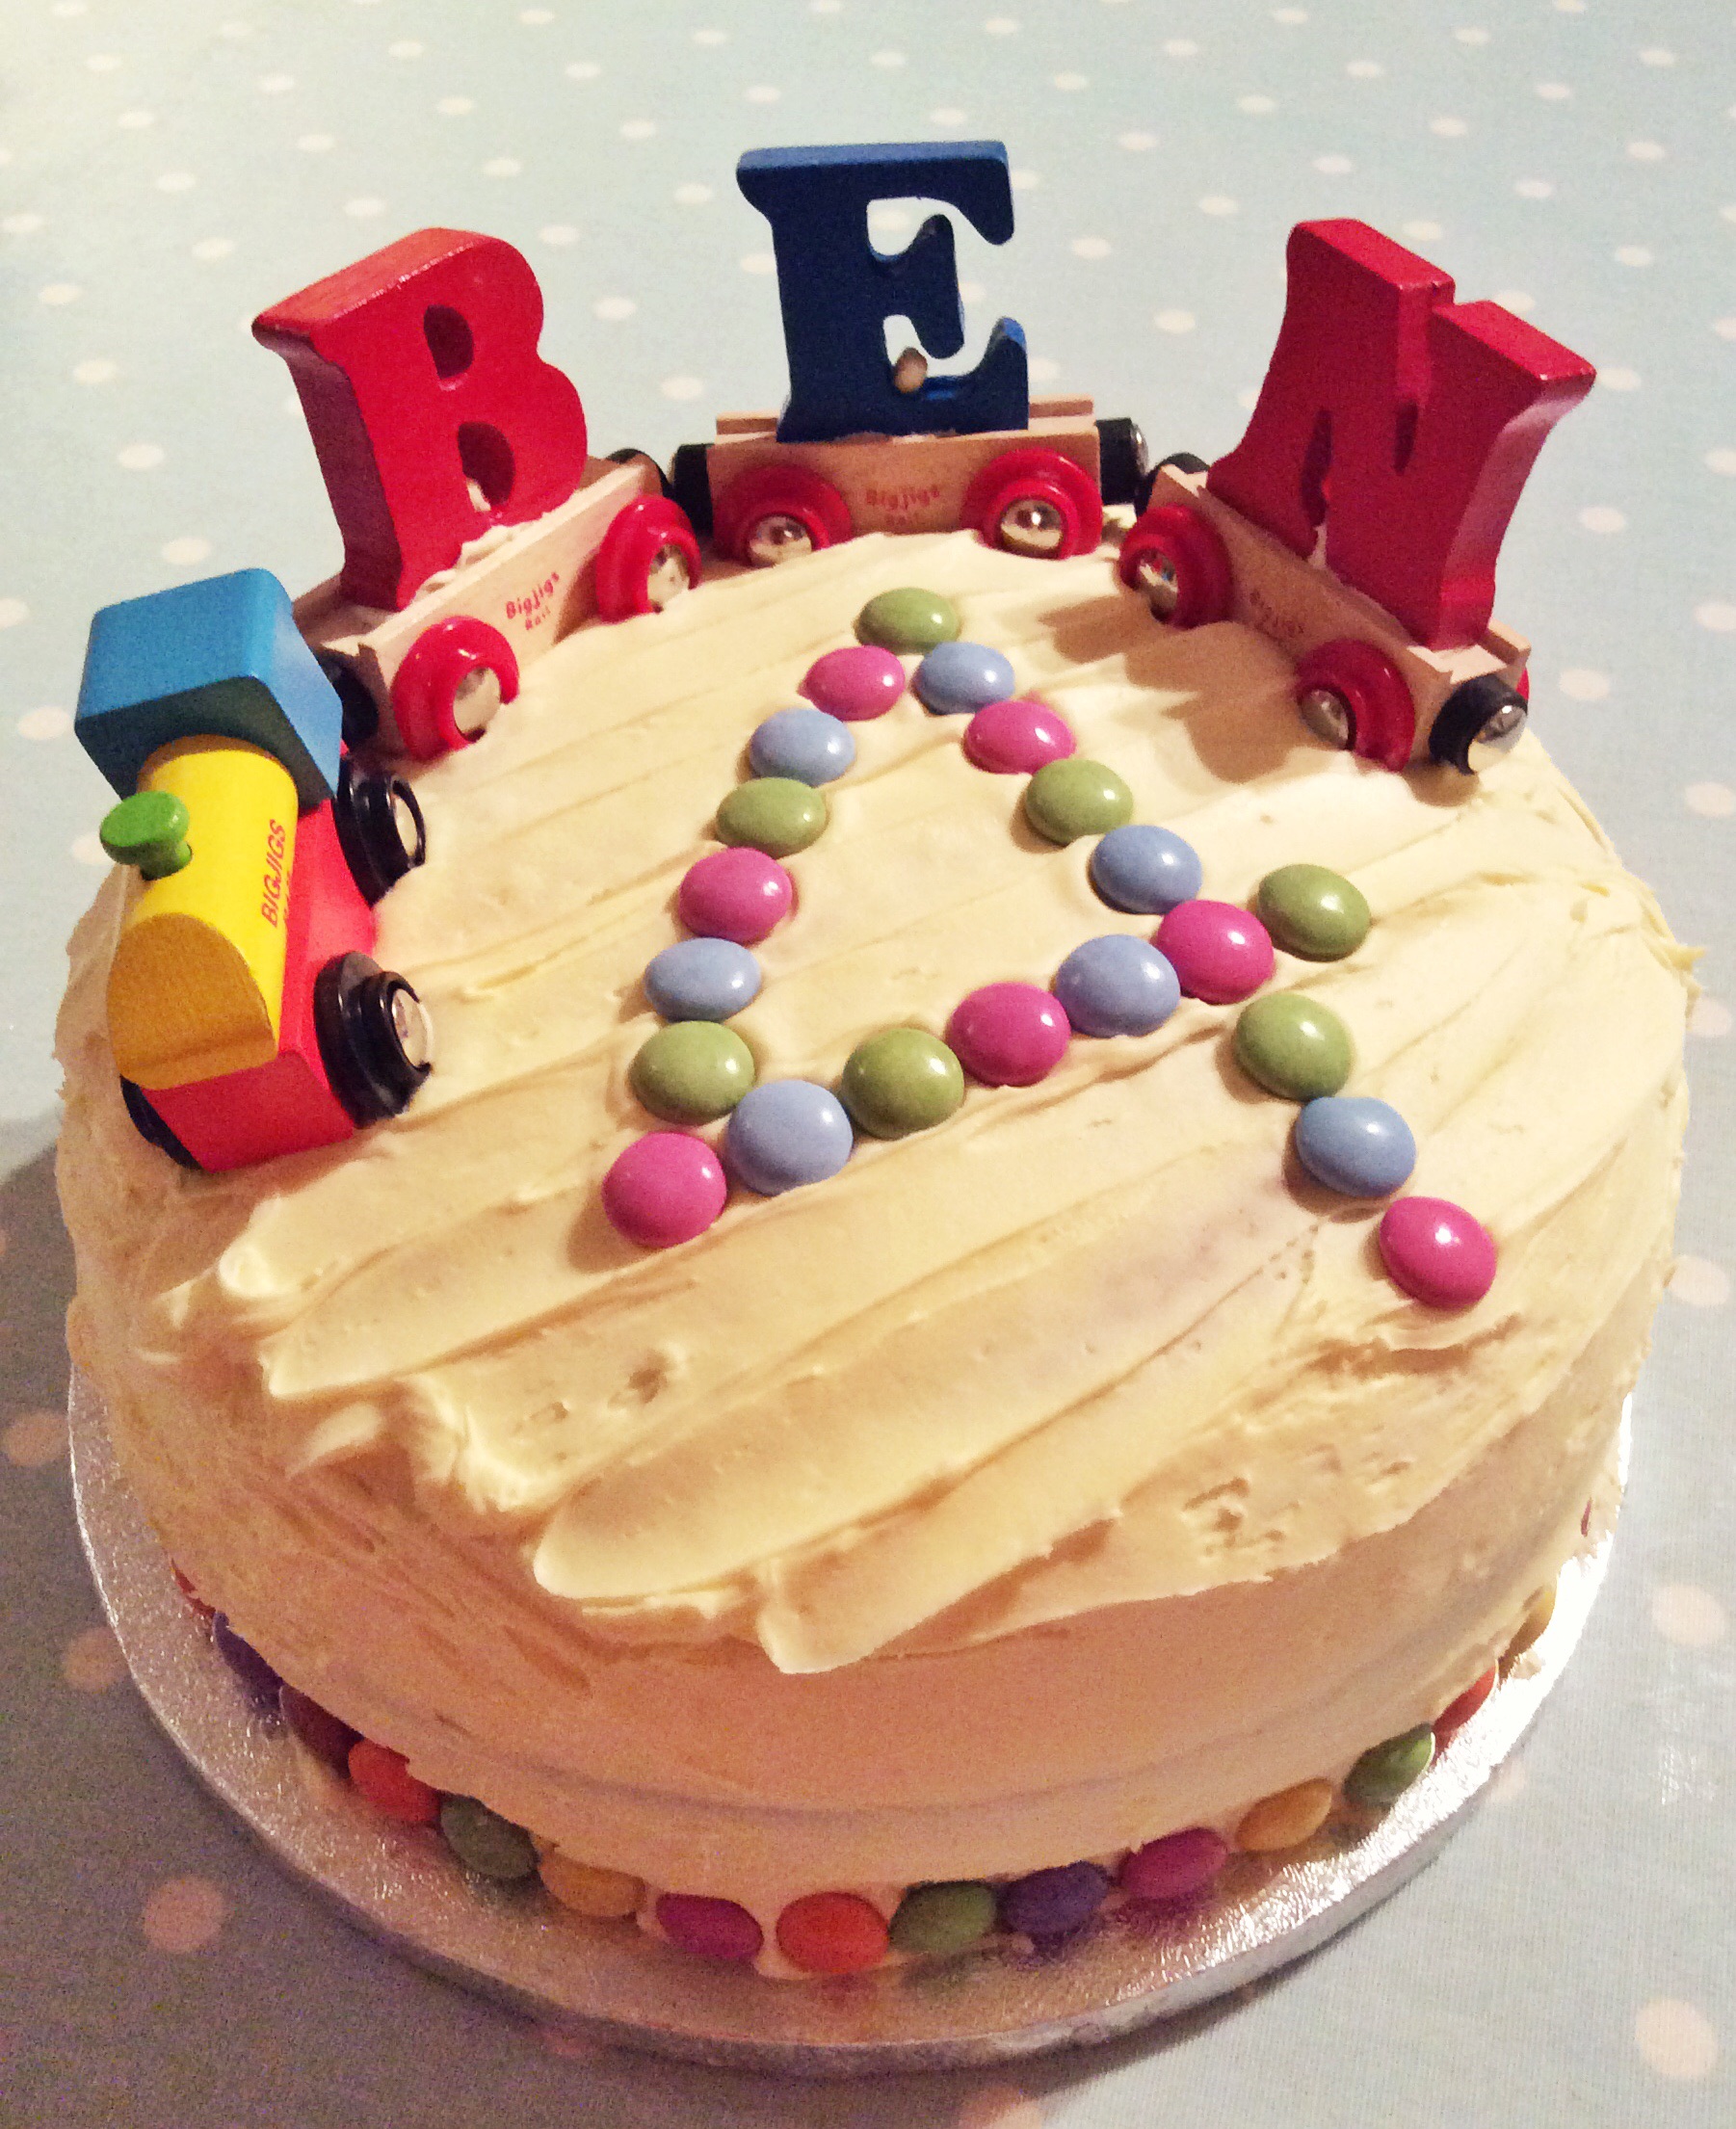
I’ve been a mum for 12 years now, and for about ten of those years, I’ve asked my son what kind of cake he would like for his birthday. I’m no Mary Berry, but I can knock up a good sponge cake, and I’m happy to give pretty much anything a go. Over the years we’ve had a volcano cake, a train cake, a Minecraft block and a Pokémon cake, amongst others. This year he asked me to make him a Warhammer purity seal cake, so I gave it my best shot.

Whilst not wanting to diminish my son’s latest obsession, Warhammer is basically painting tiny figures and then having a ruckus with your mate who also has some painted tiny figures. It’s a world I don’t fully understand, but I don’t need to understand it, I just need to continue to fund it.

How to make a Warhammer Purity Seal Cake

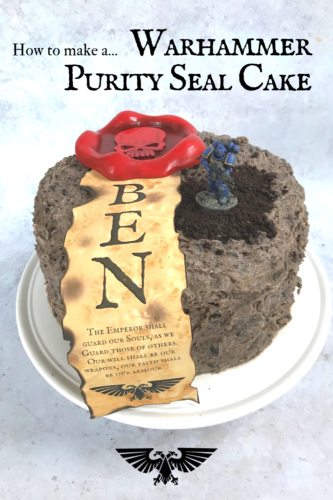
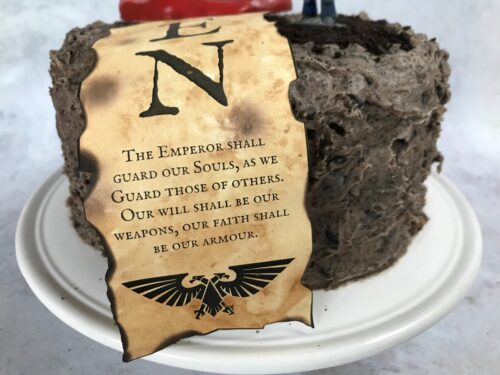
In essence the cake is three layers of Oreo sponge, with Oreo frosting between the layers and all over it, which make it look like a muddy battlefield. After tapping into the expertise of a Warhammer loving adult, we brainstormed some ideas. My friend did the hard work, the painting and his painted creations would also double up as birthday gifts for the birthday boy. My role was to make the cake, and the paper scroll for the purity seal.

To make the purity seal

This was a two part job, with my friend ordering a 3D printed purity seal coaster off Etsy and painting it up accordingly, and me creating the scroll. I did this using an app called Canva, which is free and I use it quite a lot for various design things. I added his name and some appropriate Warhammer words and logos, then printed it on cream paper. The font I used was IM Fell English SC, which was as close as I could get to authentic. Aging the scroll meant dabbing the paper with a damp teabag, which worked well.

purity seal

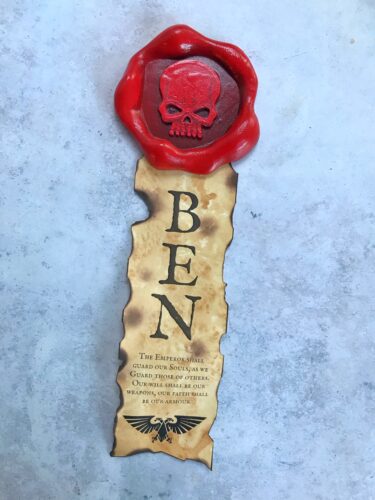
Once dry, I lit a candle and carefully (VERY CAREFULLY) held the paper above the flame to give extra colour and raggedy edges to the scroll. Be careful not to actually burn the paper. I made sure I was doing this on a flame proof chopping board, so if it did go up in flames, I could put them out quickly. Together with the appropriately painted seal, it looked pretty darn good.

If you want to read more about the painting of the purity seal, you can do here.

How to make a Warhammer Purity Seal Cake

To make the Oreo cake

For his birthday, I made two of these cakes as he was having a family party and a party with friends. Click here to go to the recipe for the Oreos cake. You can make the sponge layers in advance. As long as they are well wrapped up, they will be fine for a day or two. The vanilla frosting is meant to look like a muddy, gritty battlefield, the kind a troop of Space Marines might find themselves on. The trick is to not overmix it, or it just becomes a dirge colour and not speckled. Don’t forget to save an Oreo or two to crumble up as extra dirt on top of the cake.

Follow the instructions on how to put the cake together, once you’ve got your Oreos cake built, it’s time to decorate it!

How to make a Warhammer Purity Seal Cake

To decorate your Warhammer Purity Seal Cake

You will need a couple of toothpicks to hold some of the decorations in place, so don’t forget they’re there when it comes to serving your cake! Decide where you’re going to place your purity seal and using half a toothpick, pin the paper scroll in place. Using some of the Oreo frosting as glue, stick the purity seal down, on top of the cake, at the top of the scroll.

We also had a painted Space Marine to top off the cake. His base had been sculpted at the bottom so you could stick a toothpick in and anchor him into place, which was a stroke of genius. Around his feet I sprinkled some crushed up Oreos, which made him look like he was wading through mud.

How to make a Warhammer Purity Seal Cake

As it was a birthday cake, I ordered some black candles, which finished it off nicely. My son absolutely loved his birthday cake and was impressed by how good it looked. If you’re into Warhammer and Oreos, then this is a relatively simple cake to put together, if you’ve got someone doing the painting for you that is!

It’s a brutal looking cake, but it really was delicious!

How to make a Warhammer Purity Seal Cake

Recipe: Oreo cookies and cream cake

My son loves Oreos. They’re the thing he asks for when we need him to do something he doesn’t want to do, like take some medicine, or finish his French homework. So when it came to his birthday cake this year, he asked me for an Oreo cake, so I took to my kitchen, got experimenting and came up with this simple recipe for a three layer Oreo cookies and cream cake.

There are a lot of Oreos in this, and as we are trying to cut costs a bit, we used the Aldi version at a fraction of the cost. They’re really no different at all. I’ll leave it up to you if you want to use the real ones or the supermarket versions. This cake including the frosting used 5 packs of Oreos, which is slightly terrifying. You could use a little less if you feel that might be the right thing for you and your cake. 

Recipe: Oreo cookies and cream cake

For the frosting, I did experiment with making Oreo buttercream with butter, icing sugar etc, which worked fine, but the pre-made vanilla frosting really tasted like the inside of an Oreo, spread much more easily, and was just so much better in terms of flavour and texture. My advice would be to use the pre-made frosting and just stir the crushed Oreos through it.

If you usually make your cakes using a mixer, that’s fine, but I’d urge you to just fold the crushed Oreos through the cake batter, as mixing it with the food mixer changes the texture and look of the cake. It’s darker and denser, and somehow less appealing because of that. This is a three layer cake, because it was a celebration cake, if you want, you can cut the recipe by a third and make it a two layer cake and that’s fine too.

Oreo cookies and cream cake

Ingredients:
300g caster sugar
300g softened butter or margarine (I use Stork)
6 eggs, beaten
3 tsp vanilla extract
3 tbsp milk
300g self-raising flour
1.5 tsp baking powder
300g crushed Oreos

For the frosting:
600g vanilla frosting, I used M&S
200g crushed Oreos

Recipe: Oreo cookies and cream cake

Method:

Heat your fan oven to 190c. Grease three 20cm sandwich tins, I also lined the bottom of each tin with a circle of baking parchment. In a large bowl, beat your butter and sugar together until fluffy (I used a hand mixer). Add the eggs, milk and vanilla and combine, then add the flour and baking powder and mix together until you have a smooth batter.

Put your Oreos in a sturdy plastic bag and beat them into a rolling pin until they’re nicely crushed. You can also do this in a food processor if you feel like it. Fold in your Oreo crumbs, don’t be tempted to beat them in or mix them with your cake mixer, this makes the mixture a fairly uniform but unattractive dirty brown colour. If you fold them in, the colour and texture are much better!

Divide the mixture equally between the three tins. You can weigh them to make sure they’re fairly equal if you’d like. Bake in your pre-heated oven for around 20 mins until golden and they’re cooked. Remove from the tins and leave to cool on a cooling rack.

Leave your cakes to cool, preferably overnight before decorating them.

To make your frosting, scoop your vanilla frosting into a bowl and fold in your crushed Oreos. Again, if you beat them in the frosting will go a funny colour and texture, the less you play with this the better.

Your sponge layers may have a domed top, if you’re being a stickler for good looks, then you can carefully trim the top flat with a good knife. If this is for an occasion and not just for scoffing, I will trim the top layer, but turn it upside down, so the top of the cake is guaranteed to be perfectly flat.

Recipe: Oreo cookies and cream cake

I like a slightly rustic look to my cakes, so I used an offset palette knife to spread a generous slick of frosting between each layer and then cover the whole lot in the frosting. The cake was for a 12 year old, so the terrifying amount of sugar here wasn’t a problem, but if you wanted to cut down the sugar a bit, you could always just do an artistic swirl on the top. I decorated the cake with a few leftover (pah!) cookies and some crumbs. 

I made two of these cakes for his birthday. One was plain and simple, and the other one was turned into a Warhammer Purity Seal cake. Both cakes were a huge success and were gobbled down quickly by friends and family. Everyone loves Oreos, right?

If you enjoyed this recipe, you might also like to try this peanut butter Oreo ice cream.

Recipe: Oreo cookies and cream cake

How to make a Giant Butterfly Cake

I’m a keen baker, but lack confidence in my decorating ability, so I tend to go for simple styles. Occasionally I’ll bake something incredibly pretty, like my lemon curd cake. It was so pretty, it was featured in BBC Good Food Magazine, which was nice. For my birthday this year, I was low on time and energy, but needed something tasty but pretty to share with my family. I’m quite big on whimsy, so I decided to bake a giant butterfly cake.

Here in the UK, butterfly cakes are a bit of a birthday tea staple. Little sponge buns, with their lids cut off, filled with buttercream, and the top put back on in the shape of butterfly wings. They’re incredibly simple, but they are quite a joyful little bun. Whilst I was wondering what to bake for my birthday, I thought an upgrade to my standard Victoria sponge, but with a butterfly cake top would be simple but really quite fun. I was not wrong.

How to make a Giant Butterfly Cake

I know my Victoria sponge cake recipe is a good one, but this re-working of it really made it extra brilliant. It was as light and airy as a butterfly wing, but the vanilla buttercream and butterfly wings really made it extra special.

Giant Butterfly Cake

Ingredients:
200 g caster sugar
200 g softened butter or margarine (I use Stork)
4 eggs, beaten
1 tsp vanilla extract
1.5 tbsp milk
200 g self-raising flour
1 tsp baking powder

Buttercream
200g butter, softened
200g icing sugar
A large slug of vanilla extract, approx. 10mls

To finish
1/3 of a jar of good quality raspberry jam
Icing sugar for dusting

How to make a Giant Butterfly Cake

Method:
Heat your fan oven to 190c. Grease two 20cm sandwich tins, I also lined the bottom of each tin with a circle of baking parchment. In a large bowl, beat your butter and sugar together until fluffy (I used a hand mixer). Add the eggs, milk and vanilla and combine, then add the flour and baking powder and mix together until you have a smooth batter.

Divide the mixture equally between the two tins. You can weigh them to make sure they’re fairly equal if you’d like. Bake in your pre-heated oven for around 20 mins until golden and they’re cooked through. Remove from the tins and leave to cool on a cooling rack.

Once your sponge layers are as cool as they can be, thickly spreading good quality raspberry jam between them and sandwich them together on a cake plate or stand.

To make the buttercream, sift your icing sugar to make sure there are no lumps. Then beat the softened butter and icing sugar together with the vanilla extract until it is fully combined and fluffy.

Take a sharp knife and carefully cut a circle out of the top cake layer. Don’t cut all the way through, you’re looking to create a small crater for the buttercream to sit in. Carefully remove your circle from the cake and set it aside.

You can either pipe or spoon your buttercream into your cake crater, it’s up to you. I used a spoon. Fill the crater and smooth the buttercream, I sort of made a small ravine in the middle so there was a dip where I’d be putting the butterfly wings.

With a sharp knife, cut the circle of cake in half and place them onto the buttercream ravine. As this is much bigger than your average butterfly cake, I used my spoon to build up the buttercream underneath the wings to support them, which worked really well. Once you’re happy with how the wings look, you just need to sprinkle a tiny bit of icing sugar over the top, and it’s ready to be shared.

The cake did look awesome, everyone was oohing and ahhing over it, which is exactly the response I was going for. It’s a great, simple, fun bake and one I suspect I’ll be asked to make over and over.

How to make a Giant Butterfly Cake

How to make a Double Chocolate Twirl Cake

My nephew is brilliant company and whenever his birthday swings round, I always bake him a cake. This year he asked for a chocolate twirl cake; the details were up to me, he just wanted his favourite chocolate bar incorporated into his birthday cake. Say no more little man, your birthday wish is my command.

If you’ve ever read any of my cake recipes before, you’ll know that I favour the simplest options and that fancy decorations are best left to people more skilled than myself. I decided to make a chocolate sponge cake, with chocolate frosting between the layers and with almost 40 twirl bars glued around the side with even more chocolate frosting. It was very much a beast of a cake, but it impressed the recently turned 12 year old, and that’s all that mattered.

I baked the two sponge layers the night before so they’d cool properly before I put the cake together. With chocolate especially, you want to be working with cooled cakes. If you use still slightly warm cakes, there’s a danger that your chocolate decorations will melt, and that’s not a good thing.

How to make a Double Chocolate Twirl Cake

This is an absolute beast of a cake. It’s huge to start with and it’s also incredibly rich, so a little slice goes a long way. With this in mind, you can probably get a good 16 slices out of this cake.

Double Chocolate Twirl Cake

Ingredients:

220g unsalted butter or baking margarine
220g caster sugar
200g self-raising flour
4 large eggs
1 teaspoon baking powder
1 teaspoon vanilla extract
2 heaped tablespoons cocoa powder
2 tablespoons of milk

To decorate:
1 400g tub of chocolate frosting
Approx 35-40 Twirls

To make your double chocolate twirl cake:

Preheat the oven to 180°c. Grease and line 2 x 20cm cake tins and put to one side, ready for action.

In a large bowl, beat together the butter and sugar until pale and fluffy. Tip in the remaining sponge cake ingredients into your mixing bowl and beat together until the mixture is well combined. Then divide the mixture between the cake tins. I like to weigh them so they are of equal size.

Bake the chocolate sponge layers in the oven for 20-25 minutes until they are cooked through. Leave them to cool in the tins for 10 minutes or so, and then pop them on a cooling rack until they are completely cool. If you’re in a rush for this, after about an hour you can pop them in the fridge to chill for a little while.

When they are cool, put a blob of the frosting on your cake plate or stand; place the first layer of your sponge cake on top. The blob of frosting will anchor the cake in place and stop it from sliding about. Smother the top of your first layer with a thin-ish layer of the frosting, then sandwich the second layer on top of that.

I use an offset spatula to spread frosting and buttercream, so if you have one of these, now is a good time to dig it out of your kitchen drawer. An offset spatula is another name for a palette knife with a bend in it. If you make cakes on a semi-regular basis, then one of these is a really good investment to make.

Using an offset spatula, or similar, cover the whole cake – top and sides with the remaining chocolate frosting. Now it’s time to get busy with the twirls. I had to cut approx 1cm off the bottom of each one, as I didn’t want the twirls to be that much higher than the cake. So measure your twirls against the cake and decide how much you want to chop off. Once you’ve cut the bottoms off, put the offcuts to one side as we will be using them again later.

How to make a Double Chocolate Twirl Cake

Carefully stick the twirls around the cake, press them in so the chocolate frosting glues them on. I used 38 twirls on my cake, so you’ll need a similar amount. Please buy a few extra as some accidentally fell into my mouth as I was unwrapping them all, and this may well happen to you too.

Once you’ve stuck all the twirls to the cake, it’s a really good idea to take a length of string or ribbon and tie it around, this will help them stick to the cake and it can be removed just before you serve it.

For the top of the cake, I took all of the little pieces I’d chopped off the twirl bars and then I chopped them all up into smaller chunky pieces. I finely sliced some of them until they were almost like chocolate powder. Then I sprinkled all of these bits all over the top, pressing some of them into the frosting with the back of a spoon so they’d stick.

The cake looked tremendous. It was not for the faint hearted; it was a serious chocolate endeavour and exactly what my twirl loving nephew wanted for his birthday cake. This double chocolate twirl cake was really easy to make, it looked impressive and it took a little bit of time to put together; but it was worth it.

If you enjoyed this recipe, you might also like to try this school dinner style chocolate cake with chocolate custard recipe.

How to make a Double Chocolate Twirl Cake

How to make a Pokemon Pokeball Birthday Cake

For his birthday every year I bake my son a birthday cake. Each year he presents me with a set of grand plans for the cake, and each year I tone down his idea a little to something I can manage with my limited skills. Over the years I’ve learned how to bake pretty darn good cakes, but decorating them is where I fall down. I don’t like to disappoint, so when he asked for a Pokemon birthday cake, then rattled off an extensive list of characters I decided it would be best to make a simple Pokeball design with a colourful rainbow sponge inside.

It’s actually very simple and you don’t need loads of cake decorating skills to do it. If you can roll out icing and cut shapes out with a knife, you’ve got all the skills you need.

Pokemon Pokeball Birthday Cake

The finish of my cake was not perfect, but I had already spent a lot of time faffing about with the rainbow layers, and no one cared really. He was thrilled with his birthday cake, which is all that matters, that and piles of birthday presents.

How to make a Pokemon Pokeball Birthday Cake

You will need:

5 layers of sponge cake, rainbow coloured if you like
Vanilla buttercream, I used 2 tubs of Betty Crocker
1 packet of marzipan
2 packets of white ready to roll royal icing
Red ready to roll royal icing
Black ready to roll royal icing
Icing sugar
Water
A cake board

How to make a Pokemon Pokeball Birthday Cake

To begin with I baked the rainbow layers. I made up a double batch of my victoria sponge recipe and using a set of scales divided it into equal portions. I then mixed through a few drops of the colouring from this set of 8 food paste colours. When you do this remember that the colour darkens in the oven, so mix it a shade or two lighter than you’d like. Once baked, leave them until they’re completely cool before assembling the cake.

To stack the cake, using a palette knife put a dab of the buttercream in the centre of the cake board. If you’re using rainbow cake, decide which order your rainbow layers will go and place the bottom layer on top of the blob of buttercream. This will help to anchor your cake in place and stop it sliding about.

Pokemon Pokeball Birthday Cake

Spread a layer of buttercream on top of your first layer and top it with your next cake, cover that with buttercream and continue until all the layers are stacked.

Now it’s time to apply the crumb coat, which just means cover the whole of the cake in a thin layer of buttercream. This is so the cake crumbs stay where they should be and it will also help stick the marzipan to the cake. Once you’ve done this, put the cake to one side, somewhere cool.

Pokemon Pokeball Birthday Cake

Now it’s time to roll the marzipan out. I used icing sugar to stop it sticking to my work surface and rolling pin. Roll it out as thin as you please. My marzipan was pretty thin, but not so thin it could easily tear; perhaps about the thickness of a pound coin. You’ll need to roll out quite a big piece of marzipan to cover the cake in one go, and it might be worth measuring how much area you need to cover with a piece of string.

Lift the marzipan with the rolling pin and drape it over the cake. Use your hands to smooth it down and all over the cake. You may need to trim some of the folds back so the finish is smoother. It doesn’t matter how this layer looks because it will be covered with the royal icing, but it does need to be pretty smooth and even all over. Take your time doing this.

Pokemon Pokeball Birthday Cake

Now for the hardest bit. Take your white royal icing and put some to one side for later. Then roll out the rest of the icing, again using icing sugar to stop it sticking to the work top. When you’ve rolled out a piece as big as you need, brush the marzipan all over with water and carefully lift the icing onto the cake. Take as long as you need to gently smooth the icing over the cake. I find the warmth of my hands helps to smooth it out. This layer needs to be super smooth, so take your time to get it right.

After that you probably need to sit down with a cup of tea for a bit, so do that before you do the next bit.

Pokemon Pokeball Birthday Cake

Now it the time to turn your plain white cake into a Pokeball. Just like before, roll out the red royal icing. Take one of your cake tins and use it to trace a semi circle the size of the cake. I then used a shot glass (don’t judge me) to cut out a small semi circle on the straight edge of the icing. Brush half of the top of your cake with a little bit of water, not too much as your colours may start to run and gently press on the red semi circle of icing.

Roll out the black icing and cut out a black circle the size of a shot glass. Using a knife cut out a circle so you have a black ring. Then cut out a long strip of the black icing the diameter of the cake. Have a look at the picture below and using a dab of water fix the icing where it should be.

Pokemon Pokeball Birthday Cake

Finally cut out a circle of white royal icing to sit in the black ring. Stick it in place with a dab of water and your Pokeball birthday cake is done.

It’s a really straightforward design and frankly if I can do it, I’m sure you can too!

Pokemon Pokeball Birthday CakePokemon Pokeball Birthday Cake

If you enjoyed this you might also like to try and make these birthday cakes –

How to make a Pokemon Pokeball Birthday Cake

How to make a really easy Volcano Birthday Cake

For my son’s 7th birthday he wanted me to make him a Volcano Birthday Cake. I am by no means an expert cake decorator, so I knew whatever I made would need to be really simple to put together. The great thing about making a volcano cake if you’re not an expert cake decorator, is if it looks a bit rough and rustic when you’ve finished, it all adds to the rugged volcanic charm.

A few years of watching The Great British Bake Off has given me a few ideas, so I sketched the plan and set to work. You will need six round sponge cakes. I also used my favourite kind of shop bought frosting – Morrison’s Chocolate & Brazilian Orange Frosting. It’s the best shop bought frosting I’ve ever tried and it’s well worth searching out. If you can’t find it, use whatever chocolate frosting you can get your hands on.

How to make an easy Volcano Birthday Cake

Here’s how I made my pre-historic Volcano Cake.

How to make a Volcano Birthday Cake

You will need:

6 round sponge cakes (I used 9 inch tins)
2 tubs of Morrisons Chocolate & Brazilian Orange Frosting
Dr Oetker Regal Ice Ready to Roll Icing pack of multi-coloured icing
Wooden skewers or long straws
Selection of small plastic dinosaurs
Fountain Sparkler candle
One cupcake per letter of name (eg Ben = 3 cupcakes)
Birthday candles
Wooden letters spelling name

How to build your cake:

On a large clean tray or board put a dollop of Morrisons Chocolate & Brazilian Orange Frosting and start to build your volcano on top of this. The frosting will help to anchor the cake in place.

Sandwich your six layers of cake on top of each other with a layer of the Morrisons Chocolate & Brazilian Orange Frosting in between each cake. Take your skewers or straws and push then down from the top of your volcano structure down through the six layers to the bottom, this will make the cake more stable.

Carefully using a knife, carve your cake structure into a volcano shape. It doesn’t have to be perfect, remember if it’s rustic it all adds to the charm. Dust as many loose crumbs off your cake as you can and then start to plaster the whole cake in the Morrisons Chocolate & Brazilian Orange Frosting. Once it’s completely covered, leave it to harden a little for an hour or so.

How to make an easy Volcano Birthday Cake

Taking the red and yellow icing from the Dr Oetker Regal Ice Ready to Roll Icing pack, cut each pack of icing in half. Set aside half of each pack and with the other halves, knead them together to make an orange coloured icing.

Here’s where you can get artistic. Roll pieces of the red, yellow and orange icing into rivulets of lava and press them into your volcano. Make sure there’s plenty of lava coming out of the top and running down the sides. You might want to pool some lava at the bottom of the volcano.

How to make an easy Volcano Birthday Cake

Taking your dinosaurs and a little of the chocolate orange frosting (to stick the dinosaurs in place) add some dinos to the scene. Again be artistic; get them caught in the lava, running away from it, have them in little family groups, whatever you want.

Take your cupcakes and top with some frosting; wedge a letter on the top of each one and using the frosting on the bottom of the cupcakes, stick them in place to spell out the name. Again you can have dinosaurs around the cakes, or looking like they’re eating them maybe.

How to make an easy Volcano Birthday Cake

To finish your cake, put the fountain sparkler candle in the top (so when you light it, it should sparkle and flame like a volcano.

My son was absolutely delighted with his volcano birthday cake, and his friends were pretty impressed too. It’s surprisingly simple to put together and it doesn’t have be perfect in order for it to be impressive. I dread to think what he’s going to ask for next year!

How to make an easy Volcano Birthday Cake

How to make a really easy Volcano Birthday Cake

If a volcano cake doesn’t cut it, what about this super-simple train birthday cake?

Happy Birthday to my little big man

My, how you’ve grown my little big man. You’re four years old today and absolutely, 100% the love of our lives. Don’t get me wrong kiddo, you can be a stubborn little handful (just like your Dad), but you are our most favourite child, our best friend, our reason for everything we do and we quite like having you around the place, despite all the mess, fuss and snotty cuddles.

Your birthday is always a time of reflection for me, about the year which has passed and all the years before then. I can’t help but think about our difficult start, but as the years go by that is vastly overshadowed by all our love, adventures and mischief we get up to as a family.

4th birthday

I still find it hard to believe we made such a beautiful creature. It was love at first sight. You were all dimples, squeezy cheeks and long eye lashes. You were and still are a pretty peaceful chap.

4th birthday

This was you on your first birthday. See, you’re still ALL dimples and cheeks. You loved opening your presents and we loved helping you. You were and still are a really happy little chappie. We still couldn’t believe our luck, we are so lucky to have you in our lives.

4th birthday

This is you on your second birthday. You’re all rosy cheeked because we’d been to a soft play centre for the afternoon, then stopped at TGI Fridays on the way home. You weren’t that keen on eating, but you enjoyed doing lots of drawing and stealing our chips.

4th birthday

Here you are, all dressed up for your third birthday party. You’re so grown up looking here, we’d had a really tough year as a family but your birthday was a real highlight for us. You even had a huge Thomas the Tank Engine cake.

4th birthday

This is you just a couple of days shy of your 4th birthday. We threw a train party at a local miniature railway. I think you had an amazing time, all your friends liked it too. What a year it’s been, you’ve started nursery at the big school and you’re growing into a proper boy and you’re no longer our woddling toddler.

Little Bee, my little big man, Happy Birthday, you are the love of our lives, the apple of our eye and you’ll always be our best friend. We love you, always have, always will xxx

How to make a really easy Train Birthday Cake

Children’s birthday parties can be fairly hard work, with lots to remember, from party food, party bags, games, music, costumes and cake. I’m all for making life easy (and on a budget), so this year instead of buying an expensive cake we opted to make our own. The small boy wanted a train birthday cake to go with his train birthday party and who am I to argue?

Train birthday cake

To make this easy train birthday cake you will need:
Three rounds of sponge cake (as described below)
Half a jar of raspberry jam (approx), or strawberry if you prefer
Two tubs of Betty Crocker Vanilla Buttercream icing
Three tubes of smarties
Bigjigs trains (see below)
One cake board (or big enough plate)

Hubs is the baker of the household, so I asked him to make three layers of sponge cake. Use your favourite and foolproof sponge cake recipe (his used 8 eggs to give you an idea of the amount of sponge we made) you want to make three round sponge cakes baked in a 25cm tin. Once baked they need to be around an inch tall.

Once the cakes are cool, put a blob of the buttercream on the cake board and place the first layer of sponge on top of that, this helps to anchor the cake to the board and stops it sliding about. Spread a layer of jam on top of the first layer. Carefully turn the second layer upside down and gently spread the flat bottom with the buttercream and sandwich in top of the jam layer.

On the top of the second layer, spread evenly with more jam and then spread buttercream on the upturned bottom of the top layer of sponge, put that on top. You should have a three layered cake in front of you which from the bottom goes…
Blob of buttercream
Cake
Jam
Buttercream
Cake
Jam
Buttercream
Cake

With me so far? Good. Now you’ve got all your layers stacked carefully, spread the remaining buttercream over the top and sides of the cake. Don’t worry about it being prefect, if you aim for the rustic look it’ll be fine. I created a wavy effect with a palette knife and the sides were rough but fully covered. If you want you can make the buttercream smooth.

Bigjigs make a sort of pick and mix name train set, I bought mine from my local toy shop Giddy Goat Toys. I bought the carriage and the letters of his name for £2.25 each, which cost me just £9 in total. This was much cheaper than buying a proper train and carriages and much more personal.

I gave them a little wash, though they’d been in a sealed box, then using a little blob of the buttercream “glued” the removable letters onto the carriages and pressed the train into the thick buttercream in the top of the cake.

Tipping the smarties into a bowl I then wrote his age in smarties on the top of the cake, then I used the remaining smarties to edge around the bottom of the cake. I was pretty pleased with my efforts.

If you do this the night before the party and leave it out uncovered overnight, the buttercream should firm up slightly and make it easier to transport. On the morning of the party I wrapped it loosely in foil and it sat in my knee in the car on the way to the party. On arrival we unwrapped it and there were no buttercream smears on the foil and it still looked good. Phew.

The cake tasted really good, but hubs does make beautiful cakes. We had lots of lovely compliments about it. It sliced into approx 24 slices, which was more than enough for a kids party.

Our lovely and quite huge train birthday cake was a really big hit, a few people thought we’d bought it (ha, always a compliment) and the small boy was really, really pleased with it and proudly showed it off to his friends. It’s a really easy way to make a simple sponge birthday cake a little bit special.

Train birthday cake

How to make a really easy train birthday cake