
Last Updated on May 10, 2016 by HodgePodgeDays
It’s good practice when you’ve got a blog to schedule in a bit of maintenance on a regular basis. One of the things I like to do is to remove old giveaway posts, mainly because I didn’t like the thought of someone clicking through thinking there is a live giveaway but its closing date was months ago. I had been either re-working them into more content based blog posts, or if that wasn’t possible I was deleting them altogether, which is in hindsight a stupid thing to do.
I decided it was time I figured out how to redirect my old giveaway blog posts to my giveaway page, so anyone clicking through could see what giveaways were live on my blog right now, rather than being disappointed and just leaving my blog entirely.
I am often daunted by a page of boxes to check and things to code, but trust me, this is really easy and will make a difference to your blog. Setting up a redirect in WordPress is remarkably easy and all it takes is a plugin.
Choose a redirect plugin
I went for the Quick Page/Post Redirect Plugin. It had good reviews and seemed to do everything I needed it to do, so I installed it.

Once you install it you can take a look at the settings page, but it all looks a bit scary with too many questions I didn’t entirely understand (I always fear that I’ll tick the wrong box and delete everything I’ve ever done) and there is a better way. I wanted the plugin to redirect old giveaway blog posts to my giveaways page, which was a simple enough task.
- Find the blog post you want to redirect and go to “Edit”.
- Scroll down to “Quick Page/Post Redirect” which for me was immediately below my blog post.
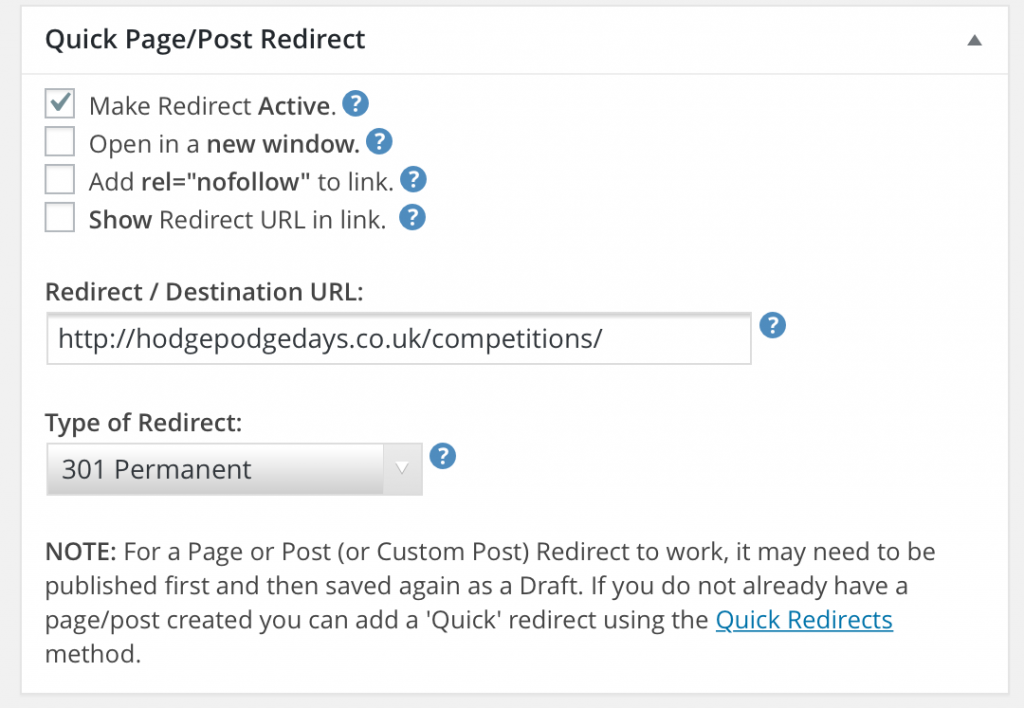
- In the “Redirect / Destination URL” box type or paste in the URL you want to redirect to.
- Select the “Type of Redirect” (more of which later). I always choose 301 Permanent.
- Tick the box with says “Make Redirect Active” and the click on “Update” in the Publish box and it’s done. (Go on, check it).
Or for Quick Redirects, once you’ve installed the redirect plugin the option to do Quick Redirects will be in your dashboard sidebar. This is useful when you know the URL but you’ve maybe deleted the old blog post. Redirecting is simple –
- Put the URL you want to Redirect in the “Request URL” box
- Put the URL of where you want to Redirect it to in the “Destination URL” box
- Click “Add new Redirects” and you’re done. Easy yes?
If you need to edit the Redirect at any time you can do so if you scroll down a little further and click on the editing pencil icon.

SEO
Is there any benefit to redirecting your blog posts instead of deleting them?
Yes, without a redirect, deleted pages just ‘drop’ out of the Google index and you lose any value you’ve built up in them. If you redirect, you retain that value AND effectively pass it on to the new target page. By setting up a redirect you’ve not only avoided losing the SEO value of your old post, but you’ve also assigned it elsewhere. From an SEO perspective it makes so much sense to redirect.
Which Redirect should I use?
The Redirect Plugin gives you four redirect options to choose from, which should you go for?
301 Permanent
A 301 redirect is a permanent redirect which passes between 90-99% of link juice to the redirected page. A 301 redirect is generally considered the best option when putting redirects on a website.
302 Temporary
A 302 redirect is a temporary redirect. It passes absolutely no link juice to the redirected page and isn’t recommended for use.
307 Temporary
A 307 redirect is the successor of the 302 redirect. Again it doesn’t pass any of your hard won link juice on to the redirected page and should only really be used if content is really being moved only temporarily.
Meta Redirect
When I mentioned Meta Redirects to my friend who is an SEO expert he told me not to go near it with a bargepole. “It’ll make your blog look spammy to Google” he said and they will be slower and you will have seen websites with a five-second countdown with the text “If you are not redirected in five seconds, click here, that’s a Meta Redirect. They are not recommended as an SEO tactic due to poor usability and the loss of link juice passed on to the redirected post.
Any questions?
If you’re in the habit of tidying up and deleting old blog posts, then it’s definitely worth looking into installing and using a redirect plugin on your WordPress blog. I went for the Quick Page/Post Redirect Plugin and I really rate it. It’s simple to use for quick redirects and it’s quick. The redirects I’ve sent up load incredibly quickly, and I’m cross with myself for deleting so many posts when I could have easily just redirected them and kept all the lovely SEO link juice for myself.
If you’ve got any questions feel free to comment here or Tweet me. Always happy to help!

Another really great post! Thanks so much for this. I always really appreciate the step by step technical tip type post, so helpful! x