How to keep track of your Social Media Followers

Last year I made it my New Year Resolution to keep track of my social media followers. This was so I could (hopefully) see how my numbers have grown over the year. The tracking was really helpful. I used a spreadsheet which I shared on my blog for people to download and use too. I know lots of people found it helpful, so I’ve decided to re-work it and share it again.

In 2017, across all of my social media accounts I’ve managed to grow my following by a total of 5000. To me this is a really good number and I’m delighted. If I can do the same in 2018 I will be thrilled. Growing your numbers can be really hard work, keeping them engaged is probably harder though, but that’s a whole other blog post. We all already know that the key to social media success is the SOCIAL bit. But the best way to grow your numbers on social media is to always to engage and be engaging with your followers. It’s as simple and as hard work as that.

It would be easy to just change the date on my old spreadsheet and just re-share it, but as the year has gone on I’ve added a few elements and made it more fit for purpose. It’s still quite simple to use and I’ve included all the social media channels I use and can think of. If there’s one on there you don’t use, you can either delete that row or just put a zero in that box and it will ignore it. If I’ve missed any, please message me or leave a comment and I’ll update the spreadsheet.

I’ve set the spreadsheet up so that it will add up your numbers and give you a total number of followers. This will also appear in the chart below. I like seeing my numbers rising on a chart. I’m a very visual person, so a rising graph always pleases me.

Download my Social Media Tracking spreadsheet HERE.

How to keep track of your Social Media Followers

One of the features I’ve added is a “To Go” column. This is entirely optional. This will show you how many more followers you need for each social network each month against your yearly target. You will need to change the code each month to make sure the sum is correct. If you’re not confident doing this then you can leave it out.

If you look at the spreadsheet you’ll see I’ve added an example number and target. The code =SUM(N4-B4) in the To Go column does the maths and tells us that with 50 followers and a target of 100 followers, you have 50 more followers to go. In February you’ll need to change the code in that box to =SUM(N4-C4) and so on each month. I added that column because I found it useful to see where I needed to have a bit of a social push in order to meet my target for the year.

I have also added an extra section underneath, which helps me keep track of the three things I was most interested in keeping a note of in 2017. For me these were my Domain Authority (DA), my total YouTube views and my Tots100 chart position. Obviously you can either delete that section or rename the rows so you can monitor whatever metrics you’re most interested in.

You might like to set yourself a target for the year. See how many followers you’ve got on New Years Day and then give yourself a target to work for. It could be an across the board total figure you’re working towards, or maybe you want to get to 10k followers on YouTube in 2018. Whatever your social media followers target for 2018, tracking your progress is the first step to success.

Let me know how you get on! Happy tracking!


Blogging: Five ways to spring clean your blog

Being a blogger is a very public affair. I know I write about all aspects of my life and the things we do as a family. It’s all out there for all to see. But what people don’t see are the behind the scenes things a blogger has to do to keep things ship-shape. Is it time to spring clean your blog?

Blog admin and maintenance are rarely anyone’s favourite things to do and I’m often guilty of letting things pile up a bit before tackling them. I tend to keep a snag list of things to do and look at when I’ve got a bit of time. Once I’m in the zone I usually barrel through my list and wonder why I left things so long.

I have a five point checklist of general admin and maintenance I do every so often to try and keep on top of things. If I were sensible I would do this every month, but I’m not very sensible really. 

Blogging: Five ways to spring clean your blog

Five ways to spring clean your blog

Run a broken link checker
Broken links are bad news. Firstly, they can be annoying for anyone reading your blog and clicking through to a dead link. Having broken links on your blog can mean that Google ranks your blog lower than it would do otherwise. 

I use a free broken link checker about once a month (or when I can be bothered). It scans through my blog looking for dead links and lists them for me. They’re usually pretty easy to fix, the checker gives me both the broken url and allows me to click through to the blog post with the broken link.

Most of my broken links are from bloggers who aren’t blogging any more, or from companies no longer trading. For most of these I just delete the link but keep the content, but you could update the link with a new relevant one too. This is a good way of finding older content which you might want to refresh and update later, I add anything I want to look at again to a snag list.

Edit and SEO old posts / refresh old content

Looking through your stats page at what people are landing on, or finding a broken link in an old blog post can highlight some old content which is ready to be refreshed. I add these to my snag list and when I have some time I look back and see what I can do.

When I first started blogging nearly four years ago my posts were painfully short, had no SEO and the images were all over the place. I look back and cringe. It would be easy to just delete these old posts. But when I read them, for the most part the actual content is good, they just need a tidy up.

You should edit and tidy up your old blog posts so they meet your current standards. If you smarten up your SEO – so you get the green light from Yoast. When people land on your ancient blog post from a Google search (other search engines are available) they won’t be horrified and bounce straight off it. They will hopefully stick around and read more. That’s the goal right?

(Never, ever delete an old post by the way, redirect it instead if it’s not salvageable).

Tidy up side bars and buttons
Bloggers like a button and I’m as guilty as the next blogger about this. They are in some ways a necessary evil. Blogging networks like bloggers to host buttons and badges. If you’re an ambassador for a brand then they often provide one. It can be a quick way for you to show off your key brand relationships and achievements to your readers and to people who may want to work with you.

It’s worth casting your eye over your side bars and buttons every so often. Things might not be relevant anymore, or may need updating or moving around a bit. Sometimes just moving things about a bit can make your blog feel a bit fresher, if only to you.

If you host adverts on your blog, like Google Adsense, you might want to try moving these to a different position. This will help you test if you can get a better income from your advert if it’s positioned elsewhere.

Update your About Page
This is a fairly neglected page on my blog. Part of me tells me I’ve done it and don’t need to ever look at it again. But things change, I change, the things I blog about change, so it’s important to check your About Page every so often. Is it still relevant, has anything changed? Maybe update any photographs on there. Does it make you seem like an interesting and attractive proposition to your readers and for potential brand collaborations? 

Categories and tags
When I first started blogging I had no idea how categories and tags worked, what they were or how to use them. Nearly four years down the line I have a better idea of what I’m doing. I’ve looked back at my older blog posts and the categories and tags are all over the place. 

Last week I had an afternoon to myself and I made sure I wouldn’t be disturbed. I looked at my categories and decided that I was going to change a couple of them. This is fairly easy to do. BUT you do need to go back and redirect the old urls to your new ones. This is REALLY important, you don’t want to lose the links and link juice those old urls had already built up. You can read this blog post about how to redirect old urls to new ones if you need some help.

It’s well worth doing as it tidies up your blog and makes things easier to find for your readers. You will need  a quiet afternoon and some methodical working. You can do it!

Blogging: Five ways to spring clean your blog

There are lots of things you can do to spring clean your blog. But here are just five you could do to make a start and make a real difference to your SEO and the look of your blog. 

What are your suggestions to spring clean your blog?

Looking back at 2016 – a year to forget

Most people will look back on 2016 and remember it for the sheer number of notable celebrity deaths. The year began with Bowie and Alan Rickman fans in bits, and went out with us saying a sad goodbye to Carrie Fisher and George Michael. For some of us, for me, we’ve lost someone incredibly important in our own lives. In my case it was my Dad.

For me 2016 began with a high. I was determined to make this whole blogging thing a success and to build on the previous few years of hard work. January began well with a blog post in the style of a school newsletter going a little bit viral. So I rolled my sleeves up and prepared to get cracking with life. Life however had different plans.

It’s hard to write a retrospective of a year like 2016. My Dad died at the end of June and my brain has almost completely deleted everything before that date, and everything after just feels a bit funny.

I’ve just scrolled back through my Instagram feed to refresh my memory and it looks like the first half of 2016 was lovely and lively. I took up crafting in earnest, attended a gin festival, won a holiday to Majorca, went to Blog Camp with a heavily pregnant friend (I binge watched Call the Midwife beforehand just in case). We had a holiday in Devon, trips to festivals, I ate and made a lot of good food and I bought a fancy camera.  

Then my Dad died. 

Looking back at 2016 - a year to forget (Peter Woolley)

And I wrote a bunch of posts about grief and how I was coping. I don’t know how I coped, but I had to. I went into myself for a good few months, my Instagram feed definitely reflects that, just the occasional photo of something I baked or something we did.

My blogging was the same. For all the reviews and write ups I do, I try (and will try harder) to make my blog a reflection of my life. The fact that there were no truly personal blog posts for months is only because I really couldn’t face opening the box inside me which contained my thoughts and feelings. Because if I did that then I’d need to acknowledge them and I didn’t have the strength to do that.

Every so often I do open my box of grief and feelings and it all pours out. I quickly slam the lid shut and turn the key in the lock. But I do feel myself wanting to write again and wanting to talk about those feelings inside me. Feelings most of us will experience at some time in our lives.

The last six months of 2016 have been busy, we did a lot of healing at the Just So Festival and we had our much needed holiday to Majorca in October. I had a jaunt to River Cottage with some blogger chums, and we went to Lapland UK in December. We’ve done a hundred wonderful things as a family and as a result our little unit of three has grown much closer. Then we three became four.

Looking back at 2016 - a year to forget / Our dog is for life, not just for Christmas

We welcomed this monkey into our home. She’s a joy, she’s a distraction, she’s a menace, but we love her. She’s the four-legged piece of the puzzle we needed to complete our family jigsaw. 

2016 will not be remembered with much fondness or joy by me. It’s a year which has completely changed my life forever. Some of it for the good I’ll admit, but a bit of my heart broke in June and it will never heal.

As for 2017, my hopes and ambitions for the next 12 months are modest. I’d like for me and the people I care about to survive the year unscathed. I really hope that isn’t too much to ask for.

Happy New Year, let’s hope 2017 gives us a better run of luck!

Looking back at 2016 - a year to forget

Blogging Basics: Keeping track of your Social Media followers

A few months ago I set myself the challenge of reaching 20k social media followers across the board by 2017. I was around 4k short by that point and I knew the only way to effectively track my numbers was on an Excel spreadsheet. I created a very basic spreadsheet and on the 1st of each month I update it with my numbers.

We all know that the essence of social media is the SOCIAL bit. I’m not going to give you any wise words about how to magically increase your social media followers overnight. But the best way to grow your numbers on social media is to always to engage and be engaging with your followers. It’s as simple and as hard work as that. 

My spreadsheet which you can download HERE is really basic and therefore very simple to use. I’ve included all the social media channels I use and can think of. If there’s one on there you don’t use, just put a zero in that box and it will ignore it. If I’ve missed any, please message me or leave a comment and I’ll update the spreadsheet.

I’ve set the spreadsheet up so that it will add up your numbers and give you a total number of followers. This will also appear in the chart below. I like seeing my numbers rising on a chart. I’m a very visual person so a rising graph always pleases me.

You might like to set yourself a target for the year. See how many followers you’ve got on New Years Day and then give yourself a target to work for. It could be an across the board total figure you’re working towards, or maybe you want to get to 10k followers on Instagram in 2017. Whatever your social media followers target for 2017, tracking your progress is the first step to success.

Blogging: Keeping track of your Social Media followers

Blogging bugbears: Would it kill you to be nice?

Three years ago I sat down with some vague ideas and set up a blog. It wasn’t pretty, it wasn’t innovative, but it was functional and it did the job. I had my own tiny corner of the Internet. About six months later, with more of a clue about what I was doing, I bought my own domain and went self hosted. My little corner of the world wide web suddenly felt a bit more permanent and felt a bit more like it was mine.

Like my house, I can do what I want with it, paint it purple, get orange scatter cushions, I can have breakfast for dinner and dinner for breakfast. My house, my rules. My blog, my rules.

There are some things I will do and some things I won’t do. Other bloggers I know would make the same choices as me, some would be altogether different. That’s fine. Their blog, their rules.

There are nearly 10k parent bloggers in the UK. The opportunities for these bloggers are finite and competition can be fierce. It’s not in my nature to be competitive, and sometimes friendly competition can turn a bit nasty. I feel like I’m seeing more and more snarky tweets and bitchy Facebook posts about “other bloggers” and the way they manage their own blog. This creates an atmosphere I feel really uncomfortable with. People going out of their way to be mean because maybe they feel bigger and cleverer for putting another individual, or a group of “lesser” individuals down. If this was in school there’s a name for people who do that.

I have a very simplistic world view. I tend to look at the world and wonder why we can’t all just get on. At our very heart we are all human beings with other human beings to love and care for. A mother is a mother in Southampton or Syria, Ipswich or Iraq, Amersham or America. I told you it was almost naively simplistic.

Why can’t we all just get on? Why do some people look at another blogger and go out of their way to do them down? They are just another individual trying to scratch out a living by blogging. By doing someone down you’re not slagging off a massive multinational business, but a mum or dad struggling to juggle kids, a home, maybe a job and blogging. And we all know that blogging can be full time and full on.

It’s not up to me or you to say that one way is the right way and everything else is wrong, wrong, wrong. I bought and paid for my little corner of the internet, it’s mine and if I want to paint my walls purple then I will. If I want to run giveaways, do reviews, sponsored posts, endless blog posts about my bad back, silly things my son said to me, or if I want to use my own personal blog to just be a nice person then I will. No one is forcing anyone to read, follow or interact with me or any other blogger. If you don’t like it, don’t read it. Simple.

Vive la difference!

blogging bugbears

It’s my blogging birthday – 3 today!

HodgePodgeDays is three years old today. I remember sitting with my laptop one quiet evening three years ago. I had a head full of words and I just needed to write to get it all out of me. I set up HodgePodgeDays on WordPress, had no clue how anything worked or what to do or anything, but that was fine, it was about just getting those thoughts and feelings out of my head and if anyone else looked at it, then wow, what a bonus!

A lot has happened in those three years. I’ve physically recovered from my spinal surgeries as much as I ever will, but I’m left with neurological issues and chronic pain. I’ve come a long way from the spiralling mental health problems which came as a result of being laid up for so long. My baby has grown into a boy, a beautiful boy who I fall in love with afresh each morning.

My blog is my job now, I can’t work in a desk bound 9-5 anymore, so this *waves hand around my blog* has to earn me an income, enough to feed and clothe my family, pay some bills and have enough left for the occasional gin. It doesn’t, it doesn’t yet, but I live in hope.

But I wouldn’t be here without you.  Thank you. Thank you for every encouraging comment, every social share, every like. The people who read my blog, who have read my blog from the start, who have seen me stumble my way from there to here, you have been some of the best friends I’ve made. We’ve laughed and cried together. Drank gin, wine, cocktails and warm orange squash together. We’ve applauded our victories and commiserated our failures.

It’s not been the easiest three years of my life, but I’m glad to have my memories here to remind me of how far I’ve come and what I have endured.  I’m equally pleased that I have almost weekly, sometimes daily photos of my son and the things we have done to remind us of our adventures together. 

The last three years have been the best of days and the worst of days, but to me they’ll always be Hodge Podge Days. Thank you xx

blogging birthday

How to set up a Redirect on your WordPress Blog

It’s good practice when you’ve got a blog to schedule in a bit of maintenance on a regular basis. One of the things I like to do is to remove old giveaway posts, mainly because I didn’t like the thought of someone clicking through thinking there is a live giveaway but its closing date was months ago. I had been either re-working them into more content based blog posts, or if that wasn’t possible I was deleting them altogether, which is in hindsight a stupid thing to do.

I decided it was time I figured out how to redirect my old giveaway blog posts to my giveaway page, so anyone clicking through could see what giveaways were live on my blog right now, rather than being disappointed and just leaving my blog entirely.

I am often daunted by a page of boxes to check and things to code, but trust me, this is really easy and will make a difference to your blog. Setting up a redirect in WordPress is remarkably easy and all it takes is a plugin.

Choose a redirect plugin

I went for the Quick Page/Post Redirect Plugin. It had good reviews and seemed to do everything I needed it to do, so I installed it.

redirect plugin

Once you install it you can take a look at the settings page, but it all looks a bit scary with too many questions I didn’t entirely understand (I always fear that I’ll tick the wrong box and delete everything I’ve ever done) and there is a better way. I wanted the plugin to redirect old giveaway blog posts to my giveaways page, which was a simple enough task. 

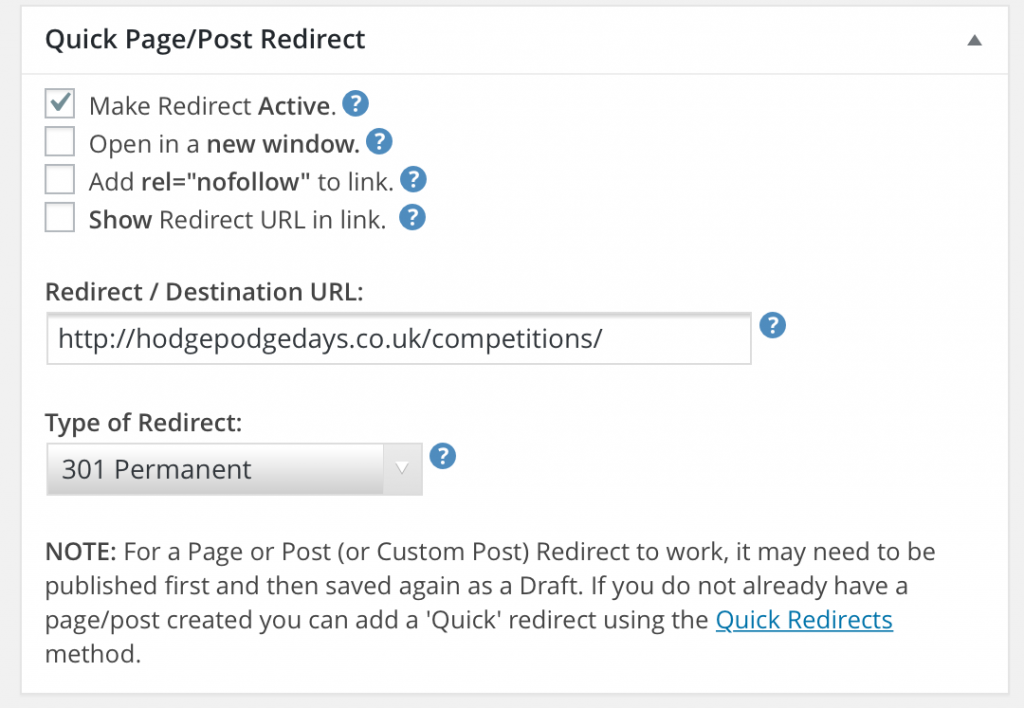
  1. Find the blog post you want to redirect and go to “Edit”.
  2. Scroll down to “Quick Page/Post Redirect” which for me was immediately below my blog post.
  3. In the “Redirect / Destination URL” box type or paste in the URL you want to redirect to.
  4. Select the “Type of Redirect” (more of which later). I always choose 301 Permanent.
  5. Tick the box with says “Make Redirect Active” and the click on “Update” in the Publish box and it’s done. (Go on, check it).

redirect plugin

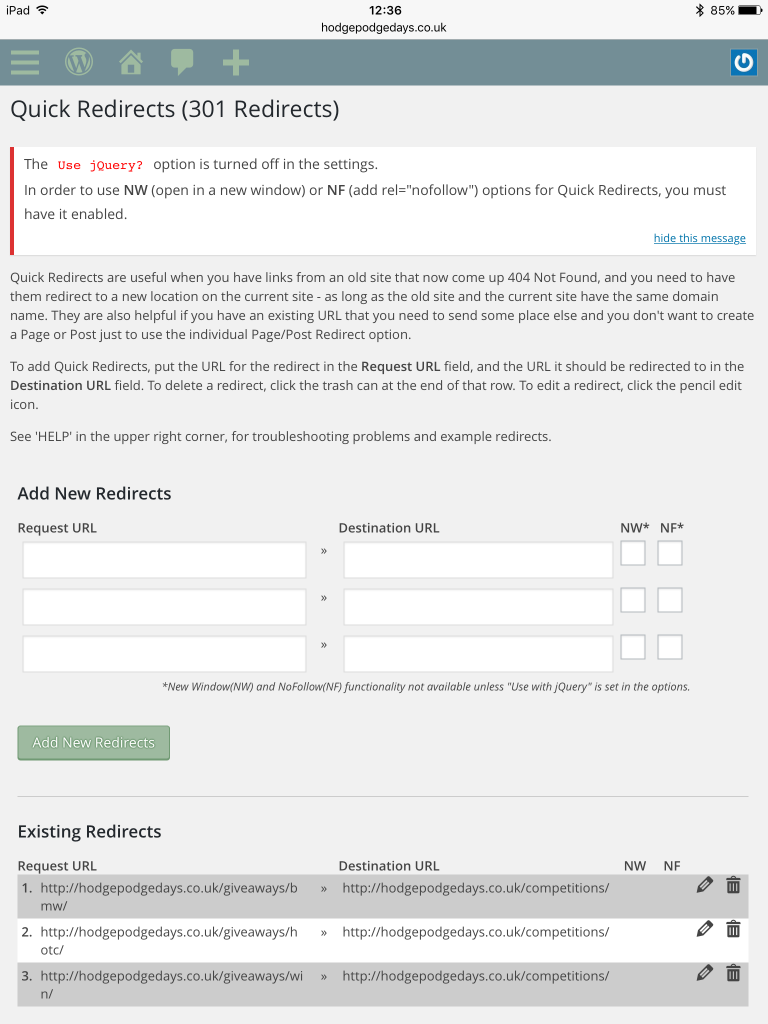
Or for Quick Redirects, once you’ve installed the redirect plugin the option to do Quick Redirects will be in your dashboard sidebar. This is useful when you know the URL but you’ve maybe deleted the old blog post. Redirecting is simple –

  1. Put the URL you want to Redirect in the “Request URL” box
  2. Put the URL of where you want to Redirect it to in the “Destination URL” box
  3. Click “Add new Redirects” and you’re done. Easy yes?

If you need to edit the Redirect at any time you can do so if you scroll down a little further and click on the editing pencil icon.

redirect plugin

SEO

Is there any benefit to redirecting your blog posts instead of deleting them?

Yes, without a redirect, deleted pages just ‘drop’ out of the Google index and you lose any value you’ve built up in them. If you redirect, you retain that value AND effectively pass it on to the new target page. By setting up a redirect you’ve not only avoided losing the SEO value of your old post, but you’ve also assigned it elsewhere. From an SEO perspective it makes so much sense to redirect.

Which Redirect should I use?

The Redirect Plugin gives you four redirect options to choose from, which should you go for?

301 Permanent 
A 301 redirect is a permanent redirect which passes between 90-99% of link juice to the redirected page. A 301 redirect is generally considered the best option when putting redirects on a website.

302 Temporary
A 302 redirect is a temporary redirect. It passes absolutely no link juice to the redirected page and isn’t recommended for use.

307 Temporary
A 307 redirect is the successor of the 302 redirect. Again it doesn’t pass any of your hard won link juice on to the redirected page and should only really be used if content is really being moved only temporarily.

Meta Redirect
When I mentioned Meta Redirects to my friend who is an SEO expert he told me not to go near it with a bargepole. “It’ll make your blog look spammy to Google” he said and they will be slower and you will have seen websites with a five-second countdown with the text “If you are not redirected in five seconds, click here, that’s a Meta Redirect. They are not recommended as an SEO tactic due to poor usability and the loss of link juice passed on to the redirected post.

Any questions?

If you’re in the habit of tidying up and deleting old blog posts, then it’s definitely worth looking into installing and using a redirect plugin on your WordPress blog. I went for the Quick Page/Post Redirect Plugin and I really rate it. It’s simple to use for quick redirects and it’s quick. The redirects I’ve sent up load incredibly quickly, and I’m cross with myself for deleting so many posts when I could have easily just redirected them and kept all the lovely SEO link juice for myself. 

If you’ve got any questions feel free to comment here or Tweet me. Always happy to help!

redirect plugin

My #BlogOnMSI 2016 Ice Breaker

It really doesn’t seem a year since the last Blog On at MSI (or #BlogOnMSI if you’re keen on hashtags) in Manchester. But I’m really looking forward to it, it’s a long day and I go home and sleep for a week afterwards, but where else do you get to catch up with all of your mates, learn a bit about blogging and take home so many goodie bags you need a wheely case to get home?

I’m helping Laura out in my own tiny way at #BlogOnMSI, I’ll be manning (personing, womaning?) the sign in desk. Do bear with me if I don’t recognise you straight away, I have short term memory problems due to my medication. Sorry, where am I again? Who are you? What am I doing here?

here are my #BlogOnMSI ice breaker answers….

Share a recent picture of you (if you are an anonymous blog, a drawing is fine)

#BlogOnMSI
If you had to describe yourself in three words…….

A bit snuffly. 

I’ve got a cold 🙁

How long have you been blogging and what made you start?

Since June 2013. I was recovering from a couple of spinal surgeries and was bedridden, bored stiff and lonely. Blogging gave me something to do and someone to speak to.

What was your favourite TV program as a child?

Blackadder. I was a precocious child and started watching it when I was 8.

Something interesting you might not know about me is . . .

I am a judge at the International Cheese Awards (the largest dairy event in the UK).

What is the weirdest food you have ever eaten?

Dried beetles. It was a bush tucker trial thing. They’re a bit scratchy when you swallow them.

What was your biggest fashion faux pas?

Every. Single. Day. 

I don’t really do fashion, I do comfort, so every day is probably a faux pas day!

What are you pet peeves?

Auto DMs. People who faff and dawdle. People who repeat themselves. Auto DMs.

Who would be your 3 perfect dinner party guests (dead or alive) and why?

Keith Floyd – He’d cook and he’d be an amazing host.

Hugh Jackman – because Hugh Jackman.

My Grandad. I never met him, would be nice to have a meal with him and get to know him a bit.

If they made a movie of your life, what would it be about and which actor would play the part of you?

Wow. Literally no one would pay to see that film. “The blogger in the striped pyjamas” starring Kathy Burke. 

If you could live in any sitcom, which one would it be?

Early Doors. One of the most underrated sitcoms ever. And it’s in a pub. 

Name a famous person you have met

Jarvis Cocker and all of Radiohead and James.

Which social media platform best describes your personality and why?

Twitter. Short and occasionally witty.

What picture do you have on lock screen on your phone / computer?

#BlogOnMSI

This one, the small boy being totes adorbs last year.

How many pairs of shoes do you own?

Millions. How many do I wear? About three pairs.

What period of time from the past would you most like to have lived?

I would have like to have lived in no period at all in the past. I would’ve been some kind of servant or manual labourer and that sounds like too much hard work. If you could guarantee I’d go back as some kind of tea drinking lady with a full household of servants, probably the 1930s.

If you could travel anywhere in the world, where would you go?

Scandinavia. I’ve been to Sweden and Norway and I’d like to explore a bit more.

What is your guilty pleasure?

Twitter. I spend far too long talking to the little people who live in my phone. But they’re so interesting and kind.

What is your favourite tipple?

I will pretty much drink anything, but I like a nice G&T.

If you had a magic lamp and a Genie, what would be your three wishes

  1. For my son to grow up happy and healthy.
  2. To have a fully operational spine again.
  3. World peace.

So that’s me. Any questions? Go on, don’t be shy.

How to add a StumbleUpon Sharing Button to your WordPress blog

Do you have a StumbleUpon Sharing Button on your blog? If not, you probably need one. It’s a great way for your readers to share your content and share the love.

A couple of years ago when I was setting up my blog I added the usual sharing buttons which would appear at the bottom of each blog post. Back then StumbleUpon was one of the standard buttons and I added it to the others not really knowing what it was. Of course these days blog posts are being Stumbled all over the place, and it’s a great way to pick up traffic.

Imagine my horror (not really horror, I might’ve tutted) when friend and blogger, Colette from We’re going on an adventure pointed out that my StumbleUpon sharing button wasn’t there and she had to manually Stumble my post.

My first port of call was to Google it. It appeared I was not alone in wondering what had happened to the StumbleUpon sharing button. It seems that the button used http which causes mixed-content warnings and sometimes fails completely on https sites. WordPress.com does not support http anymore and as StumbleUpon won’t move to https WordPress just did away with the button.

I knew it couldn’t be that hard to make a StumbleUpon button, so I figured it out so you don’t have to.

How to add a StumbleUpon Sharing Button to your WordPress blog

  1. Go into your WordPress dashboard.
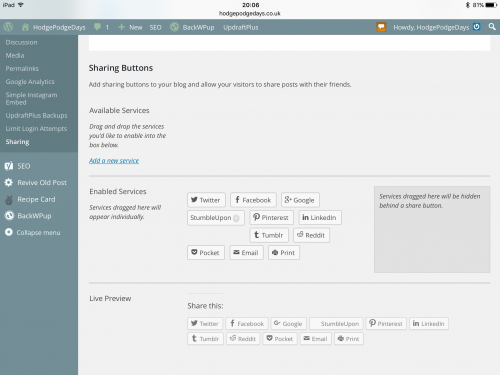
  2. Go to Settings – Sharing.
  3. Scroll down  and click on  “Add a new service”.
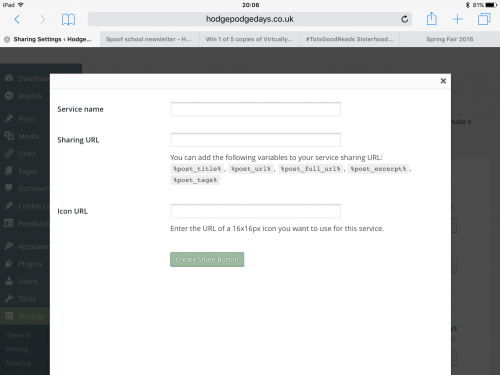
  4. In the Service Name box type “StumbleUpon”.
  5. In the Sharing URL box type – http://www.stumbleupon.com/submit?url=%post_url%&title=%post_title%
  6. In the Icon URL box add the following code – https://hodgepodgedays.co.uk/wp-content/uploads/2016/01/tiny-stumble.png
  7. Click on “Create Share Button”, the button should appear, then you just drag it down to the “Enabled Services” section.

Your StumbleUpon sharing button should now be working perfectly.

The icon URL will depend on what you which icon you want to use. I just used the standard StumbleUpon icon and resized it to 16px by 16px, uploaded it to my media library and used the URL from that (which I posted above, you’re free to use my URL or upload and use your own).

StumbleUpon Sharing Button
Click on “Add new service”
StumbleUpon Sharing Button
Fill this out, use the information I gave you above
StumbleUpon Sharing Button
Look at my beautiful StumbleUpon sharing button!

Got it? Clear as mud? It’s easy, seriously if I can figure it out you’ll be fine. Feel free to ask me if you get stuck (you won’t).

Now go forth and Stumble, hopefully starting with this blog post (hint).

How to add a StumbleUpon Sharing Button to your WordPress blog

Click here for more blogging tutorials.

Blogging: Everything you need to know about Alt Tags

I realise that I may be teaching my (blogging) granny to suck eggs here; but a couple of friends have recently been asking me how to improve their SEO. So I thought it was worth putting a blog post together about Alt Tags and how they work.

An Alt Tag is an alternative title for an image you will use in your blog post. Your alt tag will not be visible to your blog readers; but search engines who “read” your page will pick it up as a keyword. Every tiny bit of SEO can help your blog post rank a bit higher in the search engines. An alt tag will not throw your blog post to the top of the search engine rankings, but it will help to improve your SEO just enough to make it worth doing.

The only people who may be aware of your alt tag would be visually impaired people. Alt tags were originally meant to provide a text description of pictures, so people with screen-reader software would get a spoken-word description rather than it just read “IMAGE 123” for example. Ideally your alt tags should  still accurately describe the image for visually impaired people.

We all like to add images to our blog posts; it makes them prettier and it breaks up the text a bit to make it easier to read. I use WordPress to blog, so I can only really tell you how to add an alt tag in WordPress. I can’t imagine it would be that much different on a different platform.

To add an Alt Tag to your image on WordPress you can do it one of two ways…

  • Go to “Add Media” and upload your image.
  • Select the image and the “Attachment Details” menu should appear on the right hand side of your screen. You should see a box called “Alt Text”. This is where you put your keyword. I am using my recipe for Lebkuchen Cake as an example, my chosen keyword for that blog post was “Lebkuchen Cake”, so my alt tag for that image was “Lebkuchen Cake”.
  • Enter your chosen keyword into the “Alt Text” box and click on “Insert into post”. You have added an alt tag to your post.

Blogging: Everything you need to know about Alt Tags

Or….

If your image is already inserted into the post and you want to add, change, check or update your alt tag, it’s pretty easy.

  • Make sure you’re in the “Visual” view (rather than the text view) and find the image you want to edit or check.
  • Click on the image and a small toolbar will appear with alignment options and a pencil icon; click on the pencil icon and it will take you into “Image Details”. This is where you can add or edit your alt tag.
  • Insert your chosen alt tag and click on “Update”. Remember to make it the same as your chosen keyword for your blog post.

Blogging: Everything you need to know about Alt Tags

You will need to alt tag every image you use in your blog post; but it’s really very simple and can make a difference to your SEO.

There are also title tags (eg title=”lebkuchen cake”) which do the same thing, but this is the pop-up caption that appears on-screen when you point to the image with your cursor. Another place for SEO keywords and again, keep it relevant because there’s even more chance a human will point to your picture and see this caption pop up.

It’s also worth noting that the WordPress template you use will need to pull the alt text from the image library into the page code. If the template’s not got anything in it about alt text, then it won’t get put into the HTML when the post is published, so you’ll have to add the alt tags in the second way I showed you. However, most of the most common WordPress templates have this built in as standard, but it’s worth checking on all the same.

So in a nutshell (or 678 words) that’s all you need to know about alt tags and what they do. Any questions?

Everything you need to know about alt tags