How to keep track of your Social Media Followers

Last year I made it my New Year Resolution to keep track of my social media followers. This was so I could (hopefully) see how my numbers have grown over the year. The tracking was really helpful. I used a spreadsheet which I shared on my blog for people to download and use too. I know lots of people found it helpful, so I’ve decided to re-work it and share it again.

In 2017, across all of my social media accounts I’ve managed to grow my following by a total of 5000. To me this is a really good number and I’m delighted. If I can do the same in 2018 I will be thrilled. Growing your numbers can be really hard work, keeping them engaged is probably harder though, but that’s a whole other blog post. We all already know that the key to social media success is the SOCIAL bit. But the best way to grow your numbers on social media is to always to engage and be engaging with your followers. It’s as simple and as hard work as that.

It would be easy to just change the date on my old spreadsheet and just re-share it, but as the year has gone on I’ve added a few elements and made it more fit for purpose. It’s still quite simple to use and I’ve included all the social media channels I use and can think of. If there’s one on there you don’t use, you can either delete that row or just put a zero in that box and it will ignore it. If I’ve missed any, please message me or leave a comment and I’ll update the spreadsheet.

I’ve set the spreadsheet up so that it will add up your numbers and give you a total number of followers. This will also appear in the chart below. I like seeing my numbers rising on a chart. I’m a very visual person, so a rising graph always pleases me.

Download my Social Media Tracking spreadsheet HERE.

How to keep track of your Social Media Followers

One of the features I’ve added is a “To Go” column. This is entirely optional. This will show you how many more followers you need for each social network each month against your yearly target. You will need to change the code each month to make sure the sum is correct. If you’re not confident doing this then you can leave it out.

If you look at the spreadsheet you’ll see I’ve added an example number and target. The code =SUM(N4-B4) in the To Go column does the maths and tells us that with 50 followers and a target of 100 followers, you have 50 more followers to go. In February you’ll need to change the code in that box to =SUM(N4-C4) and so on each month. I added that column because I found it useful to see where I needed to have a bit of a social push in order to meet my target for the year.

I have also added an extra section underneath, which helps me keep track of the three things I was most interested in keeping a note of in 2017. For me these were my Domain Authority (DA), my total YouTube views and my Tots100 chart position. Obviously you can either delete that section or rename the rows so you can monitor whatever metrics you’re most interested in.

You might like to set yourself a target for the year. See how many followers you’ve got on New Years Day and then give yourself a target to work for. It could be an across the board total figure you’re working towards, or maybe you want to get to 10k followers on YouTube in 2018. Whatever your social media followers target for 2018, tracking your progress is the first step to success.

Let me know how you get on! Happy tracking!


Blogging Basics: Keeping track of your Social Media followers

A few months ago I set myself the challenge of reaching 20k social media followers across the board by 2017. I was around 4k short by that point and I knew the only way to effectively track my numbers was on an Excel spreadsheet. I created a very basic spreadsheet and on the 1st of each month I update it with my numbers.

We all know that the essence of social media is the SOCIAL bit. I’m not going to give you any wise words about how to magically increase your social media followers overnight. But the best way to grow your numbers on social media is to always to engage and be engaging with your followers. It’s as simple and as hard work as that. 

My spreadsheet which you can download HERE is really basic and therefore very simple to use. I’ve included all the social media channels I use and can think of. If there’s one on there you don’t use, just put a zero in that box and it will ignore it. If I’ve missed any, please message me or leave a comment and I’ll update the spreadsheet.

I’ve set the spreadsheet up so that it will add up your numbers and give you a total number of followers. This will also appear in the chart below. I like seeing my numbers rising on a chart. I’m a very visual person so a rising graph always pleases me.

You might like to set yourself a target for the year. See how many followers you’ve got on New Years Day and then give yourself a target to work for. It could be an across the board total figure you’re working towards, or maybe you want to get to 10k followers on Instagram in 2017. Whatever your social media followers target for 2017, tracking your progress is the first step to success.

Blogging: Keeping track of your Social Media followers

How to set up a Redirect on your WordPress Blog

It’s good practice when you’ve got a blog to schedule in a bit of maintenance on a regular basis. One of the things I like to do is to remove old giveaway posts, mainly because I didn’t like the thought of someone clicking through thinking there is a live giveaway but its closing date was months ago. I had been either re-working them into more content based blog posts, or if that wasn’t possible I was deleting them altogether, which is in hindsight a stupid thing to do.

I decided it was time I figured out how to redirect my old giveaway blog posts to my giveaway page, so anyone clicking through could see what giveaways were live on my blog right now, rather than being disappointed and just leaving my blog entirely.

I am often daunted by a page of boxes to check and things to code, but trust me, this is really easy and will make a difference to your blog. Setting up a redirect in WordPress is remarkably easy and all it takes is a plugin.

Choose a redirect plugin

I went for the Quick Page/Post Redirect Plugin. It had good reviews and seemed to do everything I needed it to do, so I installed it.

redirect plugin

Once you install it you can take a look at the settings page, but it all looks a bit scary with too many questions I didn’t entirely understand (I always fear that I’ll tick the wrong box and delete everything I’ve ever done) and there is a better way. I wanted the plugin to redirect old giveaway blog posts to my giveaways page, which was a simple enough task. 

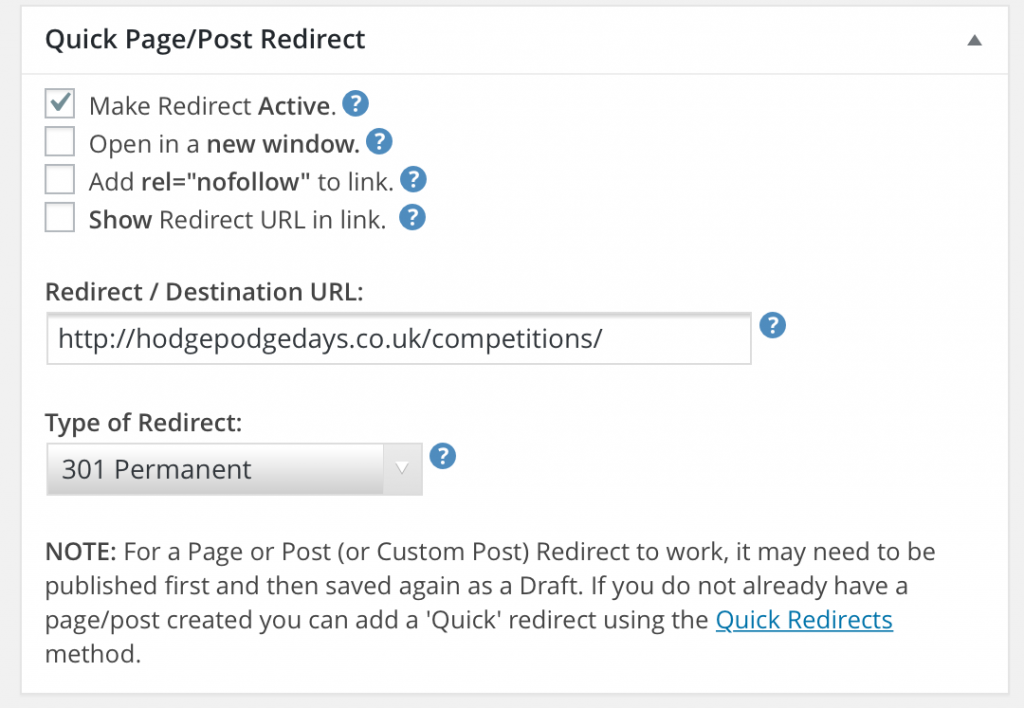
  1. Find the blog post you want to redirect and go to “Edit”.
  2. Scroll down to “Quick Page/Post Redirect” which for me was immediately below my blog post.
  3. In the “Redirect / Destination URL” box type or paste in the URL you want to redirect to.
  4. Select the “Type of Redirect” (more of which later). I always choose 301 Permanent.
  5. Tick the box with says “Make Redirect Active” and the click on “Update” in the Publish box and it’s done. (Go on, check it).

redirect plugin

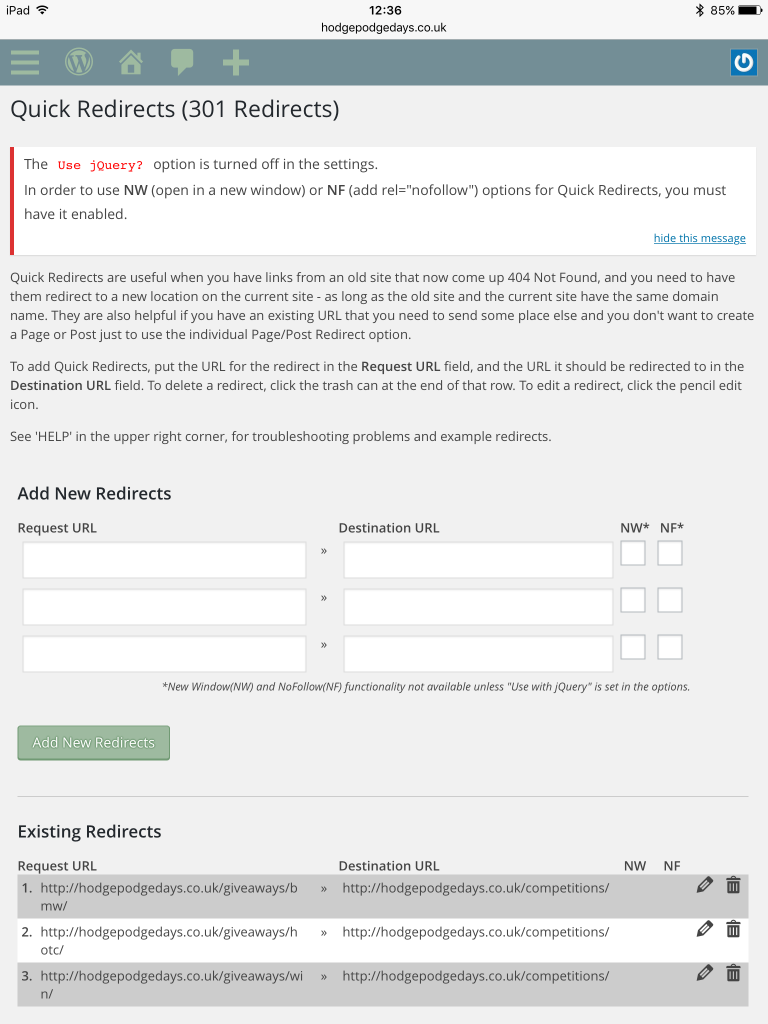
Or for Quick Redirects, once you’ve installed the redirect plugin the option to do Quick Redirects will be in your dashboard sidebar. This is useful when you know the URL but you’ve maybe deleted the old blog post. Redirecting is simple –

  1. Put the URL you want to Redirect in the “Request URL” box
  2. Put the URL of where you want to Redirect it to in the “Destination URL” box
  3. Click “Add new Redirects” and you’re done. Easy yes?

If you need to edit the Redirect at any time you can do so if you scroll down a little further and click on the editing pencil icon.

redirect plugin

SEO

Is there any benefit to redirecting your blog posts instead of deleting them?

Yes, without a redirect, deleted pages just ‘drop’ out of the Google index and you lose any value you’ve built up in them. If you redirect, you retain that value AND effectively pass it on to the new target page. By setting up a redirect you’ve not only avoided losing the SEO value of your old post, but you’ve also assigned it elsewhere. From an SEO perspective it makes so much sense to redirect.

Which Redirect should I use?

The Redirect Plugin gives you four redirect options to choose from, which should you go for?

301 Permanent 
A 301 redirect is a permanent redirect which passes between 90-99% of link juice to the redirected page. A 301 redirect is generally considered the best option when putting redirects on a website.

302 Temporary
A 302 redirect is a temporary redirect. It passes absolutely no link juice to the redirected page and isn’t recommended for use.

307 Temporary
A 307 redirect is the successor of the 302 redirect. Again it doesn’t pass any of your hard won link juice on to the redirected page and should only really be used if content is really being moved only temporarily.

Meta Redirect
When I mentioned Meta Redirects to my friend who is an SEO expert he told me not to go near it with a bargepole. “It’ll make your blog look spammy to Google” he said and they will be slower and you will have seen websites with a five-second countdown with the text “If you are not redirected in five seconds, click here, that’s a Meta Redirect. They are not recommended as an SEO tactic due to poor usability and the loss of link juice passed on to the redirected post.

Any questions?

If you’re in the habit of tidying up and deleting old blog posts, then it’s definitely worth looking into installing and using a redirect plugin on your WordPress blog. I went for the Quick Page/Post Redirect Plugin and I really rate it. It’s simple to use for quick redirects and it’s quick. The redirects I’ve sent up load incredibly quickly, and I’m cross with myself for deleting so many posts when I could have easily just redirected them and kept all the lovely SEO link juice for myself. 

If you’ve got any questions feel free to comment here or Tweet me. Always happy to help!

redirect plugin

How to add a StumbleUpon Sharing Button to your WordPress blog

Do you have a StumbleUpon Sharing Button on your blog? If not, you probably need one. It’s a great way for your readers to share your content and share the love.

A couple of years ago when I was setting up my blog I added the usual sharing buttons which would appear at the bottom of each blog post. Back then StumbleUpon was one of the standard buttons and I added it to the others not really knowing what it was. Of course these days blog posts are being Stumbled all over the place, and it’s a great way to pick up traffic.

Imagine my horror (not really horror, I might’ve tutted) when friend and blogger, Colette from We’re going on an adventure pointed out that my StumbleUpon sharing button wasn’t there and she had to manually Stumble my post.

My first port of call was to Google it. It appeared I was not alone in wondering what had happened to the StumbleUpon sharing button. It seems that the button used http which causes mixed-content warnings and sometimes fails completely on https sites. WordPress.com does not support http anymore and as StumbleUpon won’t move to https WordPress just did away with the button.

I knew it couldn’t be that hard to make a StumbleUpon button, so I figured it out so you don’t have to.

How to add a StumbleUpon Sharing Button to your WordPress blog

  1. Go into your WordPress dashboard.
  2. Go to Settings – Sharing.
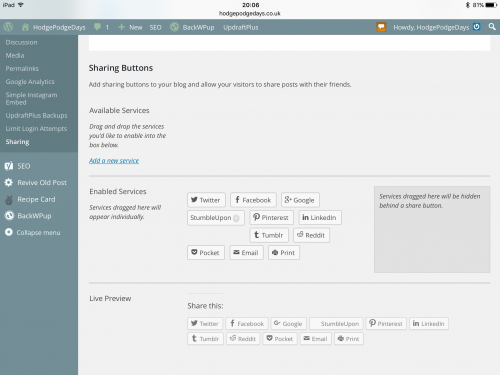
  3. Scroll down  and click on  “Add a new service”.
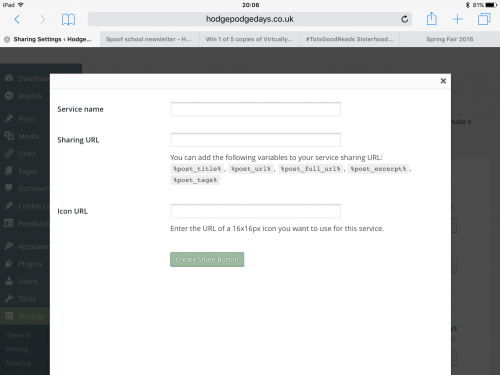
  4. In the Service Name box type “StumbleUpon”.
  5. In the Sharing URL box type – http://www.stumbleupon.com/submit?url=%post_url%&title=%post_title%
  6. In the Icon URL box add the following code – https://hodgepodgedays.co.uk/wp-content/uploads/2016/01/tiny-stumble.png
  7. Click on “Create Share Button”, the button should appear, then you just drag it down to the “Enabled Services” section.

Your StumbleUpon sharing button should now be working perfectly.

The icon URL will depend on what you which icon you want to use. I just used the standard StumbleUpon icon and resized it to 16px by 16px, uploaded it to my media library and used the URL from that (which I posted above, you’re free to use my URL or upload and use your own).

StumbleUpon Sharing Button
Click on “Add new service”
StumbleUpon Sharing Button
Fill this out, use the information I gave you above
StumbleUpon Sharing Button
Look at my beautiful StumbleUpon sharing button!

Got it? Clear as mud? It’s easy, seriously if I can figure it out you’ll be fine. Feel free to ask me if you get stuck (you won’t).

Now go forth and Stumble, hopefully starting with this blog post (hint).

How to add a StumbleUpon Sharing Button to your WordPress blog

Click here for more blogging tutorials.