FREE Printable: Chinese New Year – Year of the Rat

This year Chinese New Year falls on Saturday 25th January. Chinese New Year is a glorious, colourful celebration of the New Year, just when I feel the year is at its darkest and gloomiest. This year is the Chinese Year of the Rat.

In Manchester the Chinese New Year celebrations are legendary, with a parade, Chinese crafts exhibition, a big celebration in Albert Square and a fantastic street food market.

2020 is the Chinese Year of the Rat. The Rat is the first of the 12-year cycle of animals which make up the Chinese zodiac in the Chinese calendar. People born in the Years of the Rat including 1936, 1948, 1960, 1972, 1984, 1996, and 2008 will celebrate their Zodiac Year.

To celebrate Chinese New Year and the Year of the Rat I’ve created this colouring sheet for children, or indeed adults. It’s a simple sheet which you can print out on A4 paper. All you need are some felt tips or colouring pencils and it should keep the kids entertained for a little while. If you want to extend the fun, you could also try making a Chinese drum, or some traditional red envelopes for Chinese New Year.

FREE Printable: Chinese New Year – Year of the Rat

Click here to download your FREE Chinese New Year printable!

It’s pretty cute isn’t it? It’s A4 sized, so just print off however many you need. Give the kids a million coloured pencils or felt tips and let them go wild with them. Adults who enjoy colouring in might also like to get in on the action too.

I’d love to know what you’ll be doing to celebrate Chinese New Year, let me know in the comment box below. Gong hei fat choy!

If you enjoyed this, you might also like to try –

FREE Printable: Chinese New Year – Year of the Rat

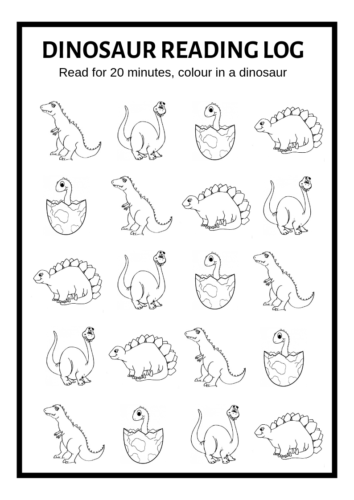
FREE Printable: Dinosaur Reading Log

Help to motivate your little dinosaur fans to read with this handy reading log. Just colour in a cute little dinosaur for every book they read, or for every 20 minutes they read for and reward them with a little treat for completing the sheet!

If you’re the parent of a primary school aged child you will probably be tasked with listening to them read each night. We love listening to our son read and we love reading to him too. We regard it as a special quiet time where we sit together and get transported to another world.

It’s not all sitting on a magic carpet happily listening to a child read. Sometimes it’s a bit harder to get him to read, especially if he’s not interested in the books he’s been sent home with. In those situations we usually promise the reading of a favourite book once the less exciting school reading has been finished. That way we get the best of both worlds.

FREE Printable: Dinosaur Reading LogDownload your FREE Dinosaur Reading Log HERE!

Our son is very motivated by rewards, it doesn’t have to be big; a sticker or 20p for his jar is very well received. He loves dinosaurs so I devised this dinosaur reading log for him. If he reads for 20 minutes he gets to colour a cartoon dinosaur in. Or if he finishes a book within those 20 minutes he colours one in too.

Once he’s completed a sheet he gets a treat. Again it’s nothing huge; he might get to choose a Netflix film for us to watch with some popcorn, or he might get a trip out to his favourite local museum.

We’ve found that this dinosaur reading log really does help to motivate and encourage him to read. He’s obsessed with anything with dinosaur on, so this reading log is a real winner!

If you enjoyed this, you might also like this simple children’s book review template or this FREE Pokemon Reading Log.

FREE Printable: Dinosaur Reading Log

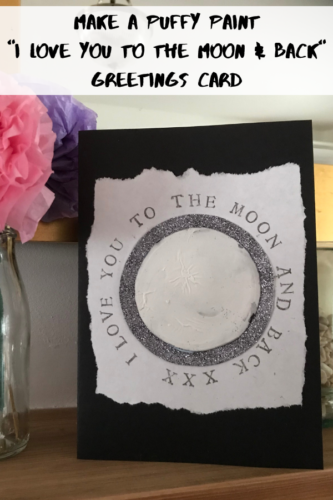
How To Make a Puffy Paint I Love You To The Moon and Back Card

Over Easter I’ve been playing about with puffy paint. You can buy puffy paint, but you can easily make your own by mixing PVA glue and shaving foam, and that’s what I did. I played about making a few things with it, but by far my favourite was this I Love You To The Moon and Back Card.

The puffy paint is really fun to play around with and as long as you give it ample time to dry, it’s a really versatile thing to craft with. This, I Love You To The Moon and Back Card I made with the puffy paint, is probably one of my favourite things that I’ve made in a while. It’s a lovely card to give to a loved one.

How To Make a Puffy Paint I Love You To The Moon and Back Card

How to make an I Love You To The Moon and Back Card

You will need:

PVA Glue
Shaving Foam
Black card, two pieces
White card
Glittery paper
White paper
Letter stamps and ink (or neat writing)

How To Make a Puffy Paint Love You To The Moon and Back Card

First of all you’ll need to mix up a batch of puffy paint. In a large bowl mix 1 part glue and 3 parts shaving foam together. If you want to colour your puffy paint you can add a few drops of coloured paint, but for the moon we need a nice white puffy paint.

How To Make a Puffy Paint I Love You To The Moon and Back Card

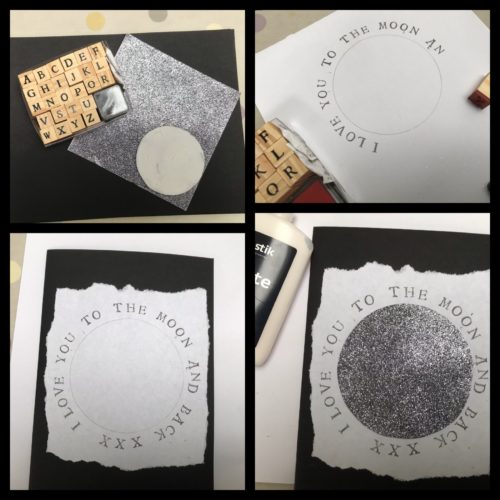
Draw a circle using a pencil on your one piece of black card and dollop some of the puffy paint on it, spread the paint about so it covers the circle. Try and make it a bit more textural; the surface of the moon isn’t smooth, so your puffy paint replica shouldn’t be either. Leave the puffy paint to dry, preferably overnight.

Once it is dry, cut out the circle of the moon and put to one side.

Take a piece of white paper and draw a circle a little bit wider than your moon shape. Using the letter stamps and ink, stamp your message around the circle. I stamped “I LOVE YOU TO THE MOON AND BACK XXX”

Take your glittery card and cut it to the same size as your circle and stick it on there. I then carefully tore the paper around the ink stamped letters. Fold your A4 piece of black card in half and glue the torn paper square onto the front of the card. Then take your moon circle and glue it to the middle of the glittery circle.

Carefully press it down, making sure not to squash the puffy paint. Leave it alone so that the glue can dry. Once it is dry, you can either write your message inside with a nice silver pen, or glue some white paper inside to write on.

It’s such a lovely card to give to someone. It’s really unusual and despite the number of steps, it’s actually really simple.

If you enjoyed this, you might also like to try making these cards…

How To Make a Puffy Paint I Love You To The Moon and Back Card

Review: Milly & Flynn Paper Craft Pop Up 3D Monkey kit

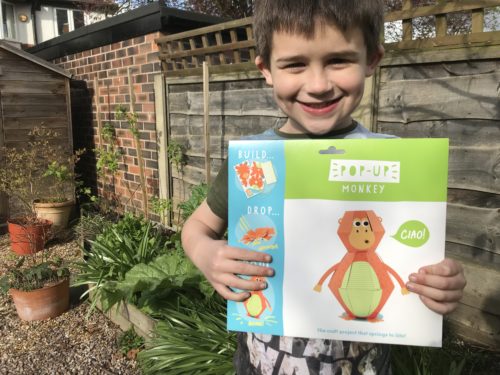
AD/Gifted. Throughout the year I collect books, games, puzzles and all kinds of things to keep my boy occupied and entertained during the school holidays. He had two weeks off over Easter, so it was time to deploy some of the fun things I’d squirreled away. One of the things was a Paper Craft Pop Up 3D Monkey from Milly & Flynn.

Win a Milly & Flynn Paper Craft Pop Up 3D Monkey kit

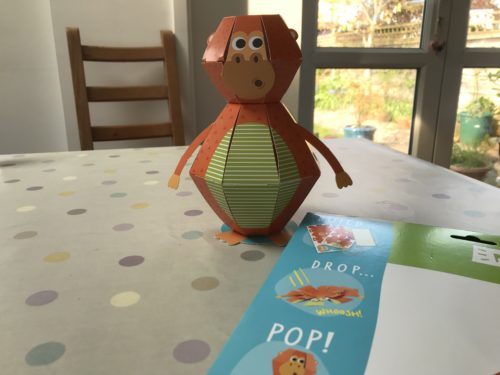
Craft kits are great little portable packets of fun. This Paper Craft Pop Up 3D Monkey contains everything you need, except a pair of scissors. The pop up monkey is exactly that, a cardboard monkey you make, squash down, drop on the floor and he pops up again. It’s tremendous fun, especially if you’re 8!

The craft kit included a page of instructions, and most helpfully the link to a YouTube video of someone putting the kit together. We read the instructions and popped out all the parts, read the instructions again and then began building the monkey.

Win a Milly & Flynn Paper Craft Pop Up 3D Monkey kit

There were a few moments where we needed to watch the video to see what needed to be done, but it was a straightforward and clever build. It took around 45 minutes to put together, then it was time to test it out. We found the monkey wouldn’t pop up on a carpet and was better if he dropped it onto the slate kitchen floor while he was stood on a chair.

It brought him enormous fun. I was really very proud that we had managed to make up the monkey by ourselves (without asking my slightly more technically proficient husband). We did find that although the pop up monkey is pretty sturdy, if an 8 year old repeatedly hurls it at the floor some of the sections start to come apart, but this is easily fixed with a bit of sellotape.

Win a Milly & Flynn Paper Craft Pop Up 3D Monkey kit

We really liked the Paper Craft Pop Up 3D Monkey. I liked that everything we needed was in the pack, which made it really portable and great for taking away on our little holiday. The kit costs £10, which on the surface might seem a little pricey, but the quality of the craft is superb and the monkey will last for ages. It’s a brilliant design and we would absolutely try other Milly & Flynn craft kits in the range.

You can find the Paper Craft Pop Up 3D Monkey here on Amazon and you can find out more about Milly & Flynn on their website.

Disclosure: I was sent this craft kit for review purposes. All images and opinions are our own.

Crafts: How to make your own Cloud Mobile

April is famous for its showers, so we decided to make our own weather based craft. We went for this fun cloud mobile which you can decorate however you want really. We went for paint, pom poms and a silver lining and we were pretty happy with the result.

To make life easier I created a simple cloud template which we could use to decorate. I’ve made the template available to download, so you can recreate the cloud mobile easily at home. This is a really lovely craft, we are so pleased with how it turned out.

Download your FREE cloud template here.

Crafts: How to make your own Cloud Mobile

Make your own Cloud Mobile

You will need:

A printout of the cloud template
Paint
String or twine
Sellotape
Scissors
A glue gun
Pom Poms
A yellow foam circle

How to make your own Cloud Mobile

Print out a copy of the cloud template on card. Decorate each cloud, we painted ours different shades of blue with silver linings. I thought they might be quite nice with glued on wisps of cotton wool, but the boy had other ideas.

Leave the paint, or whatever you’ve glued to your clouds to dry and then carefully cut them out.

Crafts: How to make your own Cloud Mobile

Using a length of twine (I used a really lovely blue striped twine I found in a nice shop in Gloucester) sellotape the  twine to the back of the clouds so they will hang evenly. Make sure there’s a decent loop of twine at the top so you can hang the cloud mobile on a hook when you’re done.

The cloud mobile looked lovely, but I wanted to embellish it with hanging pom poms and a bright sunny sun.

I selected five little pom poms and using the glue gun, glued them onto five inch long pieces of twine I’d cut. I then sellotaped them to the back of the bottom cloud. Again using the glue gun I dolloped some glue onto the yellow foam circle and stuck it so it was peeping out form behind the top cloud.

The cloud mobile was done. We did think about adding some sequins or glitter, but decided it looked great as it was. Really, you can decorate your clouds however you want, let your imagination run wild!

If you enjoyed this post, you can find all kinds of other crafts and activities here.

Crafts: How to make your own Cloud Mobile

Spring Scavenger Hunt Activity + FREE Printable

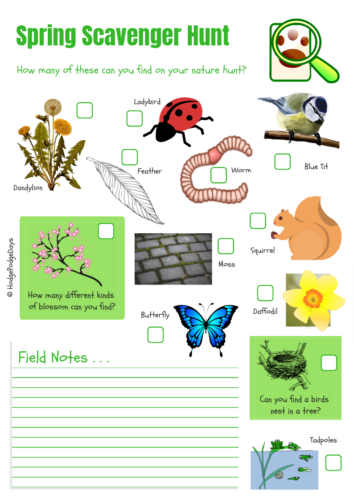
Spring has sprung and there’s nothing nicer than getting out and about with the kids. This week the boy is off school for Easter and we’ve been making the most of the fresh air and sunshine by visiting the local parks and nature reserves. Yesterday we met a couple of his friends for a Spring scavenger hunt in a local park, it was just the thing to keep them engaged and occupied for an hour and they all did really well.

We live by the river and walk the dog down there most days. By the river is a nature reserve and we often see lots of different birds, insects and plants. I’ve tried to keep the Spring Scavenger Hunt quite generic, so you should be able to find most of the bugs, birds and plants in your local park.

Download your free Spring Scavenger Hunt printable here!

Spring Scavenger Hunt Activity + FREE Printable

I have left room on the printable for children to make notes too. If they spot anything different or noteworthy, they can write all about what they’ve seen in the notes section.

While we were out on our walk we spotted a few things which weren’t on the list. We spotted a couple of bees, some different spring flowers, an assortment of birds and (as this was an urban park) dog poo with sweetcorn in it. I was both grossed out and secretly pleased by their observational skills. We also learned an important lesson about looking where we were putting our feet if we are walking in long grass.

Whatever you do over Easter, whether you’re walking in the park; pond dipping in a nature reserve or walking the dog on the beach; make sure you stay safe. Keep your eyes peeled for all the wonders of nature and watch where you put your feet!

If you enjoyed this, you might also like –

How to make a pretty Tissue Paper Flower Wreath

A few weeks ago I shared how to make Tissue Paper Flowers. They’re a lovely, simple thing to make, they take no time at all and stay looking lovely in the vase pretty much forever. I decided that they were too pretty for just one thing and I’d make a Tissue Paper Flower Wreath to brighten up my office door. It didn’t take long at all and I love how it looks. It’s really cheered up a dull corner.

Once you get the hang of them, they’re remarkably simple to make. You can put a flower together in a few minutes. You can mix different shades of tissue paper together to make a multi-coloured bloom, or stick to one colour if you prefer.

How to make a pretty Tissue Paper Flower Wreath

For my wreath I had some colourful tissue paper I’d saved for something like this, then I picked some co-ordinating colours. Once I’d finished sticking my flowers on, I decided it needed something else and I quickly cut some foam leaves and glued them in place. It balanced the whole wreath nicely.

How to make a Tissue Paper Flower Wreath

You will need:

1 paper plate
Glue stick
Green tissue paper
Coloured tissue paper, 1 sheet per flower
Scissors
A short piece of ribbon
Glue gun
Some pipe-cleaners
Green foam sheet, for the leaves

How to make a pretty Tissue Paper Flower Wreath

Begin by preparing your wreath. Take the paper plate and cut a neat hole in the inner circle. Cut the green tissue paper into long strips, rub the glue stick on both sides of the paper plate and wind the tissue paper around the paper plate hoop. Press the tissue paper onto the glue and put it to one side so the glue can set.

How to make a pretty Tissue Paper Flower Wreath

Now to make your flowers. Take a sheet of tissue paper and cut it into quarters. Make a pile of the quarters, fold them in half so it looks like a rectangle and cut along the fold. You should now have eight rectangles of tissue paper.

Click here for step by step pictures showing how to make a tissue paper flower.

Make them into a neat pile and fold them along the short edge in a concertina. The folds need to be about 1cm. Once you’ve folded the concertina along the full length of the rectangle; take the pipe-cleaner, cut it in thirds and wrap one third around the centre of the concertina. Use the other bit of pipe-cleaner on other flowers.

Once the centre of the concertina is secured, fan out the tissue paper folds and start to pull them to the centre of the flower in individual layers. Take your time over this, make sure you separate every individual layer. Once you’ve done this, ruffle the flower up and your flower is done. Make a few more flowers in this way until you’ve made as many as you need.

Once you’ve made enough flowers, Take your wreath and with a pair of scissors cut a small slit in the top and thread a piece of ribbon through, knot it so you’re able to hang your wreath from the ribbon.

With your glue gun, generously glue the back of each flower and press it into place. Do this with each flower until you’re happy with our tissue paper wreath. If you want to add some leaves, cut them out of your green foam sheet and glue them where you think they will look their best.

If you don’t have a glue gun, you could use generous dollops of PVA glue, but you’ll need to leave it to set properly, overnight if possible. Once it’s dry, hang it somewhere jolly and it’ll give you years of colourful cheer.

If you enjoyed this, you might also like these flower crafts –

How to make a pretty Tissue Paper Flower Wreath

Easter Crafts: Easy Felt Easter Egg Decorations

Last week I met my craft club friends for an evening of Easter egg painting. It was a really chilled evening and we all went home clutching an Easter tree (branches in a tall vase) and half a dozen painted Easter eggs. I think my tree looks really quite sweet, so I decided to make some Felt Easter Egg Decorations to go on it too.

The Felt Easter Egg Decorations are really simple to make and you can decorate them however you want. They’re fun to make for children and adults, my son was especially interested in using my hot glue gun, but you can use PVA and patience if you don’t have a glue gun.

Easter Crafts: Felt Easter Egg Decorations

How to make Felt Easter Egg Decorations

You will need:

Egg shaped template on card
A pencil
Felt
Ribbon
Needle and thread
Scissors
A hot glue gun or PVA glue
Decorations such as sequins, stars, gems, or whatever you have

How to make your Felt Easter Egg Decorations:

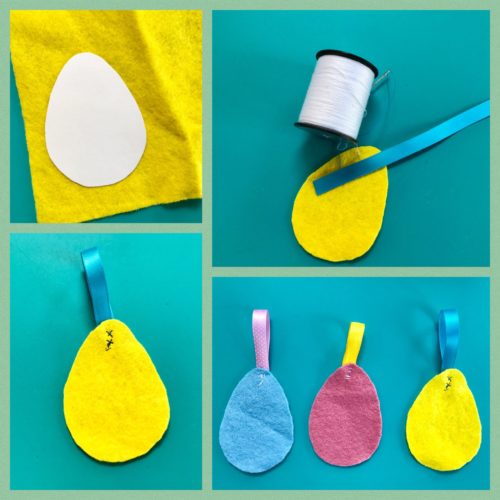
Firstly, make your egg shape template. I did this by drawing around a small glass to make a circle, then sketching the circle into an egg shape. You can easily print off an egg shape off the internet if that’s easier. Copy the shape onto card, cut it out and you’ve got a durable egg shaped template for any future egg based craft projects.

Easter Crafts: Felt Easter Egg Decorations

With a pencil, draw around the egg shape onto some coloured felt and carefully cut it out with a pair of scissors. Take about 6cm of ribbon and fold it in half length-ways. With the needle and thread, sew the ends together and stitch it to the back of your felt Easter egg. It doesn’t much matter if you can see the stitches, you can always stick a decoration or two over the top, like I have done.

Once your ribbon loop is securely stitched, you can decorate your egg. I have quite a decent selection of random things like sequins, stars, gems and other decorations. Using the hot glue gun we decided what would look good where, and glued them on. If you don’t have a hot glue gun, a dab of PVA glue should stick things perfectly well to the felt Easter egg, although you will need to leave the glue to dry for an hour or so.

Easter Crafts: Felt Easter Egg Decorations

I think our felt eggs are really sweet looking and they look lovely on our Easter tree! How would you decorate yours?

If you enjoyed this, you might also like these other crafts:

Easter Crafts: Felt Easter Egg Decorations


FREE Mother’s Day Colouring Printables

Mother’s Day aka Mothering Sunday is coming this weekend. If you’re anything like me, thing can be a bit last minute. But fear not, I, like most mums are happy with a bit of breakfast in bed and a homemade card. I’ve put together four Mother’s Day colouring sheets which could happily be turned into cards, or stuck to the fridge in celebration of Mother’s Day!

Review: Guess How Much I Love You Big Nutbrown Hare

The Mother’s Day Colouring sheets are ideal for entertaining little ones, or colouring in to give to mummy, grandma or a favourite female family member. There are four very different styles to choose from, so there’s something for everyone.

Download the FREE Mother’s Day Colouring Sheets here!

Mothering Sunday in the UK falls on the fourth Sunday in Lent, exactly three weeks before Easter Day. Traditionally Mothering Sunday was the day when people would visit their “mother” church (the church they were baptised in). Mothering Sunday has become an occasion for celebrating mothers and giving them presents, though these days we have shortened it to Mother’s Day.

Mother’s Day is celebrated around the world on different days, in the UK, Canada and Australia it falls in March. In America it is a slightly more commercial celebration which takes place in May.

Our Mother’s Day celebrations are usually pretty low-key (which is how I like it). I will be given breakfast in bed and a cuddle and a card, then we will go to church and the children hand out little bunches of flowers to all the adult women in the congregation. Then we will put on our walking boots and go for a nice bracing walk with the dog somewhere. To me, that is perfect.

If you fancy doing some Mother’s Day crafts, here are some lovely spring crafts you could try –

FREE Mother's Day Colouring Printables

Recycled Crafts: How to Paint Your Own Pretty Jars

If you’ve ever spent any time on Pinterest, you will most likely have seen pictures of pretty painted jars used in a thousand different ways. For many months I’ve looked at these pretty pictures and wanted to try it for myself. Once I’d collected a few pretty jars, I decided to have a go at painting them, so here’s how to paint pretty jars, a method so simple a toddler could do it (under supervision).

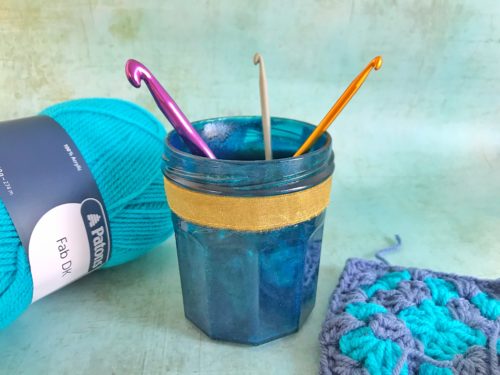
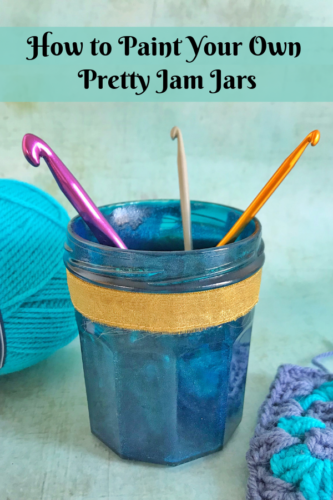
Jars have endless uses around the home. I use them as pencil holders a lot, but I’ve recently taken up crochet and I wanted something handy to keep my growing crochet hook collection in. I painted up my jar and just for a bit of extra protection for my hooks I put a circular cotton wool pad in the bottom. It’s worked out really great and my hooks now have a place of their own instead of lurking in my pencil jar.

The finish of this jar was really hard to capture in a photograph. In real life it’s iridescent and a little bit mermaidy.

Recycled Crafts: How to Paint Your Own Pretty Jars

How to Paint Your Own Pretty Jars

You will need:

A clean jar or two
PVA glue
Food colouring
A paintbrush
Maybe a nice ribbon to decorate your jar

How to paint your own pretty jars:

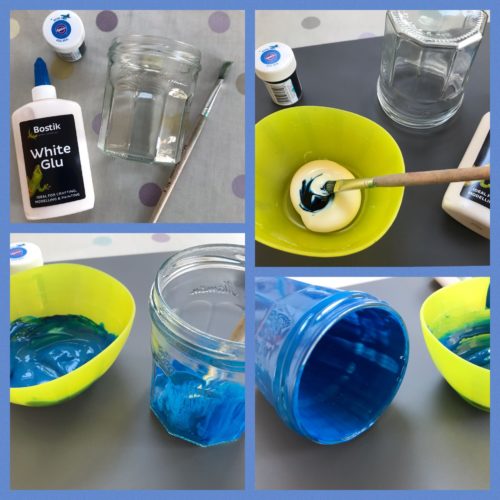
Begin by making sure your jar is clean and dry. In a bowl pour in a large dollop of the glue, you’ll need enough to paint the inside of your jar, be generous.

I chose to paint my jar a nice blue colour (as blue is my favourite colour); add a few drops of whatever colour of food colouring you’d like. Remember that the colour will darken quite a lot when it dries in the oven; so go for a couple of shades paler than you’d like and have faith.

Recycled Crafts: How to Paint Your Own Pretty Jars

Using a paintbrush, paint a thick-ish layer of the coloured glue evenly all over the inside of the jar. Once you’ve finished, tip the jar upside down and leave it for about half an hour; hopefully any excess glue will drip out.

Put your painted jar in the oven at 180°, make sure it’s upside down. After about 15 minutes, carefully (very carefully) turn the jar the right way up and bake for another 15 minutes. You can either remove it from the oven or leave it to cool inside the oven. I put mine on a rack outside to cool which took about an hour.

Once it’s cooled you can leave it as is, or you could tie a ribbon around it to finish it off nicely. It’s now ready for pens, pencils, crochet hooks or any number of uses you may have for it.

My jar is lovely, it’s really quite iridescent, but the photo doesn’t pick up on that. It’s a shade darker than I wanted, but I’ll know to mix a paler shade for next time.

What would you use your painted jar for?

If you enjoyed this, you might like to try making a jam jar snowglobe.

Recycled Crafts: How to Paint Your Own Pretty Jars