Crafts: Dried Flower Craft Ideas

This week I became the proud and excited owner of an Instant Flower Press from Interplay. Admittedly it’s designed for children, but both my son and I had great fun with it and we’ve created some pretty little dried flower craft items yesterday afternoon with some flowers we picked on the way home from school.

Dried Flower Craft Ideas

The Instant Flower Press is really simple to use and comes with an instruction booklet. You open up the press, put a layer of the felt pads and the pieces of cotton material in the plastic press, place your flowers inside. Put another layer of cotton and more felt pads (all supplied) and close the press. Pop it in the microwave for 20-30 seconds and you’ve got dried pressed flowers. Slightly more moist flowers may take a little longer in the microwave, but once you start pressing your flowers you’ll quickly be able to judge what will take an extra ten seconds and what will dry more quickly.

As a child my Grandma had a flower press and I loved using it with her, carefully picking pansies from her garden and pressing them between thick parchment and screwing the press shut, then leaving it for months before seeing the fruits of our labour.

Dried Flower Craft Ideas

With the microwave flower press the whole process is done and dusted in minutes and perfect if you need some pressed flowers for some quick dried flower craft.

Quick and easy Dried flower craft ideas

Pretty Jam Jar Candle Holders

You will need:
A clean jam jar
A selection of dried flowers and leaves
PVA glue
A paint brush

These are so simple. Take a clean jam jar and some PVA glue and a paint brush, brush the glue onto the jar where you want to stick your dried flowers. Carefully press the flower onto the glued area to stick it on, then gently cover the flower with PVA glue to seal it in place. Leave to dry.

You can be as creative as you want with this, I’ve left mine quite simple, but I love the delicate little blue flowers and the daisies. It took hardly any time at all to glue on, but maybe an hour to dry properly. They look so pretty and I can see me using this idea on so many things around the house.
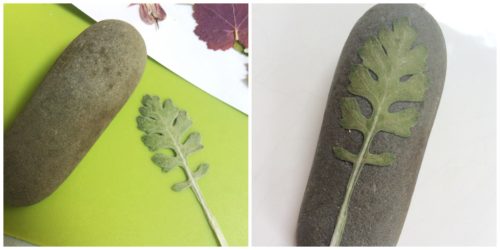
Dried Flower Craft Ideas

Pebble Paperweight 

You will need:
A clean stone
A selection of dried flowers and leaves
PVA glue
A paint brush

Again, this is very simple. We have a pile of lovely smooth pebbles in the garden, so I picked one the right size and gave it a good scrub and left it to dry. Then I selected a suitable leaf which I’d dried in the flower press and brushed PVA glue onto the pebble and pressed the dry leaf into place. I left it for a few minutes to stick, then I painted PVA over the leaf to seal it in place and then I left it to dry properly for a few hours.

I’ve now got a lovely paperweight, or a pebble to stop my napkins flying off the table when we eat in the garden.

Dried Flower Craft Ideas

Dried Flower Sun Catchers 

You will need:
A laminator and pouches or some sticky backed plastic
A selection of dried flowers and leaves

Borrowing a laminator I arranged some dried flowers in an artistic way in the laminator pouch, I then put it through the laminator a few times until I was happy. I then cut my A4 sheet down into a circle and using a clear sticky dot stuck it to the window.

It’s really quite pretty and I’ve got a nasty window in the downstairs loo which needs replacing, which I’m now going to cover in these lovely dried flowers to pretty the place up a bit!

Dried Flower Craft Ideas

These are just three very quick ideas I had for dried flower crafts that afternoon. I’ve got a few more ideas up my sleeve including some nice thank you cards and other papercrafts.

The Instant Flower Press from Interplay is a cracking piece of kit and if you enjoy crafting and have kids that enjoy crafting, then I can’t recommend it enough. The small boy went to school today with a bag full of dried flower pictures for show and tell and he’s loving showing off his dried flower craft to anyone who will listen. It’s nice to do something a bit different with him and importantly he’s really enjoyed it and got something out of it too!

Dried Flower Craft Ideas

The Instant Flower Press from Interplay costs £9.99, is suitable for ages 8+ (though my 5 year old used it happily with supervision) and is available from a wide range of retailers.

Note: We were sent the Instant Flower Press from Interplay for review purposes. All images an opinions are our own.

Review: Nick Baker’s Snail World by Interplay

We were sent the Interplay Nick Baker’s Snail World kit for review purposes. All images and opinions are our own.

We had our first proper parents evening last week. We weren’t really sure what kind of report the small boy would get, but it was all very positive. He’s settled in well, he’s made good friends, he’s interested in the world around him. We were both really pleased with his progress this term. We only really want him to be happy, to keep up with his peers and to not be naughty; all of which seem to be the case. As a reward for his good report we gave him a little (and secretly educational) present – Nick Baker’s Snail World by Interplay.

Snail World is a lovely little kit. It contains a clear tank with lid, tweezers, a magnifying glass, a pipette and an information booklet all about snails and how to look after the snails you collect for your tank.

snail world

We followed the instructions and set about finding moss and suitable leaves for the tank. We then began the snail search began, looking under flowerpots, in dark corners and under piles of leaves. The small boy was really excited to go on a snail hunt; thankfully it had been a rainy day so there were snails lurking in the garden. We found two tiny snails and two medium sized snails. We put them in the tank, fixed the lid on securely and settled them into their new home in our cool kitchen.

snail world

The small boy really loved looking for the snails and using the tweezers to gently pick them up and put them in the tank. We used the magnifying glass to look at the snails more closely; and whilst we were outside we also spotted a spider in its web so we had a good look at that too. The magnifying glass is great for looking at other insects and it’s helped to develop his interest in entomology, which is no bad thing.

The kit comes with an information booklet; it’s really important that you read the booklet carefully before you collect your snails. It contains information about washing your hands and how to use the magnifying glass safely and so forth. The booklet also covers the different kinds of snail you may encounter; plus all about their biology, caring for your mollusc as well as lots of facts about snails. It’s a well put together booklet, informative but accessible.

There are quite a few different kits in this range; including ant, triop, worm, ladybird, spider and butterfly. So if snails aren’t for you then there’s probably something else more to your taste.

The small boy has enjoyed caring for his new snails; feeding them leaves and bits of cucumber, and dropping water into the tank every so often. Things like this are interesting for him to do and have a number of stealth educational benefits for him, and even I’ve learned a thing or two about our garden snails.

Review: Paint and Play Dinosaurs from Interplay

The small boy has recently been learning more about dinosaurs. We’ve been reading stories about them and watching Andy’s Dinosaur Adventures on CBeebies together. We’ve been talking about what they’d sound like, how they’d walk, fly or swim and what their skin would look and feel like. With  almost perfect timing we received the Paint and Play Dinosaurs set from Interplay to test.

paint and play dinosaurs

The Interplay Paint and Play Dinosaurs set contains three prehistoric dinosaurs to paint, two tiny terrified cavemen, a set of paints, a paintbrush and a dinosaur fact sheet to learn more about the dinosaurs you’re decorating.

paint and play dinosaurs

The set contains a T-Rex, Pterodactyl and a Stegosaurus. The dinosaurs are white and you can paint them however you want. I chose to paint the Stegosaurus and the small boy went for the T-Rex and the Pterodactyl. I chose to copy the markings on the fact sheet as best I could, he chose to paint them in his own inimitable style.

paint and play dinosaurs

We had tremendous fun painting our dinosaurs and talking about the different colours they might be. There was plenty of paint to use and it was all washable (which was good news for his clothes and my tablecloth). There was only one fine paintbrush, so I needed to raid my supplies, so that’s worth noting if you’re going to paint your dinosaurs as a group activity.

Painting them kept us occupied for a good half hour or so, plus there was lots to talk about and the fact sheet helped us find out more about the fearsome beasts we were cheerfully painting purple and orange. We had to leave them to dry before we could play with them properly, so we read some of his dinosaur books while we waited.

Paint and Play Dinosaurs

Ok, so our dino-depictions may not be 100% factually accurate, but they were 100% fun to do. It was a nice focussed activity which he enjoyed doing, but at the same time worked his pencil (paintbrush) grip, his hand-eye co-ordination and gave us the opportunity to have a discussion all about dinosaurs, where they came from and what happened to them.

The Paint and Play Dinosaurs set from Interplay is suitable for ages 4-7. The small boy is nearly five and I think this is spot on for him. There are quite a few different sets to choose from in the Interplay Craft Box line, so I’ll be choosing something else for him to paint for our next rainy afternoon together.

Note: We were sent the Interplay Paint and Play Dinosaurs set free of charge for review purposes. All images and opinions are our own.