Recipe: Orange Upside Down Polenta Cake

This week I decided to make an orange polenta cake, but I had a bag of oranges which needed using, so I made this Orange Upside Down Polenta Cake. Polenta cakes are among my favourite kinds of cakes, they’ve got a different texture; slightly gritty but moist and they’re quite filling too.

I was wistfully looking at the photographs of the rhubarb upside down cake I made last year and remembering how great it was. It was so great it made me want to grow more rhubarb so I could make it more often. Upside down cakes seem pretty old fashioned, but they’re really wonderful and can make an attractive centrepiece for an afternoon tea spread.

Recipe: Orange Upside Down Polenta Cake

If you’re making this recipe you could remove the peel from the oranges and cut them into slices, laying them on the bottom of the cake tin. I wanted to make a batch of orange syrup, so I decided to make a bumper batch of my candied orange slices and used those as the top (or bottom) of my Orange Upside Down Polenta Cake.

Orange Upside Down Polenta Cake

Ingredients:

For the topping:
Zest and juice of two oranges
50g unsalted butter
50g caster sugar
4 drops of Spice Drops Orange Zest Extract

For the cake:
250g butter or margarine
250g caster sugar
4 eggs
150g polenta
2 teaspoons of baking powder
200g plain flour
Zest  of two oranges and juice of one orange
8 drops of Spice Drops Orange Zest Extract

Recipe: Orange Upside Down Polenta Cake

How to make an Orange Upside Down Polenta Cake

Pre-heat your oven to 170° and line an 8 inch cake tin with baking paper.

In a small saucepan, melt the 50g of butter and sugar together. Zest two oranges and add the zest and the spice drops if you’re using them (they just boost the orange flavour). Once melted leave to cool for a few minutes, then pour into the bottom of your cake tin. Peel and slice the two zested oranges and arrange them artfully on top of the butter and sugar mixture.

In a large mixing bowl, beat the butter and sugar together until fluffy, add the eggs and mix thoroughly. Add the rest of the cake ingredients and mix well to form a smooth cake batter. Carefully pour the batter over the top of the orange layer and smooth off the top.

Put the cake in the oven for 50-60 minutes until it is cooked through. Check with a skewer to make sure it’s cooked properly. Remove from the oven and cool on a rack in the tin. Once it’s cooled for around an hour, take a plate and carefully flip the cake out of the tin, so the bottom of the cake is now the top. Remove any baking paper and leave to cool properly.

This Orange Upside Down Polenta Cake is lovely. Like I said, I topped mine with my candied orange slices, but it would be quicker and probably just as tasty if you used orange slices without the peel. It’s not a quick bake, but it is really easy and one I’ll be baking again and again.

Recipe: Orange Upside Down Polenta Cake

Traybake Treats: Peppermint Crunch Slices

Peppermint Crunch is one of the things I remember from school. A couple of times a month the dinner ladies would make trays of peppermint crunch for pudding, it was a highlight. Last year we visited Keswick Market and a local bakery had a stall selling cakes and tray bakes, lo and behold there was the Peppermint Crunch I used to love as a child. I bought some, shared it with the boys and I’ve been wanting to make my own ever since.

Easter Treats: Peppermint Crunch Slices

Last week Beech’s Fine Chocolates sent me some mini chocolate Easter eggs to try out. When I got them and I saw there was a mint crisp flavour, I knew exactly what I was going to do with them. This is how this Easter version of the Peppermint Crunch Slice was born.

If you love mint, you will love Peppermint Crunch slices. They are easy to make, but there are a few steps and you need to factor in chilling time. It’s a nice thing to make with kids too. Top with some Dark Chocolate Mint Crisp Mini Eggs and you’ve got yourself a minty treat and a half!

Peppermint Crunch Slices

Ingredients:

For the base:
130g plain flour
80g desiccated coconut
25g cornflakes, crushed
90g golden caster sugar
30g cocoa powder, sifted
1 tsp baking powder
200g unsalted butter or baking margarine
1 tsp vanilla extract

Peppermint Layer:
200g icing sugar, sifted
35ml milk
8 – 10 drops of Peppermint Extract Spice Drops (I use Holy Lama)

Chocolate Layer:
200g milk chocolate (or dark if you prefer)
70ml milk
80g icing sugar, sifted

Easter Treats: Peppermint Crunch Slices

How to make Peppermint Crunch Slices:

Pre-heat your oven to 180° and grease and line a high sided baking tray.

In a large bowl, mix all the dry ingredients together, remember to sift the cocoa powder and the flour. Melt the butter or margarine (this took about 45 seconds in my microwave, but keep an eye on it) and pour it into the dry mix, add the vanilla and mix everything together. Tip it into your lined baking tin (if you put baking paper on the bottom it will come out easier) and press down with the back of a metal spoon. Make sure it’s all well compacted. Bake in the oven for 25 minutes.

Remove from the oven and leave to cool completely in the baking tin. Once it’s cool you can make the peppermint layer. Mix the sifted icing sugar, milk and peppermint drops in a bowl until smooth. It wants to be a fairly firm mix, because you don’t want it oozing out of the sides when you take it out of the tin. Taste the mix and add more peppermint if you think it needs it. Pour the peppermint mixture over the top of your base and smooth out as best you can. I did my best then shook the pan to help it level out. Put this in the fridge for at least half an hour to firm up.

Once the peppermint layer has chilled, you can turn your attention to the chocolate layer. This is pretty easy, you can either melt your chocolate in a bain marie, or very carefully in the microwave. If you’re doing it in the microwave, tread carefully as it’s very easy to over do it and the chocolate could go grainy.

Melt the chocolate, stir in the sifted icing sugar and add the milk and mix well. Pour over the top of the peppermint layer and smooth over. I used a knife to mark lines where I would cut it into slices once it was set. Using these lines as a guide, I placed a mint egg half on the top of each of these slices. Put the peppermint crunch in the fridge for at least an hour to set.

Easter Treats: Peppermint Crunch Slices

When you’re ready to eat it, carefully remove the peppermint crunch from the tin and with a sharp knife, cut it into slices. Serve with a big mug of coffee and enjoy this school dinner classic!

If you enjoyed this, you might also like to try this Cornflake Tart recipe.

Easter Treats: Peppermint Crunch Slices

Brilliant Bakes: Green Velvet Cake

Red Velvet Cake has cornered the market in coloured cakes. It’s delicious, but why should Red Velvet have all the fun? This week I’ve been playing around with a recipe for Green Velvet Cake – just like Red Velvet, but green and just the thing for St Patrick’s Day.

Green cake might not be the first thing you think of if you’re baking for a celebration, but it’s certainly eye-catching and it’s absolutely a talking point. It tastes just like red velvet cake, but it’s green. It looks like it should be mint flavoured, if you want to add a few drops of peppermint flavouring then you could do.

Brilliant Bakes: Green Velvet Cake

I made some chocolate shamrocks and decorated my green velvet cake with them. It’s a very simple but effective way to decorate a cake and I’d recommend even novice bakers give it a try.

Green Velvet Cake

Ingredients:

2 eggs
235mls vegetable oil
235mls buttermilk
1 tablespoon of white vinegar
1 teaspoon of vanilla extract
Green food colouring
320g self-raising flour
260g caster sugar
2 tablespoons of cocoa powder
1 teaspoon baking powder

For the frosting:
250g cream cheese
250g icing sugar, sifted
110g unsalted butter

How to make Green Velvet Cake:

Pre-heat your oven to 180° and grease and line 3 8 inch cake tins.

Pour the eggs, oil, buttermilk, vinegar and vanilla into a large bowl and whisk to combine. Add a few drops of food colouring ad then sift the flour, sugar, cocoa powder and baking powder into the bowl, mix well. Check you’re happy with the colour, if not, add a few more drops of colouring. Remember the shade will darken as it cooks, so don’t make the green too dark.

Pour the green cake batter into the three prepared cake tins. I usually weigh them to make sure they are more or less the same size.

Put the cakes in the oven for 18-20 minutes, until they’re cooked through. Once they’re baked, remove from the oven and leave to cool on a baking rack.

While they’re cooling you can make the frosting. Beat the cream cheese and butter together until light and fluffy, carefully sift in the icing sugar and combine well. Put the frosting in the fridge to firm up a little before using.

Brilliant Bakes: Green Velvet Cake

To put the green velvet cake together, level out the top of each cake by trimming off the top with a serrated knife, this is so they stack neater. Put a smear of icing on the bottom of your cake stand and put your first cake layer on, dollop on some frosting onto the top, spread it evenly over the layer and put the next cake on top of that. Frost the top of that layer, then turn the final cake upside down, so the top of the cake is absolutely flat. Cover the whole cake and sides with the remainder of the frosting and smooth it all over.

Decorate it however you like. I was making my green velvet cake for St Patrick’s Day, so I made chocolate shamrocks using a Cake Decor Milk Chocolate Writer tube which I’d found in Morrisons. It was really simple to use, I just made the shapes on baking paper, left them to set, peeled them off and put them on the cake. So simple and it looks pretty good too.

If you enjoyed this recipe, you might also like my Turkish Delight Cake.

Brilliant Bakes: Green Velvet Cake

Frugal Recipe: Slow Cooker Root Vegetable Stew

My husband is a yellow sticker bargain ninja. He’s forever coming home with bargains he’s found at the supermarket, some things go straight in the freezer, but fresh fruit and vegetables need to be used within a day or two.

This week he came home with two packets of  Mixed Roasting Vegetables from the Co-op which should have been £1.50 each, but were reduced to 83p each. The packs contained a small swede, 3 carrots, 2 parsnips and two medium sized onions. They were crying out to be used in a stew, so that’s what I did.

There was quite a lot of chopping involved in this stew, and I threw in some lentils and a leek I already had which was beginning to see better days. The result was so tasty and hearty that I’ll be making it again. It was a giant stew, which filled my slow cooker to the brim and took 8 hours to cook.

Frugal Recipe: Slow Cooker Root Vegetable Stew

It fed our family for three meals. I made stew and dumplings, I turned it into a pie and I just served it as stew with mashed potato. I even managed to freeze a portion for a rainy day.

This recipe uses two of the packs of vegetables, but you can half the quantities of everything if you want to make a smaller stew. With the yellow sticker bargain, I reckon I made this huge stew for around £3.

Slow Cooker Root Vegetable Stew

Ingredients:

2 medium sized onions, chopped
1 leek, sliced
1 tablespoon of oil, whatever you have
2 small swedes, diced
2 parsnips
3 carrots
2 large potatoes
75g  red lentils, rinsed
2.5 pints of vegetable stock (made with a stock cube)
1 tin of chopped tomatoes
2 cloves of garlic, crushed
1 tablespoon of tomato puree
1 tablespoon of mixed herbs
2 bay leaves
1 teaspoon of sugar
Salt and pepper
1 tablespoon of sweet chilli sauce
1 tablespoon of tomato ketchup

How to make your Slow Cooker Root Vegetable Stew

Chop your onions and cook them in half a tablespoon of oil until they are soft. Add them to the slow cooker when soft. Slice your leek and fry that until tender in the rest of the oil. Add the garlic towards the end of cooking and stir that through for a few minutes, when that’s cooked, tip the leeks and garlic into the slow cooker.

Peel and chop your swedes, carrots, parsnips and potatoes into similar sized pieces and add to the slow cooker.

Switch your slow cooker onto high and add the stock, chopped tomatoes, lentils and the rest of the ingredients. Put the lid on and cook until all the root vegetables are soft, for me this took 8 hours.

Once the vegetables are cooked, taste the stew and add more seasoning if you think it needs it. Stir through and serve however you want.

Frugal Recipe: Slow Cooker Root Vegetable Stew

My favourite way we had the stew was with dumplings. It was just the most perfect warming, hearty meal and I know I’ll be craving stew and dumplings now every time the temperature dips. My husband loved the pie, which was just a dish of the stew, which I stirred a tablespoon of vegetable gravy granules through and topped with a puff pastry lid. But it’s just as good served with a pile of buttery mash.

If you enjoyed this, you might like to try these slow cooker recipes:

Frugal Recipe: Slow Cooker Root Vegetable Stew

Teatime Recipe: Anglesey Cake

Sadly the days where the nation stopped for afternoon tea are behind us. I like baking cakes, so most weekends we do make time for a slice of cake and a mug of our favourite brew. With St David’s Day coming up I baked an Anglesey Cake, I do like to bake seasonally if I can.

Anglesey Cake is not especially well known. Anglesey Cake is darkened with treacle so it appears much richer than it is was often served at weddings where the families couldn’t afford a proper wedding cake. It’s a light fruit cake which is fairly cheap to make and just the thing to serve for afternoon tea.

Teatime Recipe: Anglesey Cake

It’s certainly very easy to make, it rises well and looks a treat on the table. It would be a good bake for the novice baker to try.

Anglesey Cake

Ingredients:

100g butter or margarine
75g soft brown sugar
2 tablespoons of black treacle
1 egg
275g self raising flour
2 teaspoons ground ginger
2 teaspoons ground mixed spice
1/2 teaspoon of bicarbonate of soda
200ml milk
100g raisins
75g currants

Teatime Recipe: Anglesey Cake

How to make Anglesey Cake:

Pre-heat your oven to 180° and grease a deep cake tin (I used an 8 inch tin). I also lined my cake tin with baking parchment for good measure.

Cream the butter or margarine with the sugar. Once it’s light and fluffy, add the egg and treacle and combine. Sift the flour, ginger and mixed spice into the mix and gently mix into a thick batter.

Stir the bicarb into the milk and whisk until it is fully dissolved, gradually stir this into the cake mixture, add the dried fruit and make sure the cake mix is well combined. Pour the cake batter into the cake tin and bake for 50-60 minutes.

Once it’s baked, remove from the oven and leave to cool. The cake is best baked 24 hours before you plan to eat it. It’s nice served plain with a good strong cup of tea, but I like it with some nice crumbly cheese like Caerphilly. Fruit cake and cheese is a traditional combination, believe it or not.

Whether you’re baking this as a St David’s Day treat, or just because you like the look of it, it’s a lovely light fruit cake which won’t break the bank to bake. Happy St David’s Day!

If you enjoyed this, you might also like my “works every time” Victoria Sponge Recipe.

Teatime Recipe: Anglesey Cake


Frugal Recipe: Vegetarian Pork and Beans

A few weeks ago I published a recipe for pork and baked beans. It’s a brilliant recipe, really frugal and tasty but not suitable for vegetarians, obviously. The clue is in the word “pork”. Anyhow, as a vegetarian I was a bit jealous of this homely dish and decided to make a version I could enjoy. I made a few changes and I was so pleased with how it turned out, I’ve decided to share my recipe for vegetarian pork and beans.

The basic recipe is much the same, but having considered my options, I swapped out the diced pork for Quorn cocktail sausages and the smoked bacon for Quorn bacon. If I’m honest, I didn’t love the Quorn bacon in the dish. It didn’t add any flavour, the texture was a bit meh and next time I make it I’ll probably leave it out entirely, or cook it separately and drape it artistically over the top. If you’re missing a bit of the smoky flavour, you could add a bit of barbecue sauce to the mix.

This recipe for Vegetarian Pork and Beans is so simple, it’s the kind of thing you can throw together and leave to bubble away gently in an oven for a few hours. Once it’s cooked, you can eat it straight away or divide it up into portions and freeze it.

Frugal Recipe: Vegetarian Pork and Beans

It makes a great lunch on thick toast, or would be great with a pile of buttery mash. I’m looking forward to having it later with a crispy fried egg on top!

This recipe is easy to make vegan, just swap out the Quorn cocktail sausages for your favourite vegan sausage and enjoy!

Vegetarian Pork and Beans

Ingredients:

500g dried haricot beans, soaked for 24 hours
1 tablespoon oil, I used vegetable, but use what you have
2 packets of Quorn cocktail sausages
2 tins of chopped tomatoes
1 tablespoon tomato puree
2 tablespoons tomato ketchup
1/2 tablespoon sugar
2 teaspoons of dried mixed herbs
Salt and pepper
1 pint of stock, made with a stock cube
4 rashers of Quorn bacon, chopped (optional)

How to make your Vegetarian Pork and Beans:

The day before you want to cook your Vegetarian Pork and Beans, soak your dried haricot beans in plenty of water, following the instructions on the back of the packet. Once they’ve soaked for 24 hours, change the water and boil them for half an hour, or until they’re not chalky inside. Drain and set aside.

Put all of the ingredients into a lidded casserole dish, don’t add the salt at this stage, the economy stock cubes I used were pretty salty, so it’s worth waiting until near the end to taste and see if you need to add more salt. Stir the pot gently and put into an oven at 160° for 2-3 hours. Make sure you give it a stir every half hour or so.

Ideally the sauce should be thick and it should look, smell and taste good. It might only take two hours for your beans to get to the right consistency, it might take nearer 3 hours. Just keep an eye on it and use your judgement. The beans should be tender and creamy inside. If the sauce gets too thick, you can always add a splash of water to loosen it.

Taste the sauce. Add more of whatever you think it needs, now is the time to add the salt if you think it needs it. Serve it however you like, it’s great on toast for lunch or piled on top of mashed potato. It’s a hearty dish, perfect for a winter warm up and ideal if you’re feeling frugal.

If you enjoyed this, you might like to try these vegetarian recipes:

Frugal Recipe: Vegetarian Pork and Beans

Easy Recipe: Vegan Sausage Rolls

Since high street bakers Greggs launched their vegan sausage rolls, they’ve been the talk of the town. My local Greggs sells out of them as quickly as they put them out, I’ve managed to get my hands on them only twice and unlike Piers Morgan, I really like them.

I’ve been making my own vegetarian sausage rolls for years because it’s always been pretty hard to find nice veggie ones in the shops. Last year I shared my recipe for vegetarian black pudding sausage rolls, which are my current favourite. It occurred to me that it would be pretty easy to change my recipe for vegetarian sausage rolls and make them vegan.

Easy Recipe: Vegan Sausage Rolls

I used Jus-Rol ready rolled puff pastry which is vegan. The Granose Meat Free Lincoln Sausage Mix is also vegan, but if you have a sausage mix you prefer, use that instead.

VEGAN SAUSAGE ROLLS

Ingredients:

1 sheet of Jus-Rol ready rolled puff pastry
150g pack of Granose Meat Free Lincoln Sausage Mix
2 tablespoons of parsley, chopped
Salt & Pepper
1 tablespoon of unsweetened soya milk

Easy Recipe: Vegan Sausage Rolls

How to make Vegan Sausage Rolls:

Take your pastry out of the fridge and pre-heat your oven to 200°. Cover a baking sheet with a piece of greaseproof paper.

Make up the mix of Granose Meat Free Lincoln Sausage according to the packet instructions. Stir through your chopped parsley and season with salt and pepper. Mix well and taste, you might want to add more seasoning if you think it needs it. I tend to use quite a lot of pepper.

Unroll your sheet of puff pastry. Cut your pastry sheet in half length-ways. Spoon a thick line of the vegan sausage mixture along the middle of each piece of pastry and paint some of the soya milk in a line along one edge of the pastry. Roll the sausage up and make sure the pastry edge is sealed well. Cut the long sausage roll down into smaller sausage rolls.

I cut each of the two long sausages down to 7, so I had 14 in total. But you can decide how big you want each roll to be, you could just make two giant vegan sausage rolls! Place them on your baking sheet with the sealed side down. Slash the top of the pastry with a sharp knife and brush with soya milk. Put them in the oven for 20 minutes, until golden brown and delicious.

Serve hot or cold, whichever you prefer. They’re not a copy of the Greggs recipe, which contains Quorn, but these make a tasty vegan lunch or snack.

If you enjoyed this recipe, you might also like to try these easy cheaty sausage rolls or my vegetarian black pudding sausage rolls.

Easy Recipe: Vegan Sausage Rolls

Recipe: Chocolate Marshmallow Brownies

I am late to the party when it comes to chocolate brownies. I’ve always found them to be either a bit too gooey, or a bit too dry. I’ve discovered that the secret to the perfect brownie is to bake them yourself, that way you are in control of how gooey your brownie is. This week I baked a batch of Chocolate Marshmallow Brownies and after years of being entirely indifferent to brownies, I ended up making the best brownies ever!

Baking brownies is such a lovely thing to do with children, my son loves stirring the chocolate and butter and watching them melt over the gentle heat of the bain marie. He’s 8 now, so only just trusted to do this job knowing the dangers of naked flames, hot water and inattention.

After school on Tuesdays, the boy and I like to have a couple of hours of baking and crafts together. It’s my favourite time of the week, his too I think. Of course, the secret to craft and baking success is planning, something I entirely forgot to do. Thankfully I had everything we needed to bake our usual chocolate brownies with cherries, everything that is apart from the cherries. No fear, I thought, I’ll improvise.

Recipe: Chocolate Marshmallow Brownies

Hiding in my coffee cupboard was a bag of marshmallows which I sprinkle on top of hot chocolates. I wondered how they’d be if I used them in the brownies, it turns out they were excellent. You could stir them through the brownie batter, or you can just sprinkle them on top before they go in the oven. They go all toasted and gooey, just like round the campfire.

Chocolate Marshmallow Brownies

Ingredients:

250g milk chocolate
250g unsalted butter
4 medium eggs
250g sugar
2 heaped tablespoons self raising flour
2 heaped tablespoons cocoa powder
60ml of vegetable oil
2 handfuls of Marshmallows

How to make your Chocolate Marshmallow Brownies:

Pre-heat your oven to 185° and line a deep sided baking dish with baking parchment.

In a bowl, over a pan of simmering water, melt the chocolate and the butter together until smooth. In a separate bowl, mix the sugar and the eggs, whisk them until they’re light and fluffy.

Pass the flour, cocoa powder through a fine sieve and add to the eggs and sugar. Gently whisk the ingredients together until combined. Then mix in the melted chocolate and the vegetable oil to combine.

If you want to stir your marshmallows through the batter, do that now. if you want to sprinkle them on top, pour the batter into the baking dish and sprinkle them all over the top.

Bake for 35-45 minutes until the brownies have lost their wobble but are still a bit gooey inside. Take out and leave to cool. You want to almost under bake them so they are still soft in the centre.

Once they are cool, cut them into squares, sprinkle them with icing sugar if you prefer. These are my favourite brownies ever. I urge you to give them a try.

Recipe: Chocolate Marshmallow Brownies

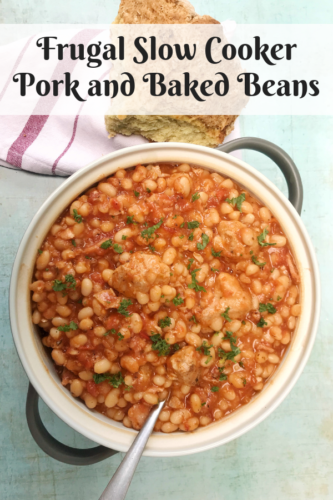
Frugal Recipe: Slow Cooker Pork and Baked Beans

This year, for various reasons we are tightening our belts. I’ve been looking to cut costs in the kitchen, and one way to do this is to batch cook dishes and freeze in portions. Another way to do this is to eat more beans and lentils. This week, I’ve done both and made a huge batch of slow cooker pork and baked beans.

This dish does take a bit of planning ahead, but at £1.12 (current price at Morrison’s) for 500g of haricot beans, it’s a pretty frugal way to feed the family. Sure, you can buy baked beans, but this recipe is worth trying at least once. It’s like the baked beans we get in a tin, but a little different. Lighter and less stodgy perhaps, they are certainly tasty.

I’ve used diced pork pieces in this recipe, but I think it’d be just as lovely if you swapped the pork for sausages or chipolatas. I like it served on thick buttered toast, but it would be great with a pile of buttery mash or on a jacket potato.

This recipe makes so much food, it’s great for batch cooking and freezing and really economical too. There’s probably enough for two good-sized meals for a hungry family of four.

Slow Cooker Pork and Baked Beans

Slow Cooker Pork and Baked Beans

Ingredients:

500g dried haricot beans, soaked for 24 hours
1 tablespoon oil, I used vegetable, but use what you have
450g diced pork (or swap for sausages)
4 rashers of smoked bacon, finely chopped
2 tins of chopped tomatoes
1 tablespoon tomato puree
2 tablespoons tomato ketchup
1/2 tablespoon sugar
2 teaspoons of dried mixed herbs
Salt and pepper
1 pint of stock, made with a stock cube

How to make your pork and baked beans:

The day before you want to cook your pork and baked beans, soak your dried haricot beans in plenty of water, following the instructions on the back of the packet. Once they’ve soaked for 24 hours, change the water and boil them for half an hour, or until they’re not chalky inside. Drain and set aside.

In a frying pan, add your oil and cook the diced pork until it is browned. Once brown put it in your slow cooker. In the same pan, fry off the bacon pieces (you can buy packets of lardons which are cheaper than bacon slices if you prefer). Once the bacon is cooked, add that to the slow cooker.

Turn the slow cooker to high and add the beans and rest of the ingredients, but leave the salt out until later. The economy stock cubes I used were pretty salty, so it’s worth waiting until near the end to taste and see if you need to add more salt.

I cooked the pork and baked beans on high for two hours, then checked it and gave it a stir. It looked watery and I wasn’t convinced it would work. I then went out for two more hours and while I was out, magic had happened in the slow cooker. The sauce had thickened, the beans had softened and the pork and smoked bacon had given out their flavours. It had in total about 4 and a half hours on high, but cook it until the sauce has thickened and it looks, smells and tastes good.

Taste the sauce. Add more of whatever you think it needs. I added a bit more ketchup and it didn’t need any extra salt. Serve it however you like, it’s great on toast for lunch or piled on top of mashed potato.

If you don’t have a slow cooker, this works just as well in the oven. Put it in a lidded casserole dish on 160° for 2-3 hours, stir it every so often and when the sauce is thick, it’s done.

This is a great dish to cook in the depths of winter. I’m pleased as punch to have several tubs of this in my freezer for a rainy day.

If you enjoyed this, you might like to try these slow cooker recipes:

Slow Cooker Pork and Baked Beans

Simple Recipe: Scotch Whisky Syllabub

If you’re planning a Burns Night celebration and you’re looking for a simple but slightly different pudding for the night, this rich and easy Whisky Syllabub recipe really hits the spot. If you can whip cream, open a bottle of whisky and zest a lemon, then this recipe is for you.

Syllabub in various forms has been around since the 16th century. Originally a frothy, milky concoction, made with sweet wine or cider; it has evolved from a hearty, warming drink to the whipped pudding we eat today. Syllabubs are similar to possets and are closely related to the famous Scottish pudding, cranachan. I’ve given a standard syllabub a Burns Night makeover and swapped out the sweet wine for whisky, and it really works!

Simple Recipe: Scotch Whisky Syllabub

This recipe for Scotch Whisky Syllabub takes no time at all to put together and makes enough for four good-sized portions, or 6 smaller ones. It is very rich though, so a smaller portion might be better. Serve it with homemade shortbread and raspberries. Delicious!

Scotch Whisky Syllabub

Ingredients:

55g caster sugar
1 lemon, zested
3 tbsp lemon juice
300ml double cream
25g icing sugar
100ml whisky

Simple Recipe: Scotch Whisky Syllabub

How to make Whisky Syllabub:

In a small saucepan, warm the sugar, lemon juice and finely grated zest until the sugar is dissolved. Stir the mixture a little to encourage the sugar to dissolve, once it has, leave it to cool completely. This shouldn’t take long, maybe 15 minutes.

In a large mixing bowl whip your double cream and icing sugar together until it goes in soft to medium peaks. I used a hand mixer for this as whipping it by hand would take me an age.

Add your whisky to the pan of juice and swirl it around, pour it into the cream mixture and fold the whisky and juice into the cream with a spatula. For good measure I gave it a quick 10 second mix with my hand mixer too.

Spoon the whisky syllabub into nice glasses and put in the fridge and chill for an hour or so. It’s fine to make it the day before and chill it overnight if you’d like. It’s also absolutely fine to serve it there and them without chilling it, it’ll just have a slightly softer texture.

Serve with some homemade shortbread and raspberries. It’s a fantastically simple pudding and one to impress the grown ups at any Burns Night celebration!

If you enjoyed this recipe, you might also like –

Simple Recipe: Scotch Whisky Syllabub