FREE Mother’s Day Colouring Printables

Mother’s Day aka Mothering Sunday is coming this weekend. If you’re anything like me, thing can be a bit last minute. But fear not, I, like most mums are happy with a bit of breakfast in bed and a homemade card. I’ve put together four Mother’s Day colouring sheets which could happily be turned into cards, or stuck to the fridge in celebration of Mother’s Day!

Review: Guess How Much I Love You Big Nutbrown Hare

The Mother’s Day Colouring sheets are ideal for entertaining little ones, or colouring in to give to mummy, grandma or a favourite female family member. There are four very different styles to choose from, so there’s something for everyone.

Download the FREE Mother’s Day Colouring Sheets here!

Mothering Sunday in the UK falls on the fourth Sunday in Lent, exactly three weeks before Easter Day. Traditionally Mothering Sunday was the day when people would visit their “mother” church (the church they were baptised in). Mothering Sunday has become an occasion for celebrating mothers and giving them presents, though these days we have shortened it to Mother’s Day.

Mother’s Day is celebrated around the world on different days, in the UK, Canada and Australia it falls in March. In America it is a slightly more commercial celebration which takes place in May.

Our Mother’s Day celebrations are usually pretty low-key (which is how I like it). I will be given breakfast in bed and a cuddle and a card, then we will go to church and the children hand out little bunches of flowers to all the adult women in the congregation. Then we will put on our walking boots and go for a nice bracing walk with the dog somewhere. To me, that is perfect.

If you fancy doing some Mother’s Day crafts, here are some lovely spring crafts you could try –

FREE Mother's Day Colouring Printables

Toy Review: Schleich Pony Agility Training Set

AD/Gifted. This week we have been playing with the Schleich Pony Agility Training Set, part of the Schleich Farm World collection. Schleich figurines are designed with lots of attention to detail and are painted and finished by hand. They’re known for being fantastic quality, my son has an awful lot of Schleich figures of various kinds in his toy box, mostly dinosaurs, but it’s good to expand your horizons every so often.

Toy Review: Schleich Pony Agility Training Set

The Schleich Pony Agility Training Set is suitable for ages 3-8, and my 8 year old and his friends had a lot of fun playing with it. My son really loves going pony riding. There is a stables near us where he goes in the holidays for a pony walk, he loves ponies, so he was really excited to play with this set.

With this Schleich Pony Agility Training Set, you can put your pony through its paces. The set is launched in April and it contains everything you need to train and have fun with your ponies; including paddock fencing, small jump obstacles that can be adjusted, a see-saw and more; an articulated child figure is included to help lead the horses.

Toy Review: Schleich Pony Agility Training Set

When you unpack your box, there are lots of pieces which need slotting together and a few stickers to decorate some of the larger pieces. Thankfully there’s a very simple to follow instruction booklet included. The set is fun to put together, older children will have no problem at all; younger children may need a little bit of help.

Once it’s all set up, it’s up to you and your imagination to direct play. The figures are well made with lots of detail. The girl figurine has movable limbs, the ponies don’t but they are wonderfully detailed; you can imagine them galloping along a windswept beach.

Toy Review: Schleich Pony Agility Training Set

The set has a lot of parts, so it’s got a lot of play value. It costs £24.99 and is a really good introduction to ponies for younger children. The Schleich Pony Agility Training Set would fit really well among the rest of the Farm World collection from Schleich, if you’ve got any already, or are starting up a collection.

What I really like about Schleich is that the quality is so good; the figures are virtually heirloom pieces, I can totally see me passing the Schleich figures down through the generations.

The Schleich Pony Agility Training Set is available from Smyths Toys and costs £24.99.

Disclosure: We were sent the Schleich Pony Agility Training Set for review purposes. All images and opinions are our own.

What to expect at Timber Festival 2019

AD/ Last year the first ever Timber Festival was held in the beautiful and unique surroundings of the National Forest at Feanedock. It was three days of music, arts, creativity and philosophy in the woods. Timber Festival 2019 is returning this year on 5th, 6th and 7th July, and we are excited to be going along for the ride!

Timber is located at Feanedock, a 70 acre woodland site in the Midlands. The woodland has been transformed from a former coalfield to be part of the first forest to be created in England for over 1,000 years. It’s a truly unique site and it’s growing by the day.

What to expect at Timber Festival 2019

The 2018 Timber Festival was really special; there was a huge moon in the woods, amazing music, storytelling around the campfire; the boy went on adventures, climbed trees, built a den, explored and grew in so many ways. It was an experience we are very keen to repeat, so we’re going again this year.

The festival is divided into eight distinct areas; The Eyrie Stage, Field Notes, As the Crow Flies, Elemental, Halcyon Days, Shivelight, The Canopy and The Common. Each area has its own thing going on, so for example, the Eyrie Stage is dedicated to the best in spoken word and live music and in Halcyon Days you’ll find all kinds of circus skills and woodland games.

If you’re planning on going to Timber as a family with children, then your plan for the weekend will probably be very different to an adult group.  Last year there were a number of really memorable things which we all loved; I’m pleased to see a lot of them back again this year.

What to expect at Timber Festival 2019

Unmissable things to do at Timber Festival 2019!

Bushcraft Survival – Discover your inner Bear Grylls in these handy workshops!

Visit the Perfectly Edible Binner Table for ‘Binner’. They will be cooking up a vibrant 2-Course Dinner made entirely out of food that would otherwise have been sent to landfill.

Foraging for Modern Humans will show you how to do it safely and ethically and explores why she believes that foraging is still important for 21st century living.

Visit Shivelight and relax with some Laughter Yoga; Tai Chi; Reiki or Forest Bathing; or just chill out with a book in the Woodland Library.

Shimmer in the Elemental area is an immersive diffusion system includes a 12-channel sound experience that uses copper-alloy cymbals as speakers to control the intensity of light to manipulate pattern and shapes.

Families would enjoy the Willow Maze and the Woodland Cinema, both in the Elemental area.

What to expect at Timber Festival 2019

Inside the As the Crow Flies area, you’ll find storytelling legend, Ian Douglas perched around the campfire telling his tall tales. For a bit of mad science, Dieter Wadeson is hilarious and dangerous in equal measure. If you are around the campfire as the night draws in, get your toes tapping to the Campfire Bands.

Visit the Moth Hotel have a go one the Giant Marble Run. There are also Slacklines to balance on, trees to climb and the ever popular Hammer & Chisel area, where kids can get building.

The Eyrie Stage was a bit of a hidden gem last year. Tucked away in the woodland, this stage was really popular with an eclectic mix of music and artists. This year you can enjoy BBC Radio 3’s Elizabeth Alker curating the Saturday programme; The Coal Tits; The Screeching Bluejays; Woodland DJs; MUHA and The Roots Community Choir.

In Field Notes, you’ll find the best of nature writing, storytelling and cutting edge ideas; from Stuart Maconie talking about writing his book, The Long Road from Jarrow; Gwenno who is Single-handedly raising the profile of the Cornish language and music from Another Sky, Otto & The Mutapa Calling and Cut A Shine.

What to expect at Timber Festival 2019

There are a million more things to see and do at Timber Festival; and new acts are being added all the time. To see the full line up and for more information about Timber Festival, visit the website.

Timber Festival 2019 will take place on 5/6/7 July 2019; at Feanedock, near Ashby de la Zouch, in the National Forest.

Disclosure: We been offered tickets to the Timber Festival 2019 in exchange for a preview and an honest review.

Recipe: Orange Upside Down Polenta Cake

This week I decided to make an orange polenta cake, but I had a bag of oranges which needed using, so I made this Orange Upside Down Polenta Cake. Polenta cakes are among my favourite kinds of cakes, they’ve got a different texture; slightly gritty but moist and they’re quite filling too.

I was wistfully looking at the photographs of the rhubarb upside down cake I made last year and remembering how great it was. It was so great it made me want to grow more rhubarb so I could make it more often. Upside down cakes seem pretty old fashioned, but they’re really wonderful and can make an attractive centrepiece for an afternoon tea spread.

Recipe: Orange Upside Down Polenta Cake

If you’re making this recipe you could remove the peel from the oranges and cut them into slices, laying them on the bottom of the cake tin. I wanted to make a batch of orange syrup, so I decided to make a bumper batch of my candied orange slices and used those as the top (or bottom) of my Orange Upside Down Polenta Cake.

Orange Upside Down Polenta Cake

Ingredients:

For the topping:
Zest and juice of two oranges
50g unsalted butter
50g caster sugar
4 drops of Spice Drops Orange Zest Extract

For the cake:
250g butter or margarine
250g caster sugar
4 eggs
150g polenta
2 teaspoons of baking powder
200g plain flour
Zest  of two oranges and juice of one orange
8 drops of Spice Drops Orange Zest Extract

Recipe: Orange Upside Down Polenta Cake

How to make an Orange Upside Down Polenta Cake

Pre-heat your oven to 170° and line an 8 inch cake tin with baking paper.

In a small saucepan, melt the 50g of butter and sugar together. Zest two oranges and add the zest and the spice drops if you’re using them (they just boost the orange flavour). Once melted leave to cool for a few minutes, then pour into the bottom of your cake tin. Peel and slice the two zested oranges and arrange them artfully on top of the butter and sugar mixture.

In a large mixing bowl, beat the butter and sugar together until fluffy, add the eggs and mix thoroughly. Add the rest of the cake ingredients and mix well to form a smooth cake batter. Carefully pour the batter over the top of the orange layer and smooth off the top.

Put the cake in the oven for 50-60 minutes until it is cooked through. Check with a skewer to make sure it’s cooked properly. Remove from the oven and cool on a rack in the tin. Once it’s cooled for around an hour, take a plate and carefully flip the cake out of the tin, so the bottom of the cake is now the top. Remove any baking paper and leave to cool properly.

This Orange Upside Down Polenta Cake is lovely. Like I said, I topped mine with my candied orange slices, but it would be quicker and probably just as tasty if you used orange slices without the peel. It’s not a quick bake, but it is really easy and one I’ll be baking again and again.

Recipe: Orange Upside Down Polenta Cake

Recycled Crafts: How to Paint Your Own Pretty Jars

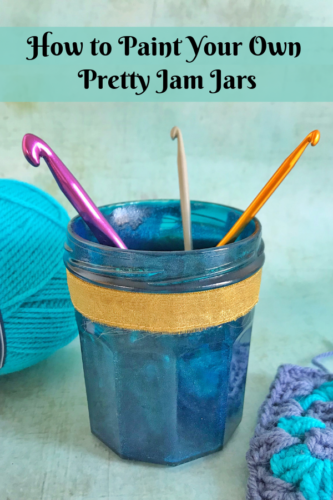
If you’ve ever spent any time on Pinterest, you will most likely have seen pictures of pretty painted jars used in a thousand different ways. For many months I’ve looked at these pretty pictures and wanted to try it for myself. Once I’d collected a few pretty jars, I decided to have a go at painting them, so here’s how to paint pretty jars, a method so simple a toddler could do it (under supervision).

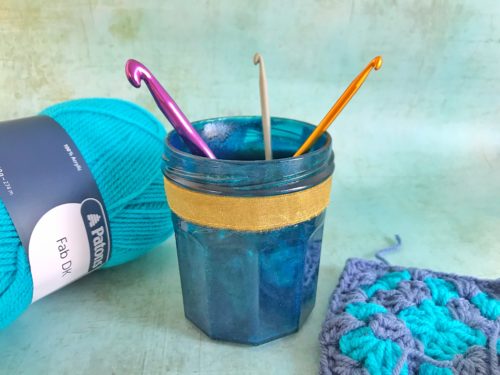
Jars have endless uses around the home. I use them as pencil holders a lot, but I’ve recently taken up crochet and I wanted something handy to keep my growing crochet hook collection in. I painted up my jar and just for a bit of extra protection for my hooks I put a circular cotton wool pad in the bottom. It’s worked out really great and my hooks now have a place of their own instead of lurking in my pencil jar.

The finish of this jar was really hard to capture in a photograph. In real life it’s iridescent and a little bit mermaidy.

Recycled Crafts: How to Paint Your Own Pretty Jars

How to Paint Your Own Pretty Jars

You will need:

A clean jar or two
PVA glue
Food colouring
A paintbrush
Maybe a nice ribbon to decorate your jar

How to paint your own pretty jars:

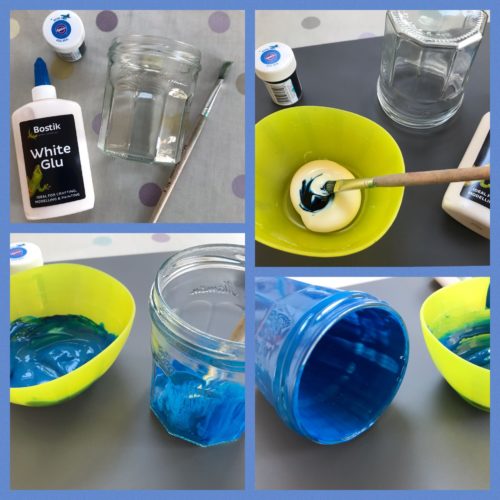
Begin by making sure your jar is clean and dry. In a bowl pour in a large dollop of the glue, you’ll need enough to paint the inside of your jar, be generous.

I chose to paint my jar a nice blue colour (as blue is my favourite colour); add a few drops of whatever colour of food colouring you’d like. Remember that the colour will darken quite a lot when it dries in the oven; so go for a couple of shades paler than you’d like and have faith.

Recycled Crafts: How to Paint Your Own Pretty Jars

Using a paintbrush, paint a thick-ish layer of the coloured glue evenly all over the inside of the jar. Once you’ve finished, tip the jar upside down and leave it for about half an hour; hopefully any excess glue will drip out.

Put your painted jar in the oven at 180°, make sure it’s upside down. After about 15 minutes, carefully (very carefully) turn the jar the right way up and bake for another 15 minutes. You can either remove it from the oven or leave it to cool inside the oven. I put mine on a rack outside to cool which took about an hour.

Once it’s cooled you can leave it as is, or you could tie a ribbon around it to finish it off nicely. It’s now ready for pens, pencils, crochet hooks or any number of uses you may have for it.

My jar is lovely, it’s really quite iridescent, but the photo doesn’t pick up on that. It’s a shade darker than I wanted, but I’ll know to mix a paler shade for next time.

What would you use your painted jar for?

If you enjoyed this, you might like to try making a jam jar snowglobe.

Recycled Crafts: How to Paint Your Own Pretty Jars

Six Children’s Books for Mother’s Day

We read quite a lot together and to each other, we regard it as a special time together. We often give each other nice books as gifts for occasions and Mother’s Day is no exception. I’ve been taking a look at some lovely books which might make nice gifts for Mother’s Day.

Six Children’s Books for Mother’s Day

With My Mummy by James Brown and Cally Johnson-Isaacs is a heartwarming celebration of the relationship between mother and child. Told in gentle rhyme by James Brown and brought to life with illustrations by Cally Johnson-Isaacs. With My Mummy is a charming picture book and the perfect gift to share time and time again.

Six Children's Books for Mother's Day

Mother’s Day by Shirley Hughes would make a gorgeous gift for Mother’s Day. Katy and her little brother Olly tell us about their day with Mum. From the fun of waking up in the morning, getting the bus into town with Mum and reading bedtime stories together. This joyous tale gives us a snapshot into a child’s day and celebrates the special bond between a mother and child.

I Love Mum with The Very Hungry Caterpillar by Eric Carle. This is a celebration of love and all the ways to tell your mum how much you care. This delightful little book features Eric Carle’s bright and distinctive artwork of animal mother’s and babies – from giraffes and crocodiles to bears and penguins – with The Very Hungry Caterpillar making an appearance alongside each one. The perfect gift for Mother’s Day, or any day you want to show your mum how much you care.

Guess How Much I Love You by Sam McBratney is an absolutely gorgeous book which perfectly sums up how much a parent loves a child. Featuring Little Nutbrown Hare and Big Nutbrown Hare; they take it in turns to try to measure how much love they have for each other. It’s lovely, it’s heartwarming and it’s about the most famous book about parental love you could think of, for good reason too!

My Mum Is Fantastic by Nick Butterworth. I love the title of this book, it’s what I’d hope my son would say about me. The mum in this book is truly fantastic. She’s a brilliant artist, she can balance on a tightrope, she can swim like a fish, do amazing stunts on a bike and she can tame wild animals. There’s very little this astounding mum can’t do. And if that leaves you feeling a bit inadequate, I’m sure you’re fantastic in our own special way.

Superhero Mom by Timothy Knapman and Joe Berger. All mums are amazing, and the mum in this story is no exception. She doesn’t wear a cape or fly around, but she runs for the bus so fast it feels like flying; she uses her super-strength to carry her daughter’s boots, coat, bag, and scooter; and can make bumps and bruises better with just a kiss. Maybe mums really do have superpowers after all!

If you enjoyed this, you might like our pick of five children’s books about love.

Six Children's Books for Mother's Day

Nerf Review: Nerf N-Strike Elite Rukkus ICS-8

AD/Gifted. If there’s one thing guaranteed to make an 8 year old happy, it’s a Nerf gun. If you want to (at least) double that joy; arrange a Nerf battle in the park with some of his Nerf loving friends. We were sent the new Nerf N-Strike Elite Rukkus ICS-8 to try out, so we took it into battle to see how it fared.

Nerf Review: Nerf N-Strike Elite Rukkus ICS-8

The Nerf N-Strike Elite Rukkus ICS-8 features an 8-dart clip. The cartridge stays attached to the blaster, making it fast and easy to reload. You load 8 darts into the front of the cartridge, pump the gun to prime, and pull the trigger to fire.

We arrived at our chosen battleground; pockets full of Nerf darts (including the 8 that the Nerf N-Strike Elite Rukkus ICS-8 came with). We met up with Nerf enthusiast Jenny from TheBrickCastle and her family. It was cold and a bit wet, but there was a nearby cafe we could retreat to after battle; so all was well with the world.

Nerf Review: Nerf N-Strike Elite Rukkus ICS-8

We loaded up our Nerf guns with darts and battle commenced. The cartridge doesn’t come out of the Nerf N-Strike Elite Rukkus, so you have to slide it up and down to fill it, which is a little bit of a faff.

There was a bit of stop-starting as the boys got used to how you fire it. The mechanism is a bit sticky; we found we had to stop pretty often to figure out why it wasn’t firing. It was usually that the pump hadn’t been properly primed, or that the cartridge hadn’t clicked along enough for the dart to fire. Despite this, you can fire the dart pretty far and with a good degree of accuracy.

Nerf Review: Nerf N-Strike Elite Rukkus ICS-8

The Nerf N-Strike Elite Rukkus ICS-8 is made for people aged 8+. My son is 8 and really enjoyed this Nerf, it was just about the right size for him. He did get a little frustrated when the mechanism got stuck and we had to help him sort it out. It operates in a different way to his other Nerf guns. I think it’ll take him a few goes to really get the hang of it and be able to troubleshoot effectively.

We’re not sure who won the Nerf battle, but an awful lot of fun was had by all. We did like the Nerf N-Strike Elite Rukkus ICS-8; despite its sometimes tricky to fire flaws, it’s a fun Nerf and a great one to take into battle.

The Nerf N-Strike Elite Rukkus ICS-8 from Hasbro costs £19.99 and is widely available in lots of toy shops and online. 

Disclosure: We were sent a Nerf N-Strike Elite Rukkus ICS-8 for review purposes. All images and opinions are our own.

Days Out: Visiting Barley Hall, Medieval House, York

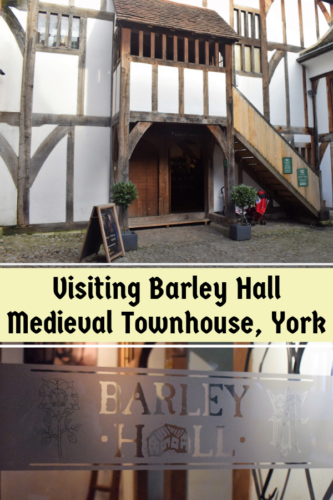
A couple of weeks ago we went to York for the day to have a look at the Viking Festival and we really packed a lot of history into our time there. As well as visiting the JORVIK Viking Centre, one of the things we did was visit Barley Hall; a medieval townhouse tucked away in the back streets of York.

Barley Hall is a reconstructed medieval townhouse which was originally built around 1360 by the monks of Nostell Priory near Wakefield. Later it became a high status residence in York.

Days Out: Visiting Barley Hall, Medieval House, York

The first record of the Snawsell family living in Barley Hall in 1466. The Hall was the residence of someone of a very high status, and William Snawsell was a goldsmith and coiner, and later the Lord Mayor. In his household lived his wife and three children, who were attended to by around 12 servants. Barley Hall was later split into separate dwellings in the 16th or 17th century. Eventually it was bought by York Archaeological Trust in 1987 and restoration work began.

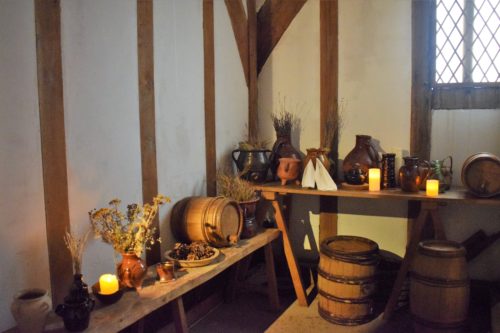
When Barley Hall was restored in 1987, York Archaeological Trust modeled the Hall on the household of the Snawsell family during the reign of Richard III. The Hall has high ceilings, exposed beams and replica furnishings throughout.

Days Out: Visiting Barley Hall, Medieval House, York

Today it is a popular museum for visitors and school children to learn more about domestic life in the medieval period. I really enjoy learning about domestic history, about how people lived and what they ate; so a visit to Barley Hall was right up my street.

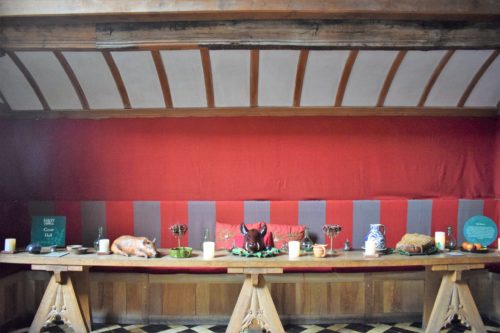
The Great Hall is the biggest and most splendid room at Barley Hall. The family would sit at the raised table at the front of the Hall; with lower status people taking their place on the side tables.

Days Out: Visiting Barley Hall, Medieval House, York

My favourite areas were where the servants worked. The dairy and the larder were really interesting to me and I spent some time exploring them. Upstairs Barley Hall currently has a special exhibition – Magic and Mystery. There were lots of interactive activities for children to do, and lots to interest adults as well.

As well as interesting displays, there was a medieval dressing up box; a make your own wand activity and you’re challenged to find the magical properties of plants, stones and wood; plus add the correct stamp in your own booklet which you can take home and keep. I especially liked the section devoted to the uses of herbs for healing and in magic. We certainly learned a few things about medieval magic!

Days Out: Visiting Barley Hall, Medieval House, York

Barley Hall is not huge, but there’s enough to interest and entertain there. It’s great for children as the history is really hands on too. The exhibitions change from time to time, so it’s worth checking before you visit to see what’s on. It really is tucked away in the back streets though, so you might need a map to help you find it.

If you’ve got a little time on your hands and you’re in York, a visit to Barley Hall is an hour or two well spent!

For more information about Barley Hall, visit the website.

Days Out: Visiting Barley Hall, Medieval House, York

Traybake Treats: Peppermint Crunch Slices

Peppermint Crunch is one of the things I remember from school. A couple of times a month the dinner ladies would make trays of peppermint crunch for pudding, it was a highlight. Last year we visited Keswick Market and a local bakery had a stall selling cakes and tray bakes, lo and behold there was the Peppermint Crunch I used to love as a child. I bought some, shared it with the boys and I’ve been wanting to make my own ever since.

Easter Treats: Peppermint Crunch Slices

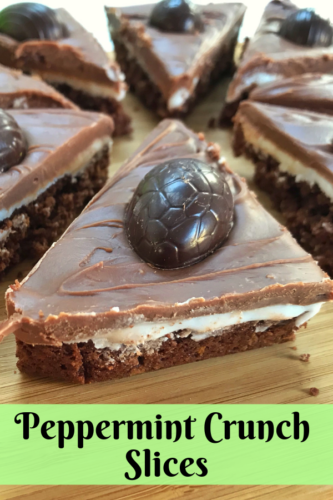
Last week Beech’s Fine Chocolates sent me some mini chocolate Easter eggs to try out. When I got them and I saw there was a mint crisp flavour, I knew exactly what I was going to do with them. This is how this Easter version of the Peppermint Crunch Slice was born.

If you love mint, you will love Peppermint Crunch slices. They are easy to make, but there are a few steps and you need to factor in chilling time. It’s a nice thing to make with kids too. Top with some Dark Chocolate Mint Crisp Mini Eggs and you’ve got yourself a minty treat and a half!

Peppermint Crunch Slices

Ingredients:

For the base:
130g plain flour
80g desiccated coconut
25g cornflakes, crushed
90g golden caster sugar
30g cocoa powder, sifted
1 tsp baking powder
200g unsalted butter or baking margarine
1 tsp vanilla extract

Peppermint Layer:
200g icing sugar, sifted
35ml milk
8 – 10 drops of Peppermint Extract Spice Drops (I use Holy Lama)

Chocolate Layer:
200g milk chocolate (or dark if you prefer)
70ml milk
80g icing sugar, sifted

Easter Treats: Peppermint Crunch Slices

How to make Peppermint Crunch Slices:

Pre-heat your oven to 180° and grease and line a high sided baking tray.

In a large bowl, mix all the dry ingredients together, remember to sift the cocoa powder and the flour. Melt the butter or margarine (this took about 45 seconds in my microwave, but keep an eye on it) and pour it into the dry mix, add the vanilla and mix everything together. Tip it into your lined baking tin (if you put baking paper on the bottom it will come out easier) and press down with the back of a metal spoon. Make sure it’s all well compacted. Bake in the oven for 25 minutes.

Remove from the oven and leave to cool completely in the baking tin. Once it’s cool you can make the peppermint layer. Mix the sifted icing sugar, milk and peppermint drops in a bowl until smooth. It wants to be a fairly firm mix, because you don’t want it oozing out of the sides when you take it out of the tin. Taste the mix and add more peppermint if you think it needs it. Pour the peppermint mixture over the top of your base and smooth out as best you can. I did my best then shook the pan to help it level out. Put this in the fridge for at least half an hour to firm up.

Once the peppermint layer has chilled, you can turn your attention to the chocolate layer. This is pretty easy, you can either melt your chocolate in a bain marie, or very carefully in the microwave. If you’re doing it in the microwave, tread carefully as it’s very easy to over do it and the chocolate could go grainy.

Melt the chocolate, stir in the sifted icing sugar and add the milk and mix well. Pour over the top of the peppermint layer and smooth over. I used a knife to mark lines where I would cut it into slices once it was set. Using these lines as a guide, I placed a mint egg half on the top of each of these slices. Put the peppermint crunch in the fridge for at least an hour to set.

Easter Treats: Peppermint Crunch Slices

When you’re ready to eat it, carefully remove the peppermint crunch from the tin and with a sharp knife, cut it into slices. Serve with a big mug of coffee and enjoy this school dinner classic!

If you enjoyed this, you might also like to try this Cornflake Tart recipe.

Easter Treats: Peppermint Crunch Slices

Flower Crafts: Simple Tissue Paper Flowers

Giving a bouquet of flowers to someone special is a really lovely thing to do, but they often fade within a few days which is a shame. A few years ago I made a huge bunch of tissue paper flowers for myself and they are still sat on my desk looking cheery. They’re so simple to make and a few of them in a little vase would make a lovely gift for Mother’s Day, Easter or a birthday.

Once you get the hang of them, they’re remarkably simple to make. You can put a flower together in a few minutes. You can mix different shades of tissue paper together to make a multi-coloured bloom, or stick to one colour if you prefer. The great thing about tissue paper flowers is they never need watering and they never die.

Flower Crafts: Simple Tissue Paper Flowers

How to make Simple Tissue Paper Flowers

You will need:

1 sheet of coloured tissue paper
Scissors
A green pipe cleaner

How to make Simple Tissue Paper Flowers:

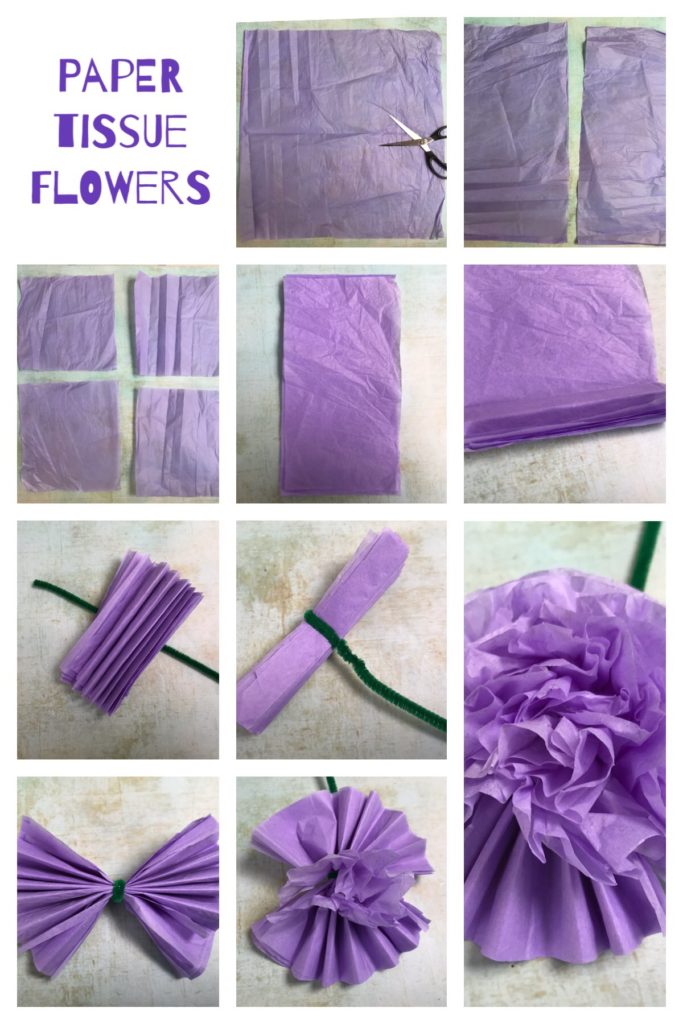
Take your sheet of tissue paper and cut it into quarters. Make a pile of the quarters, fold them in half so it looks like a rectangle and cut along the fold. You should now have eight rectangles of tissue paper.

Flower Crafts: Simple Tissue Paper Flowers

Make them into a neat pile and fold them along the short edge in a concertina. The folds need to be about 1cm. Once you’ve folded the concertina along the full length of the rectangle; take the pipe cleaner and wrap it around the centre of the concertina.

Once the centre of the concertina is secured, fan out the tissue paper folds and start to pull them to the centre of the flower in individual layers. Take your time over this, make sure you separate every individual layer. Once you’ve done this, ruffle the flower up and put it in a vase. Make a few more flowers in this way until you’ve made as many as you need.

Tip: Use a minimum of six layers of tissue paper for each flower. I like to use eight as it gives a really full bloom.

If you don’t want to use a pipe cleaner, you could bind the centre of the concertina with some thread instead.

Who will you give your tissue paper flowers to?

If you enjoyed this, you might also like these flower crafts –

Flower Crafts: Simple Tissue Paper Flowers