
October is one of my favourite months. I love the autumn colours and Halloween is always a good excuse to get the mixing bowls out to create something spooky to celebrate the occasion. We don’t do trick or treating, but we usually have a party for some of the small boy’s friends; or a little Halloween tea party of our own. I tried my hand at making some spooky Halloween cupcakes for the occasion and I was quite pleased with how they turned out.
The cupcakes were really easy to make (you can read my fail-safe sponge cake recipe here) and they take very little time to knock up with a food mixer; though I sometimes mix my cakes by hand if I can’t be bothered washing the mixer afterwards.
Once my little cupcakes had cooled, I made a buttercream. I made quite a lot of buttercream because I had several batches of cakes to decorate for various occasions. To make my buttercream I put 500g of soft unsalted butter in the food mixer and beat it for a minute or two to soften it up properly. I then added 500g of sifted icing sugar and beat them together until they were thoroughly combined. As you can see it’s just equal amounts of each ingredient, so depending on how much buttercream you need you can make more or less.

I then put half of the buttercream in a tub in the fridge to use at a later date. I put a quarter in a piping bag with a piping nozzle (I use a large star) and popped that in the fridge to firm up a little. With the remaining quarter of icing (still in the food mixer) I added orange food colouring; just a few drops at a time until you get the Halloweeny orange colour you want. Once you’re happy with the colour, pop it in the fridge to firm up a little; though not so much that you can’t pipe it. I always find freshly made buttercream is too loose to pipe with until it’s had half an hour in the fridge.
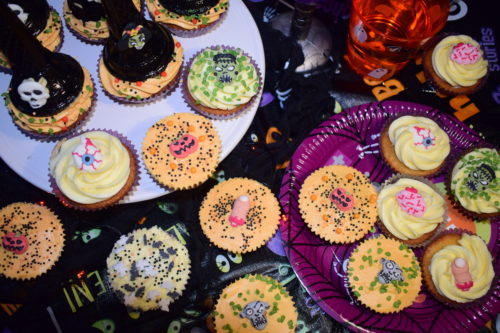
I made three different kinds of spooky Halloween Cupcakes…
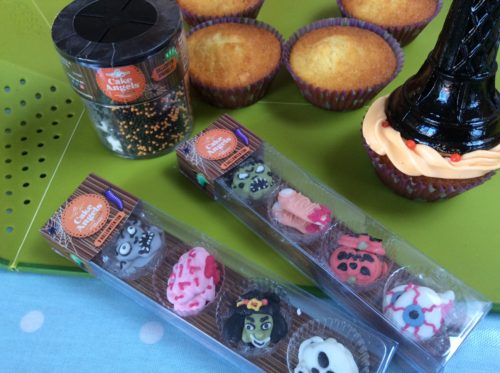
With the orange buttercream and using a palette knife, I smoothed the buttercream on top of the cupcake. Choose cupcakes which don’t rise above the edge of the paper case for this. I then took a Cake Angels Halloween cake topper and placed it in the middle of the cupcake; then sprinkled some of the Cake Angels Halloween sprinkles on. The small boy enjoyed helping to decorate the cakes like this, almost as much as he enjoyed eating them.
Using my large star piping nozzle I piped icing onto the Halloween cupcakes and topped them with a cake topper; adding sprinkles where I felt like it. I used both the plain white buttercream and the orange buttercream for this.

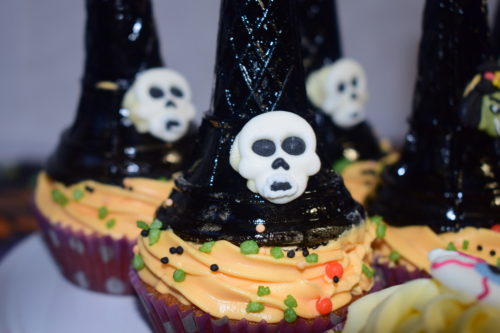
These Witches Hat Halloween Cupcakes were a bit of an experiment. I’d spotted some ice cream cones in the reduced section in a local shop. I bought some black get food colouring and spent some time the night before carefully painting my ice cream cones black. I left them to dry overnight.
When it came to icing my witches hat cupcakes; I piped orange icing (for hair) onto the cupcake, then carefully pressed the hat/cone onto the icing. To decorate; I dabbed some buttercream onto the back of one of the Cake Angels decorations and stuck that to the hat. If I’d thought it through a bit more I would have made a buckle and belt for the hat out of royal icing. I will next time.
These spooky Halloween cupcakes were lots of fun to make and would be a great centrepiece for a Halloween party. They were tasty too – too tasty. They didn’t last long before they were spirited away into our bellies!
If you enjoyed this, you might also like to try these recipes…


