Crafts: Make your own Space Themed Felt Busy Box

Over the summer holidays my son turned into the snack king. He seemed to be constantly hungry and as a result, we went through an awful lot of fruit, bread sticks and little pieces of cheese (he grew an inch over the summer, so we know where all those snacks went). I was throwing another empty box of cheese triangles into the recycling bin when I wondered if there might be a better use for this handy little box, so I put it to one side and got thinking. A few days later I’d hatched a plan to make a Space themed felt busy box.

A busy box is a box with a lid which you put together for children to play with when they’re out and about. Big fun in a little box if you will. Busy boxes usually have felt inside, with felt figures, shapes or characters to play with. I knew my son with his space themed bedroom, love of the night sky and slight obsession with Tim Peake would enjoy a space themed busy box. If I’m honest, I enjoyed making it for him too.

Crafts: Make your own Space Themed Felt Busy Box

Make your own Space Themed Felt Busy Box

You will need:
An empty cheese triangle box
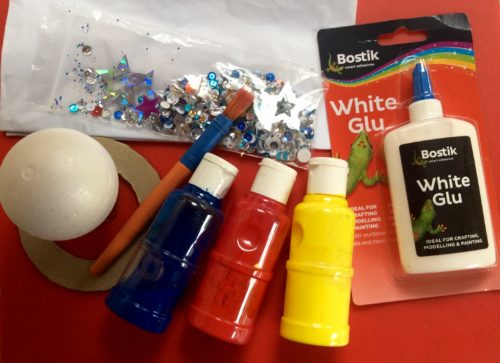
Black paint
Bostik White Glu
Black felt
Coloured felt
Bostik Glu Dots
Scissors
Blu Tack Glitter Pens

How to make your own Space Themed Felt Busy Box:
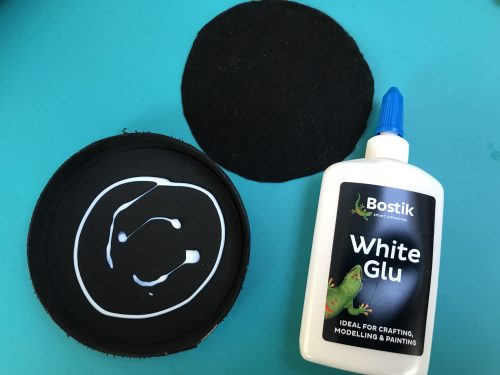
Take your empty cheese triangle box. I used a large one which had a double layer of triangles in. Paint the box inside and out with black paint, leave to dry. You might want to give it a second coat if you think it needs it.

Crafts: Make your own Space Themed Felt Busy Box

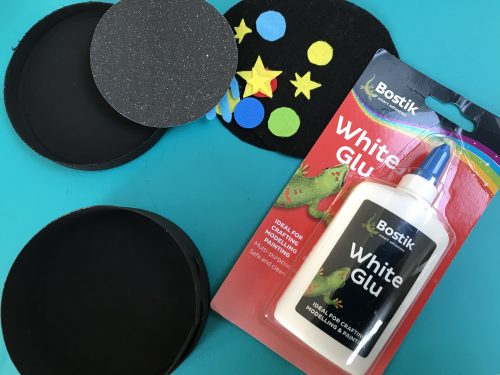
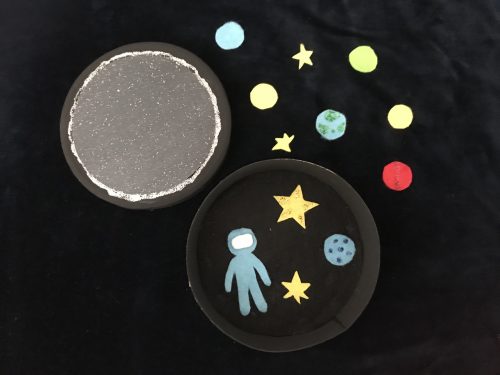
Once dry, use a pencil to draw around the box base and lid on the black felt and cut out your black circles. Check they fit in the box, you might need to trim them a little. Using the Bostik White Glu, glue one circle in the lid and another in the base, press in place and leave them until the glue is dry.

Crafts: Make your own Space Themed Felt Busy Box

Meanwhile, with the coloured felt, cut out some space themed shapes. I made an astronaut with a visor which I stuck in with a Bostik Glu Dot. Then I cut out some planets and stars. I did all of this freehand which you can probably tell from the shape of my stars. I used some Blu Tack Glitter Pens to decorate some of the felt shapes. Put these aside and leave them to dry.

Crafts: Make your own Space Themed Felt Busy Box

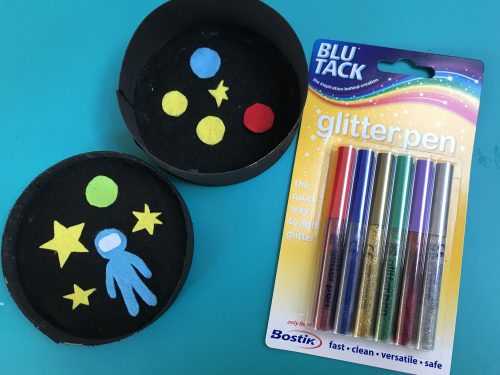
I decorated the lid with a piece of shimmery card and a silver glitter pen. You could leave your lid plain black or you could stick on some paper stars, or whatever you want to do. The only limit is your imagination.

A busy box is a great way to entertain children on journeys or waiting for appointments, or if they just want or need a little focused quiet time. It can be good for developing their fine motor skills, it’s a great little sensory learning tool and can help develop their language and storytelling skills. It’s also great for sparking their imaginations. We really enjoy this kind of play and busy boxes can be made in all kinds of different themes.

Crafts: Make your own Space Themed Felt Busy Box

Check out my other craft tutorials here!

I am a Bostik Craft Blogger and I was sent the materials to create this craft from Craft Merrily. I have not been compensated for this post. 

Craft Tutorial: Make your own Uranus (other planets are available)

It’s rare a craft tutorial comes with a soundtrack, but I’ve had this earworm the whole time I’ve been making this planet, so it’s only fair to pass it on. My son has a space themed bedroom and I fancied that I could add to its charm by making Uranus and hanging it from his ceiling, ready to be admired by his fellow 6 year olds. 

We decided to create a planet and I wanted to make one with rings because they’re prettier right? I didn’t want to do Saturn as that was too obvious, so my space savvy friend suggested Uranus as it does have rings.

Craft Tutorial: Recreating Uranus (other planets are available)
For more information about Uranus, visit https://www.nasa.gov/uranus

How to make your own Uranus

You will need:
1 polystyrene ball
Half a sheet of tissue paper
A “ring” of cardboard cut to fit the ball
Glue
Blue and silver paint
PVA glue
A length of fishing line

Craft Tutorial: Recreating Uranus (other planets are available)

How to make Uranus:

Using an egg cup to balance your polystyrene ball on, carefully tear up the tissue paper into pieces a few centimetres square and stick onto the ball using the glue. Once covered, leave it to dry for an hour or so.

Once dry, carefully put the cardboard ring around your planet. The ring should be cut to fit the ball snuggly.

When the ring is in place, paint over your planet and its ring in blue (or whichever colour you choose, your planet, your rules). You might need to give it a few coats, but remember to leave it to try in between. If you’re in a hurry, a hairdryer can be used to gently speed up the drying process.

Craft Tutorial: Recreating Uranus (other planets are available)

Once the blue base coat is dry and you are happy it doesn’t need more coats, paint over with silver paint. I wanted the silver paint to seem a bit like gases, so I dabbed it all over the planet and the rings so you could still see the blue underneath. Leave this to dry (again, carefully use a hairdryer if you’re in a rush).

Craft Tutorial: Recreating Uranus (other planets are available)

When Uranus is dry, take a length of clear fishing line and cut it to the required length. Tie a knot in the middle and thread the pin through the knot and tie it tight. Stick the pin in Uranus, thinking about how you want the planet to hang. I thought it would look pretty at a slightly jaunty angle, so I went with that.

I was going to embellish my planet with sequins and shiny stars, but it was so pretty as it was that I thought I would leave it as it is. If you decide to make your own Uranus, or another planet of your choosing; then you can paint it or embellish it however you’d like.

I’m really pleased with how my Uranus has turned out. I know my son will enjoy adding it to his bedroom planetarium.

Craft Tutorial: Make your own Uranus

Check out my other craft tutorials here!