Crafts: Make Your Own Christmas Cards

I don’t know about you, but I almost weep at the cost of Christmas cards. I’m sure that and the cost of postage are one of the reasons why fewer people seem to be sending cards. In a attempt to cut some costs, and impressed by the handmade cards we were sent last year, I was determined to try my hand and make your own Christmas cards.

Back in September I visited the Brookside Garden Centre near Poynton in Cheshire, while I was there I popped into their craft shop. The shops stocks lots of docrafts products, knowing I already had some bits and pieces at home I just bought the few extra things I needed to make the cards. It’s a lovely craft shop and worth visiting if you’re in the area.

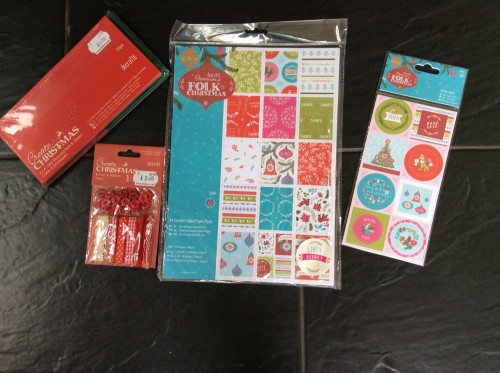
For my cards I used:
Red and Green Christmas Cards and envelopes (pack of 25)
Red Button & Ribbon Pack
Folk Christmas A4 Double Sided Paper Pack
Folk Christmas Linen Sticker Sheet Pack
A tube of Tacky Glue 60mls

The above items cost £13.95 in total for 25 Christmas cards, although there is plenty of paper and other bits and pieces left to make more cards than that. These cards cost approximately 56p each to make, plus my time.
make your own Christmas cards

My plan was fairly simple, use the Folk Christmas paper, cut it into squares, stick it onto the Christmas cards and decorate with the stickers, ribbons and buttons. Once I got started I realised what a difference the ribbons and buttons made, and slightly regretted not buying a bigger selection.

make your own christmas cards

I played about with different designs and colours and I think one or two of the cards I’ve made are pretty good really, so I’ll be using the better ones as templates for the rest of my pack.

I really love the look of the Folk Christmas range, it’s full of hand drawn traditional style Christmas illustrations and sentiments in contemporary colours. The 32 pack of papers features 16 different designs to use for card making.

make your own christmas cards

docrafts card making supplies are available from a large range of retailers and specialist craft shops. Homemade cards are always nice to receive because you know people have put their time and love into making them.

Note: We were sent the Folk Christmas Papers and Stickers free of charge for review purposes. I purchased the other items myself and all images and opinions are our own.
Halloween Crafts – Making Spooky Lanterns

It has become something of a tradition that we have a little Halloween party each year. We schedule it during half term so it gives the kids a chance to get together and have fun, and us mums get to catch up with each other. I provide the house and some basic drinks and snacks, the other mums bring extra snacks, craft activities and games, one even taught a dance routine last year! In preparation for the party we’ve started doing some Halloween crafts at home and making some things to decorate the house with for the party.

We were sent a pack of four Halloween lanterns to make from Baker Ross. They have a really interesting selection of Halloween crafts to make and I particularly like the “day of the dead” themed crafts which might be more enjoyable for older children.

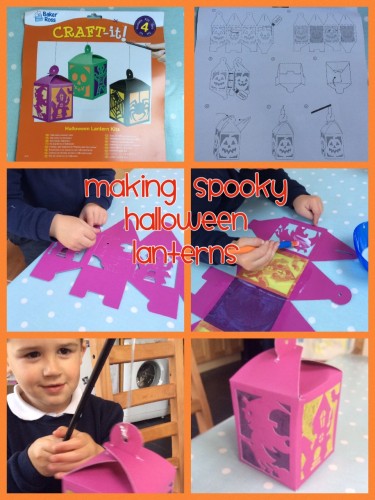
There were four different designs of spooky lanterns in the pack on different coloured card. The designs were punched out of the card and we needed to push out the design and glue the “stained glass” tissue paper on the inside of the lantern windows. This was really easy and good practice for little fingers doing a semi-fiddly job.

My top tip would be to fold the creases of the spooky lanterns where they have been scored before you start gluing and sticking, if you pre-fold them so they’re ready it makes things much easier later on.

halloween crafts

Once you’ve glued the tissue paper stained glass into place you should leave it to dry for a few hours. Then the instructions say to glue the flap on the lantern in place to create the box shape. We glued ours, but in the future I’d probably use double sided sticky tape – much easier, quicker and less sticky. 

Once the glue is dry, following the instructions, fold the lantern together and affix the stick and glittery string. You can pop an LED tea-light in if you like, but I think it looks rather fab on its own. We’ll make the rest of the lanterns and hang them from the ceiling for our party! 

The boy really enjoyed making these with me. The instructions were clear, but he did need a grown up to help guide him and to do some of the tricky folding. He loved the result though and proudly showed off his lantern to everyone who would look. This was a great Halloween craft activity, something different for us to do which we both enjoyed!

Autumn Crafts – Make your own Autumn wreath

We went for a little walk yesterday around the park and we looked at all the different colours of the leaves. It was a mellow, autumnal day, still warm but with a slight seasonal dampness. The slow death of summer and the beginnings of decay were all around us. It was a good chance to talk about change and the seasons. Inspired by this we came home and made an autumn wreath. It was really simple and lots of fun to do. Why don’t you have a go too?

autumn wreath

You will need:
One paper plate
Orange paint (plus paintbrush etc)
Leaf foam stickers
A short piece of ribbon or string
Sticky tape
Scissors

A few days before our walk we painted our paper plates orange, we had to give them a couple of coats of paint and we left them to dry. Once they were dry I cut out the inside of the plate, leaving a ring which we could decorate.

We sat down with our packet of leaf foam stickers from Baker Ross (currently available at a bit of a bargain price), and got sticking. The pack contains six assorted leaf designs in autumnal shades. Which gave us another chance to talk about leaves, autumn and the seasons.

Once we’d decorated our autumn wreath to our satisfaction, I cut a loop of ribbon and stuck it to the back of the paper plate ring with sticky tape, and we proudly hung our autumn wreath up on the wall.

It’s a really, really simple craft activity, but I think the result is quite effective and it’s a lovely way to brighten up the house a bit now the nights are beginning to get shorter. Roll on Christmas! (Too soon?)

Autumn Crafts – Painting Hedgehog Tealight Holders

It may be September, but the world has suddenly slipped into autumn. Autumn is one of my favourite seasons, full of mellow fruitfulness, crunchy leaves and an excuse to get our open fire lit and roaring. The small boy and I have been noticing the changes around us on our walks, the berries in the hedgerows, the acorns and conkers starting to fall from the trees and the busy squirrels stocking up for the lean winter months. This lead us to start talking about hibernation and the snuffling, shuffling hedgehogs which we rarely see by often read about.

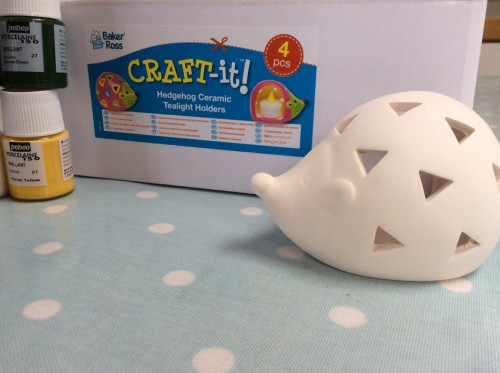
We were sent a box of ceramic hedgehog tealight holders to paint from craft company Baker Ross, so one afternoon after our autumnal walk we sat down and painted them up.

Hedgehog Tealight Holders

The box contained four plain white ceramic hedgehog tealight holders and we used some paint which we were sent to decorate them. A box of four ceramic hedgehog tealight holders currently costs just £4.40, which I think is good value and you can paint them up as presents for people.

Hedgehog Tealight Holders

I chose to paint mine blue with multi-coloured spots and the small boy wanted to paint his black and red. As you can see from the picture he was really focused on the task and he sat and painted his hedgehog for about half an hour or so. This is a great craft activity which works to strengthen his hand muscles, improve his hand-eye co-ordination and his attention to detail.

Hedgehog Tealight Holders

While we were painting we chatted away about hedgehogs and I looked up a few hedgehog facts for him. Did you know….?

  • A baby hedgehog is called a hoglet
  • Each hedgehog has about 5000 spiky spines, each one falls out after about a year
  • Hedgehogs hibernate in the winter, they eat as much as they can and then find a cosy nest to curl up in for the winter around October
  • A hedgehog is nocturnal and only comes out at night to forage for food
  • A hedgehogs favourite food is slugs – yukky!

Hedgehog Tealight Holders

Here are our finished hedgehog tealight holders. We’re very proud of them. They were easy to paint and I think they look really good. Despite my initial thought that the black and red hedgehog might look a bit gothic, I think he’s managed to create quite an interesting effect. He’s incredibly proud of his creation and loved to show it off to visitors and enjoys me lighting it at night.

Craft Kits: Easy Rugby World Cup Coaster Craft

The Rugby World Cup begins on 18th September; whilst for me the excitement might pass me by, for the boys in my life this is a time of odd-shaped-ball delight! Don’t get me wrong, I live next door to a rugby club and I realise there’s much to admire about this noble sport (mainly thighs); so I’m happy to get involved in a bit of pre-tournament crafting fun. To celebrate the Rugby World Cup, the boy and I sat down to make some Rugby World Cup Crafts.

We used the Rugby Coaster Kits from Baker Ross. These kits contain colourful printed foam coasters and foam stickers which you can make rugby themed coasters with. You can get them in packs of 6 or 18 coasters and they’d be a good craft to do for any rugby fan; world cup or not!

Everything you need to make the coasters is in the pack. This is helpful, as there’s nothing worse than sitting to do a craft and discovering you need something extra to complete it.

Rugby World Cup Crafts

The coasters are pre-printed so you know where to stick your stickers. If you wanted to free-style it you could just turn the coaster over to the blank side and do your own design.

We started by writing our names on our personalised coasters. This is good practice for him; he starts school this month and has been practicing writing over the summer. I decided to make a coaster for Daddy to put his beer soft drink on while he watched the Rugby World Cup.

We then set to work sticking the foam stickers on the coaster. This is great to improving his dexterity and hand strength; popping the foam stickers out of the sheet and peeling off the backing can be quite fiddly for little fingers. He enjoyed the challenge and did rather well with it all.

Tip: Whenever we do something involving peeling little bits of backing paper off I always make sure there is a bowl to put our rubbish in; it stops the kitchen being covered in tiny bits of paper and it’s much quicker to tidy up. Plus it encourages the small boy to be a bit more considerate with his mess.

Rugby World Cup Crafts

As you can see he enjoyed making his Rugby World Cup coaster. It kept us both busy and focussed on the task in hand for half an hour; and he’s rather proud of his creation.

You can find more of our craft posts here!

We were sent these crafts for review purposes. All images and opinions are our own.

Art Therapy for Adults – Calm Colour Create Magazine

Adult colouring books have been a bit of a thing for a little while now and  there is a part of me which really likes the idea of sitting down and doing a bit of colouring. I was sent a copy of Calm Colour Create Magazine so I could see if colouring in was for me.

Calm Colour Create Magazine

I have anxiety disorder and when I’m in the middle of it all and I can’t find a peaceful place in my head, the thought of focussing on some colouring in seems like a really good idea. It’s not a new idea, it’s a form of art therapy and something encouraged by mental health professionals. The great thing about adult colouring books is that you don’t need any artistic skills other than the ability to hold a pencil.

Calm Colour Create Magazine

Rather than the simplistic designs you would normally find in a kids colouring book, the adult designs in Calm Colour Create Magazine are quite beautiful, featuring intricate patterns. The first issue of Calm Colour Create Magazine featured sophisticated ocean themed patterns and illustrations, and it came with a packet of colouring pencils, though I’m tempted to delve into our craft box and dig out a more extensive selection of colours.

After a tiring, stressful few days I took myself off to the quiet sanctuary of my bedroom to watch the Great British Bake Off and wind my mind down a little. I spent a restful hour colouring in and not thinking about the thousand things that have been on my mind recently. Doing some colouring in helped me switch off from some negative thoughts, focus on the task in hand and wound me down nicely in time for bed.

Calm Colour Create Magazine

Calm Colour Create Magazine has 64 pages of black and white patterns and illustrations to colour in, including intricate mandalas and tangles. Each issue has a different theme, next month is florals. There’s a lot of colouring in in each magazine, so this one will last me a while, it’s handy to have something to focus on and distract me when my anxiety peaks.

Calm Colour Create Magazine is widely available, priced at £4.99 and definitely worth a look at if you’re interested in adult colouring or art therapy.

Note: I was sent a copy of Calm Colour Create Magazine free of charge for review purposes, all images and opinions are my own.

Kids Crafts: Summer Snap Bracelets with Baker Ross

I got a bit excited recently when I was invited to join the Baker Ross Blogger Network. I got even more excited when a big box of craft supplies arrived on our doorstep, just in time for the loooong summer holidays. I squirrelled it away out of sight and waited until a rainy day to get crafty with the small boy.

snap bracelets

There was so much in the box, as you can see above, lots to keep me and the small boy busy for any number of rainy days, but project number one was to decorate our own snap bracelets.

In the box was a packet of snap bracelets and a packet of rainbow stickers, I had in our existing stash of craft materials a packet of stick on foam letters, so we set to work making personalised ID snap bracelets.

snap bracelets

The small boy is four and he’s getting on really well at school, but his teacher did suggest we should do more craft with him to strengthen his hands, work his pincer grip and to encourage his fine motor skills, crafting is a really good way to do that, plus it’s a really nice way to spend some time with the boy during a damp afternoon.

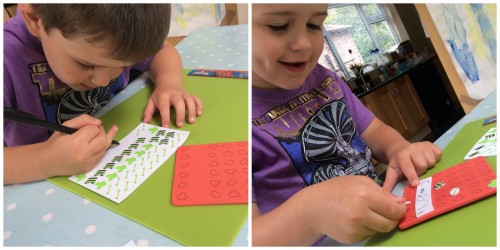
As you can probably see from the pictures below, peeling the fiddly backing off the rainbow stickers and the letters was a good test of his fine motor skills and patience. Finding the letters of his name in a big pile of foam letters was a brilliant opportunity to talk about the letters of the alphabet, the letter sounds and what words begin with that letter.

snap bracelets

He really enjoyed making his snap bracelet, he was really proud to show it off to everyone and liked to snap it around his wrist. Not to be outdone, I joined in with the activity and made this snazzy little number, which he insists I wear too!

Snap Bracelets

Making these snap bracelets was a really simple craft activity, it was ideal for the time we had available and was a lovely way to talk about what we were doing and why, as well as ticking all the boxes for his teacher too. There are plenty more things in our summer survival craft kit from Baker Ross, we’ll be playing, experimenting and crafting with those next week, so watch this space!

Note: We are part of the Baker Ross Blogger Network and have been sent these craft items free of charge in return for a blog post about what we made. All images and opinions are our own.

Crafting with Kids: Fish handprints on canvas

The world is 4.54 billion years old so I’m pretty sure there isn’t an original idea out there. I hold my hands up, I went on ye olde Pinterest and borrowed/was inspired by/stole this idea for kids handprints on canvas. They were for Christmas presents, I thought they’d be cute, cheap and easy to do. Two out of three ain’t bad.

To start with I went to one of those pound shop type places and found some cheap canvases. I bought a pack of four for a pound, which was an immense bargain.

When we got home I painted wavy scenes on them, thus accurately depicting the ocean. I would’ve asked my four your old to help but I didn’t want blue paint everywhere, it was quicker and it was easier for me to do it than to stand in the kitchen for an hour arguing why the sea couldn’t be red. My wavy canvases looked like this…

Handprints

They took a while to dry, so I left them overnight. Naively I thought getting the boy to press a painted hand onto a canvas would be the easiest thing in the world. I was wrong. I started this crafting venture on 2nd October 2014 and we managed to finish it on Christmas Eve.

Both husbear and I tried repeatedly to get him to do it, we tried it with our best “fun activity” voices, we negotiated hard, we tried bribery, we tried tricking him into doing it, we tried witchcraft (made that one up). Nothing on earth could persuade him to put paint on his hand and press it onto something four times. But for some reason, late on Christmas Eve afternoon he did it. Using some sparkly gold paint thickly slicked onto his hand, he made a fish swim in the sea. We did a victory dance. We ran up the stairs and did that thing Rocky does, I did a lap of honour round the kitchen. Then we had a brew.

Once they’d dried (at this late stage I helped them along with the hairdryer) I got a marker and drew on an eye and a mouth for the fish, wrote his name on his masterpiece (his masterpiece? Yeh right) and then wrapped them up for gifts.

Handprints

I think it looks alright, it’s a nice thing to have and any self respecting grandparent would love to receive some artwork from one of their beloved grandchildren wouldn’t they? Wouldn’t they? Apparently not. Three months of negotiation and temper tantrums (from both sides) and not a glimmer of appreciation for it. Next year they’re all getting a box of crappy chocolates instead.

This is a cheap and easy activity for you to do with a willing, co-operative child. I wish you luck with your crafting endeavours, but I fear our crafts-as-gifts days are over.

Celebrating Craftmas with Laura Ashley

I love getting crafty for Christmas. I have relatively low crafting standards at home, I’m content to make cotton wool snowmen with my 4 year old and other such delights. Sometimes it’s nice to do something for myself, so one rainy Sunday afternoon I found myself braced against the elements and heading to another wonderful Ministry of Craft event, this time in conjunction with Laura Ashley.

We were in the cosy upstairs of Rosylee Tearooms, 25 bloggers gathered for some Christmas crafting, or Craftmas if you will. We spilt into two groups and I started by making a large origami box. Using large squares of beautiful Laura Ashley wallpaper, intricately folded into a large-ish gift box with lid. We then created a large bow to top the box with, again out of strips of wallpaper. I chose a contrasting paper to my box. It’s really rather effective and I’ll be recreating this at home with some nice thick wrapping paper.

Laura Ashley

Once we’d completed our first craft task we were treated to a selection of canapés, my favourite were the mini tomato bruschetta, but there was something for everyone, even gluten free options.

Laura Ashley

Suitably fortified we moved on to the sewing machines, a personal fear of mine. I’ve not used one since school and even then I wasn’t known for my skills. I am a nervous machinist, hand sewing is fine though. Thankfully I was under the expert guidance of Jeanette from the Ministry of Craft and I was sat near Hollybobs who really knows her way around a sewing machine.

We were set to work making little drawstring bags to put presents in. Using Laura Ashley fabric we made little red sacks and decorated them with cute bunting. Jeanette soon got the measure of me and entrusted me with her unpicker, which was just as well as I managed to sew all the wrong things together. It was easy to use the machine, my problem was more a lack of care, attention and confidence. Regardless I managed to make a pretty attractive looking bag.

Laura Ashley

I was really pleased with my efforts, they may lack finesse but they’re not terrible. Spending another afternoon with the Ministry of Craft has done wonders for improving my crafting confidence, which is so important when crafting with the small boy. My New Years resolution is to find more crafting me time and to learn how to use my sewing machine!

You can read more about our craftmas afternoon on the Laura Ashley blog. I think a lovely time was had by all, thank you to Laura Ashley, the Ministry of Craft and Joe’s Bloggers for arranging it. It’s amazing what can be created from wallpaper and upholstery fabric!

Christmas Crafting at The Ministry of Craft Manchester

One of the best things about Christmas is it gives me an excuse to get my craft box out and create wonky rustic homemade items for our home. A few years ago I made cross stitch cards for everyone, I often think about making my own cards and presents but I lack both confidence and time, so it was nice to sneak off for an afternoon at The Ministry of Craft in Manchester, to indulge my crafty side and have a little bit of pre-Christmas me time.

We arrived at The Ministry of Craft in the basement of the Fred Aldous store in Manchester’s Northern Quarter. I’d never been before but it is heaven for crafters of all kinds. The Ministry of Craft is a lovely, peaceful room, fully kitted out for all of their craft classes. We were there to decorate Christmas stockings, drink coffee, eat cake and have a natter. Sunday afternoons don’t get much better than that.

The lovely Ministry of Craft team gave us a quick run through of what we were going to do. We were given basic Christmas stockings and we were going to decorate them with fabric and bondaweb, with optional hand stitching, buttons, gems and anything else we could throw at it.

I opted to cut out and stick on three blue stars, the larger of the three I spent some time hand sewing some detail on with silver thread, then I used some adhesive gems to pick out the corners of the star, I was really pleased with how it looked, even if it did look a bit wonky rustic.

Ministry of Craft

Throughout the afternoon the Ministry of Craft team were on hand to talk us through whatever we were attempting. They were very patient and encouraging and made me really want to go back and try my hand at something else.

Proudly displaying our finished stockings

It was a really restful afternoon in a too busy month, it was so lovely to take some time out to spend focusing on a nice task, drinking coffee and chatting. We were invited guests of the Ministry of Craft and Growing Up Milk Info and I think we all had a really lovely crafty afternoon.