Recipe: Delicious Armenian Red Cabbage Salad

For our wedding anniversary a few weeks ago, my husband and I went to the Armenian Taverna in Manchester for dinner. We used to go there a lot in the days before we became parents, partly because the food was absolutely fantastic and partly because my husband is half Armenian and it’s good to celebrate those roots. Together we feasted on the beautiful mezze plates and chatted like the old days. We both fought over the small but delicious portion of Armenian Red Cabbage Salad, a dish I’ve decided to recreate at home because it was that good!

Mezze is always my favourite part of any Armenian meal. I love piling my plate with little heaps of good salads and sides, with dollops of rich hummus served with still warm lavash bread. Delicious.

Recipe: Delicious Armenian Red Cabbage Salad

This Armenian Red Cabbage Salad is and always has been one of my favourite dishes. The salad is really simple to make and keeps for a few days in the fridge. I like to make a big bowl of it and serve it with almost anything. We had it this week with lamb koftas with a little salad and some lavash bread. It was so good I polished the rest of the bowl off for lunch.

It is better if you can make it the day before you need it as it really allows the flavours to develop. It’s so simple and I think a really flavoursome and slightly healthier alternative to coleslaw.

Armenian Red Cabbage Salad

Ingredients
1 small red cabbage, or half a large one
1 dessert spoon of caster sugar
2 dessert spoons of Balsamic vinegar
1 dessert spoon of good olive oil
A handful or sultanas or craisins
A good handful of fresh flat leaf parsley, finely chopped
Salt & pepper
Walnuts, optional

Method
Finely slice your red cabbage and toss in a bowl to separate all the slices. In a small jar add your sugar, balsamic vinegar, olive oil and some seasoning. Put the lid on the jar and shake it hard until it is well combined.

Pour the dressing over the red cabbage, add in your handful of sultanas or craisins and stir. Give the salad a taste and add more seasoning if you think it needs it. Cover the bowl and put in the fridge overnight.

Before serving, remove from the fridge and leave it out for an hour or so to bring it up to near room temperature. Stir through the chopped parsley and taste again to check the seasoning, adjust if you think it needs it. If I have any walnuts I sometimes like to chop them up a little and throw them into the salad too.

Recipe: Delicious Armenian Red Cabbage Salad

Serve however you want. We like our Armenian Red Cabbage Salad served with a mezze lunch or it’s great with lamb or this traditional Armenian Imam Bayildi recipe. This Armenian Red Cabbage Salad hits so many delicious sweet, sour and crunchy notes, I’m sure it’ll become a family favourite of yours too!

Recipe: Delicious Armenian Red Cabbage Salad

Recipe: Homemade Spiced Apple Pie Cookies

Every so often I like to go to Aldi and have a look at their special deals that week. Sometimes they have themed weeks where you can buy food they don’t normally stock. In July I was browsing the shelves when I found a jar of apple pie seasoning. A germ of an idea had planted itself, which eventually turned into several batches of my homemade Spiced Apple Pie Cookies.

Recipe: Homemade Spiced Apple Pie Cookies

This recipe uses Aldi Taste of America American Style Apple Pie Seasoning. You’ll probably be able to find something similar in most supermarkets. If you do struggle to find any, it can be substituted with cinnamon, nutmeg and allspice. This recipe uses two teaspoons of the spice, so I would suggest you use one teaspoon of ground cinnamon, half a teaspoon of ground nutmeg and half a teaspoon of ground allspice. Or if you don’t have those I’m sure two teaspoons of ground cinnamon would be just as delicious.

Recipe: Homemade Spiced Apple Pie Cookies

These Spiced Apple Pie Cookies are really quite simple to make. I have used thin slices of apple on the top of mine, but they’d be really good with some finely diced apple chunks sprinkled on the top before baking instead.

Homemade Spiced Apple Pie Cookies

Ingredients (makes 15 cookies)
125g butter, softened
100g soft brown sugar
125g caster sugar
1 egg
1 teaspoon of vanilla extract
2 teaspoons of apple pie seasoning (or equivalent)
225g self-raising flour
1 apple, finely sliced or diced

Method
Preheat your oven to 180°C.

In a large bowl cream your butter and the two sugars. Once they are well combined, add the egg, vanilla and apple pie seasoning. Tip in the flour and keep mixing until it forms your cookie dough.

Take a baking sheet and either grease well or use a piece of baking parchment (I used baking parchment). Using a set of scales, take the dough and weigh into 40g balls, this helps ensure all your cookies are the same size.

Place the dough balls on the baking sheet making sure there is lots (and lots) of room for them to spread out. You might need to use two or more baking sheets. Squash each dough ball down a little with the back of a fork and place your apple slice (or apple chunks) on top of the dough. You could sprinkle a little more of the seasoning or a pinch of sugar over your apple slice if you want at this stage.

Recipe: Homemade Spiced Apple Pie Cookies

Bake the cookies in your pre-heated oven for 10 minutes until they’re just turning golden round the edges. Remove from the oven and leave them on the baking sheet to firm up for a few minutes before putting them on a wire cooling rack.

My batch of 15 cookies was gobbled up incredibly quickly. They can be stored in an airtight container if you can manage not to scoff them all in one go!

Recipe: Homemade Spiced Apple Pie Cookies

Recipe: Honey Spiced Pumpkin Pie

Pumpkin Pie is one of those things most English people have heard of, but for the most part have never tried. Every year we seem to embrace Halloween traditions a little bit more, and each year more and more pumpkin-spiced things creep onto our menus. I keep trying pumpkin and wondering what all the fuss is about. I’m not a huge fan, but would a slice of homemade pumpkin pie change my mind?

Recipe: Honey Spiced Pumpkin Pie

This recipe is really simple. You can make your own pastry or you can buy a ready-made sweet pastry case, or so what I did and buy some ready rolled shortcrust pastry. Sometimes, just sometimes it’s absolutely fine to be lazy!

Honey Spiced Pumpkin Pie

Ingredients (serves 8)
3 eggs, beaten
1 425g tin of pumpkin puree (or make your own)
125g runny honey
80g soft brown sugar
200mls milk (I used semi skimmed)
1 teaspoon ground ginger
½ teaspoon ground nutmeg
1 teaspoon of ground cinnamon
Pinch of  salt
1 shortcrust pastry case (9 inch)

Method
1. Pre-heat your oven to 200°. Prepare your pastry case. if you’re using a ready-made case go to step 2. If you’re making your own or ruing ready rolled pastry then follow these instructions –

Grease your 9 inch pie tin and place on a baking sheet. Roll out your pastry and press into the pie tin evenly. I like to leave my pastry untrimmed around the edges of the pie, then tidy them up once the pie is cooked.

Prick the bottom of your pie, top with a piece of baking paper and over in baking beans. Put in the oven for 10 minutes. Remove from the oven, remove the baking beans and paper and bake for another 5 minutes.

2. In a large bowl, beat your eggs, then add your pumpkin puree, milk, sugar, honey, spices and salt. Mix very thoroughly.  Carefully pour the filling into pastry case. I liked to do this about half way, then put it in the oven and continue filling the pie, this stops it sloshing about when you’re putting your pie in the oven.

3. Bake at 200 C for 45 minutes until it’s cooked though. If you’re not sure, it shouldn’t wobble too much and you can always poke it with a knife to see if it comes out clean.

Recipe: Honey Spiced Pumpkin Pie

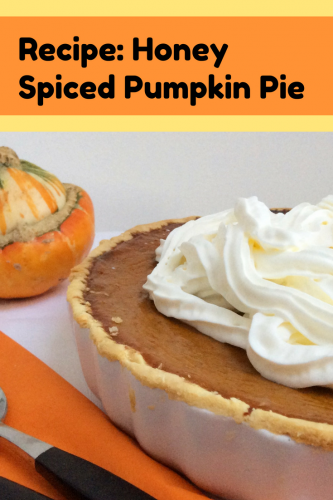
Do not make the same mistake as me. In my excitement I pulled the pie straight out of the oven to admire its beauty once it was cooked. BIG MISTAKE. What I should have done is turned the oven off and opened the door a tiny bit, then after a bit longer, opened the door some more and let the pie cool in the oven. Pulling it out too quickly shocked it and made it crack. This made me very sad.

Recipe: Honey Spiced Pumpkin Pie
Do not make the same mistake as me. Leave your pie to cool in the oven!

If you’ve made the fatal error of taking your pie out of the oven and it cracks like this, do not despair! All you need it a lot of cream. Whip it up and top your pie before serving. No one will ever know the unsightly horrors which lurk beneath!

Has my recipe for Honey Spiced Pumpkin Pie made me fall in love with pumpkin? Not really. It was very nice and the boys absolutely devoured the lot. I just think me and pumpkins just aren’t meant to be.

Recipe: Honey Spiced Pumpkin Pie

Recipe: Rich and Creamy Fennel & Potato Gratin

Have you ever had a veg box delivered, looked at its contents and thought what on earth am I going to make with that? Last week I looked in my veg box and discovered a large and lovely fennel. What on earth was I going to make with that? After a big think I decided to make an experimental Fennel & Potato Gratin. Was my experiment a success or a failure?

I’ve eaten fennel many times, but never cooked with it. I do like fennel but it can be an acquired taste. It’s got a gentle aniseed flavour which reminds me of sambuca (yes I did have a misspent youth, thank you for asking). I thought it would work well in a potato gratin and it did.

Recipe: Rich and Creamy Fennel & Potato Gratin

It is really easy to put together and fairly quick to prepare. This Fennel & Potato Gratin would be a lovely side dish for almost any hearty, wintery meal. I made a pie to go with it and served it with a big pile of veg (from my veg box). It was a roaring success. We all fought fiercely over the crispy bits and we all had seconds. I will be making this again and again and again, veg box permitting of course!

In my recipe I’ve slightly pre-cooked the fennel and potatoes before they go into the oven. I’ve been caught out by undercooked gratins before and giving everything a little head start helped ensure everything was properly cooked. I’ve also not peeled my potatoes, partly because I like the skin and partly because I’m a little bit lazy.

Fennel & Potato Gratin

Serves 4 as a side dish

Ingredients
1 fennel
3 medium potatoes, finely sliced
1 clove of garlic, crushed
1/2 teaspoon of butter
200mls double cream
Salt & pepper
Parmesan (optional)

How to make your Fennel & Potato Gratin
Put boiling water into a pan and put it on low. Finely slice your potatoes. I don’t have a mandolin so I slice them by hand. I leave the skin on because I like the skin, but peel them if you prefer. Put your slices in the pan, you don’t want to cook them, just get them started a little. If you have a mandolin and have wafer thin slices you can skip this part.

Next prepare your fennel. Slice into pieces about an inch in length and no more than an inch wide. I put them into a microwavable dish with a drop of water and microwaved for 3 minutes, again just to get it started.

In a pan, melt your butter and add your crushed clove of garlic, stir for a moment  to take the raw garlic edge off it and remove from the heat. Pour in your double cream, season and stir. You are now ready to assemble your Fennel & Potato Gratin.

Pre-heat your oven to 220°. In an ovenproof dish, layer potatoes, then fennel, then potatoes and fennel and last potatoes. You can season between layers if you like. Once you have filled your dish and there is a layer of potatoes on the top, gently press down to help the layers settle.

Put your ovenproof dish on a baking sheet (this will catch the creamy dribbles in the oven) and carefully pour over the garlic cream mixture. Do this in dribs and drabs until the dish is full. If you’ve got some, grate some Parmesan over the top and put in the oven. Bake for 20 minutes or until bubbling, golden and looking gorgeous.

This was such a hit with my family with everyone diving in for seconds. It’s a real winter warmer dish and one I’ll be making regularly.

Looking for a perfect match? This would be great with my delicious slow cooked beef stew with red wine.

Recipe: Rich and Creamy Fennel & Potato Gratin

Recipe: Spinach & Pea Soup with Ricotta Dumplings

Over the weekend I made a big pot of my Spinach & Pea Soup with Ricotta Dumplings. It’s so quick and easy to make, and it’s absolutely packed with good stuff. The ricotta dumplings are optional but they help make a simple lunch a little heartier.

For me, Autumn is the season for soup. I love making a big bubbling pot of soup as a weekend lunch, and something that’ll last me through the week too. I’ve been feeling very run down recently and both me and my son are anemic. On top of the iron supplements he has been prescribed, I’ve been feeding him up with iron rich foods, spinach being top of the list. I’ve been finely shredding it and stirring it through all kinds of things, from curries to pasta sauces. Being secretive about eating spinach isn’t always a good thing, especially when it makes something so wonderfully vibrant as this.

Recipe: Spinach & Pea Soup with Ricotta Dumplings

I’m not sure this healthy recipe could get much easier. Often I don’t bother with the dumplings and just make a huge pot of soup. It’s pretty frugal too which makes it an all round winner.

Spinach & Pea Soup with Ricotta Dumplings

Ingredients (serves 8)
2 teaspoons of olive oil
1 large onion, diced
1 large potato, peeled and diced
2 cloves of garlic, crushed
1 litre of hot vegetable stock
500g of frozen peas
800g fresh baby spinach
Sprinkling of dried mixed herbs
Salt and pepper
Single cream

For the Ricotta Dumplings –
250g ricotta cheese, drained
75g self raising flour
1 large egg
30g Parmesan style cheese, finely grated
Salt and pepper

How to make the Spinach and Pea Soup –

Drizzle the oil in the bottom of a large pan. Throw in your diced onions and cook slowly until they’re tender. Add your diced potatoes and crushed garlic and stir for a minute. Pour in your hot stock, then leave to simmer for ten minutes or so until your potato pieces are tender.

Once your potato is cooked, add your spinach (it may look like a huge amount but it will wilt down to nothing) and put the lid on the pan for a few minutes, stirring occasionally to help the wilting process. Once wilted, throw in your frozen peas and simmer for a few minutes. Add some salt and pepper and about half a teaspoon of dried mixed herbs. You could use fresh herbs such as mint or coriander if you’d like, or even pesto, but dried herbs are fine.

Take the soup off the hob and leave to cool a little. Using a stick blender, blend the soup until it’s smooth with no lumps or leafy bits. Taste it and add more salt and pepper if you think it needs it. At this stage I also like to add a couple of tablespoons of single cream to make it taste a little more luxurious. 

Recipe: Spinach & Pea Soup with Ricotta Dumplings

How to make the Ricotta Dumplings –

Drain your ricotta and pat it dry with some kitchen towel. Tip it into a mixing bowl with the Parmesan, salt and pepper and egg. Mix together. Carefully stir in the flour.

Put a large pan of water to simmer on the hob. Using two spoons, form the ricotta dough into small quinnells. If you don’t want to make quinnells, you can gently pat the dough into small ball shapes no bigger than a teaspoon scoop. Don’t be tempted to make them too big, they won’t cook through properly if you do.

In small batches put the dumplings into the simmering water to cook. Do not crowd the pan. The dumplings should sink to the bottom and then rise. I turn them over in the water and cook for another minute once they have risen to the top of the water. Remove them with a slotted spoon and drain. 

To serve, float three dumplings on top of your spinach and pea soup. I added a drizzle of single cream, but some finely grated Parmesan would work well on top of the soup and dumplings too.

Enjoy with some fresh crusty bread and feel virtuous at how much healthy veg you’re eating.

Recipe: Spinach & Pea Soup with Ricotta Dumplings

Check out my recipe for Norwegian Inspired Cauliflower Cheese Soup.

Recipe: Microwave Lemon & Thyme Sponge Puddings

A couple of years ago I made a bit of a breakthrough in making quick puddings for my family. I made a jam sponge in the microwave and that’s been our go to speedy pudding at home for a little while. As much as we all love jam sponge (and we really love jam sponge) I thought it was time to ring the changes. This weekend I made Lemon & Thyme Sponge Puddings in the microwave and they were really rather good. Good enough to give to guests who think you’re more Mary Berry than you actually are.

Easy Recipe: Microwave Lemon & Thyme Sponge Puddings

These fab little puddings are great to throw together in a hurry and take just 3 minutes to cook in the microwave. We have a microwave oven which is just the thing for cooking these speedy puds. Just make sure you cook the Lemon & Thyme Sponge Puddings one at a time and maybe check how your pudding is doing after two minutes or so.

I’ve used fresh thyme in these sponge puddings, which I admit is fairly unusual. We have fresh thyme in the garden and it is one of my favourite herbs. Don’t be tempted to used dried thyme in these puds, I don’t think dried would work. If you don’t have fresh then just leave the thyme out altogether.

Lemon & Thyme Sponge Puddings

Ingredients (serves four)
4oz butter or margarine
4oz sugar
2 eggs
Zest of 2 lemons
Juice of 1 lemon
1 teaspoon of thyme leaves, picked from the stalk
1 teaspoon baking powder
4oz self raising flour

To top the puddings –
Lemon curd
Thyme leaves
Custard

Method
With an electric hand mixer, beat the butter and sugar together until fluffy. Add the eggs, lemon zest, lemon juice and thyme leaves and combine. Tip the flour and baking powder into the bowl with the rest of the ingredients and beat together.

Lightly grease four microwave proof ramekins. Fill each one 3/4 of the way full with the sponge mix. Loosely cover with cling film, allowing some extra room for the sponge to steam and rise. Microwave each one individually for three minutes. You might want to check how they’re getting on after 2 minutes or so. Your sponges need to be cooked through but not overdone.

Once cooked, run a knife around the edge and tip them out onto a plate.

Put two heaped dessert spoons of lemon curd into a microwavable dish and warm through for 30 seconds. Stir until it is the consistency of a sauce and drizzle over the top of your sponge, scatter some fresh thyme leaves over and serve with custard. Delicious!

Easy Recipe: Microwave Lemon & Thyme Sponge Puddings

Lemon and thyme sponge pudding

Recipe: Vegetarian Champagne Jelly

About ten years ago we went to a very smart restaurant in the Lake District and had a pretty fantastic meal. For pudding my husband had Champagne Jelly and I was incredibly jealous of his light and refreshing pud. Being a vegetarian I was unable to tuck in, but he assured me that it was as good as it looked. Ever since then I’ve thought about making a veggie friendly Champagne Jelly but I’d never actually got around to doing it. This week I bit the bullet and made a beautiful, Alcohol Free Champagne Jelly using Eisberg Sparkling Rosé.

Eisberg Sparkling Rosé is a light and refreshing alcohol free sparking wine which is bursting with fresh, fruity flavours. It has 33 calories per 125ml serving and the alcohol is not more than 0.05%vol; making it great for those who might be counting calories, pregnant ladies who fancy a glass of fizz or for people who are just avoiding alcohol. This is also a drink, or a pudding which children could enjoy on a special occasion too. No one needs to feel like they’re missing out!

Alcohol Free Champagne Jelly

Vegetarian Champagne Jelly Recipe

Ingredients (serves 4):

30g caster sugar
500ml Eisberg Sparkling Rosé
1 sachet of Dr.Oetker Vege-Gel (19.5g)
A handful of raspberries, or any fruit you like

Method

Measure out 500mls of Eisberg Sparkling Rosé and pour 200mls of the wine into a saucepan, add the 30g of caster sugar and start to heat through, stir to dissolve the sugar. Once dissolved, sprinkle the packet of Dr.Oetker Vege-Gel, bring to the boil and whisk the whole time.

The Vege-Gel sets very quickly, so once it’s dissolved, add the remaining 300mls of wine and whisk. Take it off the heat when it starts to thicken and carefully pour into glasses or serving bowls, or whatever you’re serving them in.

You might want to put a few raspberries into your glasses before pouring the jelly in on top. My jellies set very quickly, so you will need to move fast.  But you might want to pop them in the fridge for a few hours to make sure they’re set firmly.

Alcohol Free Champagne Jelly

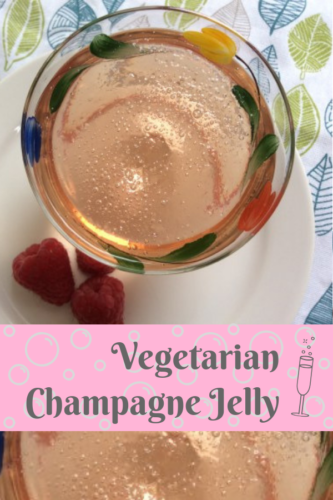
This was a really speedy dessert to make, with none of the faffing which comes with gelatine. Because it was vegetarian and alcohol free, we could all enjoy it, even my son! I love that it sets so fast it manages to capture some of the bubbles in the jelly.

The Alcohol Free vegetarian Champagne Jelly was an incredibly light and refreshing end to our meal. It would be perfect for a summer barbecue or a party. The fizz itself is delicious, I was very pleasantly surprised as I’m not usually a fan of rosé, but this is something I would happily serve my guests this summer, either as a drink or as a lovely fruity jelly.

Vegetarian & Alcohol Free Champagne Jelly Recipe

Note: I was sent some alcohol-free Eisberg Sparkling wines to try, all images and opinions are my own.

If you’ve enjoyed this recipe, you might also like my recipe for alcohol-free slow cooked beef in red wine.

Recipe: Tangy Marmalade Cupcakes

We were sent some marmalade from Duerr’s and created this recipe. I have not been compensated for this post. All images and opinions are our own.

Marmalade is one of those things children tend to dislike but adults love. A weekend breakfast of thick cut wholemeal bread, toasted and slathered with butter and good marmalade is my idea of heaven. My husband and I really are fans of marmalade, one of our favourite quick cakes is a marmalade tea loaf which is great to throw together if you’ve got guests coming round. Recently I’ve been thinking about marmalade cupcakes, with my husband’s birthday as an excuse, I knocked up a batch of marmalade cupcakes complete with tangy marmalade buttercream. Even our six year old enjoyed them!

I was sent two jars of Duerr’s marmalade to try, so I thought I’d use them both in my recipe. I used the Duerr’s Fine Cut Half Sugar Seville Orange Marmalade in the actual cupcakes and the Duerr’s Thick Cut Classic Seville Orange Marmalade in the buttercream icing. The half sugar is quite tangy and as you’d expect it’s not very sweet. I thought it would work well in the cupcake.

Recipe: Tangy Marmalade Cupcakes

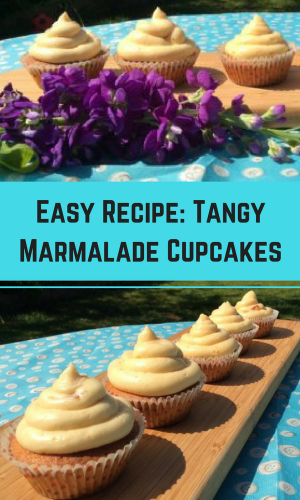
My recipe made 24 light and airy marmalade cupcakes. They went down an absolute storm and the boys have asked me to make them again, so I will.

Recipe: Tangy Marmalade Cupcakes

Tangy Marmalade Cupcakes

These easy cupcakes are light and airy. With marmalade flecked through the sponge base and with a marmalade buttercream topping, these are perfect for marmalade lovers!

Ingredients
150g marmalade
175g butter or margarine
175g caster sugar
3 eggs (large)
225g self raising flour
1 teaspoon baking powder
1 teaspoon ground ginger

For the buttercream:
250g icing sugar
250g butter (softened)
1 tablespoon marmalade

Method:

Pre-heat your oven to 180° and put paper cases in a bun or a muffin tray.

Put all of your ingredients for the cupcakes in a large mixing bowl and using a hand mixer combine until the batter is smooth and airy. Dollop a large dessert spoon of the cake batter in each case and bake in the oven for 20 minutes. Once cooked remove from the oven and cool on a rack.

While your cupcakes are cooling, sift your icing sugar and beat together with the softened butter. Add the tablespoon of marmalade, add more if you like. Make sure your buttercream is well combined and smooth.

Recipe: Tangy Marmalade Cupcakes

Once your cupcakes are cool, put your marmalade buttercream in a piping bag with a plain round piping nozzle – if you use any of the star nozzles the marmalade will block it and the buttercream won’t pipe well. I just piped the buttercream on top, but you can decorate however you think best.

Tip: I like to chill my iced cupcakes in the fridge for an hour just to firm up the buttercream before serving.

They’re as pretty as a picture. I’m really pleased with how they’ve turned out too. I’ll be making these again very soon!

Find out more about Duerr’s Marmalade here.

Recipe: Tangy Marmalade Cupcakes

Recipes: Tinned Spaghetti Pizza & other weird ideas

When I read this week about the favourite family meal of New Zealand Prime Minister, Bill English, I knew I had to try it. Bill had come in for quite a lot of criticism after making tinned spaghetti pizza for his family, despite it actually looking quite nice. It sounded just about bonkers enough for me to try and make one for myself.

Recipes: Tinned Spaghetti Pizza & other weird ideas

It’s fair to say that his recipe would probably have most Italians weeping into their cappuccino, but it’s not completely insane. Ok, so his pizza contains that love/hate pizza ingredient pineapple, but I’m one of those people who loves pineapple on pizza so I was prepared to go with it. His version also looks like it has a generous helping of ham on top, which I didn’t include on this occasion.

His pizza didn’t look terrible, and with all of the ingredients sat in the cupboard I thought it was worth trying to recreate this classic New Zealand recipe. I made three different pizzas, all of which I’d make again. I admit they’re a bit of a carb overload, but as an occasional novelty I would be happy to dish them up.

Recipes: Tinned Spaghetti Pizza & other weird ideas

In each of the recipes I use some homemade pizza dough. You can buy packets to make up some, or you could just use ready made pizza bases. It’s entirely up to you.

Tinned Spaghetti Pizza

Recipes: Tinned Spaghetti Pizza & other weird ideas

Ingredients – 
1 pizza base
1 tin of spaghetti in tomato sauce
Two rings of tinned pineapple, roughly chopped
Half a ball of fresh mozzarella
A couple of handfuls of grated cheddar cheese
Dried herbs – I used oregano
Pepper

Method – 
1.   Pre-heat your oven following the instructions on the packet of pizza dough, or the pizza base.
2.   Place your dough on a pizza or oven tray. With a sieve drain some of the excess sauce from your tinned spaghetti. If you don’t do this your pizza will be soggy. Once drained, spread the tinned spaghetti over the pizza base.
3.   Scatter your finely chopped pineapple all over the spaghetti. If you’re adding ham to your pizza, now is the time to put that on too. Season with pepper and sprinkle over a few pinches of dried herbs. I used oregano, but mixed herbs would be fine.
4.   Tear your half ball of mozzarella cheese into pieces and evenly distribute over the pizza, then sprinkle your grated cheddar cheese over the top.
5.   Bake in the oven following the instructions on your pizza dough or base. My pizzas took around 20 minutes to cook.

Tinned Meatball Pizza

Recipes: Tinned Spaghetti Pizza & other weird ideas

Ingredients – 
1 pizza base
1 tin of meatballs in tomato sauce
Half a ball of fresh mozzarella
A couple of handfuls of grated cheddar cheese
Dried herbs – I used oregano
Pepper

Method – 
1.   Pre-heat your oven following the instructions on the packet of pizza dough, or the pizza base.
2.   Place your dough on a pizza or oven tray. Open your tin of meatballs in tomato sauce and tip into a bowl. With a spoon spread most of the sauce onto the pizza base, spread it around until the base is covered. I used whole meatballs, but I’d be tempted to halve them with a knife and me more generous with my meatball topping next time. Make sure your meatballs are evenly distributed.
3.   Season with pepper and sprinkle over a few pinches of dried herbs. I used oregano, but mixed herbs would be fine.
4.   Tear your half ball of mozzarella cheese into pieces and evenly distribute over the pizza, then sprinkle your grated cheddar cheese over the top.
5.   Bake in the oven following the instructions on your pizza dough or base. My pizzas took around 20 minutes to cook.

Tinned Spaghetti Bolognese Pizza

Recipes: Tinned Spaghetti Pizza & other weird ideas

The spaghetti bolognese pizza already has a thick tomatoey-meaty sauce, which makes it excellent for topping pizza with.

Ingredients – 
1 pizza base
1 tin of spaghetti bolognese
Half a ball of fresh mozzarella
A couple of handfuls of grated cheddar cheese
Dried herbs – I used oregano
Pepper

Method – 
1.   Pre-heat your oven following the instructions on the packet of pizza dough, or the pizza base.
2.   Place your dough on a pizza or oven tray. Pour your tinned spaghetti bolognese into a bowl and with a spoon evenly spread it over the pizza base until it’s covered.
3.  Season with pepper and sprinkle over a few pinches of dried herbs. I used oregano, but mixed herbs would be fine.
4.   Tear your half ball of mozzarella cheese into pieces and evenly distribute over the pizza, then sprinkle your grated cheddar cheese over the top.
5.   Bake in the oven following the instructions on your pizza dough or base. My pizzas took around 20 minutes to cook.

I think tinned spaghetti pizza is an excellent store cupboard meal. I had everything I needed already to hand and it’s the find of thing I’d throw together on a Friday night for my family. It might not be the healthiest meal ever, but I reckon it would be great for hiding veg in if you’re that way inclined and it is excellent cold. Really excellent.

What do you think? Is tinned spaghetti pizza brilliant or bonkers? Will you be giving it a try?

Recipes: Tinned Spaghetti Pizza & other weird ideas

Recipe: Luxurious Cauliflower and Chestnut Soup

Since I made my Norwegian Inspired Cauliflower Cheese Soup in the autumn, I’ve been a bit obsessed with this deliciously frugal soup. I’ve started using frozen cauliflower for the recipe, so it’s really cheap and as I keep a bag of it in my freezer at all times, I always have the ingredients to hand if I need to throw together a quick but delicious meal.

Before Christmas I popped into Manchester for a date night with my husband. We were off to a gig but fancied a pint first. We were propping up the bar when I spotted one of their specials was cauliflower and chestnut soup, and an idea formed which I couldn’t shake. I needed to make that lovely sounding soup.

I’ve had a tin of Clement Faugier Chestnut Spread in my cupboard for a few months now. I’d bought it with great intentions, but never managed to make anything with it. I’ve never tried chestnuts before, which I know is a bit strange. So I really didn’t know what to expect until I opened my tin and had a taste.

I confess I may have made a bit of a mistake using the Clement Faugier Chestnut Spread in my Cauliflower and Chestnut Soup. It’s a sweetened spread which is probably more suited for use in desserts, cakes and bakes, but although it did make the soup taste quite sweet, it actually worked quite well.

Having now tasted the chestnut spread I’m going to buy some more to make a good pud with, and maybe buy some unsweetened chestnut purée to make more soup with, but if sweet spread is all you’ve got, it’s not the end of the world.

Recipe: Luxurious Cauliflower and Chestnut Soup

Cauliflower and Chestnut Soup

Ingredients – serves 6

1 large onion, chopped
1 teaspoon olive oil
900g cauliflower florets – fresh or frozen
300mls hot vegetable stock
400mls milk
250g chestnut purée
1 tablespoon of finely grated Parmesan cheese
Salt, pepper, ground chilli flakes

Method

Gently fry your onion in the olive oil until it’s soft.

Add your cauliflower florets to the pan and stir. Add the hot vegetable stock and 300mls of the milk. Add a little salt, pepper and ground chilli flakes, then put the lid on the pan and simmer until the cauliflower is tender.

Remove from the heat and leave to cool for ten minutes. Add the chestnut purée and the finely grated Parmesan cheese and stir through. Using a blender (I used a stick blender), blend the soup until it is smooth. I added the remaining 100mls of milk at this stage as my soup was too thick. If your soup needs loosening up add some extra milk.

Add any extra salt, pepper and ground chilli flakes if you think it needs additional seasoning.To serve, spoon into bowls and drizzle some of your favourite oil on top on top – I used a cold pressed rapeseed oil which I particularly like. Serve with warm crusty bread.

It’s as simple as that. My Cauliflower and Chestnut Soup is really delicious and it’s smooth, silky and filling. It’s a luxurious treat of a soup and more than a cut above anything I’ve had before.

What’s your favourite chestnut recipe?

Recipe: Luxurious Chestnut and Cauliflower Soup