Recipe: Lemon and Ginger Drizzle Cake

To say I’m a little obsessed with my new bundt tin is something of an understatement. I am constantly thinking of nice cakes to bake in it, after all, it’s just a fancy shaped cake tin and you can bake almost any kind of cake in it. Lemon drizzle cake is a real family favourite. It’s as light as a feather and the sweet but sour drizzle lends a satisfying tang to this afternoon treat.

Recipe: Lemon and Ginger Drizzle Cake

I had a jar of Opies Stem Ginger in Syrup left over from Christmas and as lemon and ginger are one of my favorite flavour combinations, I thought I’d spice up my standard drizzle. I was not disappointed, it was everything a classic lemon drizzle should be, but with a lovely gentle hum of ginger. I’ll be baking this one again and again and again. My lemon and ginger drizzle cake is a winner!

Lemon and Ginger Drizzle Cake

Ingredients (serves 16)
6 oz caster sugar
6 oz softened butter
3 eggs
6 oz self-raising flour
1 teaspoon baking powder
Zest of 1 lemon, finely grated
2 pieces of Opies stem ginger in syrup, finely diced

For the icing –
150g icing sugar
Zest of 1 lemon, plus juice of half of the lemon
Syrup Opies stem ginger in syrup

Method

Pre-heat the oven to 190°. Liberally grease your bundt tin with melted butter and dust the inside of your tin with flour so that the flour is stuck to the butter and your cake shouldn’t stick to the tin.

Beat your butter and sugar together in a mixing bowl until light and fluffy. Add the eggs, flour, baking powder and lemon zest and give them a good mix. Add the finely diced stem ginger and combine.

Pour the lot into your bundt tin. Smooth the top of the batter and bake in your pre-heated oven for 30 minutes. Once cooked, remove from the oven and leave to cool in the tin for at least 15 minutes.

Once cool, turn out onto a suitable plate or cake stand and make up the drizzle icing.

Sift the icing sugar into a bowl and mix with the lemon juice and zest. Loosen the icing by drizzling in some of the syrup from the jar of stem ginger, use as much or as little as you would like, I used around 3 teaspoons of the syrup.

Prick your cake all over with a skewer and carefully spoon your icing over, trying to get some of it down the little holes in your cake. Leave it in a cool place for the icing to set a little, then serve with a pot of tea.

Recipe: Lemon and Ginger Drizzle Cake

I made my cake in a bundt tin because I don’t need any excuse to bake a bunt, but it would work equally well in a loaf tin or any other cake tin you have to hand. This lemon and ginger drizzle cake is a lovely, light as a feather cake.

A lemon drizzle is a firm family favourite, but adding stem ginger takes this to the next level. What’s your favourite cake?

If you enjoyed this, you might like these other recipes –

Recipe: Lemon and Ginger Drizzle Cake

Recipe: Pizza Hot Dogs – great to make with kids!

The school holidays can take a lot of filling. On our last day off school we met up with some friends and headed to Bella Italia for lunch, then for a play at the nearby Wacky Warehouse. Lunch for 7 lively kids and 4 weary Mums was a nice relaxed affair, the food was a crowd pleaser, but one thing caught my eye – the pizza hot dogs on the kid’s menu. It was something I knew I’d have to recreate at home. I had a hunch they’d be a hit and they really were.

Recipe: Pizza Hot Dogs - great to make with kids!

Not only are the pizza hot dogs great for kids to eat, but it turns out they’re lots of fun for them to make too. They are as junky as they sound, but as a once in a while treat they’re pretty blooming fantastic. If you’re feeding vegetarians you can use vegetarian hot dog sausages (which I’ve fed to both boys before and they’ve not noticed), if not, just choose your favourite frankfurter or hot dog sausage.

Recipe: Pizza Hot Dogs - great to make with kids!

I used a pizza base mix – most supermarkets have their own these days; a jar of pizza topping and some of those bright orange cheese slices you put on burgers. It’s up to you if you want to use a homemade sauce or a less processed cheese. These pizza hot dogs are a quick meal the kids can help you make. Perfect for a picnic lunch, movie nights at home, or for when you’ve got a crowd of little monkeys around for a playdate or party.

Pizza Hot Dogs

Ingredients – makes 8 
1 packet of pizza base mix (145g)
8 slices of burger cheese
1/2 jar of pizza topping sauce
8 frankfurters or hot dog sausages

Method

Make up the pizza dough following the instructions on the packet. Pre-heat your oven to the temperature suggested on the packet  – mine was 200°.

Cut the dough into 8 equal sized pieces and roll out into rectangles (on a floured surface). There needs to be about 2cms at the top and bottom and 3cm each side when you put your sausage on.

Recipe: Pizza Hot Dogs - great to make with kids!

Take each cheese slice and cut it in half. Then lay the cheese on top of the dough and spread a heaped teaspoon of the pizza topping sauce on top of the cheese. Put your hot dog on top of the tomato sauce.

Fold the top and bottom edges of the dough over the sausage and press the edges of the dough together. Pull one of the long edges over the sausage and tuck it under. Pull the other edge across so the sausage is hidden inside. Pinch all the edges together until they are sealed shut.

Recipe: Pizza Hot Dogs - great to make with kids!

Dust a baking tray with flour or polenta so the dough doesn’t stick. Lay your pizza hog dogs on the tray. You may want to brush them with olive oil at this point, but that’s up to you.

Bake in the oven for 20-25 minutes. The time will depend on how thickly you’ve rolled out your dough. When cooked, remove from the oven and leave to cool for a few minutes.

Recipe: Pizza Hot Dogs - great to make with kids!

They retain their heat very well, so it’s an idea to cut them open and leave them to cool before little ones get their hands on them.

These Pizza Hot Dogs are really fun to make and a real family treat. You could fill them with your favourite pizza toppings too – pepperoni pizza hot dog anyone?

if you enjoyed this recipe, you might also like to try this chilli cheese hot dog casserole recipe.

Recipe: Pizza Hot Dogs - great to make with kids!

Recipe: Chocolate and Cherry Bundt with Kirsch

The Great British Bake Off has been a real game changer for amateur bakers like me. It’s given me the confidence to try new bakes and introduced the nation to previously unheard of treats from all over the world. Before GBBO I’d never seen or heard of a bundt before, but it soon became a cake I needed to bake. This week I made a Chocolate and Cherry Bundt with Kirsch and I became this week’s star baker (in my house only).

I’ve wanted a bundt tin for a long time. Every so often I’d have a look around for one but they were always a bit beyond my budget and I couldn’t justify spending that much on a cake tin. A few weeks before Christmas I spotted a Crofton bundt tin in Aldi for around £11 and I couldn’t resist. I’ve been itching to use my bundt tin ever since.

Recipe: Chocolate and Cherry Bundt with Kirsch

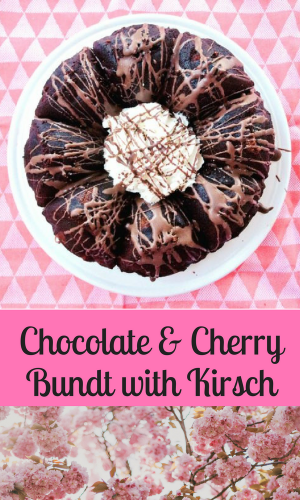
For my Chocolate and Cherry Bundt with Kirsch I used a 250g jar of Opies Black Cherries in Kirsch. I drained the cherries and set aside the kirsch for drizzling over the cake. It was really very good and the boys managed to demolish it in double quick time – always the sign of a successful bake.

Chocolate and Cherry Bundt with Kirsch

Ingredients (serves 16)
150g butter
150g sugar
4 eggs
200g self raising flour
100g cocoa powder
1 teaspoon baking powder
1 jar of Opies Black Cherries in Kirsch
1/2 tub of Dr Oetker Easy Milk Chocolate Icing

Method
Pre-heat the oven to 190°. Liberally butter your bundt tin and using 25g of your cocoa powder, dust the inside of your tin so that the powder is stuck to the butter.

Beat your butter and sugar together in a mixing bowl until light and fluffy. Add the flour, 75g of cocoa powder and baking soda and give them a quick stir, add the eggs and thoroughly combine. If your mixture seems a bit stiff or dry, add a splash of milk.

Drain your black cherries, reserving the kirsch for later. Stir your cherries into the cake batter and pour the lot into your bundt tin. Smooth the top of the batter.

Bake in the oven for 30 minutes at 190°. After 30 minutes, check it’s cooked through with a skewer and remove from the oven. Leave to cool in the tin for at least 15 minutes.

Once cool, turn out onto a suitable plate or cake stand and decorate. I used half a tub of Dr Oetker Easy Milk Chocolate Icing which you just microwave and then drizzle over with a spoon. I also whipped some cream to serve with it and spooned over some of the kirsch I’d set aside from the jar. Delicious.

Recipe: Chocolate and Cherry Bundt with Kirsch

It was a really lovely pudding and the kirsch made the cake extra moist and a little bit naughtier. I’m looking forward to getting another bundt in the oven.

Recipe: Chocolate and Cherry Bundt with Kirsch

Recipe: Mini Cheese and Pickled Walnut Quiches

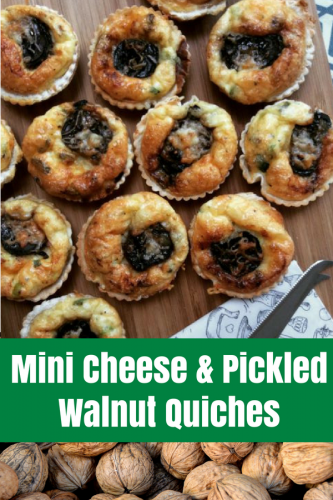
This Christmas, like every other Christmas was a time for feasting. We’ve eaten and eaten well and the fridge is full of lovely leftovers we’re slowly working our way through. A return to normality beckons and those leftovers really needed using up, so for lunch today I made a batch of these lovely mini quiches using the remnants of the cheese board, some pickled walnuts and some stale bread. The result was quite delicious, very simple and as they are made from leftovers, they cost virtually nothing to throw together.

Recipe: Mini Cheese & Pickled Walnut Quiches

Mini Cheese & Pickled Walnut Quiches

Makes 12

Ingredients
6 slices of bread
Small knob of butter
3 spring onions
3 eggs
50g finely grated cheese
3 or 4 pickled walnuts
Salt & pepper

Method
Using a rolling pin, roll each slice of bread until it is flat like pastry, then using a cutter, cut out two circles in the bread, continue until you have 12 bread circles. Butter a bun tray and press a circle in to form your quiche base.

Finely slice your spring onions and gently fry in butter until they’re soft, this should only take a few minutes.

Beat three eggs in a bowl and season, add 40g of your finely grated cheese – I used a mature cheddar. Stir through your cooled spring onions.

Pour a dessert spoon of the egg mixture into each of the bread bases. Slice your pickled walnuts (no more than 5mm thick), place one slice on the top of your quiche and sprinkle with a pinch of the remaining cheese.

Bake at 190° for 10-15 minutes until puffed up and browning. Leave to cool for a few minutes and then serve with a lovely fresh salad.

Recipe: Mini Cheese & Pickled Walnut Quiches

These little cheese and pickled walnut quiches are really quite lovely. I made a batch and the boys gobbled them up in double quick time. They’d make excellent canapés or party food, or just a very lovely lunch. The pickled walnuts add a mouth watering extra pickley edge to the mini quiche.

I know swapping out the traditional shortcrust pastry for bread might be a little controversial, but it’s a great way of using bread which is nearing the end of its usefulness and it’s so much quicker than making pastry from scratch. Though if you are a determined traditionalist, this recipe would work just as well with pastry instead of bread.

I used a nice mature cheddar, but this would work with virtually any hard cheese of your choosing. I’ve a fancy to try them with some Stilton crumbled in which I think would be particularly excellent.

We used Opies Pickled Walnuts which are soft, yielding and an excellent accompaniment to cheese, and as it turns out, pretty nifty in a quiche too. These cheese and pickled walnut mini quiches are so easy to knock up from the remains of your festive cheeseboard, I promise you won’t regret using the last of your pickled walnuts on this recipe.

How do you use up your festive leftovers?

Recipe: Mini Cheese and Pickled Walnut Quiches

Recipe: Easy Christmas Pudding Ice Cream

Christmas pudding is one of those real love/hate things. Personally I love it, but my brother can’t stand it. In an attempt to find a compromise I’ve been experimenting with making Christmas Pudding Ice Cream.

I’m not sure why some people don’t like Christmas Pudding, maybe it’s too rich after a really too rich meal. Maybe it’s too old fashioned tasting, maybe the fruit is a bit of a challenge, I don’t know. I’ve tried to make a less stodgy alternative, a bit lighter on the fruit and without so much of the heavy puddingness of the traditional pudding, but still with some of the festive flavour.

Christmas Pudding Ice Cream

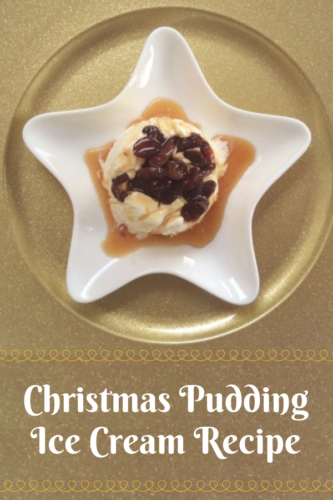
I’ve come up with this, an incredibly easy but rich vanilla ice cream topped with Courvoisier soaked festive fruits. It’s utterly delicious, you can whip it up the night before, or made up to a month ahead of the big day. It is delicious, incredibly simple and uses only four ingredients. I think we’ve found a winner!

Easy Christmas Pudding Ice Cream

Ingredients

1 pint of double cream (whipped)
Tin of condensed milk
1 teaspoon vanilla extract
1 jar of Opies Christmas Fruits with Courvoisier

Method

1. Whip your cream until it forms peaks, then beat through the vanilla extract.
2. Pour your condensed milk into a separate bowl, gently fold your cream into the condensed milk.
3. Chop up, approximately half the jar of Opies Christmas Fruits with Courvoisier and gently stir through, making sure not to include the Courvoisier syrup.
4. Line individual ramekins with clingfilm and fill with the ice cream mixture. Or, pour the mixture into a tub and freeze for 6-8 hours minimum.

To serve, turn out the ramekins, remove the clingfilm and drizzle over some more fruit and some of the lovely Courvoisier syrup from the jar.

Christmas Pudding Ice Cream

I used a jar of Opies Christmas Fruits with Courvoisier which is just perfect for this recipe and would be great in so many different things. I suspect it would be excellent in a baked apple or simply spooned onto some thick yoghurt. It’s a bit boozy, so it’s really not for breakfast (except for on high days and holidays), but absolutely fantastic to keep in the cupboard for a festive emergency, or to make some of this delicious Christmas Pudding Ice Cream with.

Are you a Christmas Pudding lover or loather?

Easy Christmas Pudding Ice Cream

Recipe: Halloween Pumpkin Cake with Cinnamon Frosting

Every year I carve a pumpkin at Halloween and every year without fail I’ve guiltily tipped the insides of the pumpkin into the compost bin. I tell a lie, one year we did try and make something but it was so inedible we tipped that straight in the bin. 

This afternoon as my son and I sat around the kitchen table carving the pumpkin and scooping out the gloopy insides, I felt really bad about tipping the pumpkin innards into the bin, so I decided to try and bake a pumpkin cake of our own. 

I consider myself to be a bit of a safe baker, I can do 100 variations of sponge cake but anything more complicated I’ve always shied away from for fear of failure. I sat at the kitchen table and puzzled over what to do, in the end I came up with a slightly experimental recipe for a pumpkin cake and a hope that it would work, it did and it was delicious.

pumpkin cake

This pumpkin cake recipe does make quite a lot of cake batter and there was enough to make one decent sized cake and 12 yummy cupcakes. We used the flesh, the firm pale bit, not the slimy gloopy bit. We cut our chunks of the flesh and grated them. We found we had 300g or so, though I think if you found yourself with more pumpkin than that, then the recipe is quite forgiving and would accommodate another 100g or so with no problems.

The pumpkin kind of melts into the cake when it’s cooked and you’d never, ever know what the spooky surprise in your cake really is. I suspect if you wanted to make this cake outside of pumpkin carving season a grated butternut squash would work just as well.

pumpkin cake

Pumpkin Cake with Cinnamon Icing

If you’ve carved your pumpkin and you don’t know what to do with the leftover flesh, here’s a cracking recipe for a cake which you can decorate as Halloweeny as you want.

For the cake…

  • 300g golden caster sugar
  • 200g butter or margarine
  • 4 eggs, beaten
  • 2 tsp mixed spice, ground
  • 5 tsp cinnamon, ground
  • 2 tsp bicarbonate of soda
  • 1/2 tsp salt
  • 300g self raising flour
  • 300g pumpkin flesh, grated
  • splash of orange juice if the latter needs loosening

For the frosting…

  • 80g unsalted butter, soft
  • 100g icing sugar
  • 4 tsp cinnamon, ground
  • 200g cream cheese
  1. Pre-heat your oven to 190.

  2. Cream the golden caster sugar and butter together.  Once light and fluffy stir in the beaten eggs, mixed spice and cinnamon. Add to bicarb of soda, salt and sifted flour and fold in until the batter is smooth. If the batter seems a little stiff add a splash of fresh orange juice to loosen it. Stir in the grated pumpkin.

  3. Put a dessert spoon of the batter in 12 cupcake cases and bake for 20 minutes, remove from the oven and cool on a rack.

  4. With the remainder of the batter, pour into a lined 8 inch cake tin. For ease I used one of the paper cake tin liners you can buy and my tin was quite deep (4 inches). Bake this cake in the oven for 50 minutes. Turn the oven off and leave the cake inside for a further 10 minutes, then remove and cool on the rack.

To make the frosting…

  1. Beat the icing sugar and butter together until smooth, add the cinnamon and stir thoroughly. Beat in the cream cheese until the mixture is well combined. Put in the fridge to firm up for 20 minutes.

  2. Once your cakes are cool they can be iced, you can either pipe on the frosting or smooth it on with a knife, decorate however you want, I sprinkled some spooky sprinkles on top of mine.

The result was a surprisingly light pumpkin cake, full of autumnal spice and not at all pumpkiny. I urge you not to tip your pumpkin innards in the bin, but to try this instead. You won’t regret it. I promise!

pumpkin cake

Casa Costello

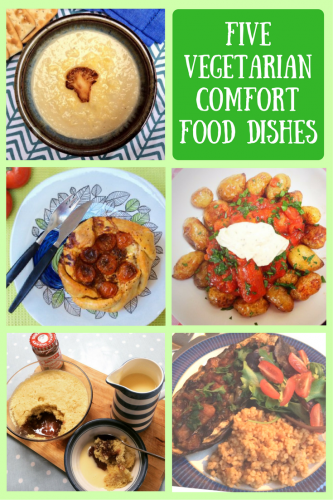
Five Delicious Vegetarian Comfort Food Dishes

I turned vegetarian when I was 13 and there’s not a lot I miss, but on a cold winter night I do sometimes hanker after the slow cooked, deep flavoured chilli my Nan used to make. Thankfully after lots of practice I’ve finally nailed the recipe and managed to make it vegetarian too.

Most of the warming comfort food dishes from my childhood were meat based – family roast dinners, my Nan’s amazing beef chilli, corned beef hash, shepherd’s pie and bubbling stews cooked so long the meat almost melted in your mouth.

There’s something about cooking up some comfort food which makes you feel like you’re showing your family some extra love. I enjoy throwing a few things in the slow cooker and knowing that by tea time there will be a delicious meal ready for my family.

Vegetarian comfort food can feel a bit hard to come by, so I’ve created and shared some of our favourite family recipes on my blog, here are five of my favourite vegetarian comfort food recipes – 

Vegetarian Galletes

vegetarian comfort food

These are a recent addition to my comfort food repertoire. They’re really easy to make, utterly delicious and once you get the hang of it you can fill them however you want. I made a Goats Cheese, Caramelised Onion and Quince Galette and a Feta, Red Pesto & Tomato Galette. Both were absolutely bang on and real crowd pleasers.

Cauliflower Cheese Soup

vegetarian comfort food

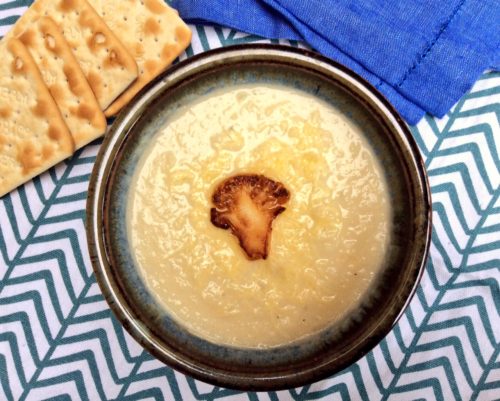
Now autumn is here my soup making pot is starting to see some serious action. Cauliflowers are cheap and plentiful in the shops, so I recreated my favourite soup, but with a cheesy twist. Try my very delicious Norwegian inspired Cauliflower Cheese Soup.

Spanish Style Bravas Sausage Casserole

vegetarian comfort food

I’d had it in my head to make a big Spanish style bravas sausage casserole in my slow cooker for a while. This summer hadn’t been up to much and I was desperate to start rustling up comfort food dishes, and this was the first one of the season. I made my sausage casserole with Quorn sausages, but you could very easily make them with your favourite meaty sausages if you’d prefer. I made the sauce in the slow cooker and let it bubble away gently to itself for a few hours. The recipe is really simple and it’s now a firm family favourite.

Authentic Armenian style Imam Bayildi 

vegetarian comfort food

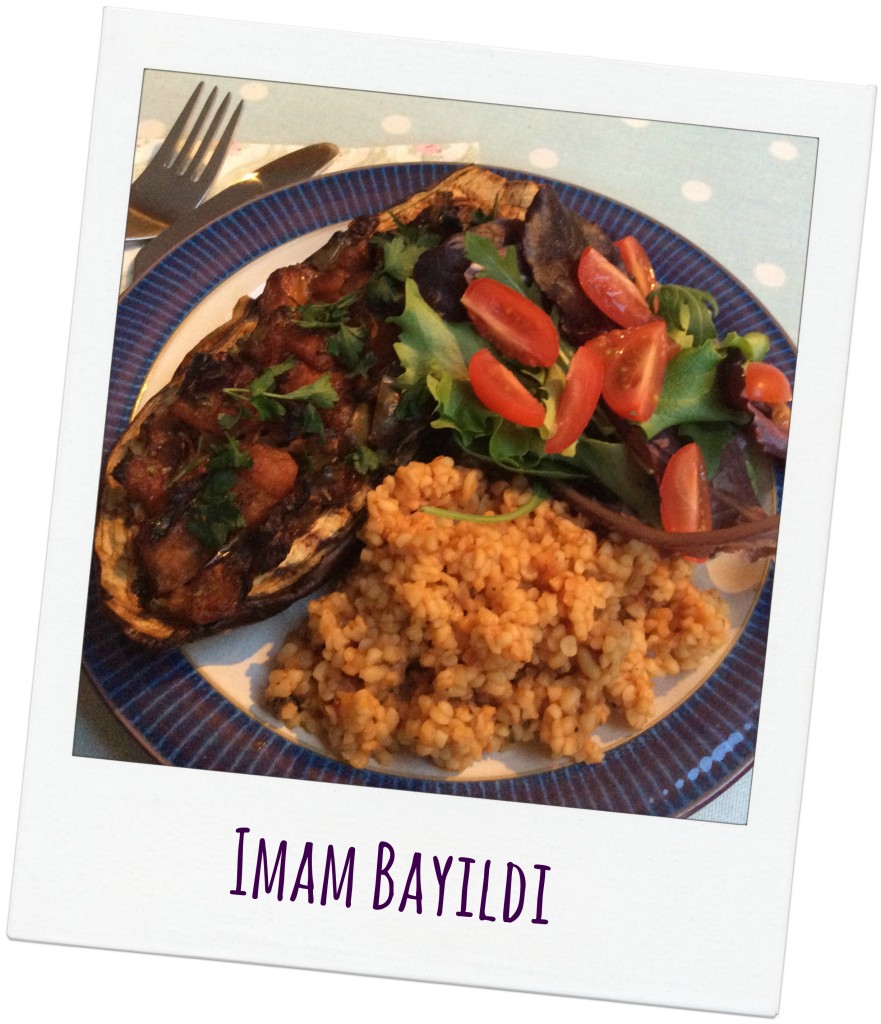
Imam Bayildi is basically stuffed, baked aubergines. They’re simple to make, you can prepare them ahead of time and then cook them when you need them and they are melt in the mouth gorgeous. I like to use good quality ingredients in this recipe as every single mouthful zings flavour. Fresh vegetables and herbs are essential, they’re packed full of flavour and these sunshiny aubergines are a little bit of summer on a cold autumn evening.

Easy Microwave Jam Sponge

vegetarian comfort food

No vegetarian comfort food round-up would be complete without a pudding. This incredibly easy to make and very quick to cook microwave jam sponge is just the ticket to warm your cockles on a cold winter evening. All you need are a few store cupboard ingredients, ten minutes of your time and you’ve got a good pud that’ll make your family smile.

Voucherbox.co.uk have a great blog post about the five healthy foods that can actually save you money, and if you want even more money off your online shop they also have plenty of Sainsbury’s vouchers which you can use.

vegetarian comfort food

Baking: Make Your Own Spooky Halloween Cupcakes

October is one of my favourite months. I love the autumn colours and Halloween is always a good excuse to get the mixing bowls out to create something spooky to celebrate the occasion. We don’t do trick or treating, but we usually have a party for some of the small boy’s friends; or a little Halloween tea party of our own. I tried my hand at making some spooky Halloween cupcakes for the occasion and I was quite pleased with how they turned out.

Spooky Halloween Cupcakes
The cupcakes were really easy to make (you can read my fail-safe sponge cake recipe here) and they take very little time to knock up with a food mixer; though I sometimes mix my cakes by hand if I can’t be bothered washing the mixer afterwards.

Once my little cupcakes had cooled, I made a buttercream. I made quite a lot of buttercream because I had several batches of cakes to decorate for various occasions. To make my buttercream I put 500g of soft unsalted butter in the food mixer and beat it for a minute or two to soften it up properly. I then added 500g of sifted icing sugar and beat them together until they were thoroughly combined. As you can see it’s just equal amounts of each ingredient, so depending on how much buttercream you need you can make more or less.
Spooky Halloween Cupcakes

I then put half of the buttercream in a tub in the fridge to use at a later date. I put a quarter in a piping bag with a piping nozzle (I use a large star) and popped that in the fridge to firm up a little. With the remaining quarter of icing (still in the food mixer) I added orange food colouring; just a few drops at a time until you get the Halloweeny orange colour you want. Once you’re happy with the colour, pop it in the fridge to firm up a little; though not so much that you can’t pipe it. I always find freshly made buttercream is too loose to pipe with until it’s had half an hour in the fridge.

Spooky Halloween Cupcakes
I made three different kinds of spooky Halloween Cupcakes…

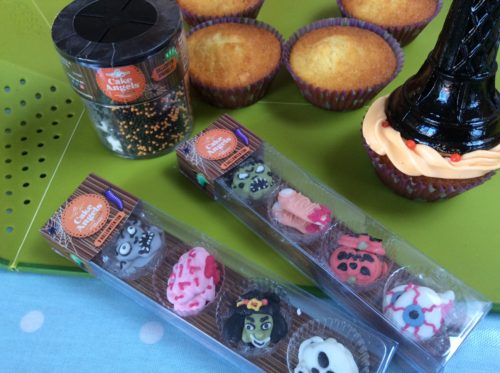
With the orange buttercream and using a palette knife, I smoothed the buttercream on top of the cupcake. Choose cupcakes which don’t rise above the edge of the paper case for this. I then took a Cake Angels Halloween cake topper and placed it in the middle of the cupcake; then sprinkled some of the Cake Angels Halloween sprinkles on. The small boy enjoyed helping to decorate the cakes like this, almost as much as he enjoyed eating them.

Using my large star piping nozzle I piped icing onto the Halloween cupcakes and topped them with a cake topper; adding sprinkles where I felt like it. I used both the plain white buttercream and the orange buttercream for this.

Spooky Halloween Cupcakes

These Witches Hat Halloween Cupcakes were a bit of an experiment. I’d spotted some ice cream cones in the reduced section in a local shop. I bought some black get food colouring and spent some time the night before carefully painting my ice cream cones black. I left them to dry overnight.

When it came to icing my witches hat cupcakes; I piped orange icing (for hair) onto the cupcake, then carefully pressed the hat/cone onto the icing. To decorate; I dabbed some buttercream onto the back of one of the Cake Angels decorations and stuck that to the hat. If I’d thought it through a bit more I would have made a buckle and belt for the hat out of royal icing. I will next time.

Spooky Halloween Cupcakes

These spooky Halloween cupcakes were lots of fun to make and would be a great centrepiece for a Halloween party. They were tasty too – too tasty. They didn’t last long before they were spirited away into our bellies!

If you enjoyed this, you might also like to try these recipes…

Make Your Own Spooky Halloween Cupcakes

Kitchen Essentials: Fail-Safe Sponge Cake Recipe

As a parent one of the key skills you need is the ability to quickly knock up a tray of cakes for the school bake sale, or for a party you’ve forgotten about, or maybe just because it’s Thursday and you and your brood fancy some cake.

Before I became a mum I was a competent cook, but a terrible baker. After several years of trial and error and a bin full of failed bakes, I’ve finally found a recipe and method which works every – single – time for me.

sponge cake recipe

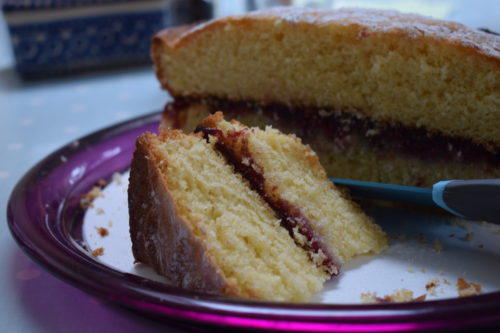
Over the years I’ve tried everything; Delia recipes, Nigella recipes, recipes passed down through the generations. I’ve tried a thousand different bakes and finally hit upon this – it’s my “Works Every Time” Sponge Cake Recipe. And it does, it really does.

I use this recipe as the basis for every sponge recipe I ever make now. If I’m baking buns or cupcakes, I just cut the recipe down by a third (so 200g of sugar instead of 300g etc). This is enough to make a three layer show-stopper of a cake, over the weekend I used this sponge recipe to make two lemon drizzle cakes in loaf tins – much to the delight of my family.

If I find myself with too much cake batter and not enough tin, then it’s just an excuse to make a few little buns on the side for a teatime treat for the boys.

Malteser Butterfly Cakes

One of the key things you need to do is to really, really beat your butter (or margarine) and sugar together until they are really light and fluffy. This makes a massive difference to the texture of your cake (trust me, a Dutchman who made incredible cakes give me that tip).

Works-Every-Time Sponge Cake

If you need a sponge cake recipe which works every single time – try this. You won’t regret it!

Ingredients:
300 g caster sugar
300 g softened butter or margarine (I use Stork)
6 eggs, beaten
2 tsp vanilla extract
3 tbsp milk
300 g self-raising flour
1.5 tsp baking powder

Method:
Heat your fan oven to 190c. Grease three 20cm sandwich tins. In a large bowl, beat your butter and sugar together until fluffy (I used a hand mixer). Add the eggs, milk and vanilla and combine, then add the flour and baking powder and mix together until you have a smooth batter.

Divide the mixture equally between the three tins, you can weigh them to make sure they’re fairly equal if you’d like. Bake in your pre-heated oven for around 20 mins until golden and they’re cooked. Remove from the tins and leave to cool on a cooling rack.

I’ve made quite a few things with this sponge cake recipe. Looking back I’ve not really blogged many of those bakes, but here they are some examples of great bakes…

My easy sponge cake recipe which works every time! #Baking #EasyBakes #Cakes

Recipe: Feta, Red Pesto & Tomato Galette

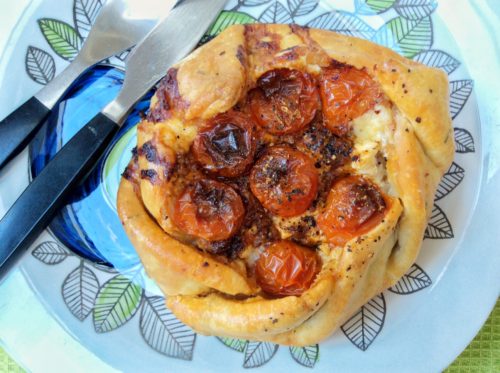
Last week I made a rather excellent Goats Cheese, Caramelised Onion and Quince Galette. It was utterly delicious and incredibly easy, so spurred on my my previous success I decided to make another. Behold my Feta, Red Pesto & Tomato Galette.

This was very much a spur of the moment, what do I have in the fridge that I can use kind of deal. I had some nice looking cherry tomatoes, some feta which needed using up and some red pesto. The rest, as they say is history. Rather delicious history.

Feta, Red Pesto & Tomato Galette

As with my Goats Cheese, Caramelised Onion and Quince Galette, this Feta, Red Pesto & Tomato Galette is ridiculously easy. You could even buy some ready made pastry if you don’t fancy making your own, though making your own takes minutes and is very simple and satisfying. Follow my easy recipe for a lovely simple supper.

Feta, Red Pesto & Tomato Galette

Serves 6
This Feta, Red Pesto & Tomato Galette is a lovely hearty autumnal dish, great for the family and even non-veggies will enjoy it.

Ingredients
For the shortcrust pastry –
100g butter
225g plain flour
1 teaspoon of thyme leaves – I used fresh but dry would be fine
tepid water
pinch of salt
For the filling –
150g of feta cheese
50g of cheddar cheese, grated
1 tablespoon of red pesto
Handful of cherry tomatoes
Dab of butter
Salt & pepper
1 egg

Instructions
1. Make your pastry. Rub the butter and flour together in a bowl until they are like breadcrumbs. Add your thyme and salt and combine. Gradually add the tepid water a couple of spoons at a time into your bowl until you have a ball of dough that isn’t too sticky and wet or too dry. Wrap in clingfilm and put in the fridge to rest for half an hour or so.
2. Roll out your dough until it’s about the thickness of a pound coin and roughly the shape of a circle approximately 30cm in diameter. Place on baking paper on a baking tray.
3. Crumble your feta cheese and cheddar and place it in the middle of the pastry, leave an edge around the sides of about 6 or 7cms so you can fold the pastry up to make the classic galette shape later.
4. Top the cheese with a tablespoon of pesto and halve your cherry tomatoes and arrange them artistcally on top.
5. Take a pastry brush and brush beaten egg around the visible edge of your galette. Now take a look at my picture of the finished galette. You will need to bring the sides of your galette over the sides and covering the top, leaving the middle of the galette open. Fold the sides in sections, working anti-clockwise so they roughly overlap. Gently press the folds together. It is meant to look rustic.
6. Brush with the beaten egg and dot the top with some butter.
7. Bake in a pre-heated oven 200°c for 45-50 minutes until golden brown.
8. Once baked, remove from the oven and leave to rest for 10 minutes, and then serve.

Notes
This serves 6 for lunch, or 4 hungry people. I served my galette with new potatoes and salad.

Feta, Red Pesto & Tomato Galette

I loved the saltiness of the feta, if you were so inclined you could throw in a handful of olives too. This Feta, Red Pesto & Tomato Galette would be perfect for a weekend lunch with a leafy salad. It’s so tasty even carnivores wouldn’t complain!

Recipe: Feta, Red Pesto & Tomato Galette