Review: Inflatable Giant Pass the Pugs

We were sent Giant Pass the Pugs for review. All images and opinions are our own.

My son has always loved anything to do with dogs, he’s got lots of dog themed games and puzzles, so when I spotted Giant Pass the Pugs, I knew that it would be something he would enjoy. It looked like an excellent garden game for the summer!

Inflatable Giant Pass the Pugs

As a child, I used to play Pass the Pigs almost weekly with my Grandma. It was, and still is a brilliant pocket sized game you could take and play anywhere with a flat surface. The rules were easy, toss your pair of pigs into the air and score points depending on how they land. Pass the Pugs is exactly the same, but my version came with two giant inflatable pugs.

Giant Pass the Pugs includes two pugs, a bag to keep them in once deflated and a score book. It’s suitable for people aged 6+, but it’s really not that difficult to play, so I don’t see why someone younger couldn’t join in the fun if they’re game! It’s for two or more players, and I reckon could be a great outdoor party game for the right crowd.

Inflatable Giant Pass the Pugs

The pugs took a bit of inflating. I tried blowing them up but I didn’t have enough puff, so we used a pump, which worked well. Within minutes we were ready to play.

As I’ve already mentioned, the rules are quite simple; throw your pugs into the air and you score points, or lose points depending on how they land. I’m not great with games with lots of rules, so this is very much on my level. The game comes with a scorebook, with the prize winning pug positions pictured on the front. It took me less than a minute to explain the rules to my son, and then we just got stuck in.

Inflatable Giant Pass the Pugs

It’s definitely a game best played outside in the garden. No one wants a pair of inflatable pugs flying around their living room. Thankfully, the sun was shining, and there was very little wind; so the conditions were just right for a game of pug tossing.

They do warn you that your pugs might need pumping up a bit during game play, but ours stayed firm throughout.

Inflatable Giant Pass the Pugs

I really liked that they’ve released a dog version of this game. I know my son was probably 100% more interested and engaged with the dog version, purely because dogs are his favourite thing ever. Who can blame him, this pair of inflatable pugs as as cute as anything.

We spent a good hour chucking them about in the garden. They are well balanced, in that they fell in different positions, which made the game quite interesting. Of course, there’s a bit of a knack to throwing them. If you throw them too hard they just land on their low scoring sides, but once you get the hang of it, you can try and throw some higher scoring rounds.

Inflatable Giant Pass the Pugs

Inflatable Giant Pass the Pugs is really great fun and the ideal outdoor game for the summer. I know that this will be played regularly this summer, and he’s already making plans to have a Giant Pass the Pugs party with some of his friends.

Giant Pass the Pugs is widely available and costs around £14.99 online and in good toy shops.

Quick Recipes: Easy Peanut Butter Mousse

Since I started my new job last month, I am suddenly quite short on time and energy. I prefer to spend my downtime hanging out with my son than slaving in the kitchen, but meals still need to be prepared. He loves peanut butter, and it’s a good source of protein, so I thought I’d whip up a batch of peanut butter mousse to make puddings for a couple of nights between us.

We are big fans of all things peanut butter in our house (this peanut butter ice cream is our favourite!). Our tastes lean towards the smooth, sticky and cheaper stuff, rather than the wholesome organic peanut butter. Yes, we are heathens, but we know what we like. In our last online shop, the supermarket had run out of the good cheap stuff, and sent us a jar of the wholesome organic stuff. My son turned his nose up at it, so instead of throwing it away, I decided to make peanut butter mousse with it.

Quick Recipes: Easy Peanut Butter Mousse

This peanut butter mousse made a delicious dessert and took hardly any time at all to make. It sits well in the fridge for a few days, and you can top it in a number of different ways to tickle your fancy.

My original attempt at this recipe was made without adding a good pinch of salt; but peanut butter thrives on salt and it really helps to bring out the peanutty flavour. If you’re unsure, feel free to leave the salt out, but that’s up to you.

I put the mousse into small glasses; it makes four decent sided portions. If you need to make more, just double up the recipe.

Easy Peanut Butter Mousse

Ingredients:

300ml double cream
125g peanut butter
50g icing sugar, sifted
1 teaspoon vanilla extract
A pinch of salt, optional

Quick Recipes: Easy Peanut Butter Mousse

How to make Peanut Butter Mousse:

In a large bowl, whip your double cream, sifted icing sugar, pinch of salt (optional) and vanilla extract until it forms stiff peaks.

Fold in your peanut butter and make sure it is well combined. If your peanut butter is too stiff, feel free to pop it in the microwave for a few seconds to soften it slightly.

Spoon or pipe the mousse into four small glasses or ramekins; I weighed them to make sure they were pretty equal is size. Refrigerate until you’re ready to serve. They are best left at least overnight and when you’re ready to serve, take them out of the fridge for half an hour or so to take the chill off.

I topped mine with chopped honey roasted peanuts, which was utterly delicious. I shared my mousse with a colleague at work who tried hers with crushed Oreos which she said were excellent. I’d also be tempted to put a small layer of melted chocolate on the top. It’s up to you, the world is your oyster!

If you enjoyed this, you might also like to try peanut butter milkshake, peanut butter cupcakes or these simple but excellent butterfinger rocky road.

Quick Recipes: Easy Peanut Butter Mousse

An afternoon at the Manchester Rum Festival 2022

We were given tickets to the Manchester Rum Festival 2022 for review purposes.

When I mentioned that I was going to the Manchester Rum Festival over the weekend, everyone I spoke to was seriously jealous, and rightly so. It’s a really fun afternoon out and if you’re interested in rum, it’s a great opportunity to find out more and to try all kinds of different styles of rum you may never have encountered before.

An afternoon at the Manchester Rum Festival 2022

Growing up in the 80’s, my Auntie Ann was a glamourous ex-model and fabulous. She drank white rum and coke in tall crystal glasses, with a lashings of ice. She was an exotic creature back then and it imprinted on me early on that rum was a drink for exotic and glamourous people; people like my Auntie Ann. Obviously that’s still true today, but these days there are more kinds of rum available than just white rum or dark rum. There’s a rum for everyone, not just rum for my Auntie Ann.

On Saturday 18th June, my rum drinking companion and I hot-footed it to the biggest and best rum festival in town – the Manchester Rum Festival 2022! Like last year, this took place at the 4-star Mercure Hotel in Piccadilly Gardens. It’s a good venue, with a just-the-right-sized room, a bar, food and a DJ; not forgetting more rum stands than you can count!

An afternoon at the Manchester Rum Festival 2022

When we arrived, the rum room was busy. People had dressed up for the festival, with flowery shirts being standard attire for gentlemen, mine included. Together we did a couple of circuits of the room, stopping to sip samples and chat to the brand representatives. We learned a lot about rum, almost without fail the reps were generous with their knowledge and their samples. Together we sipped rum from Jamaica and Venezuela; to Manchester and Martinique.

An afternoon at the Manchester Rum Festival 2022

Between us we found a few new favourites. I was really taken aback by the Clément Blanc Rhum from Martinique; which is a sugar cane rum with a really unique taste, which comes from the sugar cane. Himself liked the Ron Aguere caramel rum (so much so that he bought some); and we both very much enjoyed the Pusser’s Rum. Honourable mentions need to go to Salford Rum, which is excellent and the Witch Kings coffee rum, which is just fantastic. However, you should probably try them all out yourself at the festival next year!

An afternoon at the Manchester Rum Festival 2022

Tickets were £25 plus a booking fee, and it was such a fun afternoon, it was worth every penny. To find out more about the Manchester Rum Festival, visit their website.

Beautiful Bakes: Raspberry and Lemon Sponge Cake

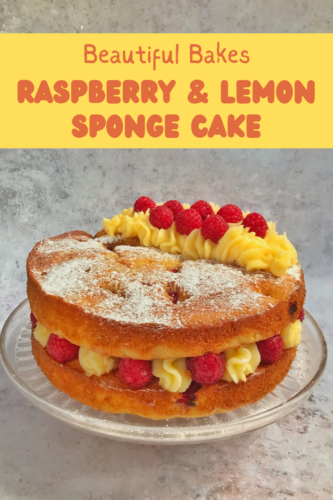
Back in March, for Mother’s Day, I baked a lemon curd sponge, which really was something special. I’ve baked it a few times since, and it’s even appeared in BBC Good Food Magazine, but this time I wanted to mix things up and bake something similar, but with fresh raspberries. I baked a regular sponge cake, but filled it with lemon curd buttercream, raspberry coulis and fresh raspberries. It was a delicious springtime treat, and a birthday cake with a hefty dose of panache.

Raspberry and Lemon Sponge Cake

As it was a birthday cake, I wanted to make it look quite a bit smarter than my usual cakes. I decided to pipe most of my buttercream into swirls, with fresh raspberries in between each elegant dollop. You don’t have to do this, but it did make it look pretty fancy.

Raspberry and Lemon Sponge Cake

Ingredients:
200g caster sugar
200g softened butter or margarine (I use Stork)
4 medium eggs, beaten
2 teaspoons of vanilla essence or extract
1.5 tbsp milk
200g self-raising flour
1 tsp baking powder
300g fresh raspberries

For the buttercream:
75g softened unsalted butter
150g icing sugar
1 large tablespoon of lemon curd

For the raspberry coulis
300g fresh raspberries
2 tablespoons of icing sugar
1 tablespoon of lemon juice

Optional extras:
Icing sugar, a sprinkle

Raspberry and Lemon Sponge Cake

How to make your Raspberry and Lemon Sponge Cake

Heat your fan oven to 190c. Grease two 20cm sandwich tins; I also lined the bottom of each tin with a circle of baking parchment. In a large bowl, beat your butter and sugar together until fluffy (I used a hand mixer). Add the eggs, and milk and vanilla extract and combine, then add the flour and baking powder and mix together until you have a smooth batter. Once the batter is mixed, add in the fresh raspberries and stir.

Divide the mixture equally between the two tins. You can weigh them to make sure they are fairly equal if you’d like. Bake in your pre-heated oven for around 20 mins until golden and they’re cooked through. Remove from the tins and leave to cool on a cooling rack. They need to be fully cool before you put the cake together.

While your cakes are cooling, now is a good time to make your lemon curd buttercream. In a bowl and using a mixer or electric hand whisk, beat your butter until it is soft. Add your icing sugar, and taking care not to create an icing sugar cloud, mix the butter and sugar together until it is smooth. Add the lemon curd and once that’s combined, taste it and see if you want to add a bit more lemon curd, which you absolutely can do. Once you’re happy with your buttercream, it’s time to make the coulis and then assemble your cake.

To make the coulis, sift the icing sugar into a bowl and add the lemon juice. You can either blitz the raspberries in a blender and then push it through a sieve to remove the seeds, or push them through the sieve to make the raspberry sauce. Either way, tip your smooth raspberry puree into the bowl with the icing sugar and lemon juice and mix together. I used a small whisk to do this, which helps smooth out any lumps.

Raspberry and Lemon Sponge Cake

Put your first layer on a cake board, or cake stand, or whatever you’re presenting it on. If you’re worried about it sliding around, a small dollop of buttercream on the bottom will stick your first layer in place and stop it moving around. Put your first layer on the cake board. I chose to pipe small swirls of the buttercream around the edge of the cake, putting a fresh raspberry in between each swirl. I then swirled a layer of the buttercream in the middle, this doesn’t need to look pretty as it’s not on display, you should then top this inner layer of buttercream with raspberry coulis.

Carefully put the next layer of cake on the top and press down gently so it’s secure. You can then either dust it with icing sugar and leave it, or if you’ve got more buttercream in your piping bag, artistically pipe a few more decorative dollops of the buttercream on the top. Finish with a few more fresh raspberries and you should have a fine looking cake on your hands.

Raspberry and Lemon Sponge Cake


Win tickets to the Manchester Rum Festival on 18th June 2022

Last year as lockdown eased and the country started to open up once more, we went to the Manchester Rum Festival. It was a really fun afternoon out, we discovered lots of new rums to try, sampled plenty of the good stuff and just generally had the best day out in what felt like years. We were as pleased as (rum) punch when we heard that the Manchester Rum Festival was back, and bigger than ever!

The Manchester Rum Festival will be on 18th June, and this year’s June event looks set to be bigger than ever with an incredible 15 new brands for attendees to enjoy. You can sample rums from over 40 producers, sip amazing cocktails by Liar’s Club, enjoy traditional music and entertainment by festival stalwart, DJ Dom and food by British Virgin Island cuisine legends Nyammin’, who will be cooking up a flavoursome storm from their pop-up stand. It’s basically a giant room filled with people keen to tell you about their brand of rum and keen to let you have a little sample too; with good music and delicious food too. What’s not to love?

Manchester Rum Festival on 18th June 2022Local Greater Manchester brands Tameside Distillery and Decorrum make their festival debuts, alongside Tanduay – a rum brand from the Philippines which will make its first ever UK appearance – and Beach House and Arcane which are both from the sunny climes of Mauritius.Other rum brands popping their Manchester Rum Festival cherries include Ron Aguere from the Canaries, Ron Colon from El Salvador and Santiago de Cuba.Festival stalwarts and much-loved local brands, Salford Rum and Diablesse, will also return to the festival, with new expressions to showcase to guests including Salford Honey Rum and Diablesse Coconut and Hibiscus Rum.  This year they will be joined by the Spirit of Manchester distillery and its One-Eyed Rebel rum brand which is crafted in the city centre.Tickets are priced at £25 and involves all available samples from the rum brands.  Find out more and book tickets at https://manchesterrumfestival.comManchester Rum Festival runs from 12pm to 7pm on Saturday 18th June 2022 at Mercure Manchester Piccadilly Hotel, Piccadilly Gardens.*Over 21s only / Cocktail bar and food not included

Win tickets to the Manchester Rum Festival

To be in with a chance to win a pair of tickets to the Manchester Rum Festival on 18th June 2022, simply complete the Rafflecopter widget below. Good luck!

a Rafflecopter giveaway

Check out our other giveaways over on our competitions page.

Terms & Conditions:
1. The competition is open to residents of the UK only aged (18) and over.
2. The prize is non-transferable and no cash alternative is offered.
3. To enter, please use the Rafflecopter widget above, complete any mandatory entries and any optional entries you would like.
4. The winner will be chosen at random from all valid entries.
5. The winner will win a pair of tickets to the Manchester Rum Festival on 18th June 2022.
6. The closing date for entries is 11.59pm GMT on 12th June 2022.
7. The winner will be contacted within 7 days of the closing date.
8. The winner will be asked to provide a full UK postal address with postcode for delivery purposes.
9. The winners address, contact details and email address only be shared with the PR to enable to prize to be sent to the winner.
10. The winners name will be available on request.
11. Entry to this giveaway confirms that participants have read, understood and agree to be bound by these Terms and Conditions.
12. HodgePodgeDays decision is final in all matters relating to this giveaway.

How to make a Double Chocolate Twirl Cake

My nephew is brilliant company and whenever his birthday swings round, I always bake him a cake. This year he asked for a chocolate twirl cake; the details were up to me, he just wanted his favourite chocolate bar incorporated into his birthday cake. Say no more little man, your birthday wish is my command.

If you’ve ever read any of my cake recipes before, you’ll know that I favour the simplest options and that fancy decorations are best left to people more skilled than myself. I decided to make a chocolate sponge cake, with chocolate frosting between the layers and with almost 40 twirl bars glued around the side with even more chocolate frosting. It was very much a beast of a cake, but it impressed the recently turned 12 year old, and that’s all that mattered.

I baked the two sponge layers the night before so they’d cool properly before I put the cake together. With chocolate especially, you want to be working with cooled cakes. If you use still slightly warm cakes, there’s a danger that your chocolate decorations will melt, and that’s not a good thing.

How to make a Double Chocolate Twirl Cake

This is an absolute beast of a cake. It’s huge to start with and it’s also incredibly rich, so a little slice goes a long way. With this in mind, you can probably get a good 16 slices out of this cake.

Double Chocolate Twirl Cake

Ingredients:

220g unsalted butter or baking margarine
220g caster sugar
200g self-raising flour
4 large eggs
1 teaspoon baking powder
1 teaspoon vanilla extract
2 heaped tablespoons cocoa powder
2 tablespoons of milk

To decorate:
1 400g tub of chocolate frosting
Approx 35-40 Twirls

To make your double chocolate twirl cake:

Preheat the oven to 180°c. Grease and line 2 x 20cm cake tins and put to one side, ready for action.

In a large bowl, beat together the butter and sugar until pale and fluffy. Tip in the remaining sponge cake ingredients into your mixing bowl and beat together until the mixture is well combined. Then divide the mixture between the cake tins. I like to weigh them so they are of equal size.

Bake the chocolate sponge layers in the oven for 20-25 minutes until they are cooked through. Leave them to cool in the tins for 10 minutes or so, and then pop them on a cooling rack until they are completely cool. If you’re in a rush for this, after about an hour you can pop them in the fridge to chill for a little while.

When they are cool, put a blob of the frosting on your cake plate or stand; place the first layer of your sponge cake on top. The blob of frosting will anchor the cake in place and stop it from sliding about. Smother the top of your first layer with a thin-ish layer of the frosting, then sandwich the second layer on top of that.

I use an offset spatula to spread frosting and buttercream, so if you have one of these, now is a good time to dig it out of your kitchen drawer. An offset spatula is another name for a palette knife with a bend in it. If you make cakes on a semi-regular basis, then one of these is a really good investment to make.

Using an offset spatula, or similar, cover the whole cake – top and sides with the remaining chocolate frosting. Now it’s time to get busy with the twirls. I had to cut approx 1cm off the bottom of each one, as I didn’t want the twirls to be that much higher than the cake. So measure your twirls against the cake and decide how much you want to chop off. Once you’ve cut the bottoms off, put the offcuts to one side as we will be using them again later.

How to make a Double Chocolate Twirl Cake

Carefully stick the twirls around the cake, press them in so the chocolate frosting glues them on. I used 38 twirls on my cake, so you’ll need a similar amount. Please buy a few extra as some accidentally fell into my mouth as I was unwrapping them all, and this may well happen to you too.

Once you’ve stuck all the twirls to the cake, it’s a really good idea to take a length of string or ribbon and tie it around, this will help them stick to the cake and it can be removed just before you serve it.

For the top of the cake, I took all of the little pieces I’d chopped off the twirl bars and then I chopped them all up into smaller chunky pieces. I finely sliced some of them until they were almost like chocolate powder. Then I sprinkled all of these bits all over the top, pressing some of them into the frosting with the back of a spoon so they’d stick.

The cake looked tremendous. It was not for the faint hearted; it was a serious chocolate endeavour and exactly what my twirl loving nephew wanted for his birthday cake. This double chocolate twirl cake was really easy to make, it looked impressive and it took a little bit of time to put together; but it was worth it.

If you enjoyed this recipe, you might also like to try this school dinner style chocolate cake with chocolate custard recipe.

How to make a Double Chocolate Twirl Cake

Recipe: School dinner style sprinkle sponge cake

Growing up in the 1980’s it’s fair to say that my recollections of school dinners are less than rose-tinted. There was the odd thing I liked, but most of it was probably nutritious but not very memorable. What I do remember though, were the puddings. From cornflake pie, chocolate cake with chocolate custard and peppermint crunch slices, every day was a puddingy treat. One of my favourites then, and indeed now is school dinner style sprinkle sponge cake.

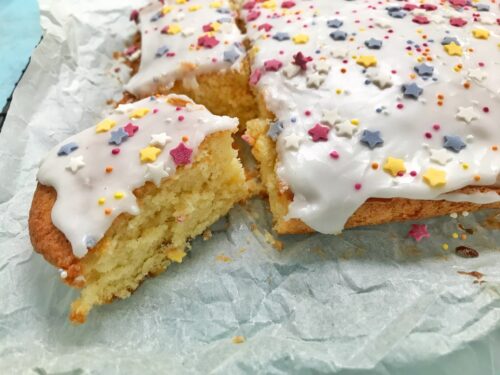
As far as really easy recipes go, this has has got to be up there. It’s a simple vanilla sponge cake topped with easy icing and then sprinkled generously with hundreds and thousands. I make this pretty regularly at home. It’s a very quick bake; easy to throw together, minimal mess, it travels very well for picnics and bake sales, and it’s always popular with my tribe!

School dinner style sprinkle sponge cake

This recipe makes 12-16 squares, depending on how generous you are with your cake cutting.

School dinner style sprinkle sponge cake

Ingredients:
200 g caster sugar
200 g softened butter or margarine (I use Stork)
4 eggs, beaten
1 tsp vanilla extract
1.5 tbsp milk
200 g self-raising flour
1 tsp baking powder

200g icing sugar, sifted
Tepid tap water, approx 2 tablespoons, see how it goes
Sprinkles, millions of them!

School dinner style sprinkle sponge cake

How to make your school dinner style sprinkle sponge cake:

Heat your fan oven to 180c. Line a 20 x 30cm cake tin with baking paper. I use a medium sized roasting tin. In a large bowl, beat your butter and sugar together until fluffy (I used a hand mixer). Add the eggs, milk and vanilla and combine, then add the flour and baking powder and mix together until you have a smooth batter.

Pour your cake batter into your prepared tin. Bake in your pre-heated oven for around 40-45 mins until golden and cooked. Leave to cool on a cooling rack.

While your cake is cooling, sift your icing sugar into a bowl to remove the lumps. Lumpy icing isn’t the best, so it’s worth taking a minute to do this. Once it’s sifted, drop some of the tepid tap water into the icing, do this a teaspoon at a time and do not make it too runny. Ideally you want a fairly stiff icing and this should use a little less than 2 tablespoons of water. Mix well until all the icing sugar in incorporated and then pour over the top of your cake. Spread the icing evenly, be aware that it will spread a little of its own accord.

Once the top of the cake is covered in the icing, sprinkle over your hundreds and thousands until you’re happy with how it looks. Use fancy sprinkles or standard sprinkles, whatever you like. Leave the icing to set for an hour or two and once the icing is firm to the touch, you can cut it into squares and share it with friends.

School dinner style sprinkle sponge cake

This really is the easiest cake to make. It’s a real crowd pleaser and it’s definitely not just for children. This vanilla sponge is delicious, but if you wanted to ring the changes, you could add a bit of lemon zest to the cake batter and make the icing with lemon juice instead of water. That really would be a lemony teatime treat!

School dinner style sprinkle sponge cake

Easy Recipe: Cheesy wild garlic quiche

Over the weekend we met some friends for a picnic. As well as all the usual picnic fodder; sandwiches, crisps and dips, sausage rolls and such like, I brought along a slightly experimental cheesy wild garlic quiche, which went down an absolute storm.

We are lucky enough to live pretty close to a lush patch of wild garlic, so it’s easy for me to pick a handful or two when I’m out walking the dog. When you’re foraging it pays to know a little of what you’re doing. Wild garlic can look pretty similar to other plants, some of which may be poisonous, but you can generally tell what is and isn’t wild garlic by the smell, which is, well, garlicky. I also try not to pick any which might be growing in a prime peeing spot for dogs, and everything get a good wash when I get home, to be on the safe side.

This quiche is really easy to do, but if you’re in a hurry or you just don’t fancy making your own pastry, you can buy ready rolled stuff, or even pre-made pastry cases. I’ll hold my hands up and admit I used a pre-made pastry case for this recipe. Time was short and I had one in the pantry, there’s no shame in it, pastry can be tricky and doesn’t respect you if you’re in a rush. I have made quiche from scratch a thousand times before, so my recipe includes the ingredients and instructions for an entirely from scratch quiche.

Cheesy wild garlic quiche

Cheesy wild garlic quiche

Ingredients:

For the pastry –
225g plain flour
100g butter
2-3 tablespoons of cold water
Pinch of salt
– OR – (and no one will judge you) a sheet of ready rolled shortcrust pastry or a pre-made pastry case

For the filling –
3 eggs
75ml milk
150g strong cheddar, grated
1 large onion, finely sliced
Butter, for frying
30g chopped (and washed) wild garlic
Salt and pepper to taste

How to make your wild garlic quiche

Make the pastry by rubbing the butter, flour and a pinch of salt together until it’s like breadcrumbs, then gradually add the cold water until it forms a firm dough. Bring the dough together on a floured surface and roll out until it’s about the thickness of a pound coin. Or just use a sheet of ready-made pastry – no one will judge you!

Grease a 20cm quiche tin and carefully lay the pastry inside it, taking care not to tear it. Roughly trim off the excess pastry, this can be tidied up properly later, leave a little overhanging for shrinkage. Cover with a piece of greaseproof paper and top with baking beans or similar, you need to blind bake your pastry so you don’t get a soggy bottom. Pop into a pre-heated oven for 15 minutes at 180°c. After 15 minutes, carefully lift off the greaseproof paper and (incredibly hot) baking beans, please be careful. Pop your pastry case back into the oven for a further 10 minutes. Then remove and set aside to cool.

Once cooled carefully trim the edges with a sharp knife. Doing it this way will give you a nice clean edge.

To make your filling, gently sweat your sliced large onion (use two smaller ones if you’d like) in a frying pan with a knob of butter. You want the onions to be soft and translucent, not brown and crispy! This will take a little while, keep your eye on the onions and stir frequently. Once they’re soft, set them to one side to cool.

In a bowl, beat together the eggs and milk, then stir in the cooled onions, cheese, your chopped wild garlic and season generously with salt and pepper. Pour the mixture into the pastry case, then bake for 25-30 minutes or until it is just set and lightly golden on top.

I like to leave my quiche to cool a little before serving with a lovely green salad.

If you liked this, you might also like to try these other wild garlic recipes –

Cheesy wild garlic quiche

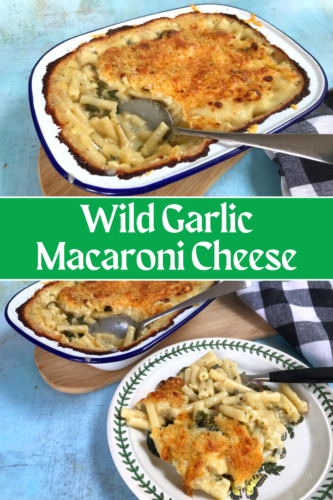
Recipe: Wild Garlic Macaroni Cheese

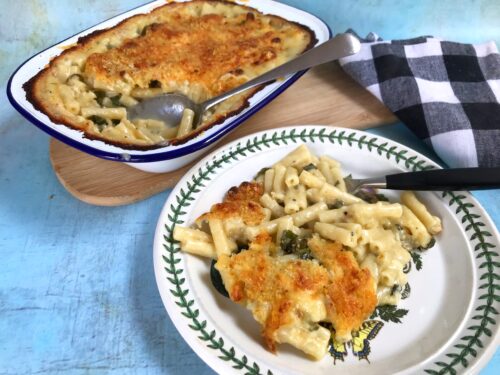
Wild garlic season is once again upon us, and with a lane near us generously fringed with these fragrant leaves, it would be rude to walk by them and not grab an handful or two. I’ve made lots of lovely things with the annual crop of wild garlic, and each year I like to try something new. This time I turned some odds and sods of cheese, some pasta and a few handfuls of wild garlic into this delicious wild garlic macaroni cheese.

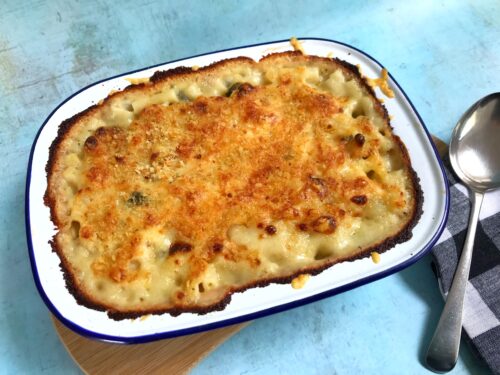
I can’t tell you how good my house smells now. The wild garlic baked in the over in the macaroni cheese has made everything smell extra delicious. This is a really simple recipe, it’s my standard go to macaroni cheese recipe, but with shredded wild garlic leaves scattered through it. It’s a really simple way of making something fairly basic into something fantastic.

Recipe: Wild Garlic Macaroni Cheese

Wild Garlic Macaroni Cheese

Ingredients:

250g dried macaroni pasta
50g unsalted butter
50g plain flour
Approx one pint of milk, maybe more, maybe less
200g mature cheddar cheese, grated
Salt and pepper
20g (approx) wild garlic, roughly chopped
30g breadcrumbs

Recipe: Wild Garlic Macaroni Cheese

How to make this Wild Garlic Macaroni Cheese:
To make this wild garlic macaroni cheese; melt the butter in a saucepan, once melted, tip in the flour and mix well with a wooden spoon. Mix until it’s a paste and then cook the flour out for a minute. Add a splash of milk and stir until it turns into a paste again. Keep adding milk in splashes and mixing until it starts to turn into a silky sauce. The amount of milk will vary, but I’d say you need at least a pint of milk.

Leave your sauce to bubble gently on the hob while you put 250g of pasta to another saucepan of boiling water. Cook the pasta according to the instructions on the packet.

While your pasta cooks, grate your cheese and setting aside 50g of the cheese to top your bake with, add all of the rest of the cheese to your sauce. I usually use a good strong cheddar cheese, sometimes I’ll add some parmesan if I have it. It’s up to you. Stir, stir, stir your sauce and season with salt and pepper. I also like to add ground chilli flakes for a bit of a gentle kick, but you can leave that out if you prefer.

Taste the sauce to check the seasoning; if it’s not cheesy enough for you, now is a good time to add more cheese. Now would also be a good time to pre-heat your oven to 220°.

Once your cheese sauce and pasta have cooked, drain your pasta and stir it into the cheese sauce, add your shredded wild garlic and make sure it’s well mixed together. Pour the wild garlic macaroni cheese into a baking dish. Level the top gently with the back of a spoon.

Sprinkle over the remaining cheese and the fresh breadcrumbs over the top; pop it into the oven for 25 minutes, or until it’s brown and bubbly on top. Take it out of the oven and put to one side for five minutes. Serve with a big salad and crusty bread. It is garlicky perfection.

Recipe: Wild Garlic Macaroni Cheese

If you liked this, you might also like to try these other wild garlic recipes –

Recipe: Wild Garlic Macaroni Cheese

Cool Drinks Ideas: Chamomile and Lime Iced Tea

We were sent the ChillFactor Neon Slushy Maker to test in exchange for using it in a recipe. All images and opinions are our own.

I love iced tea, and it’s a love which I share with my son. During the hot summer months, I quite often make up a batch of cool iced tea to keep in the fridge. It’s so refreshing and easy to make too. We were sent a ChillFactor Neon Slushy Maker to try out, and my first thought was GIN, but then I had a better second thought, which was chamomile and lime iced tea slushies. With the first sunny days of spring warming our bones, I whipped up a batch of my chamomile and lime iced tea and got to work making slushies with it. I am a genius.

Cool Drinks Ideas: Chamomile and Lime Iced Tea

The ChillFactor Slushy Maker is a simple bit of kit. It’s a silicone cup which you freeze, I freeze overnight for maximum slush. When you’re ready to make your slushy, pour your drink in and squeeze it and keep squeezing it for about a minute (this is where my 11 year old comes into his own). You should see slush form before your very eyes.

The slushy maker comes with a straw/spoon, so you can eat/drink/slurp your slushy from the cup. Though I prefer to have mine in a glass, if you keep it in the cup then it will keep it cooler for longer. Once you’ve finished, the slushy maker is reusable, just wash in warm soapy water after each use, re-freeze and its ready for you to make your next slushy.

We’ve used our slushy maker quite a lot since we got it. I like using it to make iced coffee even more icy. My son likes mixing fruit juices and creating his own frozen blend. We are really impressed with it, and it’ll really come into its own come summer. Here’s an Instagram reel of my son showing you how quick and easy it is to use the ChillFactor Slushy Maker.

Cool Drinks Ideas: Chamomile and Lime Iced Tea

Now, if you fancy the look of my chamomile and lime iced tea, which is somehow even more delicious in slushy form, then here’s my recipe.

Chamomile and Lime Iced Tea

Ingredients:

500mls boiling water
2 chamomile tea teabags
2 tablespoons of sugar
1 lime

How to make your chamomile and lime iced tea:

Boil the kettle and pour 500mls of boiling water into a heatproof jug. Drop in the teabags and sugar. Cut the lime into wedges and drop about half of the lime into the tea. Stir well and leave it to steep until it is cool. Once cool, cover and put in the fridge to chill for a few hours.

Remove the tea bags and lime, and serve over ice with some fresh lime wedges.

If you’re turning your delicious iced tea into an ice tea slushy, remove the tea lags and lime, pour approx 200-250mls into your frozen and prepared ChillFactor Slushy Maker and squeeze for approximately one minute. Either drink it from the slushy cup, or pour it into a glass and serve with some fresh lime wedges. It is divine!

We are big fans of the ChillFactor Slushy Maker. It’s perfect for turning individual drinks into slushy heaven. Now, I did say that my first thought was gin, it might be time for me to explore that in more depth! The ChillFactor Slushy Maker is available to buy online and in store now.

Cool Drinks Ideas: Chamomile and Lime Iced Tea