Recipe: Easy Chocolate Malt Cake

Since joining “the motherhood” I’ve had to get acquainted with my mixing bowl. I’ve never been a great baker of cakes, but seemingly the minute you become a mother, someone thrusts a whisk into your hands and asks you to bake two dozen fairy-cakes for some occasion or other.

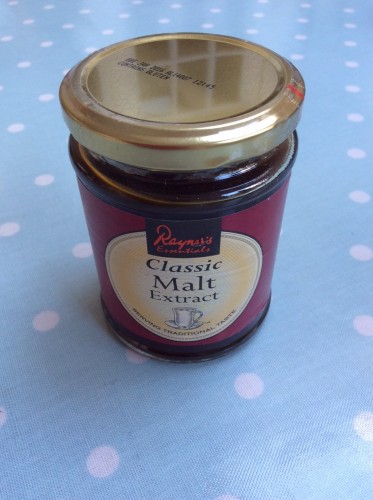
My go-to cake has been a Victoria Sponge and my Vicky-Sponge is generally pretty well received, but I have failed in my attempts to make a good chocolate version, until now that is. There was always something missing, a lack of depth of rich chocolateyness and I couldn’t figure out why. I was sent a jar of Rayner’s Classic Malt Extract to try, my first port of call was to tentatively add it to a chocolate sponge cake, and by Jove I’d cracked it!
Easy Chocolate Malt Cake Recipe

My easy chocolate malt cake recipe is by definition easy, quick to throw together in a cake emergency and tasty enough to offer the Vicar for tea. It probably won’t win any prizes for innovation or decoration, but it’s a delicious stand alone cake, or it works well with a dollop of ice cream and some fruit.

Easy Chocolate Malt Cake

Serves 8
A real simple, really tasty chocolate sponge cake with an undercurrent of malty richness.

Ingredients
4oz sugar
4oz butter or margarine
2 medium eggs
1/2 teaspoon baking powder
2 tablespoons Bourbon cocoa powder
2 teaspoons Rayner’s Malt Extract
4oz self raising flour
Splash of milk

Instructions
Beat the butter and sugar together until fluffy. Stir in the eggs, baking powder, cocoa powder and malt extract, mix until well combined. Gently fold in the self raising flour, add a small splash of milk if the mixture is too stiff.

Pour the cake batter into a lined loaf tin.

Bake in a pre-heated oven at 190 for 30 minutes, check if it is cooked through and if it is remove from the oven and leave to cool.

Easy Chocolate Malt Cake

Note: I was sent a jar of Rayner’s Classic Malt Extract free of charge to use in a recipe. All images and opinions are our own.

Recipe: Posh Cheese on Toast

Back in July I got to be a Judge at the International Cheese Awards and I came home with enough cheese to make a colony of mice very happy indeed. Between us we’ve been slowly working our way through the South Manchester Cheese Mountain™, with me commandeering the lovely Brie type cheeses I generally adore.

We seem to have a surfeit of cheddar style cheeses, which is fine, they’re a good multi-purpose cheese and a nice mature cheddar always has a place in our fridge. It’s tempting to cook up a big extra cheesy macaroni cheese or something similar, but when it comes to it, I don’t think you can beat a plate of cheese on toast. Not just any cheese on toast though, but posh cheese on toast.

Posh Cheese on Toast

This is one of my favourite quick meals. Take the comforting loveliness of cheese on toast, add a bit of frippery and it suddenly becomes more of a meal. It’s easy too and doesn’t take much longer than your bog standard cheese on toast.

Posh Cheese on Toast

Posh Cheese on Toast (feeds one hungry person)
One individual ciabatta, split in two lengthways
A handful of rocket 
A dollop of your favourite relish, I’ve gone with Ballymaloe original relish
Some Seriously Strong Extra Mature Cheddar

Method
1. Toast one side of your ciabatta (the crust side), once toasted remove from grill and spread over your Ballymaloe relish on the untoasted side. Thinly layer your rocket (or baby spinach if you prefer) on top, then evenly cover with Seriously Strong Extra Mature Cheddar. Pop under the grill.
2. Grill until the cheese has melted to your satisfaction.
3. Remove from the grill, leave for a minute to cool slightly, then devour.

Posh Cheese on Toast

Posh Cheese on Toast

Posh Cheese on Toast

It’s simple, but the best things often are. I guess in some ways it’s a bit like a pizza, but quicker and for my money nicer.

Note: We were given a block of Seriously Strong Extra Mature Cheddar Cheese to try free of charge on the proviso I used it in a recipe and blogged it. All images and opinions are my own.

Degustabox July 2015 PLUS Discount Code

Towards the end of each month I get a lovely text telling me that my Degustabox is on its way. It’s a lovely tombola of a box, filled with new, interesting, exciting and limited edition foodie treats. It’s a chance for me to discover new things all for the princely sum of £12.99, though the contents are worth more than that.

Of course, the law of averages means that I probably won’t enjoy everything in my foodie Degustabox, but the boys who have wildly differing tastes to me happily hoover up the things I’m less keen on, and vice versa.

The July Degustabox contained something very new, in some boxes they’ve started to include a special item for families with small children, this month the “Db’s Discoveries” was a pouch of Quinola Mothergrain. I have seen these before and they seem like an interesting quick ready meal style option for those times when you need a quick meal for your little one.

Degustabox July 2015

We were sent the Quinola Mothergrain Mediterranean Quinola to try, these 150g packs cost £1.99 each and seem like a healthy option, being organic, gluten free and packed with slow release carbs. The Mediterranean Quinola contains tomato, courgette and carrots. I served it with a side of meatballs. As you can see it doesn’t photograph particularly attractively, but the small boy cleared his plate.

Degustabox July 2015

The Degustabox July 2015 also contained…
Weetabix on the go (£1.49 each) two bottles
FRU Snax (£1.25) two packets
So Strawberry Lambrini (£3.29)
Say Yes to No (£1.49)
Newton’s Appl Fizzics (£1.20)
Tasty Little Numbers (£3.49)
Taking the Pea (£1.50)
Jele Vitamin Jelly Drink

Degustabox July 2015

My favourite new discovery was the Newton’s Appl Fizzics, which is a fizzy apple juice. I chilled mine, as per instructions and poured it over ice. I love apple juice and a fizzy apple juice is something of a rare treat. This was zingy, refreshing and full of crisp apple flavours, and perfect to drink on a hot sunny day.

I also enjoyed the “Taking the Pea” which was a crunchy dried pea snack, along the lines of the wasabi pea, but with different flavours. As a lover of a wasabi pea these were a very welcome addition to the box.

Another big hit were the “Tasty Little Numbers”, two 200 calorie ready meals. We had the chicken tikka masala and the beef sausage and beans. Both hubs and I are on the 5:2 diet and sometimes it’s easier to ping a low calorie ready meal than faff about counting the calories in everything. There were a tasty little solution, leaving me with 300 calories to play with the rest of the day.

If you’d like to give Degustabox a try, I have a discount code giving you £3 off your next box, just enter 8MDEO at the checkout, this code is valid until 31st October 2015. You can find out more about Degustabox on their website.

Note: I was sent a Degustabox free of charge for review purposes, all images and opinions are my own.

Bubble baths & squeaky clean fun with Paddy’s Bathroom

We were sent these Paddy’s Bathroom products for review purposes, all images and opinions are our own.

One of my favourite times of the day with the small boy is bath-time. He loves a bath, he enjoys playing with all of his bath toys. He has a selection for every mood – planes, trains and auto-mobiles; ducks and seafaring stuff and a big tub of foam letters we use to spell our names out. One thing he does insist on, but doesn’t always get, is a very bubbly bath. We were sent some Paddy’s Bathroom products to try, so we put them to the test on holiday in Devon.

Paddy's Bathroom

Paddy is the brother of Ella from the popular Ella’s Kitchen range. With such a pedigree I was expecting really good things from this brand. We were sent almost the full Paddy’s bathroom range including –

  • Foamy Stuff hair and body mousse – smells of rosy apples
  • Squirty Stuff hair and body wash – smells of mangoes
  • Squirty Stuff hair and body wash – smells of pineapples
  • Bubbly Stuff bubble bath – smells of tangerines
  • Stuff for Shiny Hair shampoo – smells like squeezy lemons
  • Stuff for Hands foaming hand wash – smells like squeaky clean lemons

We packed it all for our holiday, I always think it’s nice to take new toiletries away and these looked really good for all of us, so I didn’t even pack any “grown up” stuff.

I like the packaging, especially the products in pouches, these seemed like a really good idea to me and I’d like to see more bathroom products in pouches. The “squirty stuff” bottles are a little fiddly to open until you get the knack, but they’re a great design which foams the gel as it dispenses. The range is colourful and has a lot of information about the product on the packaging, which I find useful.

Paddy’s bathroom contains No SLS, Parabens, Phthalates, Sulphates or GMO ingredients. I am increasingly aware of parabens and the other nasties we find in skincare and bathing products, so this is good to read.

Paddy's Bathroom

But what did the small boy think? I ran him the bubbliest bath he’s probably ever had. He stayed in there until his fingers and toes were wrinkly and he had a great time. He particularly loved the foaming products, the foamy hair and body mousse was a real favourite (he’s washing his hair with it above). He came out of the bath squeaky clean and very happy.

The Paddy’s Bathroom range all have fruity scents, which is some products would smell really fake and cloying, but these are made with as much natural and organic ingredients as possible, and they smell really uplifting to me.

Both the boy and I have very sensitive skin and I was pleased that neither of us came up in a rash, or had any dry skin as a result, we’ve all used them for a week now and we all really like them.

Paddy's Bathroom

Paddy’s Bathroom products are really fun and well thought out. I’m really pleased we discovered them, a foamy hand wash will only encourage him to wash his hands, which is a nigh on impossible task. He loves the bubble bath – which may well be the bubbliest bubble bath ever, so we’ll be buying that again. And even I love the squeaky clean lemon shampoo, which makes my hair shiny – again, an almost impossible task. Paddy’s Bathroom gets the thumbs up from us!

Update: 21st November 2020. Paddy’s Bathroom are no longer trading and their products are no longer available.

Maintaining a good work/life balance

As a Mum and a Freelancer (in that order) I often struggle to balance the two competing worlds. Like most Freelancers I find that in terms of work it’s either feast or famine, and as a Mum the responsibilities are constant, as is the guilt, but that goes with the territory, whatever I did I’d feel bad, it’s a no win situation.

As a Freelancer I work from home, which means that technically I’m around whenever my family need me. I can do the school run, I can be there when my son is poorly to care for him, I can take time out during the school holidays to spend time with him. I do all of that and more, but it does mean that I also have to put in long hours in the evenings, early in the mornings, or my weekends are spent slaving over a hot laptop while my 9 – 5 husband spends time with our son.

Whilst I can see the benefits of working *for* someone else, for me the benefits of being a Freelancer far outweigh that. Although the work and the hours I put in are never constant, I am able to be more flexible with my time. This means I can create and maintain a good work/life balance, or at least strive to.

My tips for creating and maintaining a good work/life balance are…

  • Protect some time for family, for me 5 – 7pm are family time, where we eat together, talk about our days, have bath-time, read stories and snuggle.
  • Go for a walk. Being stuck at my desk all day is miserable and not why I became a freelancer. Go for a walk round the park, get some fresh air and exercise and take a brain-break. You’ll be more productive after.
  • Accept help – enlist family and friends who don’t mind entertaining your child for a few hours occasionally. My son loves his Grandad and spending time with him is a special thing for them both.
  • Don’t try and multi-task. If you’ve got a few hours of family time, focus on the family.
  • Work smarter, not harder. If you’ve magically got a spare hour to spend working, you can accomplish a lot in that hour, set time limits for tasks and see what you can achieve.
  • Be organised, even if that’s not in your nature. To do lists, a filing system, record keeping however simple will save you time. Having my own workspace has really helped with this.
  • Go to work – some people get dressed for work, or have a pre-work morning routine. I get myself a drink and plonk myself at my desk and get cracking.
  • Family comes first – for me at least. If I need to stay up and work until 3am to catch up then so be it. My son is only young for a finite amount of time and he comes first. Always.
  • Make friends. Freelancing can be a lonely life. Find and nurture a group of like minded fellow freelancers around you, they will save your sanity and sometimes your bacon!

I have found that by having a small circle of freelancing friends they can offer me advice, practical support, contacts and the feeling of having colleagues; we even go on “work nights out”, which is nice. 

I’ve recently discovered Hiive. Hiive is a creative network that offers users a portfolio platform, job opportunities and access to careers resources. Hiive is designed to encourage discussion and collaboration within the creative industries and is an incredibly useful network for freelancers. I have joined and think it’s well worth a look and can help you to balance your work and home life.

I love freelancing, it’s changed my life and my family life for the better. It’s not easy, in fact it’s bloody hard work. Finding the right work life balance is a constantly shifting task. Having an understanding husband is half the battle, but the rewards in terms of quality family time are worth the late nights and early mornings. 

What are your tips for creating a good work-life balance?

work life balance

In association with Hiive.

Introduction to Baking Class at Wilmslow Kitchen Cookery School

It’s August, which can only mean one thing – the nation goes Great British Bake Off crazy! I love baking and I class myself as an enthusiastic amateur rather than a master baker, my main problem is confidence, I look at the glorious show-stoppers on GBBO and I know my creations would be laughed out of the show tent. Thankfully (and excitingly) I was invited along to an Introductory Baking Class at the Wilmslow Kitchen Cookery School, an foodie blogger event hosted by kitchen legends – Kenwood and Currys PC World.

Wilmslow Kitchen Cookery School

We were introduced to the rather beautiful Kenwood kMix mixers, they come in a variety of lovely colours and I was drawn to the teal one, which perfectly matches my blog. I did point this fact out rather loudly and hopefully, but alas my request to take it home where it so clearly belonged fell on deaf ears.

Wilmslow Kitchen Cookery School

The Kenwood kMix is a contemporary version of the classic Kenwood mixer, it comes with the K beater, power whisk, flexi beater as well as a metal or glass bowl.

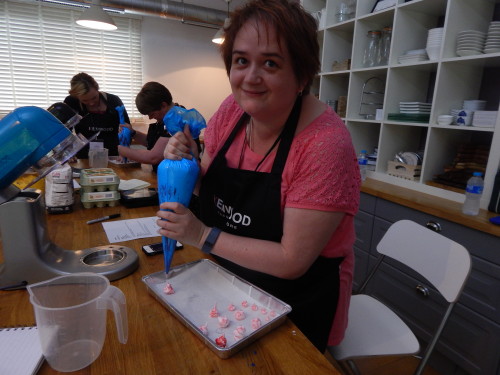
Sarah, David and Brian from Wilmslow Kitchen Cookery School gave us a run through of our busy afternoon of baking. In pairs (I was with Emma from Farmer’s Wife & Mummy) we were each going to make meringues, a Swiss roll and a rich chocolate tart. I was particularly excited (and terrified) as the thought of making and rolling a Swiss roll is an idea fraught with peril, the demonstration drew gasps of amazement from the watching crowd of bloggers.

Wilmslow Kitchen Cookery School

We were to tackle what I thought were some fairly difficult tasks, thankfully we were expertly walked through it all and what’s more it was all very enjoyable. I have long feared the meringue, but after trying my hand at the Intro to Baking session at Wilmslow Kitchen Cookery School I went home and made my own delicious batch.

The Swiss roll was, and still is frankly terrifying, but doable, and I’ve had a request to try and recreate the recipe at home. I am increasingly diary intolerant, so decided not to use cream in my Swiss roll and was given the option of a vegan buttercream, which was half a cup of vegan soy based spread whipped with half a cup of icing sugar and a lot (their words) of vanilla extract. It was pretty yummy and I didn’t miss the cream.

Wilmslow Kitchen Cookery School

Here’s what we made, the meringues were by far my favourite, the small boy liked them too. If you like a rich hit of chocolate then the chocolate tart is for you. But the Swiss roll was the winner – really light and if you’re brave, really easy to roll – honestly, if I can do it, you can too!

Recipe: No Churn Peanut Butter Oreo Ice Cream

When it comes to peanut butter, you either love it or hate it. I am firmly on the love side, whilst hubs is staunchly hate, which only means one thing…. more for me! The summer holidays so far have been a bit meh, and I’ve been having to come up with new and exciting indoor things to do. One boring morning we decided to whip up a batch of Peanut Butter Oreo Ice Cream, the small boy loves helping out in the kitchen almost as much as he likes eating the results.

I found two new and deliciously different flavours or Oreo cookie in my local shop; the Golden Oreo which is a lovely crunchy vanilla flavoured cookie and the limited edition Peanut Butter Oreo. They were both crying out to be whizzed up in a milkshake, but I thought it was time to ring the changes and try some no churn Peanut Butter Oreo Ice Cream.

peanut butter oreo ice cream

Peanut Butter Oreo Ice Cream

Ingredients

1/2 jar smooth peanut butter (I used reduced fat)
2 tablespoons hot water
1 tin of condensed milk
2 teaspoons vanilla extract
1 pint of double cream (whipped)
1 packet of Peanut Butter Oreos

Method

1. Put your peanut butter in a large bowl and add two tablespoons of hot water, stir thoroughly as this will help to loosen the peanut butter making it easier to work with. Once mixed, add your tin of condensed milk and vanilla extract to the peanut butter and combine.
2. In a separate bowl whip your cream until it forms peaks, gently fold your cream into the peanut butter mixture.
3. Chop up, or bash up a packet of Peanut Butter Oreo cookies and gently stir into your mixture, making sure the pieces are well distributed.
4. Pour into a tub and freeze for 6-8 hours. We also made peanut butter oreo ice cream popsicles with some of our mixture which worked very well.

You could also make this with normal Oreos if you can’t get hold of the peanut butter Oreo cookies.

peanut butter oreo ice cream

This is such a great recipe to make with kids, it’s incredibly simple and because there are no eggs, no cooking, no fuss; it’s quick and easy to put together – the hardest part is waiting for it to freeze!

peanut butter oreo ice cream

The recipe made a lot of ice cream – nearly two pints of it, so it was ideal for making into popsicles and also for spooning into a tub. It is very rich, so a little goes a long way. Don’t forget to take your tub out of the freezer about 10 minutes before serving too so it softens a little.

It is so simple and utterly delicious, if you love peanut butter then you’ll love this recipe! If you try it let me know what you think.

If you enjoyed this, you might also like to try these recipes –

Recipe: No Churn Peanut Butter Oreo Ice Cream