Review: Orchard Toys Christmas Surprises

It’s only been a few days since the small boy turned five, but as soon as the last of his wrapping paper goes in the bin, thoughts turn to Christmas which is only about 6 weeks away now (eek!). To get us in the mood we like to watch DVDs and play games, not least because the tree doesn’t go up until almost the last minute. Over the weekend we all went for a pub lunch, and to entertain the small boy and his cousin I took the Orchard Toys Christmas Surprises game we’d been sent to play.

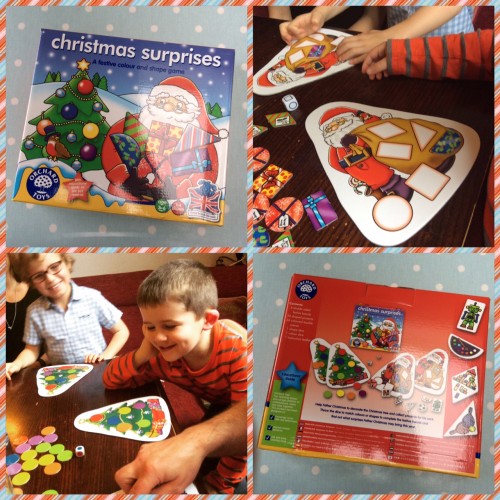
Aimed at children aged 3-6 years, the grown ups still joined in and enjoyed the game play. The game has enough double sided boards for 2-4 players. There are two different games you can play, the shape game and the colour game. The box contains 4 double sided boards, 24 shaped presents, 24 coloured baubles, 1 shape dice and one colour dice.

The shape game you play with the Father Christmas board, turn all the different shapes over so you can’t see what the presents are, roll the shape dice and pick the corresponding shape, it’s a bit like shape bingo, everyone takes a turn and the first one to fill Santa’s sack with presents wins, then everyone gets to turn over their shapes and see what Santa has brought them.

The colour game is similar and you play with the Christmas tree board. The bauble shapes are colour side up, each player rolls the dice and they collect the corresponding bauble colour, the first one to decorate the tree wins.
Christmas Surprises

The boys loved both games, with one preferring the colour and the other preferring the shape game – lucky there are two games to choose from! This is a nice matching game, where small children can get the hang of standard game conventions such as taking turns and rolling the dice, and importantly, not winning every time.

The Orchard Toys Christmas Surprises game encourages social skills and observations, improves manual dexterity and is linked with early learning goals.

It was certainly a lot of fun, kept us all entertained while we waited for our lunch and sparked several conversations about Christmas. I can see us playing this a lot up until the big day (and probably beyond). Another great game from Orchard Toys!
Christmas Crafts – Making Snowman Mosaics

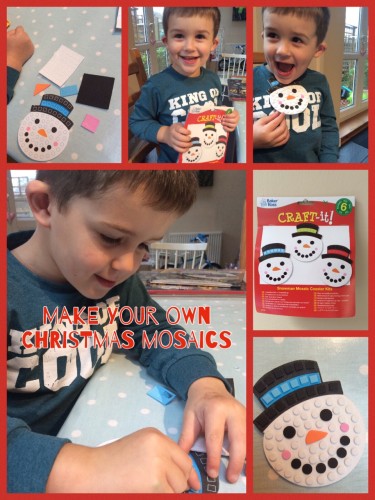
It may still only be November but I’m already starting to feel a bit Christmassy, I think it’s probably down to all the planning ahead of time so I’m less stressed later. They must be talking about it at school too as the small boy is all excited and ready to get stuck into the festivities. We’ve been busy baking Christmas cakes and starting to think about presents and decorations. One wet afternoon we sat and made some snowman mosaic coasters which I’ve decided would also look great as Christmas decorations.

The snowman mosaic coaster kit from Baker Ross contains everything you’ll need – a pre-cut snowman with a selection of foam stickers to stick on and decorate your snowman. If like me you want to turn the finished snowman into a Christmas tree decoration you’ll need a bit of ribbon and some sticky tape too.

Snowman Mosaics

Popping the foam stickers out of their sheet and peeling the backing off them is quite fiddly for little fingers, so it’s good practice for the small boy who has recently turned five. He did very well and managed to do most of them himself, only asking me to help him with the white circles, probably because there were lots and lots of them. This is a great task to help with hand-eye co-ordination and to improve dexterity and finger strength, which can really help with learning to write.

It’s a really simple kit and the snowman mosaics look really effective, too good to just be used as coasters, which is why I’m going to attach some ribbon so we can hang them on the tree once that’s up.

The snowman mosaics kits are from Baker Ross and come in packs of 6 or 18. It’s a nice tidy activity to do, it doesn’t require any setting up or any mess, just have a bowl ready to put the bits of backing paper in and you’re sorted. In fact I’ve put one in my bag for when we go out, it’s something we can do together while we’re having lunch that doesn’t involve an ipad. 

The thing I liked most about making the snowman mosaics was the chance to chat. We were both industriously beavering away on our snowmen, chatting away about school, Christmas and his recent birthday, and occasionally bursting into happy song. It was a fun half hour on an otherwise grim November day.

Having a handmade Christmas – Christmas Ink Stamps

The keen-eyed amongst you will have noted that this year I’ve decided to make my own Christmas cards. It’s something I’m doing because it’s a bit nicer to get a handmade card, it’ll save us a few pennies and it’s just a nice calming thing to do of an evening.

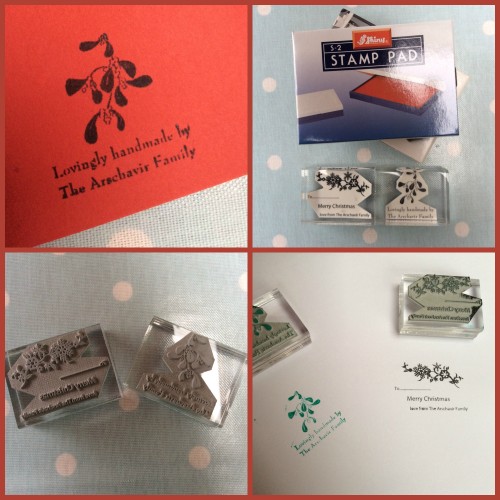
To give my cards the final finishing touch I have had a couple of ink stamps made up by Stamptastic. The first stamp is for cards and other handmade gifts and says “Lovingly handmade by the Arschavir Family”, and the other, which is for gift tags and such like says “To…Merry Christmas love from The Arschavir Family”.

Each stamp costs £15, which if you make a lot of handmade cards and gifts will be well worth it. The stamps themselves have lovely crisp detailing and are nice and chunky to hold and stamp with. 

I am planning to buy some brown parcel labels and stamp those with the gift tag stamp, I always find gift tags a bit faffy but essential and I think the stamp will give a good finish to a nicely wrapped gift.

The ink pads come in a range of colours and cost just £3.50, and will last a long time, only needing a little spritz with water if they start to dry out a little.

Christmas Ink Stamps

The stamps came from Stamptastic who have an online shop with everything you need for your personalised ink stamps, the designs are crisp, attractive and interesting. They have quite a few different Christmas designs to choose from, so if you enjoy crafting, or want to save yourself the hassle of writing out gift tags, or need an attractive address stamp or similar, have a look at what Stamptastic have to offer.

I’m really pleased with my ink stamps and I think they give my Christmas cards and gifts the final flourish they deserve.

Note: I was given the stamps and ink pads free of charge for review purposes. All images and opinions are my own.

Crafts: Make Your Own Christmas Cards

I don’t know about you, but I almost weep at the cost of Christmas cards. I’m sure that and the cost of postage are one of the reasons why fewer people seem to be sending cards. In a attempt to cut some costs, and impressed by the handmade cards we were sent last year, I was determined to try my hand and make your own Christmas cards.

Back in September I visited the Brookside Garden Centre near Poynton in Cheshire, while I was there I popped into their craft shop. The shops stocks lots of docrafts products, knowing I already had some bits and pieces at home I just bought the few extra things I needed to make the cards. It’s a lovely craft shop and worth visiting if you’re in the area.

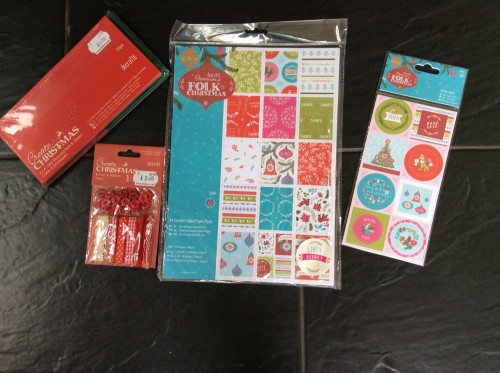
For my cards I used:
Red and Green Christmas Cards and envelopes (pack of 25)
Red Button & Ribbon Pack
Folk Christmas A4 Double Sided Paper Pack
Folk Christmas Linen Sticker Sheet Pack
A tube of Tacky Glue 60mls

The above items cost £13.95 in total for 25 Christmas cards, although there is plenty of paper and other bits and pieces left to make more cards than that. These cards cost approximately 56p each to make, plus my time.

make your own Christmas cards

My plan was fairly simple, use the Folk Christmas paper, cut it into squares, stick it onto the Christmas cards and decorate with the stickers, ribbons and buttons. Once I got started I realised what a difference the ribbons and buttons made, and slightly regretted not buying a bigger selection.

make your own christmas cards

I played about with different designs and colours and I think one or two of the cards I’ve made are pretty good really, so I’ll be using the better ones as templates for the rest of my pack.

I really love the look of the Folk Christmas range, it’s full of hand drawn traditional style Christmas illustrations and sentiments in contemporary colours. The 32 pack of papers features 16 different designs to use for card making.

make your own christmas cards

docrafts card making supplies are available from a large range of retailers and specialist craft shops. Homemade cards are always nice to receive because you know people have put their time and love into making them.

Note: We were sent the Folk Christmas Papers and Stickers free of charge for review purposes. I purchased the other items myself and all images and opinions are our own.

Celebrating Craftmas with Laura Ashley

I love getting crafty for Christmas. I have relatively low crafting standards at home, I’m content to make cotton wool snowmen with my 4 year old and other such delights. Sometimes it’s nice to do something for myself, so one rainy Sunday afternoon I found myself braced against the elements and heading to another wonderful Ministry of Craft event, this time in conjunction with Laura Ashley.

We were in the cosy upstairs of Rosylee Tearooms, 25 bloggers gathered for some Christmas crafting, or Craftmas if you will. We spilt into two groups and I started by making a large origami box. Using large squares of beautiful Laura Ashley wallpaper, intricately folded into a large-ish gift box with lid. We then created a large bow to top the box with, again out of strips of wallpaper. I chose a contrasting paper to my box. It’s really rather effective and I’ll be recreating this at home with some nice thick wrapping paper.

Laura Ashley

Once we’d completed our first craft task we were treated to a selection of canapés, my favourite were the mini tomato bruschetta, but there was something for everyone, even gluten free options.

Laura Ashley

Suitably fortified we moved on to the sewing machines, a personal fear of mine. I’ve not used one since school and even then I wasn’t known for my skills. I am a nervous machinist, hand sewing is fine though. Thankfully I was under the expert guidance of Jeanette from the Ministry of Craft and I was sat near Hollybobs who really knows her way around a sewing machine.

We were set to work making little drawstring bags to put presents in. Using Laura Ashley fabric we made little red sacks and decorated them with cute bunting. Jeanette soon got the measure of me and entrusted me with her unpicker, which was just as well as I managed to sew all the wrong things together. It was easy to use the machine, my problem was more a lack of care, attention and confidence. Regardless I managed to make a pretty attractive looking bag.

Laura Ashley

I was really pleased with my efforts, they may lack finesse but they’re not terrible. Spending another afternoon with the Ministry of Craft has done wonders for improving my crafting confidence, which is so important when crafting with the small boy. My New Years resolution is to find more crafting me time and to learn how to use my sewing machine!

You can read more about our craftmas afternoon on the Laura Ashley blog. I think a lovely time was had by all, thank you to Laura Ashley, the Ministry of Craft and Joe’s Bloggers for arranging it. It’s amazing what can be created from wallpaper and upholstery fabric!

How we made some Christmas Magic

Growing up my parents didn’t have much money, but my Dad had about as much imagination as it was possible to have. In many ways he was a great Dad, he made us laugh ridiculously hard on a daily basis. At Christmas time he sprinkled his special brand of magic around the house.

In scenes unheard of these days, our house did not have a single decoration up until Christmas Eve. My brother and I would toddle off to bed, leaving the house as it always was, save for a few Christmas cards dotted around the lounge.

Christmas morning would come, we’d tumble out of bed to find stockings hanging on our doors. We’d either sit together conspiratorially in one of our bedrooms and open our stockings together, or open them separately, then compare notes.

But under no circumstances were we allowed downstairs. If one of us did creep down for a look, there was nothing to see. Father Christmas had used his magic rope to tie the lounge and dining room doors shut and only my Dad was able to open it. If we gained entry without our parents, we were sternly warned that all the presents would disappear. No one wanted that!

Once my parents were awake (or awoken at some hellish hour) we were allowed into the lounge. The door would swing open and we’d burst in all excited. Father Christmas had put the tree up and all the decorations while we were in bed. Not only that but under the tree were presents for everyone. It was a Christmas miracle!

What I now know and realise is, it wasn’t Christmas magic, it was my Mum and Dad working their arses off from 8pm decorating the house, wrapping the presents and starting to prep the Christmas dinner. No wonder they looked extra awful come Christmas morning and no wonder when after only having 2 or 3 hours sleep they were less than overjoyed at having two excited children bouncing on them until they got up.

They were legends, their Christmas Eve efforts made everything much, much more magical and realistic for us. So I was determined to inject some magic and mystery into our family Christmases.

I’d love to do what my parents did, but that’s an incredible amount of hard work very late in the day. Plus a lot of people think you are stark raving mad if you’ve not fully decorated your house by the 1st December these days. So we’ve struck a balance.

On Saturday we went to Wythenshawe Community Farm and bought our tree, a very handsome 7 footer. We propped the tree up in a cool corner in the kitchen with a promise to decorate it tomorrow.

That night he had an early night, so we sprung into action. The Christmas tree was put into position, decked with lights, baubles and treasured decorations. The mantlepiece was decorated and our stockings hung up, lights and garlands were strung everywhere.

We were exhausted, but the house looked lovely. Our last act was laying out some decorations and a note from Elfie our Elf on the shelf saying she’d not had chance to finish decorating the tree and could the small boy put the last few decorations on.

Morning came, he woke us up and we all went downstairs (hubs sneaking down first to put all the lights on). The small boy walked in and was stuck dumb with wonder. He jumped up and down and said “the tree, the tree!” And then inspected everything with a look of pure joy on his face. After a few minutes he said “is it Christmas time now?” And my heart melted.

Christmas magic

THAT is what Christmas is all about. We found true Christmas magic on Sunday morning. He’s utterly delighted that Elfie decorated the tree and we love that we’ve created some actual, real magic for him.

Christmas isn’t about presents, giving and receiving, or vast turkeys wedged in the oven. It’s about magic and love. It’s a beautiful thing to believe in magic, because it does happen, even if it’s manufactured by exhausted parents. Merry Christmas x

Elf on a Shelf – December 1st-7th

Love or loathe Elf on a Shelf, it’s something we’re embracing this year. I first encountered Elf on a Shelf a few years ago, one of my American cousins was doing it for her children. Back then in my pre-child days I thought it was a bonkers idea, but now I have a small boy of my own we’re loving it.

On 1st December a mysterious, yet beautifully wrapped parcel appeared, attached was a note from Father Christmas. He was very busy and unable to keep an eye on the small boy during December, so he was sending “Elfie” the elf to keep an eye on him. Despite being one of his favourite elves Elfie, we were warned, was cheeky and might get up to mischief while she was staying with us. Cheeky Elfie!

One signature of Elfie’s mischief is that she leaves a sprinkling of snow wherever she goes in the night. It must be when she returns from the North Pole after visiting Father Christmas each night. What a messy elf!

Elf on a shelf

On 2nd December we woke up to discover that Elfie had been playing with the small boy’s beloved train track and she’d also brought with her a liberal sprinkling of “snow”.

Elf on a shelf

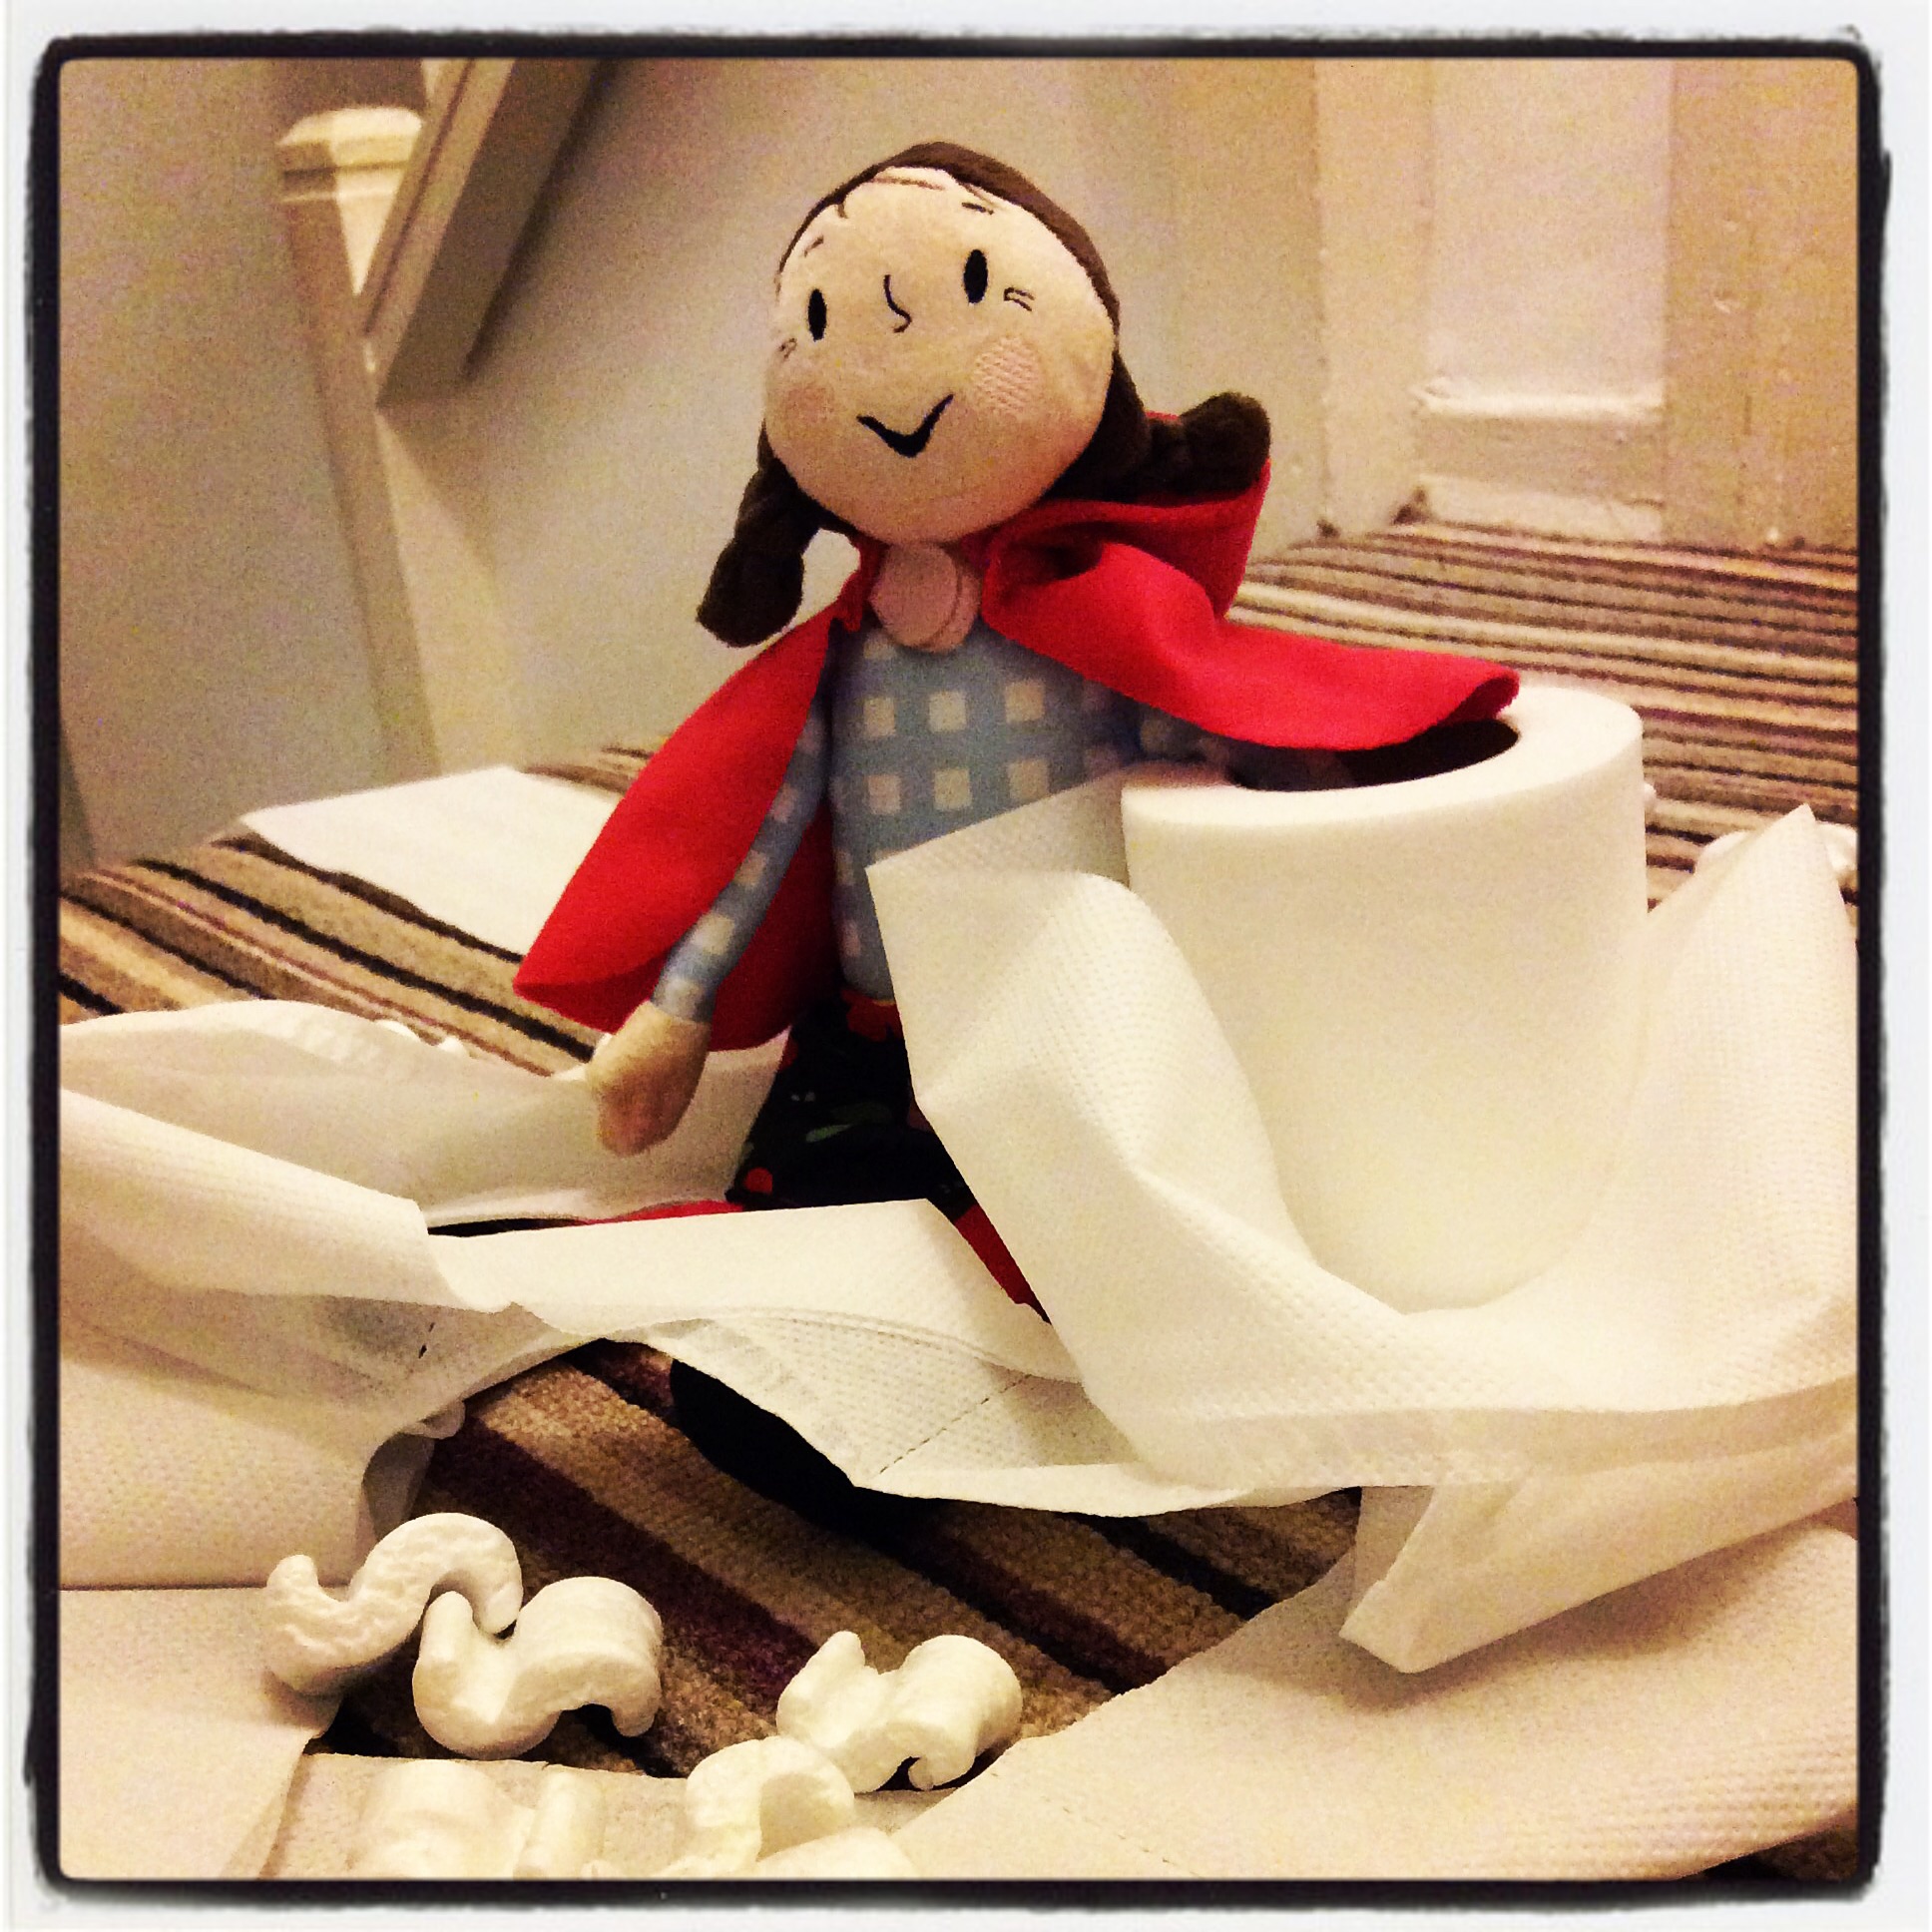
On 3rd December Elfie got very cheeky and rolled a toilet roll down the stairs, not only that she’d got tangled in it at the top and right at the bottom she’d left a handful of magic money (chocolate coins) as a special treat.

Elf on a shelf

On 4th December Elfie obviously got a bit thirsty and we found her in the fridge drinking his milk. Naughty Elfie had left a sprinkling of “snow” outside the fridge too.

Elf on a shelf

On 5th December Elfie decided we needed to add a bit of festive cheer to our as yet undecorated house, we came downstairs in the morning to find she’d strung up some lights at the window and got herself tangled in them too!

Elf on a shelf

On 6th December we discovered Elfie in a marshmallow bath, she looked happy enough and seemed to have had a good soak. The marshmallows didn’t last long either!

The small boy was by now getting the hang of waking up to discover Elfie’s adventures.

Elf on a shelf

On 7th December the house awoke to a mess, Elfie had discovered the scissors and had been busy in the night cutting out snowflakes and sticking them all over the house.

Elf on a shelf

Elfie has been wonderful company so far this month, we’re really looking forward to seeing what other mischief she gets up to!

Are you doing Elf on a shelf?

Decking the halls with The Christmas Boutique

One of my favourite Christmas traditions is putting some carols on, mulling some wine and decorating the house for Christmas with my family. It’s one of my favourite Sunday afternoons in December and really gets us all in the mood for Christmas. This year, thanks to Christmas Boutique we can add to our collection of treasures to trim the tree with.

Like most families we have favourite things to put on the tree; we favour a traditional theme, reds, greens and golds, with white lights strung around the house. I love Nordic style decorations and have picked up a few, small but very treasured pieces on our pre-baby travels. I was thrilled a couple of years ago when they suddenly became fashionable and I could find the things I loved virtually everywhere. So sticking to that theme I chose some new treasures.

Christmas Boutique

The small boy is obsessed with penguins (who isn’t this year), so I chose a pair of cute felt penguins (£9.99) for the mantlepiece, you can hang them from tree, but we’ll put them  with other penguins and polar bears in our collection. The cute hanging Mr and Mrs Gingerbread (£4.99) fit right in with our scheme and I’m a little bit in love with the two fluffy moose in bobble hats (£8.99), which I’ll hang on the tree.

Christmas Boutique

I loved the look of these Christmas Sacks (£8.99 each) you can choose between a Father Christmas face or the Christmas Tree (above), they are nicely made with good stitching and they seem strong and durable. We’ll lend this to Father Christmas to fill with presents and leave under our tree.

My favourite thing was the Nativity set (£34.99). This set contains the baby Jesus, three Kings, Mary, Joseph, a stable & two animals. It’s made out of resin and the figures are nicely detailed and solid enough not to break easily if they’re picked up by little toddler hands. It arrived well packaged too, so after Christmas you just put the pieces back in their protective box which will keep them safe for next year.

The Christmas Boutique website has lots of interesting Christmas accessories and decorations to suit different tastes, the decorations I received were well made and of good quality and I would recommend checking them out, especially if you’re looking for something a little bit different, a little bit modern and a little bit stylish.

Note: The Christmas Boutique sent me a selection of products for review purposes. All images and opinions are my own.

Christmas Cards from Made with Love

I hold my hands up. I’m one of those people who sits down for a couple of evenings in mid-November and writes all her Christmas cards. I like sending cards and putting little personal notes in for the friends and family I’ve not seen in a while. I like that it’s a little gesture that says that we’ve thought about someone. Often the boys go out hand delivering cards to friends and neighbours, they love doing this as they tend to get invited in for cups of tea and pieces of cake.

The sending of cards is a tradition I will continue to firmly uphold. Though it can be a fairly costly business, buying stamps these days is really quite expensive, especially if like us you post around 50 cards each Christmas. I’m also a bit picky about my Christmas cards, I really hate flimsy cheap Christmas cards, buying budget doesn’t need to mean bad, really bad quality. Anyway, I appear to have digressed.

I’ve recently been sent a small selection of cards from the Made with Love Christmas card range to have a look at and review. They sent me the Christmas Star card (£3.50) and the Tartan Reindeer card (£4.50). They are really good quality cards, made from recycled material, well printed and produced in the UK.

made with love

You can easily arrange for them to be printed with a personalised message for example “with love from the Smith family” too. All cards from Made with Love are available in multi-packs.

These Christmas cards are for me a little expensive to send  in great numbers, but I tend to buy nicer, special cards for family and friends who don’t fall into the uncle and aunt categories, so I’d send these slightly more expensive, considerably more special cards to them, especially if I’d personalised them from our family.

I like the modern designs from Made with Love, they’re nicely different, they’ve got a lovely concept and I particularly like that they are a UK product. Well worth checking out if you want something different and a bit special.

Note: I was sent four cards free of charge for review purposes, all opinions and images are my own.

Christmas Recipe: Easy Joulutorttu (Finnish Jam Tarts)

For about 11 months of the year I don’t really do much baking; then December starts and I’m elbow deep in flour. I actually love it, I make the usual mince pies and shortbread, hubs makes the cakes and because we’re a bit rubbish we always buy a Christmas pudding. I’m always on the look out for really, really easy, but fairly impressive looking and tasting things to add to my festive baking repertoire. This year I’m firmly sold on Joulutorttu, a sort of festive Finnish jam tart.

Traditionally the Joulutorttu is made with puff pastry and a special Finnish prune jam. We don’t tend to have prune jam in the cupboard; but I had a jar of Mackays Christmas Preserve. I thought this would make a good substitute. Of course if you have prune jam at hand you could use that, but this delicious Christmas preserve is packed with berries, made with mulled wine and lends a particularly merry feel to the Christmassy tarts.

Joulutorttu

Easy Joulutorttu (Finnish Jam Tarts)

You will need:
One packet of ready made puff pastry (or make your own if you’re clever)
One jar of Mackays Christmas Preserve with Mulled Wine
A splash of milk for brushing
Butter for buttering your baking tray

To make:
Butter your baking tray.
Pre-heat your oven to 200 degrees.
Unroll your sheet of puff pastry, cut it into squares approx 3 inches square (my sheet cut into 15 squares).
Take a square and put a teaspoon of jam in the middle. Cut each corner to the middle and fold one corner of each triangle into the middle to make a windmill shape (trust me, this is much easier than it sounds, the picture probably explains it better).
With a pastry brush, brush the windmills with milk and pop into a pre-heated oven for 15-20 minutes until the Joulutorttu are golden and puffy.
Once cooked, leave to cool, this is very important as the jam will be super heated. To serve, dust with icing sugar, they would be especially excellent with a good cup of coffee and best enjoyed whilst wearing a Scandinavian style jumper.

Joulutorttu

These Joulutorttu are pretty much as easy as baking gets. They’re a great store cupboard treat to whip up with no notice when festive visitors just happen to pop in. They’re crunchy, sweet and full of star-shaped Christmas joy.

Recipe: Easy Joulutorttu (Finnish Jam Tarts)

You can find more of my recipes here.