Recipe: Honey Spiced Pumpkin Pie

Pumpkin Pie is one of those things most English people have heard of, but for the most part have never tried. Every year we seem to embrace Halloween traditions a little bit more, and each year more and more pumpkin-spiced things creep onto our menus. I keep trying pumpkin and wondering what all the fuss is about. I’m not a huge fan, but would a slice of homemade pumpkin pie change my mind?

Recipe: Honey Spiced Pumpkin Pie

This recipe is really simple. You can make your own pastry or you can buy a ready-made sweet pastry case, or so what I did and buy some ready rolled shortcrust pastry. Sometimes, just sometimes it’s absolutely fine to be lazy!

Honey Spiced Pumpkin Pie

Ingredients (serves 8)
3 eggs, beaten
1 425g tin of pumpkin puree (or make your own)
125g runny honey
80g soft brown sugar
200mls milk (I used semi skimmed)
1 teaspoon ground ginger
½ teaspoon ground nutmeg
1 teaspoon of ground cinnamon
Pinch of  salt
1 shortcrust pastry case (9 inch)

Method
1. Pre-heat your oven to 200°. Prepare your pastry case. if you’re using a ready-made case go to step 2. If you’re making your own or ruing ready rolled pastry then follow these instructions –

Grease your 9 inch pie tin and place on a baking sheet. Roll out your pastry and press into the pie tin evenly. I like to leave my pastry untrimmed around the edges of the pie, then tidy them up once the pie is cooked.

Prick the bottom of your pie, top with a piece of baking paper and over in baking beans. Put in the oven for 10 minutes. Remove from the oven, remove the baking beans and paper and bake for another 5 minutes.

2. In a large bowl, beat your eggs, then add your pumpkin puree, milk, sugar, honey, spices and salt. Mix very thoroughly.  Carefully pour the filling into pastry case. I liked to do this about half way, then put it in the oven and continue filling the pie, this stops it sloshing about when you’re putting your pie in the oven.

3. Bake at 200 C for 45 minutes until it’s cooked though. If you’re not sure, it shouldn’t wobble too much and you can always poke it with a knife to see if it comes out clean.

Recipe: Honey Spiced Pumpkin Pie

Do not make the same mistake as me. In my excitement I pulled the pie straight out of the oven to admire its beauty once it was cooked. BIG MISTAKE. What I should have done is turned the oven off and opened the door a tiny bit, then after a bit longer, opened the door some more and let the pie cool in the oven. Pulling it out too quickly shocked it and made it crack. This made me very sad.

Recipe: Honey Spiced Pumpkin Pie
Do not make the same mistake as me. Leave your pie to cool in the oven!

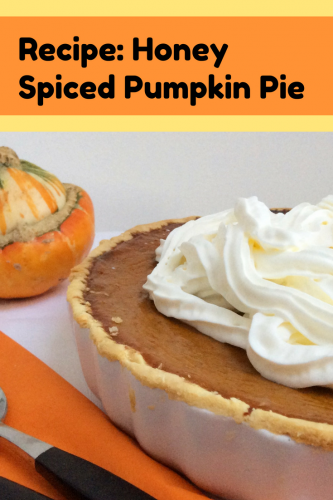
If you’ve made the fatal error of taking your pie out of the oven and it cracks like this, do not despair! All you need it a lot of cream. Whip it up and top your pie before serving. No one will ever know the unsightly horrors which lurk beneath!

Has my recipe for Honey Spiced Pumpkin Pie made me fall in love with pumpkin? Not really. It was very nice and the boys absolutely devoured the lot. I just think me and pumpkins just aren’t meant to be.
Recipe: Honey Spiced Pumpkin Pie

Crafts: Spooky Halloween Pom Pom Spiders

Pom poms are a pretty easy thing to make and with a little imagination you can turn them into all kinds of different creatures and characters. This month I was tasked by Craft Merrily to create a Halloween craft. I’d been wanting to master my new pom pom maker, so I decided to make some pom pom spiders. They’re easier than you think and an easy craft to do with children.

Crafts: Spooky Halloween Pom Pom Spiders

We’ve all made pom poms before using two rings of cardboard you laboriously wind wool around, then cut, tie and you’re done. I’ve bought a set of pom pom makers on the recommendation of my friend Lucy – an expert pom pom maker. She is right, they really are a pom pom game changer!

Lucy showed me how to use the pom pom maker. You wind your wool around two semi-circles of the maker, then wind it around the other two semi-circles, clip them together, cut them and the tie them around the middle and you’re done. Easy. Not just easy, but quick and easy.

Crafts: Spooky Halloween Pom Pom Spiders

You can make your pom pom spiders as big or as small as you want (if you’re not sure how to make pom poms, there’s a video you can watch here). Use whatever colours you think would work best.

How to make Pom Pom Spiders

You will need –
Pom pom makers (or make your own cardboard rings)
A ball of wool
Scissors
Pipecleaner
Googly eyes
Bostik Glu Dots

How to make your Pom Pom Spiders –
Wind your wool around your pom pom maker, make sure you are generous with the winding. The more wool you use, the fuller your pom pom will be.

Before you cut and tie your pom pom, cut your spider legs out of the pipecleaners. I used four identical lengths of pipecleaner (which make 8 spiders legs). Twist the pipecleaners together in the middle and put them through the centre of your pom pom.

Cut the wool around your ring and tie you pom pom together tightly with a long length of wool. You should have a pom pom now, it may need trimming up slightly so it is even all over.

Using the Bostik Glu Dots and the googly eyes, stick eyes onto your pom pom spider. Bend its legs to make spiders legs. You pom pom spider is now complete. You can leave the long piece of wool on him or cut it off if you prefer.

Your pom pom spiders are ready for Halloween. Hang them around the house, make a pom pom spider garland out of them or decorate your Halloween party table with them. How would you use your pom pom spiders?

Crafts: Spooky Halloween Pom Pom Spiders

I am a Bostik craft blogger and I was sent the materials to create this craft from Craft Merrily. 

Check out my other craft tutorials here!

Crafts: Easy Halloween Monster crafts for kids

It may only be the start of September, but I’m sure Halloween preparations get earlier every year! My boy is already making noises about going trick or treating, it’s too soon for me, but it’s never too soon to get crafting. This month I was tasked by Craft Merrily to create some Monster Crafts. We’ve done two monster crafts this month, one ideal for a playdate or party and the other is just a simple craft you can do with as many children as you want.

Monster Crafts – Shower Puff Creatures

You will need:
One shower puff per person
Bostik Glu Dots
Pipe cleaners
Googly eyes
Cardboard
Scissors
Felt (you can use card if you don’t have any felt)

Crafts: Easy Halloween Monster crafts for kids

How to make your shower puff monster:
This is pretty simple. Using your pipe cleaners, twist them into a shape you like and wrap them tightly around the monster’s head. I had them as weird ears, but you could use lots and do crazy hair. 

Cut out some circles (or other shapes if you prefer) and stick your googly eyes on to them. I drew lines around the eyes to make my monster look more monstrous. Using the glu dots, stick your monster eyes wherever you think your monster might have eyes. 

Cut a mouth shape out of the felt (or cardboard), make a tongue or creepy teeth if you prefer and stick them in the mouth. I used a pen to draw some detail on the mouth and tongue. Once you’re happy with you mouth stick it in place using the glu dots. You are done! Find a nice place to hang your monstrous creation.

Crafts: Easy Halloween Monster crafts for kids

Monster Crafts – Create your own monster!

You will need:
Cardboard
Bostik Glu Dots
Felt tips or crayons
Assorted craft things to stick on – feathers, glitter, stickers, eyes etc

Crafts: Easy Halloween Monster crafts for kids

I have drawn up some of my own monster templates which you are more than welcome to download here. I printed them out on card. If you don’t want to use my drawings (I’m no artist) then you can draw your own on paper or cardboard.

Colour, stick, create, go wild, let you imagination know no limits and conjure up the monster of your dreams, or nightmares! As you can see the boys had lots of fun creating and decorating their monstrous creatures.

Crafts: Easy Halloween Monster crafts for kids

The boys really liked this little crafting session, perfection was not required and they loved using their imaginations. They gave their monsters very cute names too, like Ghosty and Mr Colourful. I really like this one, this is Ghosty and he is multicoloured with green accessories, oh and you can walk him with your fingers too.

This is the kind of craft activity that they can do with fairly minimal supervision and you can use their creations to decorate the house come Halloween too.

Crafts: Easy Halloween Monster crafts for kids

Note: I am a Bostik craft blogger and I was sent the materials to create this craft from Craft Merrily. 

Crafts: Easy Halloween Monster crafts for kids

Check out my other craft tutorials here!

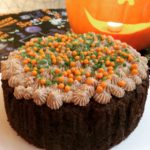
Recipe: Halloween Pumpkin Cake with Cinnamon Frosting

Every year I carve a pumpkin at Halloween and every year without fail I’ve guiltily tipped the insides of the pumpkin into the compost bin. I tell a lie, one year we did try and make something but it was so inedible we tipped that straight in the bin. 

This afternoon as my son and I sat around the kitchen table carving the pumpkin and scooping out the gloopy insides, I felt really bad about tipping the pumpkin innards into the bin, so I decided to try and bake a pumpkin cake of our own. 

I consider myself to be a bit of a safe baker, I can do 100 variations of sponge cake but anything more complicated I’ve always shied away from for fear of failure. I sat at the kitchen table and puzzled over what to do, in the end I came up with a slightly experimental recipe for a pumpkin cake and a hope that it would work, it did and it was delicious.

pumpkin cake

This pumpkin cake recipe does make quite a lot of cake batter and there was enough to make one decent sized cake and 12 yummy cupcakes. We used the flesh, the firm pale bit, not the slimy gloopy bit. We cut our chunks of the flesh and grated them. We found we had 300g or so, though I think if you found yourself with more pumpkin than that, then the recipe is quite forgiving and would accommodate another 100g or so with no problems.

The pumpkin kind of melts into the cake when it’s cooked and you’d never, ever know what the spooky surprise in your cake really is. I suspect if you wanted to make this cake outside of pumpkin carving season a grated butternut squash would work just as well.

pumpkin cake

Pumpkin Cake with Cinnamon Icing

If you’ve carved your pumpkin and you don’t know what to do with the leftover flesh, here’s a cracking recipe for a cake which you can decorate as Halloweeny as you want.

For the cake…

  • 300g golden caster sugar
  • 200g butter or margarine
  • 4 eggs, beaten
  • 2 tsp mixed spice, ground
  • 5 tsp cinnamon, ground
  • 2 tsp bicarbonate of soda
  • 1/2 tsp salt
  • 300g self raising flour
  • 300g pumpkin flesh, grated
  • splash of orange juice if the latter needs loosening

For the frosting…

  • 80g unsalted butter, soft
  • 100g icing sugar
  • 4 tsp cinnamon, ground
  • 200g cream cheese
  1. Pre-heat your oven to 190.

  2. Cream the golden caster sugar and butter together.  Once light and fluffy stir in the beaten eggs, mixed spice and cinnamon. Add to bicarb of soda, salt and sifted flour and fold in until the batter is smooth. If the batter seems a little stiff add a splash of fresh orange juice to loosen it. Stir in the grated pumpkin.

  3. Put a dessert spoon of the batter in 12 cupcake cases and bake for 20 minutes, remove from the oven and cool on a rack.

  4. With the remainder of the batter, pour into a lined 8 inch cake tin. For ease I used one of the paper cake tin liners you can buy and my tin was quite deep (4 inches). Bake this cake in the oven for 50 minutes. Turn the oven off and leave the cake inside for a further 10 minutes, then remove and cool on the rack.

To make the frosting…

  1. Beat the icing sugar and butter together until smooth, add the cinnamon and stir thoroughly. Beat in the cream cheese until the mixture is well combined. Put in the fridge to firm up for 20 minutes.

  2. Once your cakes are cool they can be iced, you can either pipe on the frosting or smooth it on with a knife, decorate however you want, I sprinkled some spooky sprinkles on top of mine.

The result was a surprisingly light pumpkin cake, full of autumnal spice and not at all pumpkiny. I urge you not to tip your pumpkin innards in the bin, but to try this instead. You won’t regret it. I promise!

pumpkin cake

Casa Costello

Baking: Make Your Own Spooky Halloween Cupcakes

October is one of my favourite months. I love the autumn colours and Halloween is always a good excuse to get the mixing bowls out to create something spooky to celebrate the occasion. We don’t do trick or treating, but we usually have a party for some of the small boy’s friends; or a little Halloween tea party of our own. I tried my hand at making some spooky Halloween cupcakes for the occasion and I was quite pleased with how they turned out.

Spooky Halloween Cupcakes

The cupcakes were really easy to make (you can read my fail-safe sponge cake recipe here) and they take very little time to knock up with a food mixer; though I sometimes mix my cakes by hand if I can’t be bothered washing the mixer afterwards.

Once my little cupcakes had cooled, I made a buttercream. I made quite a lot of buttercream because I had several batches of cakes to decorate for various occasions. To make my buttercream I put 500g of soft unsalted butter in the food mixer and beat it for a minute or two to soften it up properly. I then added 500g of sifted icing sugar and beat them together until they were thoroughly combined. As you can see it’s just equal amounts of each ingredient, so depending on how much buttercream you need you can make more or less.

Spooky Halloween Cupcakes

I then put half of the buttercream in a tub in the fridge to use at a later date. I put a quarter in a piping bag with a piping nozzle (I use a large star) and popped that in the fridge to firm up a little. With the remaining quarter of icing (still in the food mixer) I added orange food colouring; just a few drops at a time until you get the Halloweeny orange colour you want. Once you’re happy with the colour, pop it in the fridge to firm up a little; though not so much that you can’t pipe it. I always find freshly made buttercream is too loose to pipe with until it’s had half an hour in the fridge.

Spooky Halloween Cupcakes

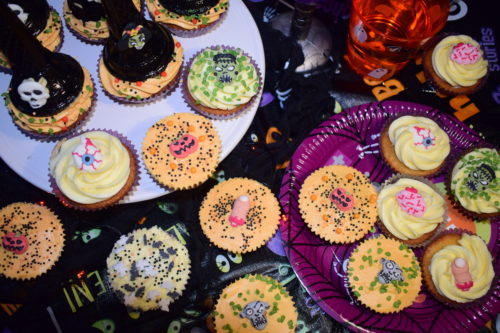
I made three different kinds of spooky Halloween Cupcakes…

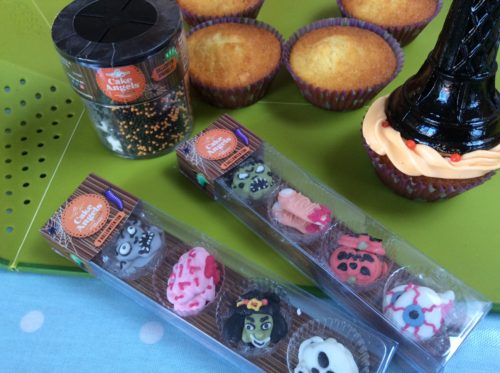
With the orange buttercream and using a palette knife, I smoothed the buttercream on top of the cupcake. Choose cupcakes which don’t rise above the edge of the paper case for this. I then took a Cake Angels Halloween cake topper and placed it in the middle of the cupcake; then sprinkled some of the Cake Angels Halloween sprinkles on. The small boy enjoyed helping to decorate the cakes like this, almost as much as he enjoyed eating them.

Using my large star piping nozzle I piped icing onto the Halloween cupcakes and topped them with a cake topper; adding sprinkles where I felt like it. I used both the plain white buttercream and the orange buttercream for this.

Spooky Halloween Cupcakes

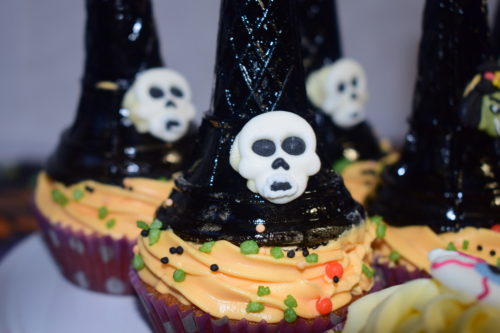
These Witches Hat Halloween Cupcakes were a bit of an experiment. I’d spotted some ice cream cones in the reduced section in a local shop. I bought some black get food colouring and spent some time the night before carefully painting my ice cream cones black. I left them to dry overnight.

When it came to icing my witches hat cupcakes; I piped orange icing (for hair) onto the cupcake, then carefully pressed the hat/cone onto the icing. To decorate; I dabbed some buttercream onto the back of one of the Cake Angels decorations and stuck that to the hat. If I’d thought it through a bit more I would have made a buckle and belt for the hat out of royal icing. I will next time.

Spooky Halloween Cupcakes

These spooky Halloween cupcakes were lots of fun to make and would be a great centrepiece for a Halloween party. They were tasty too – too tasty. They didn’t last long before they were spirited away into our bellies!

If you enjoyed this, you might also like to try these recipes…

Make Your Own Spooky Halloween Cupcakes

Easy Ideas for Halloween Crafts

One of my favourite things about Halloween, apart from being given an excuse to dress up, is Halloween crafts. It’s one of those occasions when you and the kids can go all out on the spooky stuff.

Last year me made a few different Halloween crafts, but our favourites were the Spooky Lanterns from Baker Ross which you can find out how to make here. They are still available this year on the Baker Ross website and they do look really effective.

halloween crafts

This month we’ve been starting to look at some more easy Halloween Crafts. We were sent a selection of Halloween and autumnal themed crafts to try (we will do the autumnal crafts in a separate blog post).

The Halloween crafts we were sent were –
  • Day of the Dead colour in mini gift bags
  • Halloween Dotty Art
  • Halloween Pom Pom Decoration Kits

halloween crafts

Day of the Dead has been very much in fashion for the last few years and is gaining in popularity. Indeed, last year I dressed as a Day of the Dead style zombie bride for Halloween. The little colour in gift bags (there are 6 in a pack) would be a great craft activity for a kid’s Halloween party, then they could fill their bags with sweets and take them home afterwards.

halloween crafts

The Halloween Dotty Art kits would also be great for a Halloween Party (we are going to take ours on holiday with us over half term). The pack contains eight different Halloween designs (Monster, Spider, Cat, Ghost, Pumpkin, Owl, Bat & Skull) and packs of coloured stickers. You then stick the stickers on the spooky design and bring your Halloween picture to life. This kind of thing is great for strengthening little fingers and increasing dexterity, as well as being a fun activity you can do together without creating any mess.

halloween crafts

I love pom pom crafts, so I was pleased to find these Halloween Pom Pom Decoration Kits in my box of seasonal crafts from Baker Ross. The pom pom kit contains everything you need to make a spider, a bat and a pumpkin.

Like most pom pom crafts they are a little fiddly to make and probably need a grown up to get it started and help tie it off at the end. Making pom poms is lots of fun and once you’ve snipped your threads you can start to see your spooky pom pom creature come to life.

The Baker Ross website has hundreds of easy to do craft kids for children and adults alike. Their kits are almost universally well designed and thought out, and there’s something for all ages, abilities and craft interests, often with minimal mess and fuss. For easy Halloween crafts, have a look at Baker Ross for inspiration.

We are Baker Ross Ambassadors.

Preview: Halloween with The Witches at Tatton Park

This October half term, get into the Halloween spirit with a week of witchy fun and mischief – part of Roald Dahl’s Tremendous Adventures. Meet The Witches at Tatton Park, part of a year-long programme of events celebrating 100 years since the author’s birth.  

From Saturday 22 to Sunday 30 October, The Old Hall – the park’s oldest building – will be transformed into Hotel Magnificent (the scene of most of the action in Roald Dahl’s famous book) where visitors are invited to a Spooktacular Halloween Party and are invited to dress up, or not if you don’t want to.

The Witches at Tatton Park

This Witch Spotting Checklist will help you spot The Witches at Tatton Park….

  • They always wear gloves

o    Witches don’t have normal fingernails, they have thin claws, like cats – which is why they wear gloves ALL THE TIME, even indoors.

  • They are bald as a boiled egg

o    But many choose to wear very realistic wigs –don’t be fooled!

  • They have large nose holes

o    Real witches have an amazing sense of smell due to their very large nose holes – they can smell a child from across the street. And the cleaner the child, the easier they are to smell.

  • Their eyes change colour

o    If you look carefully at a real witch’s eye, you will notice the pupil changes colour – it will send shivers down your spine.

  • They have no toes

o    Real witches have feet with square ends – but they try to hide this by squeezing their feet into pretty shoes. Watch out for them limping!

  • They have blue spit

o    Real witches have spit so blue they can even use it to write with it.

Whilst you’re at Tatton Park,  head to The Farm and collect your conker from the Witches’ Tree. The whole family can join in a creepy and chilling conker challenge.  To top off the fun at the Farm there’s gazillions of fun to be had taking part in the Fantastic Mr Fox Farm trail.

Tatton Park is is bringing Roald Dahl’s imagination to life, with a host of children’s trails and events for all the family. Join Danny the Champion of the World in the gardens, Fantastic Mr Fox at the farm and Matilda in the mansion and you’ve got to be careful of The Enormous Crocodile out in the parkland!

The Witches at Tatton Park

This October half term is the perfect time for an autumnal visit to Tatton Park to catch the Roald Dahl themed activities and exhibitions. What better way of celebrating Halloween but by visiting The Witches at Tatton Park!

Get a Totally Tatton Twit Ticket and enjoy discounted entry to 3 of the Roald Dahl attractions. Family £27.50, Adult £11, Child £5.50. Car entry £6.

Halloween Crafts – Making Spooky Lanterns

It has become something of a tradition that we have a little Halloween party each year. We schedule it during half term so it gives the kids a chance to get together and have fun, and us mums get to catch up with each other. I provide the house and some basic drinks and snacks, the other mums bring extra snacks, craft activities and games, one even taught a dance routine last year! In preparation for the party we’ve started doing some Halloween crafts at home and making some things to decorate the house with for the party.

We were sent a pack of four Halloween lanterns to make from Baker Ross. They have a really interesting selection of Halloween crafts to make and I particularly like the “day of the dead” themed crafts which might be more enjoyable for older children.

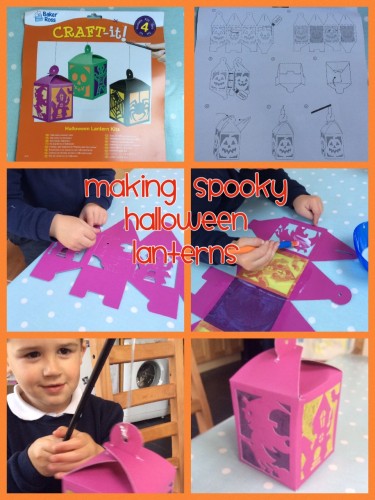
There were four different designs of spooky lanterns in the pack on different coloured card. The designs were punched out of the card and we needed to push out the design and glue the “stained glass” tissue paper on the inside of the lantern windows. This was really easy and good practice for little fingers doing a semi-fiddly job.

My top tip would be to fold the creases of the spooky lanterns where they have been scored before you start gluing and sticking, if you pre-fold them so they’re ready it makes things much easier later on.

halloween crafts

Once you’ve glued the tissue paper stained glass into place you should leave it to dry for a few hours. Then the instructions say to glue the flap on the lantern in place to create the box shape. We glued ours, but in the future I’d probably use double sided sticky tape – much easier, quicker and less sticky. 

Once the glue is dry, following the instructions, fold the lantern together and affix the stick and glittery string. You can pop an LED tea-light in if you like, but I think it looks rather fab on its own. We’ll make the rest of the lanterns and hang them from the ceiling for our party! 

The boy really enjoyed making these with me. The instructions were clear, but he did need a grown up to help guide him and to do some of the tricky folding. He loved the result though and proudly showed off his lantern to everyone who would look. This was a great Halloween craft activity, something different for us to do which we both enjoyed!

Budget but brilliant Halloween Party

It’s half term, all of my friends have small children, they’re bored. They all like pizza, cake and dressing up, there’s a really simple and cheap way to keep them entertained for an afternoon – have a Halloween party.

Halloween Party

Our Halloween party was a pretty huge success, but parties can be time consuming and expensive to set up, so we decided to spread the cost, stress and workload. I provided the space, some basic snacks and drinks and we “made” our own pizzas.

Halloween Party

Pizzas are a brilliant thing to do at kids parties, just get some supermarket basics small pizzas (cost about 50p each) then chop up a selection of toppings, we did cherry tomatoes, mushrooms, ham, pineapple and extra cheese, but you can use whatever you like. It’s a cheap way to feed them and it gives them a little activity to get involved with. (Tip, write the child’s name on a strip of greaseproof paper and slip it under the pizza before cooking, it’ll help identify which pizza belongs to which child).

My friend Sarah brought a big bag of fruit and inspired by Pinterest made some banana ghosts, satsuma pumpkins and apple and marshmallow mouths. They looked brilliant and the satsuma pumpkins were especially popular.

Halloween Party

Blogger chum Liz (aka Expression Confession), was head of baking and arrived with a stunning four layer sponge which she’d made and spookily iced with her two girls. She also brought an array of shop bought Halloween party cakes and treats.

Lucy, mother of two gorgeous boys, who is calm beyond measure and a primary school teacher, was in charge of crafts. After we’d scoffed our haunted pizzas she made scary spiders web pictures with the kids, it was a nice bit of focussed quiet time during the afternoon, the pictures are really effective too.

Halloween Party

My friend Jane led the party games; there was pass the parcel, musical statues, a dance routine to “Let it go” and then some raving to indie classics with glow sticks (that might have been for my benefit).

Dressing up was optional, though those who did really got into the spirit of the occasion and we had a vampire, a cat, a couple of witches and fairies as well as a small team of skeletons. The costumes had been bought from supermarkets and pound shops, my little vampire cost under £5 to dress.

I decorated the kitchen area fairly sparsely, there were a couple of 99p pumpkin garlands and a cheap battery powered pumpkin lantern from B&M Bargains. I created a little pumpkin patch using some squashes we’d grown ourselves and some pumpkins we’d been given and we’d carved.

Halloween Party

Individually we’d spent a little but not a lot. We spread the cost and the work and we all managed to have a nice time. It was really chilled out but lots and lots of fun. I think opening a bottle of prosecco before noon also raised our spirits. More importantly all the children had a really great time. It’s a party that will take a lot of beating.

My Autumnal Top Ten

I love autumn, it’s my favourite season, or my least favourite season, I’m still undecided. So in the style of a teenage girl doing a pros/cons list on a potential boyfriend, my favourite things about autumn are…

1. Kicking through crunchy leaves on walks
2. Hot chocolate with optional whipped cream and marshmallows
3. Warm snuggles under a blanket
4. Halloween parties
5. Stew and buttery mash
6. Rainy day crafting with the small boy
7. Watching firework displays from the bedroom window
8. Collecting conkers
9. The evening sky in autumn is often incredible
10. Stodgy, happy puddings with lashings of custard.

But I really hate autumn for these reasons…

1. Rain, endless rain
2. The dark
3. It’s cold
4. Slippery leaves on the pavement
5. Falling conker concussion
6. Arguing over putting the heating on
7. The resulting heating bill
8. Diets are hard, like really hard, I want sticky toffee pudding
9. It’s too cold to go out and exercise, I wanna stay under the blanket
10. Stupid fireworks, it’s not November 5th yet

I could go on, but I won’t, that angry nerve in my eye is twitching again. I’m still undecided. Autumn definitely is a love/hate season for me.

Autumn