Easter Crafts for Kids (and grown-ups too!)

Easter has “crafts” written all over it. There are so many Easter crafts to make, from Easter cards to Easter bonnets and beyond. Easter has the benefit of having a long Bank Holiday weekend as well as a couple of weeks off school for the holidays. That means there are an awful lot of hours to keep the kids occupied, crafting is a great way to fill an hour or two, especially if they just need a bit of quiet time, concentrating on a task and creating something lovely.

We got cracking with some Easter Crafts over the weekend. We all sat down and decorated these Egg Mosaic Baubles from Baker Ross. The pack contains everything you need to decorate four of the polystyrene eggs, including the eggs, a selection of sticky squares, ribbon and plastic pins.

Easter crafts

It’s quite fiddly to peel the backing off each individual square, so I peeled them off in rows or blocks, stuck them on the back of my hand and peeled them off as I needed them. The small boy didn’t like the idea of doing neat rows, so he stuck his on randomly, which I really like, and for some reason it made me think of Tetris the computer game.

Once the eggs were covered in the mosaic stickers I pinned the ribbons in place and hung them on a plant. I think they’re quite lovely and the certainly brighten the place up. The small boy is always so proud of his crafts and can’t wait to show them off to anyone who will look.

Later that day I was flicking through a craft magazine when I saw something I recognised. The Spring Blossom Tree kit from Baker Ross. Inspired, I got the kit out of our crafts box and made my first (and rather lovely) blossom tree.

easter crafts

The instructions are really clear and easy to understand. The tree, blossom and stand are all made from foam pieces, you stick the glittery blossom onto the plain coloured blossom and stick that onto the tree, and the stand just slots together. It’s very simple and very effective. I’m a sucker of cherry blossom, whether it’s made of foam or not.

We’ve got lots more Easter crafts and things to do over the next few weeks, so do keep an eye on our Instagram feed for new ideas and inspiration!
Valentine’s Day Crafts & Activity Sheets

With Valentine’s Day just around the corner, the small boy and I sat down for an afternoon of Valentine’s Day crafts and activity sheets to get us into the spirit of things. Generally Hubs and I don’t much go in for too many hearts and flowers, we’ve been together since 1995 so we’ve seen more Valentine’s Days together than most, but a heartfelt card and a small token gift is always the order of the day.

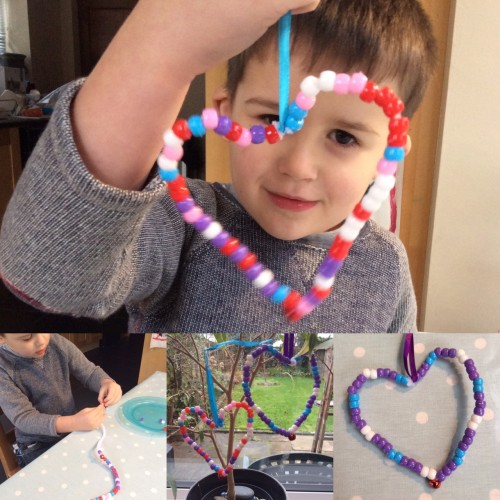
We’d already started to make some cute heart shaped decorations using a heart decoration bead kit from Baker Ross. The kits include some nice long pipe-cleaners and lots of colourful beads. You thread the beads onto the pipe-cleaners and then bend into a heart shape. The kit comes with a little bell you can attach to the heart and some ribbon so you can hang it up. It was a lovely, fun activity which we did together. It was also great for helping to develop his fine motor skills which are essential with helping him to learn to write.

Valentine's Day Crafts

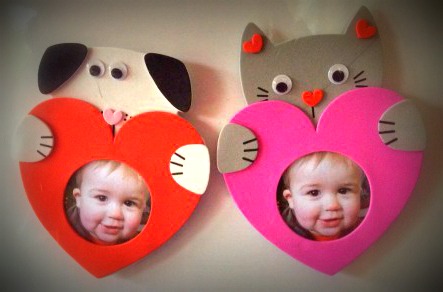
A reasonably quick but fun craft we did was to make these heart pets photo frame fridge magnets. Again these are from Baker Ross and they’re really easy to put together. The foam pieces and googly eyes all have peel off backs, so you just peel everything off and stick it together. The small boy enjoyed putting the frame together and making his doggy. He said he’s going to give his frame to Grandad on Valentine’s Day, because he loves him *heart melts*.

Valentine's Day Crafts

Again, the peeling and sticking actions are all great for those fine motor skills, and for exercising his pincer grip, we can’t get enough of that kind of thing at the moment.

Once we’d put our craft box away, we decided to have a go at some of the Valentine’s Day activity sheets we’d printed off from Twinkl, including the Valentine’s Day worksheet and the Valentine’s Day word and picture matching worksheets. These went down very well with the boy, we started with the word and picture matching, he spelt out every word and we looked at the pictures to see which we thought might match the word, he loves this kind of activity at the moment so I was glad we had a couple of sheets of these to do.

Valentine's Day Crafts

The worksheet was a little more challenging for him, he’s not a confident writer, so together we thought about some of the questions and how we might answer them. He verbally listed everyone he loved (dogs first, naturally) and then said his best friend was Daddy. He was getting tired by now, so we called it a day. I didn’t want to push things as that can be counterproductive. It was time for a cuddle and a walk in the park!

Valentine's Day Crafts

We both love our craft afternoons together. It’s lovely to see him focus on a task and enjoy sitting with me. These quiet moments with him are probably the highlight of my week. I think I know who my Valentine is this (and every) year.

Christmas Crafts: Make a Baker Ross Reindeer Crown

We were sent this reindeer crown from Baker Ross for review purposes. All images and opinions are our own.

Now the weather has taken a decidedly wintery turn I’m starting to get into the Christmas spirit. This weekend was an especially cold one, the small boy had a nasty cold and we decided to stay in, cosy in front of the fire and have a lazy weekend. Keen to get cracking with some Christmas crafts we busied ourselves by making a reindeer crown using hand prints and we were pleased with the results.

reindeer crown

The reindeer crown kits are available from Baker Ross and come in packs of 4 or 16. The packs contain everything you need to make the crown, except for glue, though we used double sided sticky tape because it’s quicker and there’s less mess than with glue.

The instructions are really easy to follow. Draw around your hands and cut out your hand print shape. I did the cutting because the small boy is terrifying with scissors or anything with a blade. The instructions suggest you use glue to stick the cut our hand shapes onto the headband; but I used double sided sticky tape for this. The other pieces, the ears, the reindeer hair and the holly and berries are self-adhesive, so the small boy peeled the backing paper off these and stuck them onto the headband.

Once he had finished he very proudly wore it around the house for a few hours. I think these make a nice alternative to the paper cracker crowns we are forced to wear for Christmas dinner; so I might make myself one to wear on Christmas Day.

reindeer crown

There was some parental supervision required with the cutting out of the hand shapes; but other than that he did the rest himself. It was something he enjoyed doing, he likes peeling and sticking things. It was pretty simple, but it kept him interested and entertained for a while. Another good and fun Christmas activity from Baker Ross!

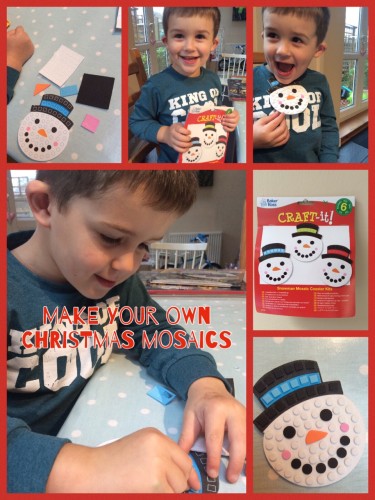
Christmas Crafts – Making Snowman Mosaics

It may still only be November but I’m already starting to feel a bit Christmassy, I think it’s probably down to all the planning ahead of time so I’m less stressed later. They must be talking about it at school too as the small boy is all excited and ready to get stuck into the festivities. We’ve been busy baking Christmas cakes and starting to think about presents and decorations. One wet afternoon we sat and made some snowman mosaic coasters which I’ve decided would also look great as Christmas decorations.

The snowman mosaic coaster kit from Baker Ross contains everything you’ll need – a pre-cut snowman with a selection of foam stickers to stick on and decorate your snowman. If like me you want to turn the finished snowman into a Christmas tree decoration you’ll need a bit of ribbon and some sticky tape too.

Snowman Mosaics

Popping the foam stickers out of their sheet and peeling the backing off them is quite fiddly for little fingers, so it’s good practice for the small boy who has recently turned five. He did very well and managed to do most of them himself, only asking me to help him with the white circles, probably because there were lots and lots of them. This is a great task to help with hand-eye co-ordination and to improve dexterity and finger strength, which can really help with learning to write.

It’s a really simple kit and the snowman mosaics look really effective, too good to just be used as coasters, which is why I’m going to attach some ribbon so we can hang them on the tree once that’s up.

The snowman mosaics kits are from Baker Ross and come in packs of 6 or 18. It’s a nice tidy activity to do, it doesn’t require any setting up or any mess, just have a bowl ready to put the bits of backing paper in and you’re sorted. In fact I’ve put one in my bag for when we go out, it’s something we can do together while we’re having lunch that doesn’t involve an ipad. 

The thing I liked most about making the snowman mosaics was the chance to chat. We were both industriously beavering away on our snowmen, chatting away about school, Christmas and his recent birthday, and occasionally bursting into happy song. It was a fun half hour on an otherwise grim November day.

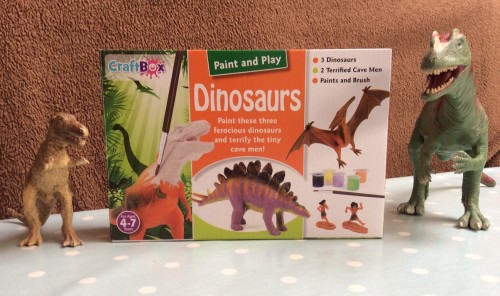
Review: Paint and Play Dinosaurs from Interplay

The small boy has recently been learning more about dinosaurs. We’ve been reading stories about them and watching Andy’s Dinosaur Adventures on CBeebies together. We’ve been talking about what they’d sound like, how they’d walk, fly or swim and what their skin would look and feel like. With  almost perfect timing we received the Paint and Play Dinosaurs set from Interplay to test.

paint and play dinosaurs

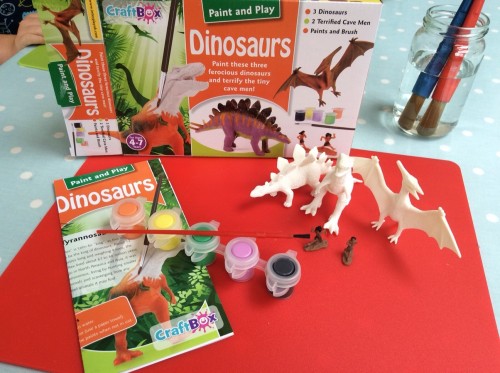
The Interplay Paint and Play Dinosaurs set contains three prehistoric dinosaurs to paint, two tiny terrified cavemen, a set of paints, a paintbrush and a dinosaur fact sheet to learn more about the dinosaurs you’re decorating.

paint and play dinosaurs

The set contains a T-Rex, Pterodactyl and a Stegosaurus. The dinosaurs are white and you can paint them however you want. I chose to paint the Stegosaurus and the small boy went for the T-Rex and the Pterodactyl. I chose to copy the markings on the fact sheet as best I could, he chose to paint them in his own inimitable style.

paint and play dinosaurs

We had tremendous fun painting our dinosaurs and talking about the different colours they might be. There was plenty of paint to use and it was all washable (which was good news for his clothes and my tablecloth). There was only one fine paintbrush, so I needed to raid my supplies, so that’s worth noting if you’re going to paint your dinosaurs as a group activity.

Painting them kept us occupied for a good half hour or so, plus there was lots to talk about and the fact sheet helped us find out more about the fearsome beasts we were cheerfully painting purple and orange. We had to leave them to dry before we could play with them properly, so we read some of his dinosaur books while we waited.

Paint and Play Dinosaurs

Ok, so our dino-depictions may not be 100% factually accurate, but they were 100% fun to do. It was a nice focussed activity which he enjoyed doing, but at the same time worked his pencil (paintbrush) grip, his hand-eye co-ordination and gave us the opportunity to have a discussion all about dinosaurs, where they came from and what happened to them.

The Paint and Play Dinosaurs set from Interplay is suitable for ages 4-7. The small boy is nearly five and I think this is spot on for him. There are quite a few different sets to choose from in the Interplay Craft Box line, so I’ll be choosing something else for him to paint for our next rainy afternoon together.

Note: We were sent the Interplay Paint and Play Dinosaurs set free of charge for review purposes. All images and opinions are our own.

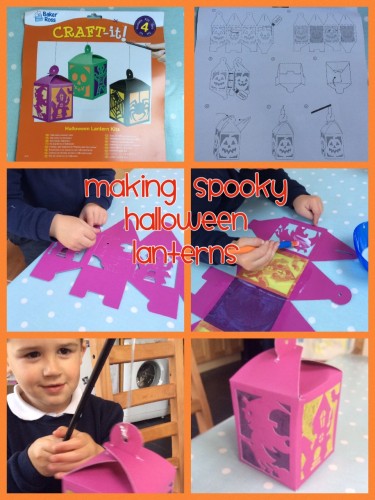
Halloween Crafts – Making Spooky Lanterns

It has become something of a tradition that we have a little Halloween party each year. We schedule it during half term so it gives the kids a chance to get together and have fun, and us mums get to catch up with each other. I provide the house and some basic drinks and snacks, the other mums bring extra snacks, craft activities and games, one even taught a dance routine last year! In preparation for the party we’ve started doing some Halloween crafts at home and making some things to decorate the house with for the party.

We were sent a pack of four Halloween lanterns to make from Baker Ross. They have a really interesting selection of Halloween crafts to make and I particularly like the “day of the dead” themed crafts which might be more enjoyable for older children.

There were four different designs of spooky lanterns in the pack on different coloured card. The designs were punched out of the card and we needed to push out the design and glue the “stained glass” tissue paper on the inside of the lantern windows. This was really easy and good practice for little fingers doing a semi-fiddly job.

My top tip would be to fold the creases of the spooky lanterns where they have been scored before you start gluing and sticking, if you pre-fold them so they’re ready it makes things much easier later on.

halloween crafts

Once you’ve glued the tissue paper stained glass into place you should leave it to dry for a few hours. Then the instructions say to glue the flap on the lantern in place to create the box shape. We glued ours, but in the future I’d probably use double sided sticky tape – much easier, quicker and less sticky. 

Once the glue is dry, following the instructions, fold the lantern together and affix the stick and glittery string. You can pop an LED tea-light in if you like, but I think it looks rather fab on its own. We’ll make the rest of the lanterns and hang them from the ceiling for our party! 

The boy really enjoyed making these with me. The instructions were clear, but he did need a grown up to help guide him and to do some of the tricky folding. He loved the result though and proudly showed off his lantern to everyone who would look. This was a great Halloween craft activity, something different for us to do which we both enjoyed!

Autumn Crafts – Make your own Autumn wreath

We went for a little walk yesterday around the park and we looked at all the different colours of the leaves. It was a mellow, autumnal day, still warm but with a slight seasonal dampness. The slow death of summer and the beginnings of decay were all around us. It was a good chance to talk about change and the seasons. Inspired by this we came home and made an autumn wreath. It was really simple and lots of fun to do. Why don’t you have a go too?

autumn wreath

You will need:
One paper plate
Orange paint (plus paintbrush etc)
Leaf foam stickers
A short piece of ribbon or string
Sticky tape
Scissors

A few days before our walk we painted our paper plates orange, we had to give them a couple of coats of paint and we left them to dry. Once they were dry I cut out the inside of the plate, leaving a ring which we could decorate.

We sat down with our packet of leaf foam stickers from Baker Ross (currently available at a bit of a bargain price), and got sticking. The pack contains six assorted leaf designs in autumnal shades. Which gave us another chance to talk about leaves, autumn and the seasons.

Once we’d decorated our autumn wreath to our satisfaction, I cut a loop of ribbon and stuck it to the back of the paper plate ring with sticky tape, and we proudly hung our autumn wreath up on the wall.

It’s a really, really simple craft activity, but I think the result is quite effective and it’s a lovely way to brighten up the house a bit now the nights are beginning to get shorter. Roll on Christmas! (Too soon?)

Autumn Crafts – Painting Hedgehog Tealight Holders

It may be September, but the world has suddenly slipped into autumn. Autumn is one of my favourite seasons, full of mellow fruitfulness, crunchy leaves and an excuse to get our open fire lit and roaring. The small boy and I have been noticing the changes around us on our walks, the berries in the hedgerows, the acorns and conkers starting to fall from the trees and the busy squirrels stocking up for the lean winter months. This lead us to start talking about hibernation and the snuffling, shuffling hedgehogs which we rarely see by often read about.

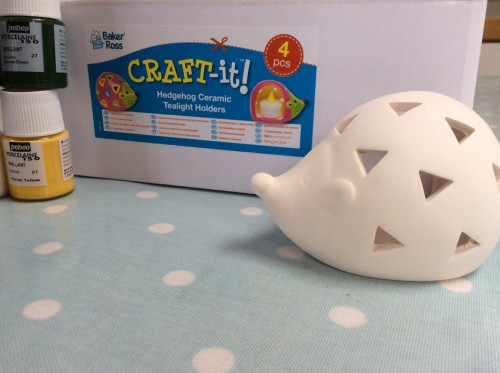
We were sent a box of ceramic hedgehog tealight holders to paint from craft company Baker Ross, so one afternoon after our autumnal walk we sat down and painted them up.

Hedgehog Tealight Holders

The box contained four plain white ceramic hedgehog tealight holders and we used some paint which we were sent to decorate them. A box of four ceramic hedgehog tealight holders currently costs just £4.40, which I think is good value and you can paint them up as presents for people.

Hedgehog Tealight Holders

I chose to paint mine blue with multi-coloured spots and the small boy wanted to paint his black and red. As you can see from the picture he was really focused on the task and he sat and painted his hedgehog for about half an hour or so. This is a great craft activity which works to strengthen his hand muscles, improve his hand-eye co-ordination and his attention to detail.

Hedgehog Tealight Holders

While we were painting we chatted away about hedgehogs and I looked up a few hedgehog facts for him. Did you know….?

  • A baby hedgehog is called a hoglet
  • Each hedgehog has about 5000 spiky spines, each one falls out after about a year
  • Hedgehogs hibernate in the winter, they eat as much as they can and then find a cosy nest to curl up in for the winter around October
  • A hedgehog is nocturnal and only comes out at night to forage for food
  • A hedgehogs favourite food is slugs – yukky!

Hedgehog Tealight Holders

Here are our finished hedgehog tealight holders. We’re very proud of them. They were easy to paint and I think they look really good. Despite my initial thought that the black and red hedgehog might look a bit gothic, I think he’s managed to create quite an interesting effect. He’s incredibly proud of his creation and loved to show it off to visitors and enjoys me lighting it at night.

Craft Kits: Easy Rugby World Cup Coaster Craft

The Rugby World Cup begins on 18th September; whilst for me the excitement might pass me by, for the boys in my life this is a time of odd-shaped-ball delight! Don’t get me wrong, I live next door to a rugby club and I realise there’s much to admire about this noble sport (mainly thighs); so I’m happy to get involved in a bit of pre-tournament crafting fun. To celebrate the Rugby World Cup, the boy and I sat down to make some Rugby World Cup Crafts.

We used the Rugby Coaster Kits from Baker Ross. These kits contain colourful printed foam coasters and foam stickers which you can make rugby themed coasters with. You can get them in packs of 6 or 18 coasters and they’d be a good craft to do for any rugby fan; world cup or not!

Everything you need to make the coasters is in the pack. This is helpful, as there’s nothing worse than sitting to do a craft and discovering you need something extra to complete it.

Rugby World Cup Crafts

The coasters are pre-printed so you know where to stick your stickers. If you wanted to free-style it you could just turn the coaster over to the blank side and do your own design.

We started by writing our names on our personalised coasters. This is good practice for him; he starts school this month and has been practicing writing over the summer. I decided to make a coaster for Daddy to put his beer soft drink on while he watched the Rugby World Cup.

We then set to work sticking the foam stickers on the coaster. This is great to improving his dexterity and hand strength; popping the foam stickers out of the sheet and peeling off the backing can be quite fiddly for little fingers. He enjoyed the challenge and did rather well with it all.

Tip: Whenever we do something involving peeling little bits of backing paper off I always make sure there is a bowl to put our rubbish in; it stops the kitchen being covered in tiny bits of paper and it’s much quicker to tidy up. Plus it encourages the small boy to be a bit more considerate with his mess.

Rugby World Cup Crafts

As you can see he enjoyed making his Rugby World Cup coaster. It kept us both busy and focussed on the task in hand for half an hour; and he’s rather proud of his creation.

You can find more of our craft posts here!

We were sent these crafts for review purposes. All images and opinions are our own.

Kids Crafts: Summer Snap Bracelets with Baker Ross

I got a bit excited recently when I was invited to join the Baker Ross Blogger Network. I got even more excited when a big box of craft supplies arrived on our doorstep, just in time for the loooong summer holidays. I squirrelled it away out of sight and waited until a rainy day to get crafty with the small boy.

snap bracelets

There was so much in the box, as you can see above, lots to keep me and the small boy busy for any number of rainy days, but project number one was to decorate our own snap bracelets.

In the box was a packet of snap bracelets and a packet of rainbow stickers, I had in our existing stash of craft materials a packet of stick on foam letters, so we set to work making personalised ID snap bracelets.

snap bracelets

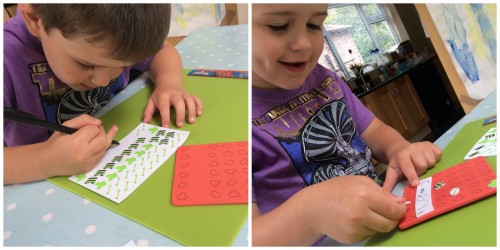
The small boy is four and he’s getting on really well at school, but his teacher did suggest we should do more craft with him to strengthen his hands, work his pincer grip and to encourage his fine motor skills, crafting is a really good way to do that, plus it’s a really nice way to spend some time with the boy during a damp afternoon.

As you can probably see from the pictures below, peeling the fiddly backing off the rainbow stickers and the letters was a good test of his fine motor skills and patience. Finding the letters of his name in a big pile of foam letters was a brilliant opportunity to talk about the letters of the alphabet, the letter sounds and what words begin with that letter.

snap bracelets

He really enjoyed making his snap bracelet, he was really proud to show it off to everyone and liked to snap it around his wrist. Not to be outdone, I joined in with the activity and made this snazzy little number, which he insists I wear too!

Snap Bracelets

Making these snap bracelets was a really simple craft activity, it was ideal for the time we had available and was a lovely way to talk about what we were doing and why, as well as ticking all the boxes for his teacher too. There are plenty more things in our summer survival craft kit from Baker Ross, we’ll be playing, experimenting and crafting with those next week, so watch this space!

Note: We are part of the Baker Ross Blogger Network and have been sent these craft items free of charge in return for a blog post about what we made. All images and opinions are our own.