Crafts: Celery Rose Print Valentine’s Cards

Make hearts flutter this Valentine’s Day with these Celery Rose Print Valentine’s Cards and gift wrap!

Crafts: Celery Rose Print Valentine's Cards

The first Valentine’s cards were sent in the 18th century. These were handmade cards, covered in romantic symbols of the age, such as flowers and love knots. The cards often included riddles and poetry. Cards were slipped secretly under the door of your beloved.

These days, although cards and poetry are often emailed to those who have made your heart flutter, a handmade card is still a lovely thing to give and to receive and in so many way, infinitely more preferable.

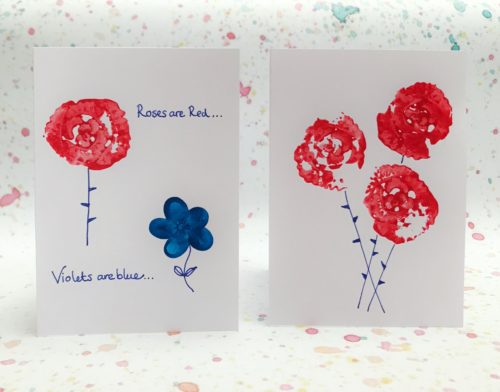
With Valentine’s Day just around the corner, we had a weekend of painting and experimenting with printing with various things. I’d seen people printing roses with celery stalks on Pinterest and decided to give it a try – it really works!

How to make Celery Rose Print Valentine’s Cards

You will need:

Some blank cards
The root end off a bunch of celery
Red paint
Blue paint
A nice black pen
A plastic plate, or somewhere to blob your paint

Crafts: Celery Rose Print Valentine's Cards

How to make your Celery Rose Print Valentine’s Cards:

Tidy the end of your celery with a sharp knife so that it’s flat. Put a dollop of red paint on your plastic plate, dunk your celery in it, scrape off any excess paint on the edge of the plate and practice printing your roses on some scrap paper until you get the right effect. I found not having too much paint on my celery was best.

Once you’re happy with your printing, take your blank greetings cards and print your roses on them. I did two designs, a bouquet of roses on one; and a roses are red, violets are blue on the other. To print the violets I get my son to dip one of his fingers in blue paint and showed him where to press his fingers to make petal shapes.

Crafts: Celery Rose Print Valentine's Cards

We hung the cards up to dry for a few hours, whilst they were drying we took some brown packing paper and he set to work printing roses and violets in a repeating pattern until the paper was covered. The effect is really very good, and ideal for wrapping Valentine’s gifts. Leave your gift wrap for a few hours to dry, when it’s dry you can wrap your gifts.

Once the cards were dry, I grabbed a nice inky pen and drew thorny stems and embellished the violets with leaves and a stamen. All that was left to do was for us to write romantic messages to the people we secretly, or not so secretly admire.

If you enjoyed this, you might also like to try these other Valentine’s Crafts:

Crafts: Celery Rose Print Valentine's Cards

Learning: Take the Valentine’s Lego STEM Challenge

We are getting quite into STEM crafts and activities at home now. We’ve been busy with jellybean architecture, made a sponge house to grow cress on and this week we’ve been using the Valentine’s Lego STEM Challenge Cards from Mrs Mactivity and seeing what we could create.

Lego play is well known for having all kinds of great developmental benefits, these include –

  • Promoting fine motor skills
  • Encouraging team work
  • Improving creativity
  • Developing problem solving and mathematical thinking
  • Improving communication skills
  • Developing lateral thinking and planning skills

Crafts: Valentine’s Lego STEM Challenge Cards

Developing STEM (Science, technology, Engineering and Maths) skills and encouraging an interest in these areas is so important for all children. I’m lucky that my son is very keen on science and engineering; not so much maths, but we’re working on that. He absolutely loves playing with Lego too, so these Valentine’s Lego STEM Challenge Cards were absolutely perfect for him.

We printed out the Valentine’s Lego STEM Challenge Cards and gathered a few boxes of Lego together. We each chose a challenge and got to work. I made the heart, the present and spelled out the word LOVE. He did an arrow, a heart and he also wrote the word LOVE in Lego.

Learning: Valentine’s Lego STEM Challenge Cards

It was really interesting for us to do something a bit different with our Lego and nice to build something which wasn’t a Lego City or Ninjago set. I can see how it worked his problem solving muscles, trying to find the right piece to go in the right place, picking and choosing colours and carefully following the visual instructions on the cards.

I think it’s also helped to show him that he doesn’t just have to build the sets, that he can be a little more creative with his Lego. He especially enjoyed writing with it and went on the write his name and mine. This is definitely something we can build on together at home.

Learning: Valentine’s Lego STEM Challenge Cards

This was most definitely a fun thing to do together and the learning is obvious to me, but it’s just fun for him!

The Valentine’s Lego STEM Challenge Cards are available to download on the Mrs Mactivity website. You can also find a good selection of other activity sheets there – all designed to be fun and educational too!


Learning: Valentine’s Lego STEM Challenge Cards

Valentine’s Day Crafts: 52 Reasons Why I Love You

After 23 years of Valentine’s Days with my husband, I’m not saying romance is dead, but the budget has been somewhat slashed. We have for a number of years had a £5 gift and a card policy; which means that Valentine’s Day often requires a bit of creativity. His favourite of the homemade Valentine’s gifts I’ve made for him was the 52 Reasons Why I Love You pack of cards. It’s a favourite of mine too, because it’s so darn cute!

Valentine's Day Crafts: 52 Reasons Why I Love You

It’s remarkably easy to put together. All you need is a pack of cards, a permanent marker and a list of 52 Reasons Why I Love You. That last one is the tricky one. My advice would be to take a few days to list some of the reasons why you love your partner. I found that I could find 30 or so reasons pretty easily, but then I started to write things like “I love you because you take the bins out”; which is a valid reason but lacks a little romance.

You can use a normal pack of cards. I found a nice heart shaped pack of cards and used them, but you can find a similar pack here on Amazon. Using your list of the 52 Reasons Why I Love You; neatly write a reason on every card in the pack. You may want to write the biggest and best reasons on the heart cards, and make sure you write it on the suit side, not the patterned side of the cards.

Here are a few of my reasons to give you an idea of what I wrote –
  • You cook amazing meals
  • You work so hard for our family
  • You’re ace in every single way
  • You’re generous with everyone
  • I love snuggling with you
  • I’ve known and loved you forever
  • I love the way you tuck me in at night

This 52 Reasons Why I love You gift is such a lovely thing to give someone. I know my husband looks at the cards often. The reasons are full of our shared history, our shared interests, our family and all the special things about him which I love and appreciate.

It’s such a small, inexpensive and simple gift. But it’s something that your partner will probably really appreciate and treasure for many years to come.

See what other Valentine’s Day crafts you could make here.

Valentine's Day Crafts: 52 Reasons Why I Love You

Crafts: Easy Valentine’s Paper Heart Wreath

This month Craft Merrily have set the Bostik Bloggers the task of creating a craft for Valentine’s Day. Last year I made a lovely découpage candle holder for Valentine’s Day, but this year I thought I’d make a Paper Heart Wreath.

I really like making paper wreaths, we have a place in the kitchen where I like to hang the seasonal wreaths I make. This is a little different to my usual style, this Paper Heart Wreath is put together with easy to make 3D hearts. It’s really quite easy to make, it looks very effective and it’s a lovely Valentine’s decoration.

Crafts: Easy Valentine's Paper Heart Wreath

How to make a Paper Heart Wreath

You will need
Colourful paper, A4 size
Scissors or a craft knife
A ruler
Bostik Glu Dots
A length of ribbon

How to make your Paper Heart Wreath

Using a ruler measure the long side of your piece of paper and divide that length by 7. Measure out 7 equal widths of paper and carefully cut into strips using a pair of scissors or a craft knife. If you’re doing this with children then you may want to be in charge of this bit.

Fold each strip in half, make sure you’ve got a neat, crisp fold here, this will be the pointy bottom of your heart shape.

Crafts: Easy Valentine's Paper Heart Wreath

Using a glue dot, stick a dot at the end of your strip and bend the edges together to create the heart shape. Press the paper together so the glu dot is holding the shape firmly in place. Do this with all 7 hearts.

Crafts: Easy Valentine's Paper Heart Wreath

Take two hearts and stick them together using the glu dots. Then take your ribbon and using the glu dots stick the ribbon to either side of the two hearts. Make sure the ribbon is positioned so the ends will be hidden between the hearts. Using the glu dots, carry on sticking the hearts together until all 7 hearts are stuck together.

Crafts: Easy Valentine's Paper Heart Wreath

Your paper heart wreath is now finished and you just need to find somewhere to hang it!

I am a Bostik Craft Blogger and I was sent the materials to create this craft from Craft Merrily. 

Check out my other craft tutorials here!

Crafts: Easy Valentine's Paper Heart Wreath

Valentine’s Crafts: How to make a Découpage Lantern

I am part of a craft group who meet monthly. Each month we try something different and last month we did a spot of découpage. It was really simple, given that it’s essentially sticking pieces of paper onto something. This month I’ve been thinking about crafts for Valentine’s Day and I thought I’d make a découpage lantern, and it turned out pretty well. Here’s what I did.

How to make a Découpage Lantern for Valentine’s Day

You will need:
Two sheets of tissue paper
One clean jam jar
Some PVA glue (I used Bostik White Glue)
Some ribbon or coloured rafia craft twine

Crafting: Making a Découpage Lantern for Valentine's Day

Tear up one sheet of the tissue paper, choose the paler colour. Paint the jam jar with the PVA glue and cover in the ripped up pieces of tissue paper. If you layer it up so that all of the jar is covered, but some parts have several layers it will create a nice effect when the candle is lit.

Crafting: Making a Découpage Lantern for Valentine's Day

Once the jar is covered with tissue paper, take your darker paper and cut heart shapes in varying sizes.

Crafting: Making a Découpage Lantern for Valentine's Day

Glue the hearts over the jar however you like. I covered some of the sides of my jar with big hearts and others with little hearts. Leave the jar to dry for a few hours or overnight.

Crafting: Making a Découpage Lantern for Valentine's Day

Once the jar is dry you can tie a ribbon around the top which finishes it off nicely and makes a really pretty little centrepiece for your Valentine’s Day dinner table, or just some lovely mood lighting for a romantic night in front of the TV.

Crafting: Making a Découpage Lantern for Valentine's Day

Découpage is really easy and so great for decorating lanterns and votives with. You can découpage almost anything. At my craft club we decorated little boxes which were quite pretty when they dried, but I think it really lends itself to glass and especially glass jars.

If you enjoyed this post, you may also like…

Valentine's Crafts: Make a Découpage Lantern

Valentine’s Day Crafts & Activity Sheets

With Valentine’s Day just around the corner, the small boy and I sat down for an afternoon of Valentine’s Day crafts and activity sheets to get us into the spirit of things. Generally Hubs and I don’t much go in for too many hearts and flowers, we’ve been together since 1995 so we’ve seen more Valentine’s Days together than most, but a heartfelt card and a small token gift is always the order of the day.

We’d already started to make some cute heart shaped decorations using a heart decoration bead kit from Baker Ross. The kits include some nice long pipe-cleaners and lots of colourful beads. You thread the beads onto the pipe-cleaners and then bend into a heart shape. The kit comes with a little bell you can attach to the heart and some ribbon so you can hang it up. It was a lovely, fun activity which we did together. It was also great for helping to develop his fine motor skills which are essential with helping him to learn to write.

Valentine's Day Crafts

A reasonably quick but fun craft we did was to make these heart pets photo frame fridge magnets. Again these are from Baker Ross and they’re really easy to put together. The foam pieces and googly eyes all have peel off backs, so you just peel everything off and stick it together. The small boy enjoyed putting the frame together and making his doggy. He said he’s going to give his frame to Grandad on Valentine’s Day, because he loves him *heart melts*.

Valentine's Day Crafts

Again, the peeling and sticking actions are all great for those fine motor skills, and for exercising his pincer grip, we can’t get enough of that kind of thing at the moment.

Once we’d put our craft box away, we decided to have a go at some of the Valentine’s Day activity sheets we’d printed off from Twinkl, including the Valentine’s Day worksheet and the Valentine’s Day word and picture matching worksheets. These went down very well with the boy, we started with the word and picture matching, he spelt out every word and we looked at the pictures to see which we thought might match the word, he loves this kind of activity at the moment so I was glad we had a couple of sheets of these to do.

Valentine's Day Crafts

The worksheet was a little more challenging for him, he’s not a confident writer, so together we thought about some of the questions and how we might answer them. He verbally listed everyone he loved (dogs first, naturally) and then said his best friend was Daddy. He was getting tired by now, so we called it a day. I didn’t want to push things as that can be counterproductive. It was time for a cuddle and a walk in the park!

Valentine's Day Crafts

We both love our craft afternoons together. It’s lovely to see him focus on a task and enjoy sitting with me. These quiet moments with him are probably the highlight of my week. I think I know who my Valentine is this (and every) year.