Crafts: Making your own Christmas Stocking

Christmas is peak crafting season for me. I love making things, or trying to make things for the house and for my family. Alas my crafts often turn out a little wonky and rustic looking, but for me the thing I enjoy most is the act of crafting, not necessarily the result. This month tried my hand at making a Christmas stocking.

Crafts: Making your own Christmas Stocking

I was sent a box of craft materials to use and it was up to me to decide what I wanted to do. There were all kinds of things in the box, tinsel, a sewing kit, pine cones, glitter glue, decorative robins, string, hessian, and bells.

I began by cutting out a Christmas stocking shape out of the hessian, which I then hand sewed together. This took a little while as I’m not very quick when it comes to sewing by hand. Turning the stocking right side out, I sewed a piece of laced ribbon in a loop at the top to hang the stocking. I stitched the ribbon around the top of the stocking and down over the areas I’d hand sewn, in part to hide the stitched edge, in part because I was going for a really simple look.

I then sewed on some wire craft stars I’d made at my craft class the week before. I left them so they would dangle and sway on the stocking.

Crafts: Making your own Christmas Stocking

To make the wire craft stars I printed out a star shape of the right size. Then I bent some brown paper covered craft wire into a star shape using the template. Using PVA glue, I glued the wire star onto some decorative paper. I used a slightly aged page from a music book. I left the glue to dry overnight and then trimmed around the star. The result was quite effective and could be used in so many different ways. Perhaps as decorations or on Christmas cards.

Crafts: Making your own Christmas Stocking

My simple Christmas stocking was finished and just needed hanging by the fire ready for Father Christmas.

When you make your own Christmas stocking, once you’ve got your basic shape, it’s up to you how you embellish it. You can go wild, or stay simple like me. I really like my brown and cream stocking. My stitching leaves a little to be desired, but you can’t see that and it doesn’t really matter, as long as it holds when it’s full of Christmas goodies!

How would you decorate your Christmas stocking?

Craft Round Up: Five Easy Autumn Leaf Crafts

At this time of year the trees are shedding their beautiful leaves. The pavements and paths are filled with crispy and colourful leaves and they are crying out to be used in crafts. Easy autumn leaf crafts are amongst my favourite kinds of craft, partly because it’s good fun to actually collect the leaves, then sitting down with the boys and having fun crafting something beautiful makes me happy. Here are some of my five favourite ideas for easy autumn leaf crafts.

Autumn Leaf Sand Art

Easy Autumn Leaf Crafts

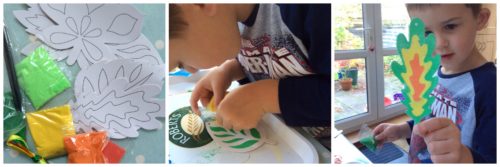
We are firm fans of sand art and we loved doing this fab kit from Baker Ross. My top tip for sand art is to do it on a tray or a piece of paper so you can collect any stray sand to use again later. Sand art kits are fab, just peel the stickers off the leaf and sprinkle sand onto the sticky paper underneath. It requires some concentration and a steady hand, but my five year old loved it and I think he made some very beautiful autumn leaves.

Make your own Autumn Wreath

Easy Autumn Leaf Crafts

This is a great rainy day activity. Using some foam stickers from Baker Ross and a paper plate we made our own autumn wreath which I think looks pretty cool, and he enjoyed making it which is the most important thing.

Making Autumnal Alphabet Wreaths

autumnal alphabet wreaths

This is a craft I did myself (a grown up craft if you will), but you could easily do this with children too. I think this looks fab and it was really good fun to do too, it’s probably one of my favourite easy autumn leaf crafts. You can read my tutorial here.

Create an autumnal woodland wonderland

easy autumn leaf crafts

This is one of those easy autumn leaf crafts which is good to have up your sleeve for a rainy day. It was incredibly easy, but he had the best time making his woodland wonderland, who doesn’t love stickers? These woodland foam stickers from Baker Ross are great. We used them with some of the leftover leaf stickers from our autumn wreath and made our lovely woodland scenes. All I had to do was print out a silhouette of a tree and he did the rest.

Paint your own tree

easy autumn leaf crafts

I’m very fond of this one. We had so much fun going to the park and collecting a big bag of leaves. When we got home we had a hot chocolate and warmed up. We painted a big tree and then stuck leaves on it. This wonderful artwork is still hung up in our kitchen and it makes me smile at the memory every time I see it.

These are my ideas for easy autumn leaf crafts – what do you like to make at this time of year?

Five Easy Autumn Leaf Crafts

I am a Baker Ross Ambassador.

Crafts: Autumnal Alphabet Wreaths

This week it has been dry, crisp and decidedly autumnal. During a walk around my local park I filled a bag with fallen leaves to do autumn leaf crafts with the boy, but as I’d gathered so many I wanted to make something by myself, for myself. So whilst the boys were out feeding the ducks, I spent a happy hour at the kitchen table making autumnal alphabet wreaths.

autumnal alphabet wreaths

These autumnal alphabet wreaths are really easy to make. I’m really pleased with how mine turned out. You can make whichever letter, or letters you want. I chose an A because our surname begins with an A. You could also do any shape you wanted. I’ve got plans to do a few more, maybe a heart and a circle.

You will need:

  • A piece of thick cardboard
  • A pencil
  • Scissors
  • PVA glue
  • A paintbrush
  • Lots of leaves, a variety of shapes and sizes is best
  • A piece of ribbon

To make your autumnal alphabet wreaths:

With your pencil, sketch the letter or shape you will base your wreath on. You can make this as big or small as you would like, mine was around 30cm tall. Carefully cut out your shape, taking care not to lose any fingers. If a child is making this, ideally an adult should do this part.

Before you begin sticking your leaves to your wreath shape, it’s easier to fix on your ribbon. As I knew my shape would be covered in leaves I chose to staple my ribbon to the wreath, but you could tie the ribbon to the top, or make a small hole and thread it through if you prefer.

autumnal alphabet wreaths

Once you are happy with the cardboard base of your wreath, pour some PVA glue into a bowl and in sections paste glue onto the cardboard. As you start to stick the leaves on, dab a little extra glue on each leaf and stick the leaf to the shape. Try and choose an interesting mixture of leaves and cover any gaps. 

I found it useful to stop every so often and leave the glue to set a little before starting the next section. You may also find it helpful to lay a plastic tray or board on top of the leaves for half an hour or so, this will apply even pressure whilst the glue dries a bit and it shouldn’t crush the leaves too much.

autumnal alphabet wreaths

Once you’ve covered your alphabet wreaths, leave them somewhere to dry, preferably overnight. Once dry you can hang them up indoors. I’m really pleased with how mine turned out. It was really effective and would lend itself to lots of different and rather interesting shapes.

Autumn leaf crafts are some of my favorite things to so, I think the colours and textures are so lovely, it’s a shame not to make the most of them whilst they’re so vibrant.

autumnal alphabet wreaths


Easy Ideas for Halloween Crafts

One of my favourite things about Halloween, apart from being given an excuse to dress up, is Halloween crafts. It’s one of those occasions when you and the kids can go all out on the spooky stuff.

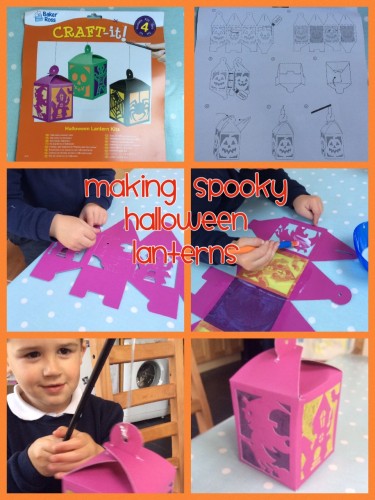
Last year me made a few different Halloween crafts, but our favourites were the Spooky Lanterns from Baker Ross which you can find out how to make here. They are still available this year on the Baker Ross website and they do look really effective.

halloween crafts

This month we’ve been starting to look at some more easy Halloween Crafts. We were sent a selection of Halloween and autumnal themed crafts to try (we will do the autumnal crafts in a separate blog post).

The Halloween crafts we were sent were –
  • Day of the Dead colour in mini gift bags
  • Halloween Dotty Art
  • Halloween Pom Pom Decoration Kits

halloween crafts

Day of the Dead has been very much in fashion for the last few years and is gaining in popularity. Indeed, last year I dressed as a Day of the Dead style zombie bride for Halloween. The little colour in gift bags (there are 6 in a pack) would be a great craft activity for a kid’s Halloween party, then they could fill their bags with sweets and take them home afterwards.

halloween crafts

The Halloween Dotty Art kits would also be great for a Halloween Party (we are going to take ours on holiday with us over half term). The pack contains eight different Halloween designs (Monster, Spider, Cat, Ghost, Pumpkin, Owl, Bat & Skull) and packs of coloured stickers. You then stick the stickers on the spooky design and bring your Halloween picture to life. This kind of thing is great for strengthening little fingers and increasing dexterity, as well as being a fun activity you can do together without creating any mess.

halloween crafts

I love pom pom crafts, so I was pleased to find these Halloween Pom Pom Decoration Kits in my box of seasonal crafts from Baker Ross. The pom pom kit contains everything you need to make a spider, a bat and a pumpkin.

Like most pom pom crafts they are a little fiddly to make and probably need a grown up to get it started and help tie it off at the end. Making pom poms is lots of fun and once you’ve snipped your threads you can start to see your spooky pom pom creature come to life.

The Baker Ross website has hundreds of easy to do craft kids for children and adults alike. Their kits are almost universally well designed and thought out, and there’s something for all ages, abilities and craft interests, often with minimal mess and fuss. For easy Halloween crafts, have a look at Baker Ross for inspiration.

We are Baker Ross Ambassadors.

Crafts: Making simple bunting cards

As a crafter I count myself as an enthusiastic complete amateur. I think often, especially with the crafts I make, simple is often better. I needed to make some fairly quick and simple cards to thank some people who have helped me out lately and I thought I’d make some bunting cards. 

I was sent some card making goodies from Create & Craft TV. They sell online as well as running a popular crafting TV channel – if you’ve not seen it and are interested, you can watch it on their website at http://www.createandcraft.tv/tvschedule as well as on Sky, Freeview etc.

Create & Craft TV

My bunting cards are really simple and quick to make, they’re great for kids to make too and they can create all kinds of designs depending on what kind of scrap paper triangles you use.

Create & Craft TV

You will need –
Blank cards
Scrap paper cut into bunting triangles
Foiled & Die Cut Sentiments
A black felt tip
Glue, I used Pritt Stick

To make your really easy bunting cards –
With your felt tip, draw a slightly downward curved line across your card. Cut your scrap paper into small triangles, mine were about 2cm long. Glue your triangles along the line and decorate with a sentiment, draw a little picture, add whatever embellishments you want.

I kept mine really simple as I think the bunting looks effective enough without too many other things on the card.

Create & Craft TV

As you can see from the two cards I made, the less wiggly line of the two worked better and for future bunting cards I will use a straighter curved line.

Create & Craft TV

There are a full range of craft products on the Create & Craft TV website including papercraft, sewing, baking, jewellery, knitting and much more. I know if you’re anything like me when it comes to craft products, I’m always on the lookout for interesting and versatile new things to use. 

I am particularly taken with the big book of Hunkydory Sentiments, all die cut and foiled ready for popping out and using on your cards. The book contains 620 individual sentiments in a range of styles and colours and I know I’ll be using them for lots of cards this year. 

You can never have too many blank cards to hand and the pack sent to me by Create & Craft TV were great quality and included a mixture of finishes. I was impressed with the variety of card making kit which I received and it’s got my creative juices flowing again.

I enjoyed creating my really simple bunting cards, they’re ideal if you want to make and send a homemade card but you’re short on time or confidence to do anything more elaborate. But honestly, I always think simple is better and I’m pleased with how they’ve turned out.

Note: I was send some papercraft products from Create & Craft TV to make some cards with. All images and opinions are my own.

Crafts: Dried Flower Craft Ideas

This week I became the proud and excited owner of an Instant Flower Press from Interplay. Admittedly it’s designed for children, but both my son and I had great fun with it and we’ve created some pretty little dried flower craft items yesterday afternoon with some flowers we picked on the way home from school.

Dried Flower Craft Ideas

The Instant Flower Press is really simple to use and comes with an instruction booklet. You open up the press, put a layer of the felt pads and the pieces of cotton material in the plastic press, place your flowers inside. Put another layer of cotton and more felt pads (all supplied) and close the press. Pop it in the microwave for 20-30 seconds and you’ve got dried pressed flowers. Slightly more moist flowers may take a little longer in the microwave, but once you start pressing your flowers you’ll quickly be able to judge what will take an extra ten seconds and what will dry more quickly.

As a child my Grandma had a flower press and I loved using it with her, carefully picking pansies from her garden and pressing them between thick parchment and screwing the press shut, then leaving it for months before seeing the fruits of our labour.

Dried Flower Craft Ideas

With the microwave flower press the whole process is done and dusted in minutes and perfect if you need some pressed flowers for some quick dried flower craft.

Quick and easy Dried flower craft ideas

Pretty Jam Jar Candle Holders

You will need:
A clean jam jar
A selection of dried flowers and leaves
PVA glue
A paint brush

These are so simple. Take a clean jam jar and some PVA glue and a paint brush, brush the glue onto the jar where you want to stick your dried flowers. Carefully press the flower onto the glued area to stick it on, then gently cover the flower with PVA glue to seal it in place. Leave to dry.

You can be as creative as you want with this, I’ve left mine quite simple, but I love the delicate little blue flowers and the daisies. It took hardly any time at all to glue on, but maybe an hour to dry properly. They look so pretty and I can see me using this idea on so many things around the house.

Dried Flower Craft Ideas

Pebble Paperweight 

You will need:
A clean stone
A selection of dried flowers and leaves
PVA glue
A paint brush

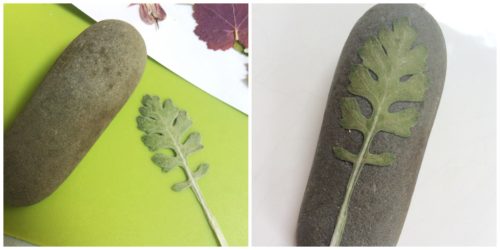
Again, this is very simple. We have a pile of lovely smooth pebbles in the garden, so I picked one the right size and gave it a good scrub and left it to dry. Then I selected a suitable leaf which I’d dried in the flower press and brushed PVA glue onto the pebble and pressed the dry leaf into place. I left it for a few minutes to stick, then I painted PVA over the leaf to seal it in place and then I left it to dry properly for a few hours.

I’ve now got a lovely paperweight, or a pebble to stop my napkins flying off the table when we eat in the garden.
Dried Flower Craft Ideas

Dried Flower Sun Catchers 

You will need:
A laminator and pouches or some sticky backed plastic
A selection of dried flowers and leaves

Borrowing a laminator I arranged some dried flowers in an artistic way in the laminator pouch, I then put it through the laminator a few times until I was happy. I then cut my A4 sheet down into a circle and using a clear sticky dot stuck it to the window.

It’s really quite pretty and I’ve got a nasty window in the downstairs loo which needs replacing, which I’m now going to cover in these lovely dried flowers to pretty the place up a bit!

Dried Flower Craft Ideas

These are just three very quick ideas I had for dried flower crafts that afternoon. I’ve got a few more ideas up my sleeve including some nice thank you cards and other papercrafts.

The Instant Flower Press from Interplay is a cracking piece of kit and if you enjoy crafting and have kids that enjoy crafting, then I can’t recommend it enough. The small boy went to school today with a bag full of dried flower pictures for show and tell and he’s loving showing off his dried flower craft to anyone who will listen. It’s nice to do something a bit different with him and importantly he’s really enjoyed it and got something out of it too!

Dried Flower Craft Ideas

The Instant Flower Press from Interplay costs £9.99, is suitable for ages 8+ (though my 5 year old used it happily with supervision) and is available from a wide range of retailers.

Note: We were sent the Instant Flower Press from Interplay for review purposes. All images an opinions are our own.

Easy Father’s Day Crafts

The small boy is at that lovely stage in life where he’s always making us little cards and writing us little notes for no other reason than he loves us. Which is nice. With Father’s Day on the horizon the boy was keen to get crafting for his daddy. So when our Baker Ross box arrived, we delved deep and found some really lovely, simple Father’s Day Crafts to do together.

The first thing we tackled was the very easy Father’s Day Tie Bookmarks. These are made from soft foam and are cut out ready for use. I did the tricky bit, which was threading the ribbon through the tiny hole and he did the rest.

Father's Day Crafts

The pack comes with a selection of stickers. His chosen one contained the letters which spelt “Top Dad”. I told him what the words were and he picked the right letters and stuck them on himself. He then had some design decisions to make, namely where to stick his selection of stickers. He was really pleased with his design and chose to “wear” the tie around the house himself for a while. We’ve now tucked his little gift away for Father’s Day.

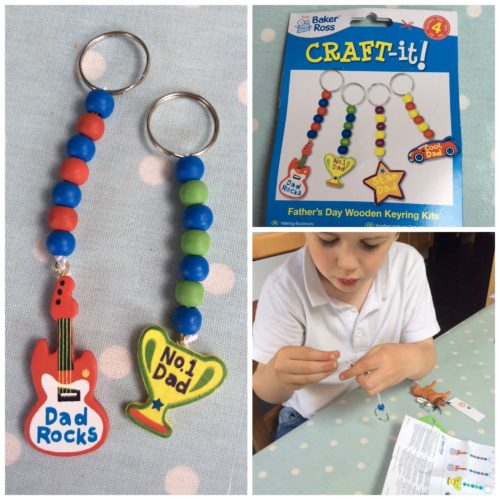
The second of our Father’s Day Crafts were these lovely Father’s Day Wooden Keyrings. The pack comes with four different designs to choose from. Ben chose to make the trophy and I went for the guitar. The pack contains everything you’ll need for your keyrings.

Father's Day Crafts

This was actually quite a tricky little craft activity, threading the beads onto the cord made us both concentrate hard. I had to do the fiddly tying of the cord, but it was a real workout for his hand/eye co-ordination and his fine motor skills.

Making Father’s Day Crafts to give as little gifts is a lovely gesture and we enjoyed making these really simple and easy crafts. I’m sure daddy will like receiving them too!

Father's Day Crafts

Father’s Day is on 19th June 2016.

How to Scrapbook – Project Craft at Paperchase

I was an invited guest of Paperchase and I was not asked to pay for my workshop place or materials. All images and opinions are my own.

Paperchase (purveyors of beautiful stationery and arts and crafts materials) have recently launched “Project Craft”, a series of special crafting workshops for adults and children. The Project Craft sessions are currently only available in three flagship stores – Manchester, Glasgow and London, but they should be rolled out to a high street near you soon.

Being an occasionally crafty type, I was invited along to their Manchester store for an evening of crafting and cupcakes. The Project Craft workshops cost from £10 and include all the craft materials you will need for the session. Current Project Craft workshops include –

  • How to scrapbook
  • How to make a tissue paper pom pom
  • Card making with dye-cutting, lino print or foil
  • How to make kids crafts
  • How to make paper flowers
  • DIY stationery

A small group of happy crafters sat in a quiet corner of the store, next to the little cafe upstairs in an area set aside for Project Craft. We were there for the “How to Scrapbook” workshop, which costs £20 and includes a scrapbook and some materials. You are also advised to take along some photographs, old tickets, paper keepsakes and souvenirs that you might want to incorporate into your scrapbook.

project craft

If you’re a bit of a hoarder of tickets and little bits of paper, a scrapbook can be a lovely way to keep it all together and make something of your memories. At the workshop you create at least one double page layout and learn lots of useful tips including how to arrange your photos, layer pages and embellish your scrapbook with different products.

Sadly I’d forgotten to bring some things to scrapbook, but undeterred I rifled through some magazines and had a good rummage through the papers and embellishments they had. Thankfully I managed to forage enough nice things to make a few pages for my scrapbook.

project craft

There was expert tutelage from the Project Craft team at Paperchase. They gave an overview of the scrapbooking process, showed us some examples and sample templates and set us to work creating our masterpieces. There was always someone on hand to give advice and encouragement when required. I was the only scrapbooking virgin in the room, but I didn’t feel too far behind the others and whilst what I created was probably a bit basic, I was happy with the results.

project craft

Whilst my crafting heart probably doesn’t lie in scrapbooking, I did enjoy the process and I think this would be a nice thing to do with my son. Something we can use to document our days out together and something we can use to look back on in later life. I really like the idea of scrapbooking holidays and visits to museums and such like with him.

My scrapbooking might not be perfect, but it was very enjoyable and I learned a few things that I will take forward with me. I enjoyed my little taster of Project Craft at Paperchase and I will be booking in to try the lino print craft workshop soon.

Project Craft Workshops are available at Paperchase in Manchester, Glasgow and London, with more stores to follow soon.

Note: I was an invited guest of Paperchase and I was not asked to pay for my workshop place or materials. All images and opinions are my own.

To craft, or not to craft – Celebrating Shakespeare 400

This year sees the 400th anniversary of the death of William Shakespeare. To celebrate his life and work, stationers Viking sent me some crafting goodies and asked me to create a craft project featuring one of Shakespeare’s quotes. So I invited my craftiest friend Sarah around for an evening of crafting, chat and at least one bottle of chablis.

Sarah is an accomplished paper cutter and makes the most beautiful paper crafts, so she brought her paper cutting kit and I got my craft box out. To our existing stock we added the crafting goodies Viking had sent for our evening and we mulled over the brief whilst searching for Shakespeare quotes online. Independently we both came up with a similar idea.

Shakespeare
Our craft goodies from Viking

I had some watercolour paints and a couple of spare canvases, we both decided to paint a background on the canvas and then add our Shakespeare quotes. Sarah loves stars and the night sky, so she chose to paint a dusky sky and use a quote about stars. I love the colour teal, so wanted a  teal-ish canvas with a “go get ’em” semi motivational quote for my office.

Sarah began by painting her sky and then left her canvas to dry whilst she cut out some stars.

Shakespeare

Once her canvas was dry she used a silver metallic paint pen to write her quote and then she carefully glued her paper stars and some sequins in a shooting star formation on the canvas, I thought it looked really beautiful.

“It is not in the stars to hold our destiny, but in ourselves”

Shakespeare

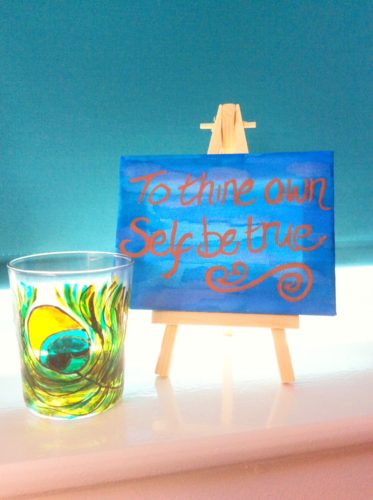
I chose the famous quote from Hamlet “To thine own self be true” and I selected a much smaller canvas with an easel.  After painting the canvas with a few different shades of teal and blue (the photo doesn’t show the colours as well as it should) I left it to dry before using a paint brush and some burnt sienna watercolour paint to write my quote on the canvas.

Shakespeare

It didn’t take very long to do and I’m not 100% happy with it, but I like it well enough for it to take up residence in my office.

Having finished my intended project a little too quickly, I decided to have a play with my new golden feathered calligraphy quill and the little pot of ink. I can’t do calligraphy but I thought I’d have a play anyway.

Shakespeare

It was rather good fun and something I would try and use in future craft projects. There’s a bit of a knack to using a quill and a pot of ink, so it took me a few blobby goes before I got something I quite liked, and I quite liked this.

Shakespeare

And using the metallic gold paint pen I wrote this, a line from Sonnet 116 which I’ve been completely in love with for years.

Sarah and I go to a monthly craft club and we enjoy getting stuck in and having a go, often with mixed results, but it’s all good fun and makes for an interesting evening. This was our first craft evening together where we’ve not been supervised by experts, and I think Sarah in particular has produced something especially lovely. 

We’ve decided to have a few more craft evenings together, mainly because you don’t get wine at craft club I think, but also because it was interesting and fun. 

Note: We were sent products free of charge from Viking to use to create our Shakespearean masterpieces, and also in return for this blog post.

Easy Mother’s Day Crafts

I’ll hold my hands up, when I originally planned this blog post it was all about doing Mother’s Day crafts with my five year old son. We enjoy crafting together, making things that are beautifully wonky and imperfect, but I very rarely spend any time by myself doing some crafting, partly because of lack of time I guess. This month I looked at our box of seasonal goodies from Baker Ross and decided it was time to do some crafting by myself, and the results were very pleasing, at least I think so.

Mother's Day crafts

We were sent a box of ceramic bird flowerpots to paint, these were pretty adorable and we set about painting them in our own style. He wanted to paint his black, but thankfully I was able to steer him towards some brighter colours. I just did whatever I fancied and I was pretty pleased with how it turned out. I’m no artist but they were really lovely to do, especially together. I have bought some tiny crocus bulbs which I’ll plant in them nearer to Mother’s Day.

Mother's Day crafts

The next thing I tackled were these lovely tissue paper flowers. I sat down for a quiet half hour and made myself these lovely blooms. They were incredibly easy to do, everything you needed was in the pack. I just wrapped a pipe-cleaner around the middle of the tissue paper and then slowly and gently teased the paper out to form the flower.

They were so simple to do and really relaxing, I was a bit sad when I’d made them all and the pack was empty. I put them all in a vase which now sits on my office desk, brightening the place up, they never need watering and they’ll never die. I really love them!

Mother's Day crafts

As you can see from our Mother’s Day crafts, there are lots of really cheery, colourful crafts you can do to usher spring into your home. The flowers would make a lovely gift for mum, but if you really love her you’ll make her a cup of tea and let her get on with making them herself!