Recipe: Cornflake Tart – a school dinner treat

School dinners in the 1980’s were never really going to win many awards for excellence. I do have fond memories of a few select dishes – spam fritters and mashed potato being one. But mostly I remember grey slivers of liver in a murky sauce and most puddings served with a side of tinned prunes. One stand out dish I remember with significant fondness is Cornflake Tart, or cornflake pie.
Recipe: Cornflake Tart - a school dinner treat

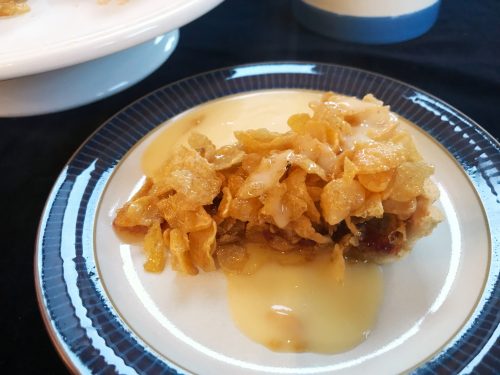
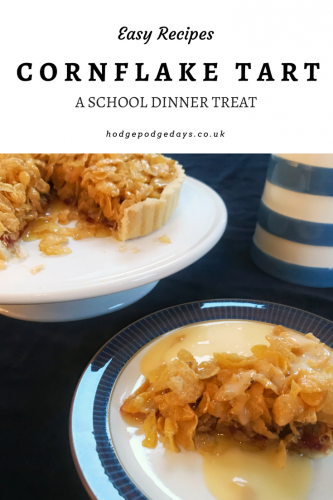
Cornflake Tart is simple, cheap, sweet and filling. There’s not a lot that’s healthy about it, but for nostalgia’s sake I had to recreate it. Served with a ladle of steaming custard, this school dinner treat really hit the spot. Crisp shortcrust pastry, a thick layer of raspberry jam topped with sticky golden syrup smothered cornflakes. Was that the bell for dinnertime?

It’s best if you can make this ahead to allow the golden syrupy cornflakes to set a little, but even if you can’t wait, it’s so good impatience can be forgiven!

Recipe: Cornflake Tart - a school dinner treat

Easy Recipe: Cornflake Tart

Ingredients:
For the pastry –
114g plain flour
56g butter, cubed
A pinch of salt
2-3 tablespoons of cold water
-or- a packet of ready rolled shortcrust pastry

For the filling –
110g golden syrup
80g butter
30g sugar
100g Cornflakes, though add more if you think it needs it
100g raspberry or strawberry jam

Method:
Put the flour and butter in the mixing bowl and rub the flour and butter together with your finger tips until they look like breadcrumbs. Add the water but do not make it wet or sticky. Knead gently together and wrap the dough in clingfilm and chill in fridge for about 20 minutes.

Roll out your pastry and line a greased tart tray with the pastry and trim the edges. Prick the pastry all over and bake blind, for around 20 minutes at Gas Mark 6/400’F/200’C/180 Fan.

Melt the butter, sugar and syrup in a large heavy bottomed saucepan, remove the pan from the heat then stir in the cornflakes.

Spread a thin layer of jam over the bottom of the pastry case and tip the cornflake and syrup mixture evenly on top of the jam. If the jam is too thick to spread, warm it slightly in microwave for a few seconds.

Put the tart back in the oven for 5 minutes to allow the mixture to set. Serve in thick slices with as much custard as you can cope with.

Recipe: Cornflake Tart - a school dinner treat

School dinner bliss, and you don’t hear that every day!

If you enjoyed this recipe, you might like some of my other cakes, bakes, puddings and pies which you can find here.
Recipe: Cornflake Tart - a school dinner treat

Recipe: Easy Pesto Baked Fish – family meal favourite!

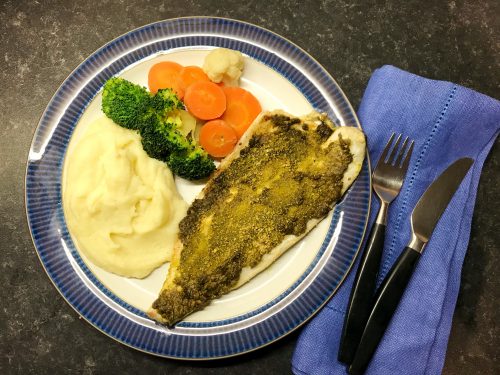
If you were to ask my family what their favourite meal is, it would be Pesto Baked Fish. If you were to ask me what the quickest, healthiest meal I make is, it would be Pesto Baked Fish. It takes me about 2 minutes to prepare and 15 minutes to cook. The fish just seems to evaporate from their plates as soon as I put it in front of them. It’s a speedy-dinner winner!

We are very lucky to have a good traditional fishmonger in our village. I always try and buy my fish from there; it’s good to shop local when you can and the fish is incredible quality. It’s so fresh and they can bone it and prepare it any way I want. For this recipe I use one fillet of white fish per person. I was cooking for the boys so I needed two fillets of skin-on white fish. The sea bass looked great, so I opted for that. I have also bought some plaice fillets and put them in the freezer for another week.

Recipe: Easy Pesto Baked Fish - a family meal favourite!

If you don’t have a fishmonger local to you; you can buy packets of skin-on fillets of fish from the supermarket. You can choose any white fish you like the look of. I’ve made this with plaice, sole, cod, haddock or bass. If you’re cooking a thicker fillet of fish like cod, make sure you cook it for a bit longer to allow for the extra thickness of the fish.

The NHS recommends that we eat two portions of fish each week, with at least one portion being oily fish such as salmon. I’m sure this recipe would also work well with salmon, but my boys find it a bit boring and much prefer the white fish. The white fish I choose is low in fat, an excellent source of protein and contains some of those omega-3 fatty acids which are essential to our diet.

Pesto Baked Fish

Ingredients:
1 fillet of fish per person
Freshly ground pepper
1 heaped spoon of pesto, red or green pesto work equally well
1 teaspoon of breadcrumbs
A small knob of butter

Method:
Pre-heat your oven to 200°.

Check your fish over for bones and remove any that you find. Put your fish skin side down on a baking tray which has been covered in baking parchment. Grind some black pepper over the top and put a dab of butter on the paper either side of the fish.

Spread a heaped teaspoon of pesto over the fish. You can use red or green pesto, whichever is your favourite, both work well. Scatter your breadcrumbs over the pesto. I have a tub of dried breadcrumbs in my cupboard, but I have used fresh breadcrumbs. Both kinds are fine, use whichever you have to hand.

Recipe: Easy Pesto Baked Fish - a family meal favourite!

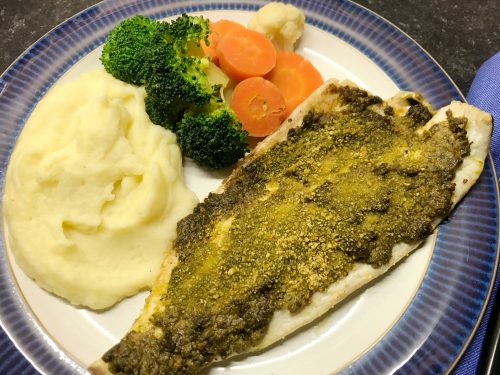
Bake in your pre-heated oven for 15 minutes (or longer if your fish fillets are thick). Check they’re cooked through, they should be starting to brown slightly at the thin edges. Once they’re cooked, take them out of the oven and serve.

Recipe: Easy Pesto Baked Fish - a family meal favourite!

As you can see I’ve served my fish today with creamy mashed potato and vegetables. In the summer it is accompanied by new potatoes and a lovely fresh salad. It’s a flexible, simple summer which is guaranteed to be wolfed down every time by my hungry boys.

If you enjoyed this recipe, you might also enjoy my 55 ideas for family meals your kids will actually eat.Recipe: Easy Pesto Baked Fish - a family meal favourite!

Recipe: Baked Russet Squire Crusty Bread Bowl

Cheese is an important part of my life. I eat a lot of it at an amateur level, but once a year I dust down my judging jacket and head off to the International Cheese Awards to do my bit for the dairy industry. It’s the most fun and each year I get to discover a new cheese or two that I just have to have. Just after the International Cheese Awards last year, I popped into one of my favourite delis – John’s of Instow in Devon and spied two of my favourite cheeses – Miss Wenna and Boy Laity, both from Cornish Cheesemakers Curds and Croust.

Recipe: Baked Russet Squire Crusty Bread Bowl

Curds and Croust have recently launched an interesting new cheese – Russet Squire, a cider washed cheese Cornish soft cheese. They sent me some to try out and I couldn’t resist making something incredibly delicious with it.

Russet Squire is bathed in Cornish cider seven or eight times which gives the soft rind a distinctive russet look. The cheese itself is rich and creamy with a sweet note. It’s unbelievably good on an oaty biscuit and really lends itself to lots of recipes. It has quite a low melting point which makes it wonderfully oozy very quickly.

If you’re a fan of brie, it’s well worth looking out for Russet Squire. It’s got all lovely oozy things you love about brie, but with the addition of the slightly sweet cider. It’s next level Cornish brie.

I often think with brie style cheeses, if you’re going to cook with them they best thing you can do it leave them whole and not mess about too much with other flavours. I wanted to bake a round of Russet Squire into a round loaf which you could tear apart and dip in the melted cheese.

Recipe: Baked Russet Squire Crusty Bread Bowl

The problem was I couldn’t find the kind of loaf I wanted locally, so I had to bake my own bread. All you want is a nice crusty round loaf, you should be able to find them at a good bakery or perhaps a supermarket. Or you could just bake your own. I baked a cheese and onion loaf and left it to cool for a bit before I made my baked Russet Squire Cheese in a crusty bread bowl.

Baked Russet Squire Crusty Bread Bowl

Ingredients:
1 Russet Squire Cheese
1 round loaf
2 tablespoons of Cider
1 teaspoon of chopped rosemary
A pinch of brown sugar
A twist or two of black pepper

Method:
Pre-heat your oven to 220°. Take your round loaf and cut out a hole in the top to nestle your cheese. Scoop out some of the bread, save this for dipping and dunking later.

Skim the top off the cheese to help it melt a bit better. Place your cheese in the loaf. Spoon over your cider and scatter over your chopped rosemary, pinch of brown sugar and your black pepper.

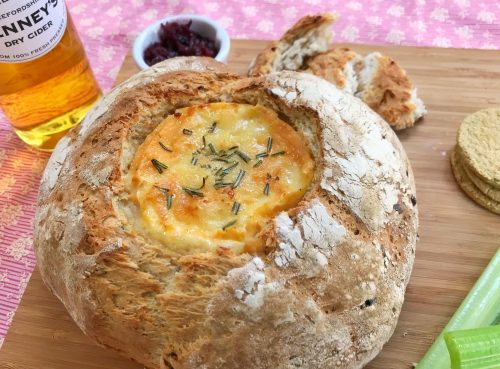
Bake you loaf in the oven for 10-15 minutes until the cheese is going slightly brown on the top and is all oozy and melty inside.

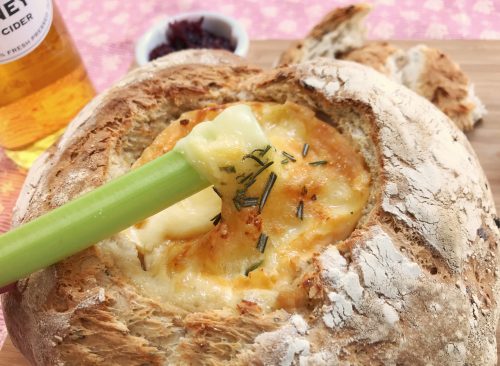
Serve with chutney, sticks of celery or anything else you want to dip in this gorgeous cheese.

This Russet Squire Crusty Bread bowl is seriously, seriously good. It just works perfectly. It’s so easy to put together and looks really impressive too. Can you imagine putting one on the table next time friends come round for lunch?

Recipe: Baked Russet Squire Crusty Bread Bowl

We were sent some Russet Squire cheese to make something lovely with. I have not been paid for this post. All images and opinions are my own.

Recipe: Baked Russet Squire Crusty Bread Bowl

How to make a really easy Volcano Birthday Cake

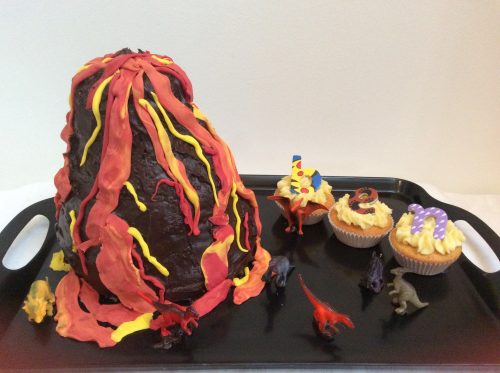
For my son’s 7th birthday he wanted me to make him a Volcano Birthday Cake. I am by no means an expert cake decorator, so I knew whatever I made would need to be really simple to put together. The great thing about making a volcano cake if you’re not an expert cake decorator, is if it looks a bit rough and rustic when you’ve finished, it all adds to the rugged volcanic charm.

A few years of watching The Great British Bake Off has given me a few ideas, so I sketched the plan and set to work. You will need six round sponge cakes. I also used my favourite kind of shop bought frosting – Morrison’s Chocolate & Brazilian Orange Frosting. It’s the best shop bought frosting I’ve ever tried and it’s well worth searching out. If you can’t find it, use whatever chocolate frosting you can get your hands on.

How to make an easy Volcano Birthday Cake

Here’s how I made my pre-historic Volcano Cake.

How to make a Volcano Birthday Cake

You will need:

6 round sponge cakes (I used 9 inch tins)
2 tubs of Morrisons Chocolate & Brazilian Orange Frosting
Dr Oetker Regal Ice Ready to Roll Icing pack of multi-coloured icing
Wooden skewers or long straws
Selection of small plastic dinosaurs
Fountain Sparkler candle
One cupcake per letter of name (eg Ben = 3 cupcakes)
Birthday candles
Wooden letters spelling name

How to build your cake:

On a large clean tray or board put a dollop of Morrisons Chocolate & Brazilian Orange Frosting and start to build your volcano on top of this. The frosting will help to anchor the cake in place.

Sandwich your six layers of cake on top of each other with a layer of the Morrisons Chocolate & Brazilian Orange Frosting in between each cake. Take your skewers or straws and push then down from the top of your volcano structure down through the six layers to the bottom, this will make the cake more stable.

Carefully using a knife, carve your cake structure into a volcano shape. It doesn’t have to be perfect, remember if it’s rustic it all adds to the charm. Dust as many loose crumbs off your cake as you can and then start to plaster the whole cake in the Morrisons Chocolate & Brazilian Orange Frosting. Once it’s completely covered, leave it to harden a little for an hour or so.

How to make an easy Volcano Birthday Cake

Taking the red and yellow icing from the Dr Oetker Regal Ice Ready to Roll Icing pack, cut each pack of icing in half. Set aside half of each pack and with the other halves, knead them together to make an orange coloured icing.

Here’s where you can get artistic. Roll pieces of the red, yellow and orange icing into rivulets of lava and press them into your volcano. Make sure there’s plenty of lava coming out of the top and running down the sides. You might want to pool some lava at the bottom of the volcano.

How to make an easy Volcano Birthday Cake

Taking your dinosaurs and a little of the chocolate orange frosting (to stick the dinosaurs in place) add some dinos to the scene. Again be artistic; get them caught in the lava, running away from it, have them in little family groups, whatever you want.

Take your cupcakes and top with some frosting; wedge a letter on the top of each one and using the frosting on the bottom of the cupcakes, stick them in place to spell out the name. Again you can have dinosaurs around the cakes, or looking like they’re eating them maybe.

How to make an easy Volcano Birthday Cake

To finish your cake, put the fountain sparkler candle in the top (so when you light it, it should sparkle and flame like a volcano.

My son was absolutely delighted with his volcano birthday cake, and his friends were pretty impressed too. It’s surprisingly simple to put together and it doesn’t have be perfect in order for it to be impressive. I dread to think what he’s going to ask for next year!

How to make an easy Volcano Birthday Cake

How to make a really easy Volcano Birthday Cake

If a volcano cake doesn’t cut it, what about this super-simple train birthday cake?

Recipe: Baked Guinness Cheesecake

A few weeks ago I had the idea for this Guinness Cheesecake. Given that I’d never made a cheesecake before, I knew it would take some thought, planning and possibly a couple of failed attempts that would end up in the bin. I read a lot of recipes and a lot of advice about how to bake the perfect cheesecake. Then I went and did things my own way.

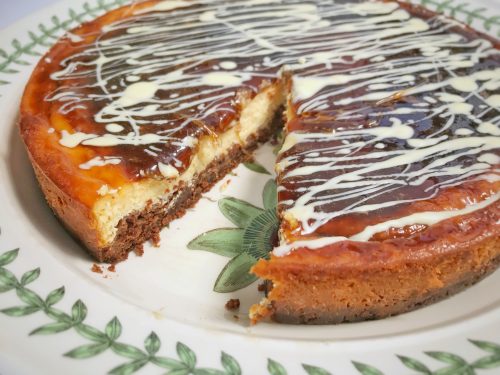
Most people use digestive biscuits as their cheesecake base, but my Guinness Cheesecake needed something darker, so I opted to use bourbon biscuits instead. How was I going to turn a plain vanilla cheesecake into a Guinness Cheesecake? I needed to make a thick batch of Guinness syrup and spoon that over. This cheesecake would take a few days to make fully from scratch, what with needing to make the Guinness syrup first, but boy, was it worth it. It’s the best thing I’ve baked in ages!

Recipe: Baked Guinness Cheesecake

Baked Guinness Cheesecake

Ingredients:
300g bourbon biscuits, crushed
100g melted butter
1 tablespoon of Guinness syrup
600g cream cheese
100g caster sugar
1 tablespoon vanilla essence
1 tablespoon lemon juice
4 eggs
Half a jar of Guinness syrup
Melted white chocolate to decorate

Method:

Whiz your bourbon biscuits up in a food processor until you have fairly fine crumbs. Add your tablespoon of Guinness syrup and melted butter and whiz through again.

Grease a springform tin, I used a 30cm one. Press your biscuit crumb mix into the bottom of the tin. Make sure it’s evenly spread and well-packed. Pop the tin in the fridge for half an hour to firm up.

Pre-heat your oven to 170°.

In a large mixing bowl, beat your cream cheese, then add the sugar, vanilla essence and lemon juice. Add the eggs one by one taking care not to beat them too hard, you don’t want to create air bubbles in your mix.

Take your base out of the fridge and wrap the base of the tin in foil, some mix may leak out so it’s best for your tin to have a foil “nappy” to catch the drips. Put your springform tin on a baking tray too, it just makes it easier to take out of the oven.

Bake for an hour. Keep an eye on it and keep the oven door shut as much as you can. Once the cheesecake has risen all over (mine had a dip in the centre until right near the end), turn your oven off and leave the door shut. This will stop your cheesecake from cracking. Leave it as long as you can, after half an hour I opened the oven door a fraction and I left it overnight to cool fully before decorating.

Carefully remove the cheesecake from the tin and put it on a large plate or whatever you’re going to serve it on. You ideally want something with a bit of a lip to catch any syrup which slips off the cheesecake.

Recipe: Baked Guinness Cheesecake

Depending on the consistency of your Guinness syrup, you may want to re-boil it until it goes thick like a slightly spreadable toffee. If you do this, make sure it’s more or less cool before you pour it on your Guinness Cheesecake.

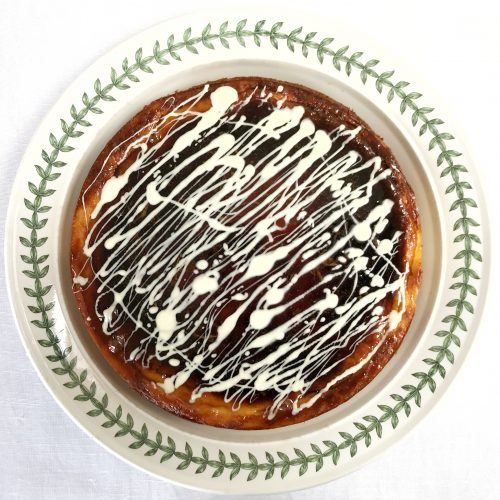
To decorate, pour your thick Guinness syrup over the top of your cheesecake, just enough so it sits on the top. Melt some white chocolate and artistically drizzle it over the top of your cheesecake, then admire your hard work!

Recipe: Baked Guinness Cheesecake

This Guinness Cheesecake is a real beauty of a cheesecake. It’s the perfect celebration cheesecake and it’ll feed an appreciative crowd. The Guinness is both sweet and savory at the same time, and it has a wonderfully bitter edge. It’s a fantastically grown up cheesecake which is so good, even my son approves of it.

Recipe: Baked Guinness Cheesecake - Pure Genius!

Recipe: How to make Guinness Syrup

Why would you want to make Guinness syrup I hear you ask? My answer? Because it’s completely awesome, that’s why. This lovely syrup has a surprising number of uses; it’s pretty simple to make and it has all the complex bitter, stouty flavours of Guinness, but in a sweet form which makes it fabulous for puddings and cocktails.

I have many plans for my Guinness syrup, so do keep your eyes peeled for recipes in the coming weeks, but first, let’s make a batch ready to be drizzled over pancakes, stirred or shaken into cocktails and even baked into cakes.

Recipe: How to make Guinness Syrup

How to make guinness syrup

Ingredients:
500ml bottle of Guinness
500g of sugar

Method:
Tip your Guinness and sugar into an enamel pan or a preserving pan, stir carefully with a wooden spoon on a gentle simmer until the sugar has dissolved.

With the lid off the pan, and stirring frequently, gently simmer the liquid for at least an hour. I simmered my syrup for nearly 2 hours until it reached a thick pouring consistency, slightly looser than golden syrup. Depending what you need your Guinness syrup for, simmer it until it’s the syrupy consistency you need.

Make sure you have a couple of squeaky clean jars or bottles which have been sterilised ready for your syrup. To sterilise your jars, put your clean jars in a low oven for at least half an hour. Carefully remove your jars from the oven (they will be incredibly hot) and pour in your syrup. I suggest you use a jug and a funnel for this. Work quickly and carefully and get the lids on your jars while everything is still hot. Leave your syrup to cool overnight and it’ll be good to go in the morning.

How will use your Guinness syrup? I think it’s got so many possible uses, but drizzled over plain vanilla ice cream would be a pretty good start!

Recipe: How to make Guinness Syrup

Recipe: Orange Poppy Seed Cake – a teatime treat!

Lemon and poppy seed cake is such a classic and one of my favourite bakes. It’s a cake that’s pretty easy to make and with a lovely drizzle icing, it always looks so homely and delicious. With a celebration in mind I decided to turn a cheery bag of juicy oranges into something a little bit special. It’s a little twist on the original, topped with candied oranges and bursting with sweet citrus flavours – my Orange Poppy Seed Cake is a teatime showstopper!

Recipe: Orange Poppy Seed Cake for Mother's Day

This Orange Poppy Seed Cake is made with Orange Zest Spice Drops which add a lovely freshly squeezed flavour to all kinds of cakes, bakes and savory dishes. I’d used the spice drops when I made a batch of delicious candied orange slices to decorate the cake with (you can find the recipe here) and also in the Orange Poppy Seed Cake itself.

Orange Poppy Seed Cake

Ingredients:
225g soft butter or margarine
225g caster sugar
275g self-raising flour
1 heaped teaspoon of baking powder
4 eggs
4 tablespoons of milk
25g poppy seeds
12 drops of orange zest spice drops

For the drizzle icing:
225 g icing sugar
12 drops of orange zest spice drops
Tepid water, added gradually

Method:
Pre-heat your oven to 180° and grease a deep 20cm cake tin. I usually put a circle of greaseproof baking paper at the bottom to help stop the cake from sticking.

In a large mixing bowl, cream the butter and sugar together until light and fluffy. Add the rest of the ingredients and mix well. Scrape into your cake tin, smooth the top and pop it in your pre-heated oven. Bake for 50-60 minutes. Poke it with a skewer to make sure it’s cooked through.

Leave the cake to cool in the tin, then turn it out put it onto your cake stand or serving dish.

Mix up your icing, drop your orange zest spice drops into the icing sugar and add the water gradually, mixing as you go until you have a drizzle icing of the right consistency – which is loose but not runny. Spread it over the top of the cake allowing some to dribble down the sides of the cake.

Recipe: Orange Poppy Seed Cake for Mother's Day Recipe: How to make Candied Orange Slices

Take your candied oranges and slice them in half, fan them around the top of the cake, gently pressing them into the drizzle icing so they stick in position. Now admire your pretty cake and serve with a lovely cup of tea!

If you enjoyed this, you might also like my awesome Turkish Delight Cake.


Recipe: Orange Poppy Seed Cake for Mother's Day

Easy Recipe: Sparkly Chocolate Cups

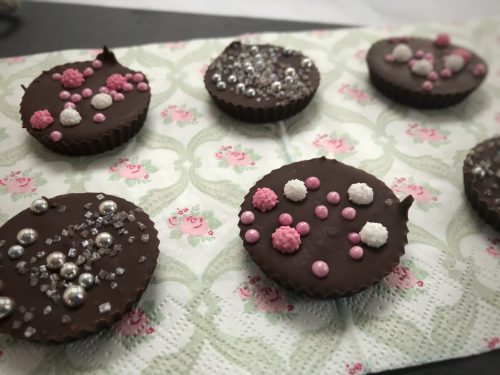
I love getting homemade cards and gifts from my son on Mother’s Day (and any other day he wants to make me something). As you can probably imagine, we’re quite big on baking at home and we bake for almost any occasion. I’m a firm believer in making life easy for myself. Whilst I’m happy to bake a fairly complex cake, there’s definitely space in my kitchen for incredibly simple recipes. I’ve made these Sparkly Chocolate Cups for Mother’s Day. They’re very, very easy to make and perfect for kids to make with a little adult supervision.

Easy Recipe: Sparkly Chocolate Cups for Mother's Day

Not only are they great for kids to make, if you lack confidence in the kitchen, these are so easy to make and look pretty impressive too.

Sparkly Chocolate Cups

Ingredients:
250g of good quality dark or milk chocolate
Cake decorating sprinkles, stars, silver balls, whatever you fancy

You will need:
A saucepan, a glass bowl which will sit in the pan, but so it doesn’t touch the bottom, a metal spoon, some cupcake cases – I used silicone but paper ones are fine.

How to make your chocolate cups:
Boil some water and pour the water into your pan so it’s about 3cm deep. Carefully place the glass bowl in the pan making sure the bottom of the bowl doesn’t touch the water. This is called a bain marie.

Break your chocolate up into small pieces and put it in the glass bowl, the water in the pan needs to be at a gentle simmer, not bubbling and boiling. Stir the chocolate until it is melted.

Once the chocolate is melted, with a spoon scoop about two dessert spoons of melted chocolate into each cupcake case. Gently shake each one so the chocolate settles.

Once you’ve used all of your chocolate, take your chosen sprinkles and sprinkle as much or as little as you like over the top of each chocolate. Leave them to cool for at least two hours.

Easy Recipe: Sparkly Chocolate Cups for Mother's Day

Once they’re cool you can either take the chocolates out of their cases and put them in a nice gift box or cellophane bag, or you could just present them as they are in their pretty cupcake cases.

They’re so easy to make and they look impressive, whoever you give these to will be as pleased as punch!

If you enjoyed this recipe, you might also like these super-easy love heart jam tarts.

Easy Recipe: Sparkly Chocolate Cups for Mother's Day

Recipe: How to make Candied Orange Slices

When I spotted a cake in a local tea shop decorated with gorgeous glistening slices of preserved orange, I knew I had to find out more. It turns out they were candied orange slices and they are ridiculously easy to make, if a little time consuming. They’re fabulous for decorating a pretty cake with or for dipping in chocolate for a little teatime treat. Plus there’s an exciting by-product to the process – more of which later!

How to make Candied Orange Slices

Ingredients:
2 oranges, fairly finely sliced
1 mug of caster sugar
1 mug of boiling water (add more if required)
8 drops of Spice Drops Orange Zest Extract

Method:
In a sauté pan, or high sided frying pan, tip in the water and sugar and heat; stirring all the time until the sugar has dissolved. Add your Spice Drops Orange Zest Extract and lay your slices of orange in the pan. If you don’t have the spice drops, you can use a couple of tablespoons of orange juice instead.

Recipe: How to make Candied Orange Slices

Gently cook the orange slices for around an hour with the lid off the pan, make sure you turn them over every so often. You’re looking for the oranges to go a little translucent, once they do, they’re ready.

Carefully lay them on a cooling rack (make sure you put a cloth or paper towel underneath to catch any drips) and leave to cool and solidify overnight. Once they’ve cooled properly, they’re ready to use however you wish.

Recipe: How to make Candied Orange Slices

If you need to candy more than two oranges, I suggest you do it in batches. If you crowd the pan, they just wont cook as well. It’s not the worst thing in the world to have a pan of delicious, citrusy oranges blipping away on the hob for an afternoon!

That exciting by-product I mentioned earlier? Save the syrup the oranges have been poached in, it’s absolutely fantastic and perfect for baking, drizzling on pancakes or using in cocktails. Waste not, want not!

Recipe: How to make Candied Orange Slices

Recipe: Indulgent Chocolate Barleycup Tart

Last year I seriously cut down on my caffeine intake and now I just drink a couple of cups of tea or coffee a week. These days I seem to be very sensitive to caffeine and if I have a cup of coffee too late in the day, I just won’t sleep at night. I don’t want to cut it out completely, but I do have to keep an eye on just how much I drink. With this in mind, I was sent a jar of Barleycup to try.

I’ve swapped my lunchtime coffee for Barleycup and I’ve hardly noticed the difference. Barleycup is made from roasted cereal grains and chicory roots and is free-from caffeine and contains no artificial additives. Barleycup is also gluten-free and certified by Coeliac UK.

Recipe: Indulgent Chocolate Barleycup Tart

Recipe: Indulgent Chocolate Barleycup Tart

Not content with just drinking it, I wondered if it would be any good to bake with. It turns out that it was. I made a variation on a chocolate and coffee tart, I made a deliciously indulgent Chocolate and Barleycup Tart which was every bit as good as the original. Here’s my recipe…

Chocolate and Barleycup Tart

Ingredients:
For the pastry –
4oz plain flour
2oz butter, cubed
A pinch of salt
2-3 tablespoons of cold water
-or- a packet of ready rolled shortcrust pastry

For the filling –
150g single cream
2 tablespoons of sugar
150g good quality dark chocolate
2 tablespoons of Barleycup powder dissolved in 4 tablespoons of boiling water

Method:

Tip the flour, salt and butter in a large mixing bowl. Using your fingers, rub the butter into the flour until it looks like breadcrumbs. Use a knife and stir in just enough cold water to bind the dough together. Do this gradually as you don’t want your pastry to be too wet. Once you’ve made the dough, cover the bowl and chill it in the fridge for 15 minutes or so before rolling out.

Or if you’re using shop bought, ready rolled pastry, take it out of the fridge half an hour before you want to use it.

Pre-heat your oven to gas mark 5 or 190°

Take your pastry and roll it out to the thickness of a pound coin. You can either roll it out on a floured surface, or between two pieces of baking parchment. I find the baking parchment method quicker and a lot less messy.

Grease a 20cm tart tin and carefully put the pastry in the tin, pressing it against the sides. Let the pastry hang over the sides of the tin, you can trim it later. Prick the base all over with a fork. Top the pastry with a sheet of baking parchment and cover with baking beans, bake in your pre-heated oven for 10 minutes.

Remove the baking beans and parchment and pop back in the oven for another 8 minutes. Remove from the oven and leave to cool. Once cool, carefully with a sharp knife trim the pastry so it is flush with the top of the tin.

Recipe: Indulgent Chocolate Barleycup Tart

While your pastry is cooling, warm up your cream and sugar in a saucepan. Finely chop the chocolate and once the cream is simmering, turn off the heat and add the chocolate to the pan. Leave for a minute and stir until the mixture is smooth. Add in your Barleycup mixed with water and stir until combined.

Carefully fill the tart case with the Barleycup and chocolate mix, level it off and make an artistic swirl or ripple on the top if you want. Put your tart in the fridge for a minimum of two hours, or overnight if you wish.

To serve, garnish with raspberries or chopped nuts. It is very rich, so a little goes a long way.

I can confirm that Barleycup is a great coffee substitute in baking. It works really well, adding a slight bitter note and complexity to the tart. I’ll definitely be baking with it again, I wonder what a Barleycup and walnut cake would be like?

Recipe: Indulgent Chocolate Barleycup Tart

Note: I was set a jar of Barleycup to bake with. I have not been otherwise compensated for this post.