Toy Review: BRIO Crane and Mountain Tunnel

A wooden train track is something most children play with at some point and BRIO is one of the biggest makers of wooden train tracks and accessories (we have almost all of their range already). This week we’ve been putting the BRIO Crane and Mountain Tunnel to the test, but what did the boy think of this new addition to his train set?

Toy Review: BRIO Crane and Mountain Tunnel

This month my son turns 8 and all he really wants for his birthday is BRIO. He has always loved his wooden train set and gets it out every so often to play with it. Over the summer something really clicked with him and a combination of  BRIO YouTube videos and having some extra time on his hands made him fall properly back in love with his BRIO.

BRIO is very safe to play with, it’s well designed, sturdy and great for little fingers to slot together. My son is definitely at the older end of the target age range, but he really adores his wooden train track and plays with it every day. This BRIO Crane and Mountain Tunnel is suitable for ages 3+.
Toy Review: BRIO Crane and Mountain Tunnel

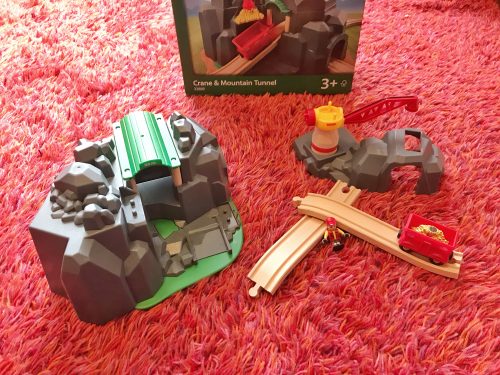
The BRIO Crane and Mountain Tunnel set includes a mountain with crane; a cargo engine, a BRIO mini figure, a wagon, a load and 2 pieces of wooden track.

The BRIO Crane and Mountain Tunnel is easy to connect up to any exiting wooden track you’ve got. It comes with two pieces of track which slot together through the mountain to make the tunnel bridge. To play with this set fully you will need more track and trains. We’ve got lots of track, so that wasn’t a problem.

You will need 2 LR44 batteries which aren’t included. The batteries power the sound, so when your train passes through the tunnel it makes one of four train noises. Though you can do without the sound if you like and just make your own choo-choo noises if you prefer.

Toy Review: BRIO Crane and Mountain Tunnel

The boy was absolutely delighted with the BRIO Crane and Mountain Tunnel set. He had some similar pieces already which he added to the track he laid down and he really enjoyed playing with all of the elements. The tunnel bridge which goes through the mountain is an especially good feature; though it is a little tricky to set up. You need to connect the two pieces of track which come with the set through the tunnel.

The crane piece sits on top of the mountain and swings around. There is a magnet on the crane so you can lift the cargo in and out of the wagons. There’s also a mini figure who operates the crane. It’s well thought out and a really good size if you’re looking to add a bit of height and interest to your existing train set.

Toy Review: BRIO Crane and Mountain Tunnel

We can’t fault it, it’s exactly the kind of thing the boy has been asking for since summer. The BRIO Crane and Mountain Tunnel costs £49.99 and would make a good present for a wooden train enthusiast like my son!

We were sent the BRIO Crane and Mountain Tunnel for review purposes. All images and opinions are our own.

Review: Oregon Scientific Smart Globe Explorer

My son, lover of maps and everything geography has been asking for his own globe for a few months now. We’ve been looking at a few different kinds of globes in the run up to his birthday. We wanted something more than just a simple globe; we wanted something which would furnish him with facts, test his knowledge and teach him about the world. Did the Oregon Scientific Smart Globe Explorer AR tick all of those boxes?

Review: Oregon Scientific Smart Globe Explorer AR

The Oregon Scientific Smart Globe Explorer AR is a globe which opens up so you can also explore the solar system and the Earth’s core. It comes with a wireless talking smart pen which you touch the globe with and it helps you explore the world and the solar system. You can also install an App on your phone or tablet which allows you to explore in more detail using augmented reality.

Review: Oregon Scientific Smart Globe Explorer AR

The globe sits on a stand which has an interactive activity panel which contains more than 42 educational games and activities. To operate the activity panel you need to use the smart pen which you can charge and update using the USB cable included. The pen takes about two hours to fully charge and the charge seems to last quite a long time. The smart pen is shaped a bit like a space shuttle and makes all the right noises.

To use it, you select your age group and activity, then follow the instructions. There are simple games like finding certain places on the globe and touch them with the pen. There are three age range settings; 5 to 8, 9 to 14 and 15+, and a pull-out local map so you can explore the UK and Ireland in more detail. The Oregon Scientific Smart Globe Explorer AR is suitable for ages 5+.

Review: Oregon Scientific Smart Globe Explorer AR

There’s such a lot of educational value in this Smart Globe Explorer with over 220 countries to explore. The globe itself is vibrant and interesting, when used with the activity panel and smart pen there’s just so much information and interesting things to do. My son who is just shy of 8 years old picked up how to use it really quickly. I was delighted to discover at 6.30am this morning that there is a volume control on it.

Using the globe, you can learn all about countries, continents and capital cities. You can also find out about populations, currency and information about the world leaders. There’s also a current affairs section, which is one of the things which needs to be updated on a regular basis.

Review: Oregon Scientific Smart Globe Explorer AR

The globe opens up to reveal the Earth’s core and the solar system, which can be explored using both the smart pen and with the augmented reality app. The interactive augmented reality really brings things to life and features, landscapes, animals, landmarks, dinosaurs and even the solar system.

Weirdly, it somehow triggers our Alexa. If you have Alexa, it’s worth using your globe in a different room or it creates a slightly bonkers robotic cacophony.

Inside the stand is the pull-out map of the UK. Take this out and open it up and it creates a stand for the globe to rest on when it’s opened up. Using the smart pen you can tap on various points of interest on the inside of the globe and more information spills out.

It’s a great piece of kit. The Oregon Scientific Smart Globe Explorer is all we wanted in a globe and more. The smart pen and the activity panel really makes this for me. Together they’re a brilliant teaching tool and you can really learn a lot from them. It’s the kind of gift which will grow with a child. The different age settings mean that there is more age appropriate learning available with each birthday.

The Oregon Scientific Smart Globe Explorer is available from a wide range of retailers and online and currently costs £129.99 (though at the time of writing it’s £99.99 on Amazon). It’s a lot of money for a globe; but if you’re serious about STEM and learning at home, or if you have a child like mine who lives for maps and geography, then it’s worth investing it. Especially as it’s the kind of thing which will absolutely grow with the child.

We were sent the Oregon Scientific Smart Globe Explorer for review purposes. All images and opinions are our own.

Recipe: Grasmere Style Gingerbread biscuits

Back in September we visited Keswick in the Lake District for the weekend. We had a very lovely time and as we headed home, we ambled through the Lake District, stopping off at a few places. One of those places was the popular village of Grasmere, famous for its delicious Grasmere gingerbread.

Grasmere gingerbread is very special. It is firmer than any other kind of gingerbread I’ve ever had and it’s full of ginger and spice. It’s got mixed peel running through it and a crumbly topping like nothing I’ve ever eaten. It is one of my favourite things in the world.

Recipe: Grasmere Gingerbread biscuits

The original recipe is very closely guarded secret, but I’ve been baking my own version at home for a few years now. It’s not quite as firm or as crumbly as the proper Grasmere gingerbread, but it’s a good almost Grasmere gingerbread and it fills the gaps between visits to Grasmere to stock up on this treat.

Grasmere style Gingerbread

Ingredients:

225g self-raising flour
75g golden caster sugar
3 teaspoons of ground ginger
Pinch of salt
100g unsalted butter
1 tablespoon of golden syrup
2 eggs
50g mixed peel, chopped
Granulated sugar, to sprinkle over the top

Method:

Pre-heat your oven to 170°. Mix the flour, caster sugar, ginger and salt in a bowl. Melt the butter and golden syrup in a small pan, once melted, take off the heat and leave to cool slightly.

Take your eggs and separate the yolks, beat the yolks and slowly add them to the cooled syrup and butter. Whisk well. Tip this into the dry mix and combine. Set aside the whites of the eggs for later.

Take your mixed peel and chop it up into tiny pieces. Stir this through the mixture.

Grease a Swiss roll tin, spread the mixture in the pan making sure it’s even all over. Brush the top of the gingerbread with some of the egg whites and sprinkle the granulated sugar over the top, use as much or as little as you like. I used about 2 tablespoons of sugar.

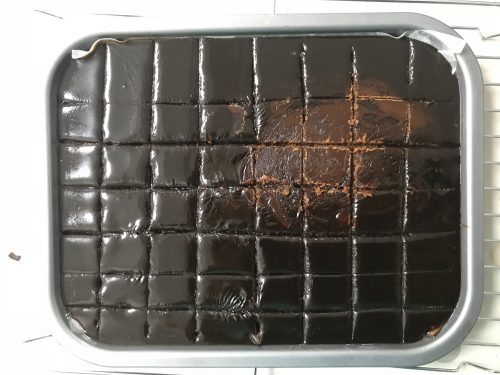
Bake in a pre-heated oven for 25-30 minutes until golden brown all over. As it is cooling, with a sharp knife cut it into rectangles in the tin and leave to cool. Once fully cool you should be able to cut the biscuits easily across these lines with a knife.

Recipe: Grasmere Gingerbread biscuits

Proper Grasmere gingerbread is then portioned up and wrapped in greaseproof paper. This would be a lovely way to wrap up your gingerbread, especially if you’re going to give it as a gift, perhaps at Christmas.

These are lovely gingerbread biscuits, but they’re not quite as lovely as the originals. If you’re ever visiting Grasmere in the Lake District, I urge you to visit the tiny gingerbread shop by the church. Just follow your nose and you’ll soon find it!

Recipe: Grasmere Style Gingerbread biscuits

If you enjoyed this recipe, you might also like to try these Crumbly Cranachan Shortbread with Whisky rounds.

Grasmere Style Gingerbread biscuits

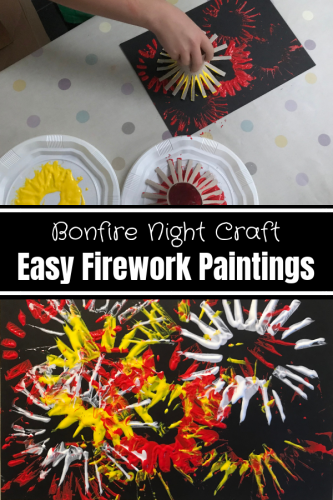
Bonfire Night Craft: Easy Firework Paintings

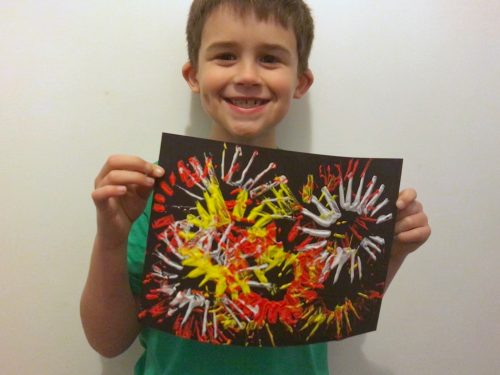
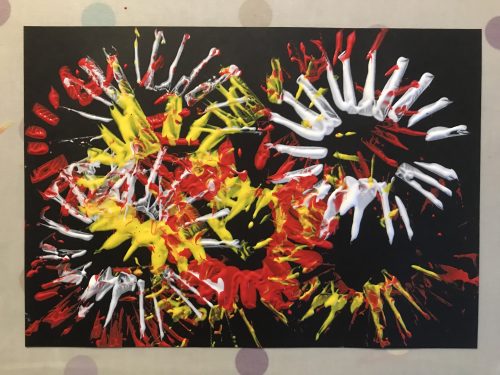
In the run up to Bonfire Night, we like to do some themed crafts. I had some black card left over from another craft and I thought we’d do some firework paintings. They’re really simple to do and great for pre-schoolers, right up to adults. I joined in the fun too and although my painting wasn’t a patch on his, I still enjoyed it.

I sometimes feel a bit sorry for Bonfire Night. When I was growing up it was a much bigger celebration, these days Halloween gets all the attention. Not so in our house, I do enjoy putting together a Bonfire Night feast, wrapping up to go and watch a local firework display and having sparklers in the garden. It’s cold at this time of year, so having some crafts up your sleeve is never a bad thing.

Bonfire Night Craft: Easy Firework Paintings

Easy Firework Paintings

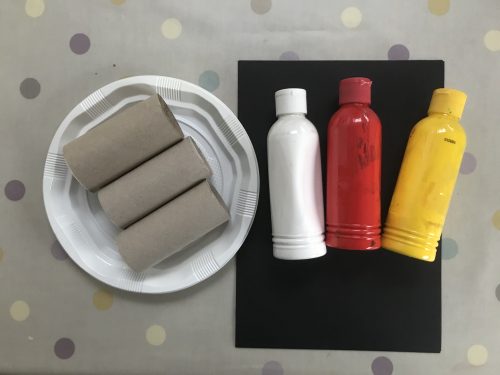
You will need:

Black paper or card
Cardboard toilet roll or kitchen roll tubes
Scissors
Paper plates or plates you can wash the paint off later
Coloured poster paint, I used three fireworky colours

Bonfire Night Craft: Easy Firework Paintings

How to make your Easy Firework Paintings:

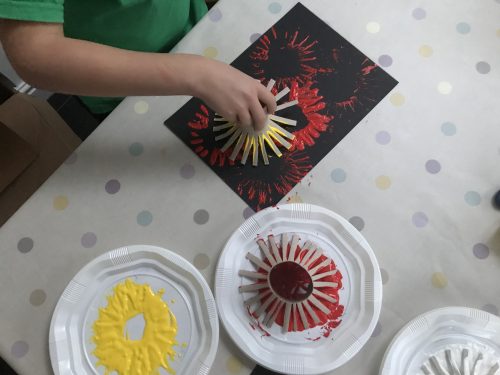
Take your poster paint and put a generous amount of paint on each plate.

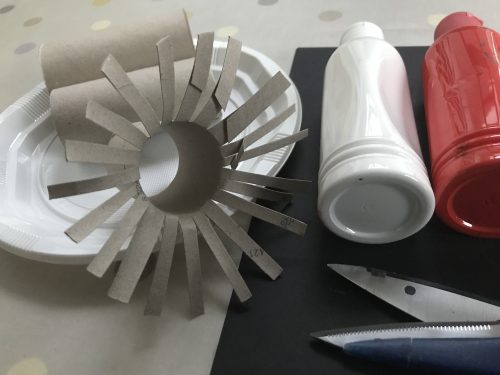
Using a pair of scissors (maybe get an adult to do this bit) cut a line about 6cm long and half cm intervals up the tube (see picture below). Once you’ve done this all around the tube, splay the cut pieces out.

Bonfire Night Craft: Easy Firework Paintings

Dip your cut tube into the paint and dab firework shapes onto your card. The painting looks best if you use two or three different colours to give the impression of a sky lit up with fireworks.

Try not to mix the paint colours up too much, though interesting colour mixes can make for quite a pretty firework.

Bonfire Night Craft: Easy Firework Paintings

Leave your paintings to dry and then stick them on the fridge or wherever you display your artworks! We think our paintings look pretty good. What do you think?

Bonfire Night Craft: Easy Firework Paintings

If you enjoyed this, you might like to try my recipe for Bonfire Night Treacle Toffee Pan Pops.

Bonfire Night Craft: Easy Firework Paintings

Children’s Books: Six Books about Remembrance

On the last day of school before half term I went along to my son’s school where they were having a special assembly about Remembrance Day. They’ve been taking part in the There But Not There project with the local church. Each class had taken a name of a soldier on the War Memorial in the school and done some research on the soldier. They then sang this song and there wasn’t a dry eye in the house!

Fairly unusually, we have two soldiers listed on the school War Memorial. They are my Great Uncles, both died horribly young in France. I’m very proud of these boys who went to war and didn’t come back, but I would like to know more about them. I’ve always spoken to my son about these two boys, but as he’s got a bit older, he’s started to understand what it all actually means. Over half term we did some reading and learned a bit more about the First World War, about why we remember and about Remembrance Day.

Children's Books: Six Books about Remembrance

Here are our six books about Remembrance 

Remembrance Day (Why do we remember?)by Izzi Howell. This is the first book we read on the topic and it is very comprehensive. Covering everything from the First World War right up to modern day conflicts; and poppies, memorials and Remembrance Day parades. It’s written for children aged 5+ and it’s a solid place to start exploring the topics of war, peace, conflict and remembrance. 

Charlie’s War Illustrated: Remembering World War One by Mick Manning. Mick Manning’s grandfather joined the army in 1914 and served right through the First World War. Fighting in the artillery on the front line in Egypt, Palestine and France, Charlie lived to tell his tale. Written for readers aged 6+ this book was nominated for the 2014 English 4-11 picture book awards. Charlie’s War doesn’t pull any punches, but it shares the reality of war on the front line in a way which is interesting and engaging for primary aged children.

Remembrance Day by Jane Bingham & Ruth Nason. Remembrance Day looks at the background to the First World War and looks at objects, such as poppies and the Cenotaph that are key to the day itself. Key words at the bottom of each section help children build their vocabulary and get a better understanding of the topic. It’s a simple book for children aged 6+ and will help children to understand why we remember.

Coming Home (My Story) by Jim Eldridge. For slightly older children (8-11 years), this first hand account of a 13 year old who goes off to war to find his father is both gripping and moving. Joe returns home after the war and finds life is very different life to the one he left behind. His father is injured and furious at Joe for going to war, plus the Spanish flu is raging. Joe may have survived World War One, but the danger isn’t over yet.

Poppy Field by Michael Morpurgo. Most famous for his incredibly moving story, War Horse, Michael Morpurgo has written a special book about the meaning behind the poppy with the Royal British Legion. This illustrated book shares the real horrors of war in a poignant way through the love and loss of one family. The book also includes a full-colour, illustrated afterword that explains the history that inspired the story.

Remembrance: Imperial War Museum Anniversary Edition by Theresa Breslin. For readers aged 9-12 years; this is the fictional story of a group of Scottish teenagers who become engulfed by what is to become known as The Great War. Determined to forge their own paths during a time of enormous upheaval, the five friends encounter the horrors of the trenches. Their lives will be changed forever – and nothing will ever be the same again. It’s an incredibly moving and powerful story, one which is very thought provoking.

Children's Books: Six Books about Remembrance

This November there will be a number of events and Remembrance Services that we will go to. We will remember those who gave their lives so that we could have the freedoms we enjoy today. We will never forget.

Family Game Review: Quirk! The Card Game

We are always on the look out for games we can take out and about with us. I always like to have something fun but tiny in my bag to bring out when we’re out for dinner or on a train journey or something. On a recent trip to Coniston in the Lake District I had one such thing up my sleeve – Quirk! The Card Game.

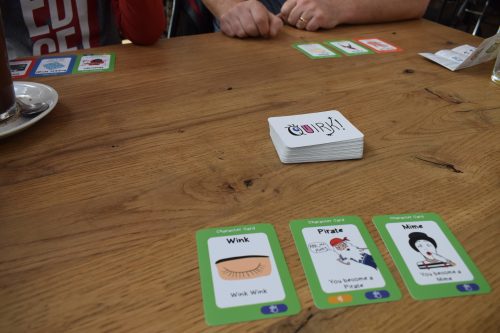
Quirk! is a new card game from Emmerse Studios. The pack contains 56 cards including; 13 Characters cards (39 cards), 7 Tactics cards, 3 Defence cards and 7 Skip cards. The pack also includes instructions. It’s a bit like a mad combination of Go Fish and Exploding Kittens. It’s actually remarkably easy to pick up and lots of fun. My almost 8 year old loved it, and his 40-something parents enjoyed it too!

Review: Quirk! The Card Game from Emmerse Studios

Each player gets dealt three cards to start with. The aim of the game is to collect three matching Quirk cards. The player with the most sets of cards at the end is the winner. Simple, yes?

I’ll be honest and say we did read the instructions a few times before we started playing, and we weren’t 100% sure of what we were doing when we began, but once we’d played for five minutes, it all became perfectly clear.

Review: Quirk! The Card Game from Emmerse Studios

You act out the Quirk card you want to any player of your choosing. So on your turn you might wink at one of the other players, they have to guess you’re after the wink Quirk card and if they have it, they give it to you. If they don’t, they say “Go Quirk” and you have to pick up a card from the top of the pile. There are tactic and defence cards which you can play if you need to. The instructions for using these cards are written on them. It’s all much easier than it sounds.

Quirk is suitable for up to 6 players aged 5+ and we all really enjoyed playing it. Each game takes about half an hour to play, so it’s great for a quick game when you’re out.

Review: Quirk! The Card Game from Emmerse Studios

It’s a standard sized pack of cards, so it’s very transportable and great for keeping in the car for trips out and weekends away. It can get a bit silly (my husband squawking like a parrot did attract some attention in the cafe we played it in), so if you’re self conscious, don’t play it in public.

Also available is Quirk! Legends which is along the same quirky lines, but with unicorns, dragons, superheroes and evil villains. Both games are available on the Quirk! website for £10 or on Amazon for £12.99.

We were sent Quirk! for review purposes. All images and opinions are our own.

Bonfire Night Recipe: Treacle Toffee Pan Pops

Treacle toffee has long been a favourite of fine. Sticky and sweet, it’s something of a love/hate treat. I’ve always enjoyed it, but not really enjoyed eating the sharp shards of broken toffee. It can be sticky to eat, if only there was some way of eating it without getting sticky fingers. To solve the sticky finger problem, I’ve come up with these Treacle Toffee Pan Pops – all the loveliness of treacle toffee, but neatly presented on a lolly stick. I can confirm they are absolutely delicious too!

Bonfire Night Recipe: Treacle Toffee Pan Pops

To me, Bonfire Night has always been a celebration of cosy autumnal food and flavours. We always have jacket potatoes heaped with hot toppings like chilli. There’s always hot dogs with onions, toffee apples, parkin with custard and treacle toffee. From now on I’m adding my Treacle Toffee Pan Pops to the list!

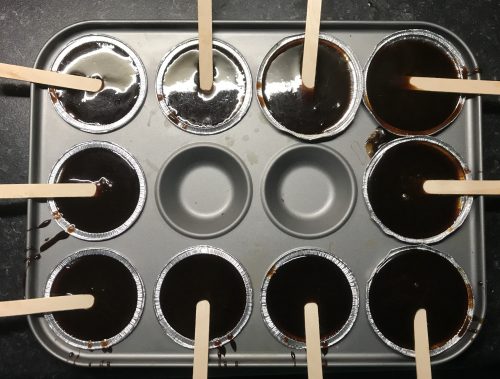
These treacle treats are set in shallow tin foil cases, the kind you might buy jam tarts in. After a bit of searching I found exactly what I wanted here on Amazon (this is an affiliate link. I might get a couple of pence if you buy them). You will also need some lolly sticks (or popsicle sticks if you’re in America), again you can find them here on Amazon (affiliate link).

I made 10 Treacle Toffee Pan Pops and poured the rest of my treacle toffee into a lined swiss roll tin so I could compare and contrast the two with my family, we all preferred eating the pan pops, they were just easier to manage. This recipe would make around 30 pan pops, give or take. It’s also helpful if you have a cooking thermometer, sugar can be a tricky beast and this will help you know when it’s cooked properly. Here’s one of those Amazon affiliate links to one.

Bonfire Night Recipe: Treacle Toffee Pan Pops

Treacle Toffee Pan Pops

Ingredients:

1 tablespoon of white wine vinegar
2 tablespoons of water
125g of unsalted butter
450g of soft brown sugar
225g of treacle

Method:

Put your vinegar, water and butter in a large saucepan and melt together, make sure you stir with a wooden spoon. When your butter has melted add your sugar and treacle.

Gently heat the mixture, stirring occasionally with a wooden spoon so nothing sticks to the sides or the bottom of the pan. Be careful not to splash anything out of the pan, it will burn. You need to boil the mixture to 138°C. It will take about 20 minutes to get to this point, don’t rush it.

When it’s boiled, remove it from the heat and let it sit until it stops bubbling.

Bonfire Night Recipe: Treacle Toffee Pan Pops

I set my foil tins in a cupcake tray because I felt they’d be steadier there. If you have enough trays, do that. Carefully (please do this very carefully) pour about 2 tablespoons of the treacle toffee mixture into each pan, it should be so that it’s near the top, but not pouring over. The liquid toffee is very hot at this point.

Once you’ve filled all of your tin foil pans, take your wooden lolly sticks and place them in each one. Leave them for about ten minutes and then go and turn the sticks over in the toffee, this will help the stick to sink into it better. Leave the pops to cool for as long as you can, at least two hours.

When they’re fully cool, wrap each one in cellophane, I used cellophane bags I’d bought to put treats in. Keep them in an airtight tin until Bonfire Night.

Bonfire Night Recipe: Treacle Toffee Pan Pops

If you want to make a tray of treacle toffee, use the same method but pour the mixture into a greased Swiss roll tin. When the mixture is cooling, mark out squares with a sharp knife and go over those marks every half an hour or so until it’s fully cool. With luck your toffee will snap into neat little squares. Bag those up in cellophane and suck them around the bonfire!

If you enjoyed this recipe, you might also like to try this honey spiced pumpkin pie.

Bonfire Night Recipe: Treacle Toffee Pan Pops

How to paint a Halloween t-shirt with Little Brian Fabric Paint Sticks

This week is half term and we are filling the week with trips to the park and some crafts and activities at home. One thing we’ve been doing is decorating some t-shirts for a party we are going to next week. We got our hands on a packet of Little Brian Fabric Paint Sticks and we’ve been letting our creativity run wild ever since.

On Halloween this year we are going to a not Halloween party. There will be party games and some spooky stuff, but it’s NOT a Halloween party. Dressing up is encouraged, but the usual zombie/witch/Dracula type costumes are quietly discouraged. It’ll be more fun than it sounds, with apple bobbing, party games and treasure hunts. We will be wearing our decorated t-shirts, and we think they’re pretty cool.

Little Brian Fabric Paint Sticks

Painting Your Own T-shirts

You will need:

A plain white t-shirt
Large chopping board
Plastic bag
A stencil (an image printed on card and cut out with a craft knife)
Masking tape
Little Brian Fabric Paint Sticks

How to paint your own t-shirts:

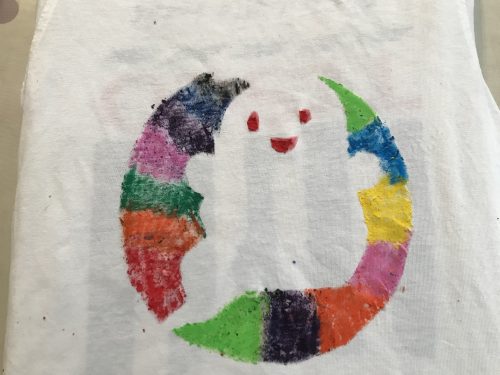
First make your stencil. I looked on Google for a simple spooky image and chose a cartoon of a ghost against a black background. I found this one on Free Stencil Gallery. Print it out on a piece of card and using a craft knife, cut out all the black bits around the ghost.

Little Brian Fabric Paint Sticks

I then took my large chopping board and covered it in a plastic bag (so any paint wouldn’t go through). Then I pulled the t-shirt over the chopping board and tucked the excess fabric around the back and laid it on the table. Make sure the fabric is flat and not rippled or baggy.

Using a few pieces of masking tape, tape the stencil onto the front of the t-shirt. This is to keep it in place while you paint.

Take the Little Brian Fabric Paint Sticks and read the instructions. The Little Brian Fabric Paint Sticks are a bit like crayons, so there’s no dripping, spilling or mess. Take each paint stick and colour in the area you want to paint. We decided to have a rainbow background for our ghost, so we coloured in little patches in the stencil.

Little Brian Fabric Paint Sticks

Once you’re happy with how it looks, iron or blow-dry the paint on, following the instructions in the packet, it will withstand washing up to 40’C. Your t-shirt is now ready to wear and be admired.

The Little Brian Fabric Paint Sticks are really easy to use, there’s no mess and they are great for kids to use too. Each Fabric Stick has vibrant, colourful paint that you literally twist up and down, exactly like a glue stick to paint with!

Little Brian Fabric Paint Sticks

Little Brian Paint Sticks are available from Hobbycraft, Tesco and directly from their website. 

Disclaimer: We were sent a pack of Little Brian Fabric Paint Sticks for review purposes. All images and opinions are our own.

Book Review: The Crocodile and the Dentist

Getting my son to brush his teeth is one of life’s great challenges. I’ve tried both the carrot and the stick and nothing, absolutely nothing could persuade him to brush his teeth. I did wonder if a story about a crocodile who had to go to the dentist might somehow encourage him, but only time will tell. This week we’ve been reading The Crocodile and the Dentist by Taro Gomi.

Book Review: The Crocodile and the Dentist

The Crocodile has a toothache but he’s afraid of the dentist. The dentist wants to help, but he’s afraid of the crocodile. The Crocodile and the Dentist soon learn to be brave and face their fears.

The Crocodile and the Dentist is a lovely, easy to read story with lots of repetition which I know from my own son, children like. This book is aimed at children aged 3-5 years and it’s a simple story that they will enjoy. I know I enjoyed it, especially the mirroring thoughts from both Crocodile and Dentist.

Author, Taro Gomi originally wrote and published this story in Japan in 1984. His style of illustration is eye-catching areas of textured colour on top of simple drawings. Taro Gomi one of Japan’s most successful children’s book illustrators, having illustrated over 400 children’s books over the years.

Book Review: The Crocodile and the Dentist

The Crocodile and the Dentist is full of simple humour and empathy. You can empathise with the Crocodile who has all of those teeth to look after, and the Dentist who has to look after all of those teeth.

It ends with a reminder to brush your teeth. You might escape a visit to the dentist if you do!

The Crocodile and the Dentist by Taro Gomi costs £12.99 in hardback. It’s published by Chronicle Books and it is available from a wide range of bookshops including Amazon.

Disclosure: We were sent a copy of The Crocodile and the Dentist for review purposes. All images and opinions are our own.

Review: 60th Anniversary Paddington Bear Plush

Paddington Bear has been a part of the nation’s childhoods since 1958. The tale of the lost bear from Darkest Peru has delighted and inspired generations of children, me included, and now my son loves Paddington too. This October is Paddington’s 60th anniversary month, will you be celebrating 60 years of this little lost bear from Darkest Peru?

In 1958 the first Paddington Bear book, A Bear Called Paddington was published. Little could Michael Bond have known then how many people around the world would come to know and love this small bear, with his recognisable bush hat and duffle coat.

Review: 60th Anniversary Paddington Bear Plush

To celebrate this milestone anniversary, Rainbow Designs have unveiled their brand new Paddington Bear Classic range. It features a host of cuddly toys for enthusiasts and fans of Paddington to cuddle and love. One of the most eye-catching in the range is the new Large Cuddly Anniversary Paddington Bear with Scarf. This Paddington Bear plush is snuggled up in a checked scarf complete with “Please look after this Bear” label. This plush is cuddly enough to appeal to young Paddington fans and stylish enough to look the part on a collector’s shelf.

The design of this Anniversary Paddington Bear is inspired by the original artworks by Peggy Fortnum and he does look very true to the original bear. I love his battered felt hat and the label (which you can remove if you want) is a lovely extra touch. The snuggly scarf with the 60th anniversary badge is what will make this bear such a collectible. His coat isn’t removable and the duffle coat toggles are printed on, which I think is a much better option if you’re giving this bear to young children.

Review: 60th Anniversary Paddington Bear Plush

This Anniversary Paddington Bear is suitable from birth and as soft and cuddly as they come. He is 23cm tall and costs around £24.99.

The 60th Anniversary Paddington Bear would make a wonderful gift for a Paddington Bear fan of any age. With Christmas coming, who will look after this bear?

The 60th Anniversary Paddington Bear from Rainbow Designs is available from a wide range of retailers including John Lewis.

Review: 60th Anniversary Paddington Bear Plush

Disclaimer: We were sent this 60th Anniversary Paddington Bear plush for review purposes. All images and opinions are our own.