Recipe: Baked Guinness Cheesecake

A few weeks ago I had the idea for this Guinness Cheesecake. Given that I’d never made a cheesecake before, I knew it would take some thought, planning and possibly a couple of failed attempts that would end up in the bin. I read a lot of recipes and a lot of advice about how to bake the perfect cheesecake. Then I went and did things my own way.

Most people use digestive biscuits as their cheesecake base, but my Guinness Cheesecake needed something darker, so I opted to use bourbon biscuits instead. How was I going to turn a plain vanilla cheesecake into a Guinness Cheesecake? I needed to make a thick batch of Guinness syrup and spoon that over. This cheesecake would take a few days to make fully from scratch, what with needing to make the Guinness syrup first, but boy, was it worth it. It’s the best thing I’ve baked in ages!

Recipe: Baked Guinness Cheesecake

Baked Guinness Cheesecake

Ingredients:
300g bourbon biscuits, crushed
100g melted butter
1 tablespoon of Guinness syrup
600g cream cheese
100g caster sugar
1 tablespoon vanilla essence
1 tablespoon lemon juice
4 eggs
Half a jar of Guinness syrup
Melted white chocolate to decorate

Method:

Whiz your bourbon biscuits up in a food processor until you have fairly fine crumbs. Add your tablespoon of Guinness syrup and melted butter and whiz through again.

Grease a springform tin, I used a 30cm one. Press your biscuit crumb mix into the bottom of the tin. Make sure it’s evenly spread and well-packed. Pop the tin in the fridge for half an hour to firm up.

Pre-heat your oven to 170°.

In a large mixing bowl, beat your cream cheese, then add the sugar, vanilla essence and lemon juice. Add the eggs one by one taking care not to beat them too hard, you don’t want to create air bubbles in your mix.

Take your base out of the fridge and wrap the base of the tin in foil, some mix may leak out so it’s best for your tin to have a foil “nappy” to catch the drips. Put your springform tin on a baking tray too, it just makes it easier to take out of the oven.

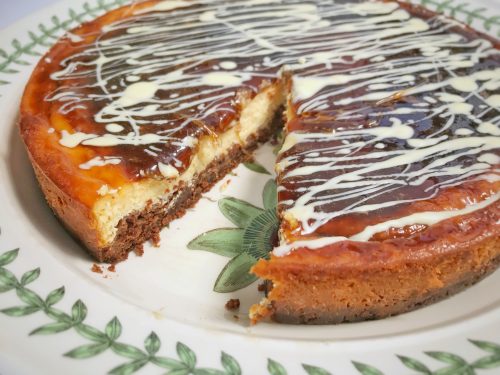
Bake for an hour. Keep an eye on it and keep the oven door shut as much as you can. Once the cheesecake has risen all over (mine had a dip in the centre until right near the end), turn your oven off and leave the door shut. This will stop your cheesecake from cracking. Leave it as long as you can, after half an hour I opened the oven door a fraction and I left it overnight to cool fully before decorating.

Carefully remove the cheesecake from the tin and put it on a large plate or whatever you’re going to serve it on. You ideally want something with a bit of a lip to catch any syrup which slips off the cheesecake.
Recipe: Baked Guinness Cheesecake

Depending on the consistency of your Guinness syrup, you may want to re-boil it until it goes thick like a slightly spreadable toffee. If you do this, make sure it’s more or less cool before you pour it on your Guinness Cheesecake.

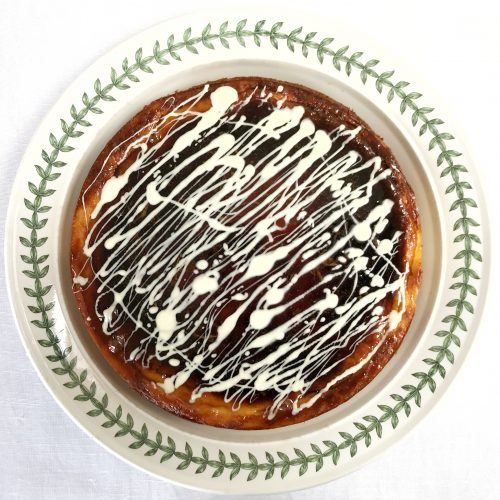
To decorate, pour your thick Guinness syrup over the top of your cheesecake, just enough so it sits on the top. Melt some white chocolate and artistically drizzle it over the top of your cheesecake, then admire your hard work!
Recipe: Baked Guinness Cheesecake

This Guinness Cheesecake is a real beauty of a cheesecake. It’s the perfect celebration cheesecake and it’ll feed an appreciative crowd. The Guinness is both sweet and savory at the same time, and it has a wonderfully bitter edge. It’s a fantastically grown up cheesecake which is so good, even my son approves of it.

Recipe: Baked Guinness Cheesecake - Pure Genius!

STEM Learning: Growing Egg and Cress Heads

Tasked with coming up with some interesting crafts and things to do with three children during the half term, I thought we’d start our week by making some egg and cress heads. I thought it would be interesting to watch them grow over the week. They’re easy to put together and all three had great fun making them and watching them grow over the week.

This activity is perfect for my 7 year old who is in Year 2. Cress grows incredibly quickly, and almost before your eyes. This fast growing crop was really exciting for the children to watch growing. Each day they found a new thing to be excited about. The best day was when they got to try eating the peppery cress, it’s a rare sight watching three children delightedly eating their greens!

STEM Learning: Growing Egg and Cress Heads

Growing egg and cress heads is a great opportunity for children to talk about their observations about how the seed grows into a plant and guessing what will happen next. It can also help to promote scientific thinking and helps with linking science to real life experiences.

Growing Egg and Cress Heads

You will need:
A hard boiled egg each
Cotton wool
Cress seeds
Felt tips to decorate your egg

STEM Learning: Growing Egg and Cress Heads

How to make your egg and cress heads:
Hard boil your eggs and get a grown up to carefully take the top off and scoop out the egg inside.

Gently decorate your egg however you want. We drew pictures of cats and dogs on ours, but you could do almost anything.

Fluff up some cotton wool and put it inside the egg. Then pour some water over the cotton wool. Sprinkle some cress seeds on the top of the cotton wool and put on a windowsill in an egg cup.

Check the progress of your seeds every day, sprinkle more water on the seeds every so often. Within a week all of your seeds should have sprouted and your egg head should have a thick crop of cress hair!

STEM Learning: Growing Egg and Cress Heads

If you enjoyed this, you might also enjoy this Jelly Bean STEM Architecture. 

STEM Learning: Growing Egg and Cress Heads

Recipe: How to make Guinness Syrup

Why would you want to make Guinness syrup I hear you ask? My answer? Because it’s completely awesome, that’s why. This lovely syrup has a surprising number of uses; it’s pretty simple to make and it has all the complex bitter, stouty flavours of Guinness, but in a sweet form which makes it fabulous for puddings and cocktails.

I have many plans for my Guinness syrup, so do keep your eyes peeled for recipes in the coming weeks, but first, let’s make a batch ready to be drizzled over pancakes, stirred or shaken into cocktails and even baked into cakes.

Recipe: How to make Guinness Syrup

How to make guinness syrup

Ingredients:
500ml bottle of Guinness
500g of sugar

Method:
Tip your Guinness and sugar into an enamel pan or a preserving pan, stir carefully with a wooden spoon on a gentle simmer until the sugar has dissolved.

With the lid off the pan, and stirring frequently, gently simmer the liquid for at least an hour. I simmered my syrup for nearly 2 hours until it reached a thick pouring consistency, slightly looser than golden syrup. Depending what you need your Guinness syrup for, simmer it until it’s the syrupy consistency you need.

Make sure you have a couple of squeaky clean jars or bottles which have been sterilised ready for your syrup. To sterilise your jars, put your clean jars in a low oven for at least half an hour. Carefully remove your jars from the oven (they will be incredibly hot) and pour in your syrup. I suggest you use a jug and a funnel for this. Work quickly and carefully and get the lids on your jars while everything is still hot. Leave your syrup to cool overnight and it’ll be good to go in the morning.

How will use your Guinness syrup? I think it’s got so many possible uses, but drizzled over plain vanilla ice cream would be a pretty good start!

Recipe: How to make Guinness Syrup

Children’s Books: Five Superb Books About Science

One of my son’s favourite things is science. We can often be found at a science museum, or experimenting at home. He also loves to read books about all kinds of science; with a particular focus on dinosaurs, space and the earth sciences. I’ve picked out five of our favourite books about science, each one is a great introduction and resource for science mad kids!

Here are my Five Superb Books About Science –

First Encyclopedia of Science by Rachel Firth published by Usborne is a lovely basic introduction to science. Suitable for younger children this children’s encyclopedia is packed with easy-to-read text and lively illustrations which  introduces a broad range of basic science topics. It’s a great first step into science for younger children!

Children's Books: Five Superb Books About Science

Bug Hotel by Libby Walden and illustrated by Clover Robin is a beautiful book aimed at 3-6 year olds. Each page details the hotel habitat where creepy crawlies of all shapes and sizes can find a place to stay. Lift the flaps to find out facts about your favourite garden insects and learn how a bug hotel can create a sustainable, safe environment for insects and mini-beasts.

365 Science Activities by Minna Lacey is jam-packed with fun science activities and experiments. With a different activity or experiment for every day of the year, this book is filled with hands-on science you can do at home with everyday things you’ll find around your home. This book is perfect for inspiring future scientists!

Astronaut Academy by Steve Martin is a wonderfully fun book for aspiring astronauts. This activity book will test their ability to manage life in space, working on their hand-eye coordination and putting them through obstacle courses; building a balloon rocket, learning basic first-aid skills, how to deal with weightlessness, and doing fiddly things while wearing big gloves! The book also includes stickers, a poster, board game, press-outs, and a model space shuttle; in fact everything an astronaut needs to get started!

National Geographic Kids – Everything Volcanoes and Earthquakes by Kathy Furgang. The National Geographic Kids series is fantastic for explaining things in ways children will understand. We are big fans of the Nat Geo books and Everything Volcanoes and Earthquakes is one of our favourites. Packed with incredible photographs and facts, this book takes a fun approach to science; introducing kids to plate tectonics and the tumultuous forces brewing beneath the Earth’s surface. 

Do you have any favourite books about science you read with your children? 

Children's Books: Five Superb Books About Science

Blogger Q&A: Who is HodgePodgeDays?

Colette from We’re Going On An Adventure has tagged me in a Blogger Q&A. I thought it might be nice to share some random information about me with you all – especially if you’re a newer reader!

HodgePodgeDays

When was the last time you cried?
I cry all the time over almost anything. I think the last time I cried was when my son won a prize at school. Which was on Thursday. It’s some kind of miracle I’ve not cried for three whole days!

If you were another person, would you be a friend of yourself?
I think so. I think I can be pretty good company. I’m a good listener and pragmatic with the advice I give. I’m a bit of an introvert though, if I want to hide in my cocoon I will do, which might leave you wondering where I’ve disappeared to.

Do you use sarcasm a lot?
Yes. I’m incredibly sarcastic and most people don’t get my sense of humour which has been described as “as dry as a bone, actually, even drier than that”.

What’s the first thing you notice about people?
Their eyes. Then how they treat other people. I’m pretty big on kindness and respect and if you aren’t kind or respectful to me or other people then I won’t have much time for you.

Scary movie or happy endings?
A happy ending please. I don’t like being scared, if I did do I’d just look at my bank statements.

Favourite smells?
I’m weird. I like solvents. My Dad worked with chemicals so there are certain chemical smells which remind me of him and remind me of my childhood. There’s a printing chemical which is used to wash printing presses called “blanket wash” which for me is the nicest smell in the world.

On the flipside I also like herbal smells, particularly rosemary. It’s just a very calming smell.

What’s the furthest you’ve ever been from home?
America when I was 13. I feel very wedded to Manchester and have no great desire to be far from home for too long. That doesn’t mean I don’t like to go away on holiday, but a fortnight is about my limit.

20 questions Sol Katmandu Hotel, Majorca with Jet2Holidays

Do you have any special talents?
Not really. I asked a few friends and they told me I can write pretty well and also when I make my eyes go big I look like a Snapchat filter. Only one of these facts will make it onto my CV.

Where were you born?
Didsbury in South Manchester. Apart from my three years at uni, I’ve lived here all my life.

What are your hobbies?
I’ve recently joined the WI and I like crafting and baking, I blog about both of those quite a lot. I also like going to the pub but I’m not sure that’s technically a hobby.

What did you want to be when you grew up?
Growing up I wanted to be a writer. I went to uni and studied journalism, then left and wrote for a local paper for a while. I ended up getting a series of admin and managerial jobs to pay the bills, but when I started blogging in 2013 I felt like I’d gone back to doing what I always wanted to do.

How many countries have you been to?
Hmm let me see (it’s not a massive number)…
Spain, Germany, America, Holland, Cyprus, Ireland, Sweden and Norway.

What was your favourite/worst subject in School?
I pretty much hated school and don’t look back on those years with any kind of fondness. At school I hated maths and I think the subjects I tolerated most were drama or English. I was pretty badly bullied at school so those years have very few redeeming features.

What is your Favourite drink?
Lager, gin, lime and soda or a nice cup of tea or coffee. Depends on my mood and where I’m drinking. I’ve currently got a weak orange squash on the go. Exciting yes?

What would you (or have you) named your children?
My son is called Ben, had he been a girl he would have been Scarlett Eleanor, or Red Nell for short. I had different ideas back then.

Fractional Mesotherapy

Who are some of your favourite YouTubers?
I don’t really watch much on YouTube. I realise this marks me out as some kind of dinosaur. There are two very different channels I subscribe to but always catch up on when I can are Colette from We’re Going On An Adventure and JaackMaate.

How many Boyfriends have you had?
Very few. I met my husband when I was 16 and we got together two years later.

Favourite memory from childhood?
On Thursday nights, my Dad who was a magician used to have his friends come round to hone their magic tricks. We used to sneak downstairs in our PJs and his friends would show us their tricks. It was always the highlight of our week.

How would you describe your fashion sense?
Scruffy casual. I live in jeggings and plain tops. I like to be comfortable and working from home I hardly see anyone, so there’s no need to dress to impress.

Tell us one of your bad habits!
I bite my nails and I check Twitter every 8.4 seconds. These two facts are unrelated!

I’m tagging some other bloggers who I’d love to do this Blogger Q&A – over to Rebecca, Helen, Latoya and Emma. 

Easter Treats – Make and Melt Chocolate Egg Heads

Making and baking is one of my most favourite things to do with my son. Over the half term we went away with some friends, and with three children to entertain I thought I’d take along some simple crafts and kitchen makes to do with them. This was a brilliant idea, the kids loved our daily craft sessions and I got bonus points from the other adults for keeping them entertained. One of the things I packed was a Make and Melt Chocolate Egg Heads kit from choconchoc.

Easter Treats - Make and Melt Chocolate Egg Heads

This self-contained kit was brilliant to take away with us and had pretty much everything we needed. The Make and Melt Chocolate Egg Heads kit from choconchoc costs £12 and includes a large bag of milk chocolate buttons, a paper chef’s hat, a bag of sweets to decorate with and the moulds for the chocolate eggs. The kit is suitable for ages 6+ with adult supervision.

I have tried to make chocolate eggs before, with little success. I liked the simplicity of this kit and I had high hopes that it would be both easy and successful. Or at least more successful, which it was!

Easter Treats - Make and Melt Chocolate Egg Heads

To make, you carefully melt the chocolate. I did this in a glass bowl over a pan of water. I stirred it and stirred it until it was melted, then called the children over. After liberally greasing the moulds as instructed, I got the children to dollop the chocolate in the moulds and spread the chocolate about a bit. So far, so good. I left the eggs to set for a few hours and then went back to them.

For the life of me I couldn’t remove the egg from the moulds, so I scraped the chocolate out, re-melted it and greased the moulds very thoroughly. Again the eggs wouldn’t come out. I must have been doing something wrong, I’m not sure what.

Easter Treats - Make and Melt Chocolate Egg Heads

In the end I lined the moulds with cling film and tried again. This worked really well but didn’t produce a smooth egg. The egg was wrinkled which I actually quite liked. I stuck the two halves of the egg together with some melted chocolate and once that had set we stuck the sweets on with more melted chocolate.

The children were absolutely thrilled with the egg. It looked a bit rustic, but they’d made their very own chocolate egg and it tasted fantastic too. The quality of the Belgian chocolate in these kits is fantastic, it’s really creamy and rich and makes excellent eggs. Or should that be eggcellent eggs?

Easter Treats - Make and Melt Chocolate Egg Heads

Despite my failings as a chocolatier, I would absolutely get this or similar choconchoc chocolate kits again. The kids had a brilliant time making and eating them and I really liked how easy it was to make.

This self-contained kit was brilliant to take away with us and had pretty much everything we needed. The Make and Melt Chocolate Egg Head kit would be a excellent thing to do with the kids over the Easter break.

For more information about the Make and Melt Chocolate Egg Head from choconchoc, visit their website. You can also find choconchoc in John Lewis, Booths and Waitrose.

Easter Treats - Make and Melt Chocolate Egg Heads

We were sent this chocolate egg kit from choconchoc for review purposes. All images and opinions are our own.

How I learned to talk positively to myself every day

Five years ago I was in a horrible place, physically and mentally I was broken. It’s taken a lot of hard work to get me back to the pretty good place I find myself in today. It was a long and at times painful road. The thing that really helped me back to wellness was talking positively to myself; or rather talking to myself with a more positive voice.

I have always talked about myself negatively. I have a negative voice in my head which tells me how terrible I am, how ugly I am and how useless my life is. My negative internal voice has always had a terrible impact on my self-esteem. I don’t think the negative voice will ever really go away, but when it pipes up, I make a point of trying to find some positive things to affirm myself with.

How I learned to talk positively to myself every day

Five years ago when I was in that dark dark place, a friend sat me down and gave me a talking to. I needed to start digging myself out of the dark hole I was in. Every morning I would text them a positive thing about me. Some days it was really hard to find a good thing to say about myself, some days were easier than others.

Each time I sent a positive text to my friend I also copied it into the notes on my phone. When I needed some positive affirmation I could look back and remember good things, good times and the days when I was stronger, better, happier and know that more of those good days were ahead of me.

I no longer send those positive texts and I don’t list the good things each day. There are times when I can feel my mood dipping; my anxiety rising and I know I need to put my positivity pants on again and I make a list. I list the good things I am grateful for. I list the good things about me and my life and I try to balance every negative thing my internal voice throws at me with something good, something better, something incredibly positive about me.

It’s not an easy habit to get into, but if you struggle with your own negative voice then getting into the habit of finding something nice about yourself every morning and writing it down can help you focus a little on the positives when everything may seem quite negative.

It helped me to have someone to text my affirmation to; someone who would come back to me and say I can do better, or that’s not positive enough. It helped me to have someone to be accountable to.

It’s not a magic bullet which will cure depression, anxiety or low self-esteem. Talking positively to yourself is a tool in your armory which can help and did help me. I really do credit this daily habit I kept up for almost a year for helping to drag me out of the absolute depths of my depression.

I’ve looked back at my talking positively list. Here are a few of my positive thoughts and affirmations from that time… 

  • I know I can and will survive what life throws at me.
  • Overthinking and dwelling is bad. I can stop it and I will.
  • I am so lucky to be as loved as I am.
  • It’s a beautiful day and full of possibilities.
  • I can make good things happen to myself.
  • There is nothing to panic about. Everything is ok.
  • People can’t hurt me unless I let them.

How I learned to talk positively to myself every day

Recipe: Orange Poppy Seed Cake – a teatime treat!

Lemon and poppy seed cake is such a classic and one of my favourite bakes. It’s a cake that’s pretty easy to make and with a lovely drizzle icing, it always looks so homely and delicious. With a celebration in mind I decided to turn a cheery bag of juicy oranges into something a little bit special. It’s a little twist on the original, topped with candied oranges and bursting with sweet citrus flavours – my Orange Poppy Seed Cake is a teatime showstopper!

Recipe: Orange Poppy Seed Cake for Mother's Day

This Orange Poppy Seed Cake is made with Orange Zest Spice Drops which add a lovely freshly squeezed flavour to all kinds of cakes, bakes and savory dishes. I’d used the spice drops when I made a batch of delicious candied orange slices to decorate the cake with (you can find the recipe here) and also in the Orange Poppy Seed Cake itself.

Orange Poppy Seed Cake

Ingredients:
225g soft butter or margarine
225g caster sugar
275g self-raising flour
1 heaped teaspoon of baking powder
4 eggs
4 tablespoons of milk
25g poppy seeds
12 drops of orange zest spice drops

For the drizzle icing:
225 g icing sugar
12 drops of orange zest spice drops
Tepid water, added gradually

Method:
Pre-heat your oven to 180° and grease a deep 20cm cake tin. I usually put a circle of greaseproof baking paper at the bottom to help stop the cake from sticking.

In a large mixing bowl, cream the butter and sugar together until light and fluffy. Add the rest of the ingredients and mix well. Scrape into your cake tin, smooth the top and pop it in your pre-heated oven. Bake for 50-60 minutes. Poke it with a skewer to make sure it’s cooked through.

Leave the cake to cool in the tin, then turn it out put it onto your cake stand or serving dish.

Mix up your icing, drop your orange zest spice drops into the icing sugar and add the water gradually, mixing as you go until you have a drizzle icing of the right consistency – which is loose but not runny. Spread it over the top of the cake allowing some to dribble down the sides of the cake.

Recipe: Orange Poppy Seed Cake for Mother's Day Recipe: How to make Candied Orange Slices

Take your candied oranges and slice them in half, fan them around the top of the cake, gently pressing them into the drizzle icing so they stick in position. Now admire your pretty cake and serve with a lovely cup of tea!

If you enjoyed this, you might also like my awesome Turkish Delight Cake.


Recipe: Orange Poppy Seed Cake for Mother's Day

Easy Recipe: Sparkly Chocolate Cups

I love getting homemade cards and gifts from my son on Mother’s Day (and any other day he wants to make me something). As you can probably imagine, we’re quite big on baking at home and we bake for almost any occasion. I’m a firm believer in making life easy for myself. Whilst I’m happy to bake a fairly complex cake, there’s definitely space in my kitchen for incredibly simple recipes. I’ve made these Sparkly Chocolate Cups for Mother’s Day. They’re very, very easy to make and perfect for kids to make with a little adult supervision.

Easy Recipe: Sparkly Chocolate Cups for Mother's Day

Not only are they great for kids to make, if you lack confidence in the kitchen, these are so easy to make and look pretty impressive too.

Sparkly Chocolate Cups

Ingredients:
250g of good quality dark or milk chocolate
Cake decorating sprinkles, stars, silver balls, whatever you fancy

You will need:
A saucepan, a glass bowl which will sit in the pan, but so it doesn’t touch the bottom, a metal spoon, some cupcake cases – I used silicone but paper ones are fine.

How to make your chocolate cups:
Boil some water and pour the water into your pan so it’s about 3cm deep. Carefully place the glass bowl in the pan making sure the bottom of the bowl doesn’t touch the water. This is called a bain marie.

Break your chocolate up into small pieces and put it in the glass bowl, the water in the pan needs to be at a gentle simmer, not bubbling and boiling. Stir the chocolate until it is melted.

Once the chocolate is melted, with a spoon scoop about two dessert spoons of melted chocolate into each cupcake case. Gently shake each one so the chocolate settles.

Once you’ve used all of your chocolate, take your chosen sprinkles and sprinkle as much or as little as you like over the top of each chocolate. Leave them to cool for at least two hours.

Easy Recipe: Sparkly Chocolate Cups for Mother's Day

Once they’re cool you can either take the chocolates out of their cases and put them in a nice gift box or cellophane bag, or you could just present them as they are in their pretty cupcake cases.

They’re so easy to make and they look impressive, whoever you give these to will be as pleased as punch!

If you enjoyed this recipe, you might also like these super-easy love heart jam tarts.

Easy Recipe: Sparkly Chocolate Cups for Mother's Day

Make A Squash and a Squeeze Story Book Bag

Encouraging a love of books and a love of reading in some children can be a harder job that you’d imagine. It can be really fun and useful to try to bring a story to life. You could use silly voices, or act out the story with puppets, or put together a story book bag. A story book bag is a great way to bring a story to life. I’ve done one with one of our favourite books – A Squash and a Squeeze by Julia Donaldson.

A Squash and a Squeeze is the story of a little old lady lives all by herself in her little house but she’s not happy. Her house just feels too small, but what can she do? She seeks out the help of a wise old man who advises her to bring in a flappy, scratchy, greedy, noisy crowd of farm animals. When he eventually advises her to evict all of the animals, he house suddenly feels big again.

Make A Squash and a Squeeze Story Book Bag

A Squash and a Squeeze is a lovely story to read out loud. Like Julia Donaldson’s other books, it’s wonderfully rhythmic and really enjoyable. The illustrations in the book are fab too, full of life and action, though for copyright reasons I used royalty free images instead of the iconic Axel Scheffler illustrations from the book.

Story book bags are a lovely thing to make up. We chose one of our favourite books – A Squash and a Squeeze. I printed some suitable images onto card; cut them out and stuck them onto lolly sticks. I also gathered a few suitable props, like an egg and a jug and popped them in the bag alongside a copy of the book A Squash and a Squeeze.

You can download my story prompt cards here.

Make A Squash and a Squeeze Story Book Bag

My son absolutely loved the story book bag. It really helped bring the story to life for him. He loved using the props and acting out the story as I read it out. He enjoyed it so much, that once I’d finished reading he went on to make his own fun story using the characters.

Make A Squash and a Squeeze Story Book Bag

I’m really pleased that such a simple thing really brought the story to life. I’m delighted that it also encouraged my son to do some creative storytelling of his own. Do I have a future author on my hands? I hope so.

A Squash and a Squeeze is widely available from all good bookshops.

Make A Squash and a Squeeze Story Book Bag