Christmas Crafts: How to make Pretty Paper Baubles

It’s the week before Christmas and I’ve got a million things to do. One of them is to plan some things for me and the boy to do on Friday. We have a whole day to ourselves before the madness begins, and he’s already requested crafts and baking. Those I can do. I’ve been wanting to try to make some paper baubles for a few weeks, I finally had the chance this morning.

These paper baubles are so simple to do, but they look pretty smart and I’m sure they cutting and sticking will appeal to my son. Paper bauble making will definitely be on our agenda for Friday.

Christmas Crafts: How to make Pretty Paper Baubles

How to make Pretty Paper Baubles

You will need:

Coloured or patterned paper
A glass
A pencil
Scissors
A glue stick
A length of ribbon

How to make Pretty Paper Baubles:

You’ll need coloured paper, I used plain red paper and a patterned red paper which I thought would work well together. On your coloured paper, draw around the rim of the glass to make a circle. You’ll need at least 8 circles to make your bauble.

Cut your circles out and fold them in half. If you’re using patterned paper, the pattern needs to be in the inside of the fold.

Christmas Crafts: How to make Pretty Paper Baubles

Using the glue stick, glue the folded halves together; if you’re using plain and patterned paper, alternate them. Make sure your circles are well stuck together, you might want to press them under a heavy book for half an hour to make sure they’re firmly glued together. I found it best to make two halves of the bauble before putting the ribbon on.

To fix the ribbon in place, give the inside half of one side of your bauble a really good rub with the glue stick. Lay your ribbon in place and having given the other half of the bauble a good rub with the glue stick, press the two sides together. Your bauble is complete and ready for hanging up on the tree.

It’s as simple as that!

If you enjoyed this, you might also like to try –

How to make Pretty Paper Baubles

Kids Crafts: Simple Hand Print Christmas Wreath

I’m all about the Christmas wreaths at the moment and wanting to make a Hand Print Christmas Wreath before my son’s hands grow too big, this week we set our minds to making this lovely hand print wreath.

My son has just turned 8 years old and he’s growing so fast. A few days ago we were looking at some clay hand prints he did as a baby and we were marveling at how much he has grown. His hands are shaped like his father’s hands, square, stout and strong. In a year or two his hands will be the same size as mine. It’s going too fast, too fast.

Kids Crafts: Simple Hand Print Christmas Wreath
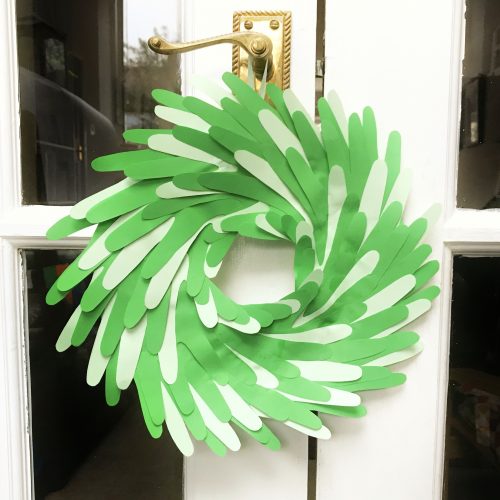
Wanting to preserve his hand print a little, this easy to make Hand Print Christmas Wreath is a lovely thing to do with children. Here’s what we did…

Make a Simple Hand Print Christmas Wreath

You will need:

A paper plate
A pencil
Scissors
Coloured paper, preferably two colours.
Glue, I used a Bostik Wide & Fine Glu Pen
Some ribbon

Kids Crafts: Simple Hand Print Christmas Wreath

How to make your Hand Print Christmas Wreath:

To begin with, take your paper plate and in the centre of the plate  draw around your child’s hand. Then carefully, making sure not to cut across the plate (because you’ll be making a ring out of it) cut out the hand shape, this will be your template.

Now carefully trim around the inner ring of the plate, so you have a nice ring to glue your hand prints too later. Cut a small slit in the top of the ring and thread a piece of ribbon through, knot the ribbon. This is how you will hang your wreath once it’s finished.

Kids Crafts: Simple Hand Print Christmas Wreath
Take your hand print template and draw around it on your coloured paper. I think I ended up using 8 pale hand prints and 22 darker hand prints, but the more you have, the better the effect I think.

When you’ve got all your hand shapes cut out, it’s time to sit down with the glue. Put a layer of glue all over the plate ring and then place your first hand print on it. Don’t press it down yet as you’ll have to slip another hand shape under it, and then under that.

Put a small dollop of glue on the palm of each hand shape and work around the ring layering the hands under each other. This will make sense when you’re doing it. If you’re using two colours of paper, make sure they are evenly distributed.

Once you’ve worked your way around the ring and the hand shapes are all overlapping each other pretty evenly, then you can press the shapes down onto the ring. Leave the glue to dry for a few hours. Once it’s dry it’s ready to be hung up. If you wanted you could add some embellishments, like little red pom poms or something.

Kids Crafts: Simple Hand Print Christmas Wreath

So there we have it, one very simple Hand Print Christmas Wreath – a great way to remember your children’s little hands. It’s a handmade Christmas decoration which will look great year after year.

If you enjoyed this, you might also like to try –

Kids Crafts: Simple Hand Print Christmas Wreath
Christmas Crafts: Paper Plate Holly Wreath

I love a good wreath at Christmas. We always buy a nice foliage one from our local Community Farm and have it on the front door. Inside the house we have a few more delicate wreaths on some of the internal doors, it just makes the place look more festive. I really enjoy making wreaths with my son. Once you’ve got your paper plate base sorted, you just let your imagination run wild. This week we’ve made a Paper Plate Holly Wreath and we’re really quite pleased with it.

Christmas Crafts: Paper Plate Holly Wreath

I had the idea for this Paper Plate Holly Wreath, but I knew that I’d probably be the one who would be spending some time cutting out the individual holly leaves and my son (with direction) would be doing much of the sticking. I sat down with a giant mug of tea and Say Yes to the Dress on TV and got cutting. I’ve no idea how many holly leaves I cut out, but it was about two A4 sheets worth.

Now that I’ve seen the finished Paper Plate Holly Wreath, I am really pleased with it. I think it looks really effective and I’ll be pleased to have it hanging in my kitchen this Christmas.

How to make a Paper Plate Holly Wreath

You will need:

A paper plate
Scissors
Green paint
Paint brush
A pencil
Ribbon
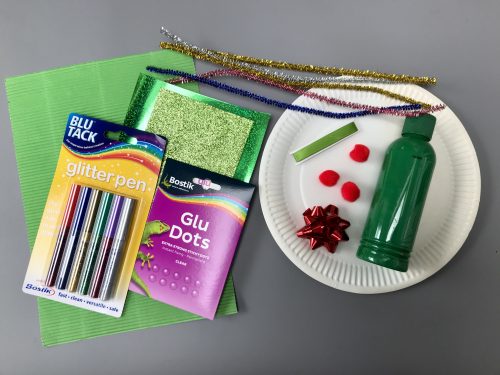
3 or 4 different kinds of green card or foam
Bostik Glu Dots
Red embellishments – mini pom poms, beads, paper shapes etc

Christmas Crafts: Paper Plate Holly Wreath

How to make your Paper Plate Holly Wreath:

With a pair of scissors, cut the middle out of your paper plate so it looks like a ring. Near the top of your wreath, cut a small slit where you can thread your ribbon through later.

Paint the wreath all over, front and back with green paint and leave it to dry. If you’re impatient like me, you can use a hairdryer to speed up the process. Your ring might need a second coat of paint on the front if you think it’s a bit patchy looking. This process does take a bit of time, so factor that in if you’re crafting with slightly impatient kids.

While your paint is drying, take the piece of cardboard which you cut out of the paper plate and draw a holly leaf on it. It needs to be about 5cm long, but you can make your leaves as big or small as you want really. Cut out your leaf shape, this is now your template.

I found whatever green card I had in my craft cupboard, which was a nice piece of corrugated card, some shiny card and some glittery card. I also found a piece of glittery foam. Using the pencil I then drew around my holly leaf template all over the back of each piece of card. Try and do this so you get minimal waste when you cut them out.

Once you’ve drawn all your holly leaves, you need to cut them out. This takes a little bit of time, so do factor that in.

Christmas Crafts: Paper Plate Holly Wreath

Once you’ve got a big pile of leaves, it’s time to stick them onto your wreath. Before you start sticking, thread your piece of ribbon through the slit you cut earlier and tie a knot in the ends securely.

Take a Bostik Glu Dot and stick it to the back of each leaf, towards one end if you can. Then stick your leaves however you like all over your wreath. We chose to stick the corrugated leaves all around the outside of the wreath. I suggested he try to stick them in pairs, like holly leaves often are and I think he did a good job.

With the other types of holly leaf, we arranged them in an attractive way around the inner circle of the wreath. Ben then stuck them in place. All the holly wreath needed now was berries. Using the red embellishments; mini pom poms, paper shapes and stick on gems, we decorated some of the leaves with red “berries”. I find stick on gems a bit tricky, so I always use a glu dot on them to make sure they stick.

Your wreath is now complete. It looks pretty impressive yes?

Christmas Crafts: Paper Plate Holly Wreath

Check out my other craft tutorials here!

If you enjoyed this wreath craft, you might also like to try these –

I am a Bostik Craft Blogger and I was sent the materials to create this craft from Craft Merrily. I have not been compensated for this post. 

Christmas Crafts: Five Festive Crafts from Baker Ross

This time of year really lends itself to crafting, especially with kids. Our small boy seems to be doing quite a lot of creative crafts at school at the moment, which means when he comes home he wants to do more of the same. I love crafting with him and this year we often make things to decorate the house with, or to give as gifts. I’ve picked out five festive crafts from Baker Ross for this month.

Baker Ross have a really huge selection of Christmas craft kits this year. It seems to be bigger and better than ever. Whether you’re making little gifts for friends, family or teachers, or crafting your own Christmas cards, the Baker Ross website is the place to look for craft kits and inspiration.

Christmas Crafts: Five Festive Crafts from Baker Ross

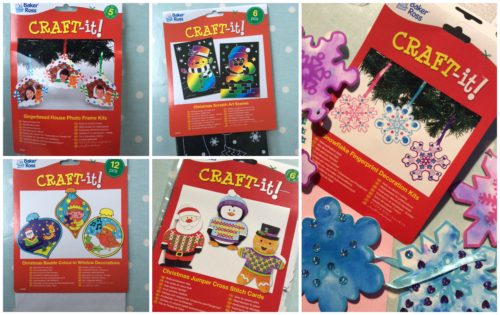
This year scratch art seems to be big in the craft world and I love the look of the Christmas Scratch Art Scenes kit, it comes with a little tool to scratch off your designs a it’s really rather eye catching. The small boy had a lot of fun discovering the rainbow of colours underneath too.

For slightly older children the Christmas Jumper Cross Stitch Decoration Kit is a lovely way to spend an afternoon. The kit comes with a set of plastic “needles” which are easy to handle and safe to use. These would make excellent Christmas cards for special friends.

The Christmas Bauble Colour-in Window Decorations will always be a popular craft activity. Simply colour in these stained glass style decorations which include Santa in his sleigh, an Angel, a Skiing Penguin, a Robin, an Elf and a Skating Snowman. They look really very effective.

One of the crafts my son enjoyed the most this Christmas was the Snowflake Fingerprint Decoration Kits. These kits include six foam snowflake templates, stick-on gems, 3 ink pads and ribbon. My son loved getting a bit messy with these and they’re now waiting to be hung up on the tree. 

Lastly, these Gingerbread House Photo Frame Decoration Kits would make a lovely gift for family members. All your little ones need to do is decorate their gingerbread house with the foam decorations provided and then stick their picture inside the frame. It’s a lovely fun gift.

There are so many more festive crafts on the Baker Ross website, not just for kids either. It’s well worth taking a look for craft kits and materials in general for your Christmas crafts.

What’s your favourite Christmas craft?

Christmas Crafts: Five Festive Crafts from Baker Ross

– I am a Baker Ross Ambassador –

Christmas Crafts: Make a Baker Ross Reindeer Crown

We were sent this reindeer crown from Baker Ross for review purposes. All images and opinions are our own.

Now the weather has taken a decidedly wintery turn I’m starting to get into the Christmas spirit. This weekend was an especially cold one, the small boy had a nasty cold and we decided to stay in, cosy in front of the fire and have a lazy weekend. Keen to get cracking with some Christmas crafts we busied ourselves by making a reindeer crown using hand prints and we were pleased with the results.

reindeer crown

The reindeer crown kits are available from Baker Ross and come in packs of 4 or 16. The packs contain everything you need to make the crown, except for glue, though we used double sided sticky tape because it’s quicker and there’s less mess than with glue.

The instructions are really easy to follow. Draw around your hands and cut out your hand print shape. I did the cutting because the small boy is terrifying with scissors or anything with a blade. The instructions suggest you use glue to stick the cut our hand shapes onto the headband; but I used double sided sticky tape for this. The other pieces, the ears, the reindeer hair and the holly and berries are self-adhesive, so the small boy peeled the backing paper off these and stuck them onto the headband.

Once he had finished he very proudly wore it around the house for a few hours. I think these make a nice alternative to the paper cracker crowns we are forced to wear for Christmas dinner; so I might make myself one to wear on Christmas Day.

reindeer crown

There was some parental supervision required with the cutting out of the hand shapes; but other than that he did the rest himself. It was something he enjoyed doing, he likes peeling and sticking things. It was pretty simple, but it kept him interested and entertained for a while. Another good and fun Christmas activity from Baker Ross!

Christmas Crafts – Making Snowman Mosaics

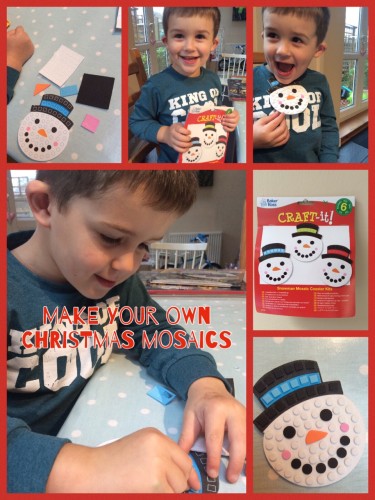
It may still only be November but I’m already starting to feel a bit Christmassy, I think it’s probably down to all the planning ahead of time so I’m less stressed later. They must be talking about it at school too as the small boy is all excited and ready to get stuck into the festivities. We’ve been busy baking Christmas cakes and starting to think about presents and decorations. One wet afternoon we sat and made some snowman mosaic coasters which I’ve decided would also look great as Christmas decorations.

The snowman mosaic coaster kit from Baker Ross contains everything you’ll need – a pre-cut snowman with a selection of foam stickers to stick on and decorate your snowman. If like me you want to turn the finished snowman into a Christmas tree decoration you’ll need a bit of ribbon and some sticky tape too.

Snowman Mosaics

Popping the foam stickers out of their sheet and peeling the backing off them is quite fiddly for little fingers, so it’s good practice for the small boy who has recently turned five. He did very well and managed to do most of them himself, only asking me to help him with the white circles, probably because there were lots and lots of them. This is a great task to help with hand-eye co-ordination and to improve dexterity and finger strength, which can really help with learning to write.

It’s a really simple kit and the snowman mosaics look really effective, too good to just be used as coasters, which is why I’m going to attach some ribbon so we can hang them on the tree once that’s up.

The snowman mosaics kits are from Baker Ross and come in packs of 6 or 18. It’s a nice tidy activity to do, it doesn’t require any setting up or any mess, just have a bowl ready to put the bits of backing paper in and you’re sorted. In fact I’ve put one in my bag for when we go out, it’s something we can do together while we’re having lunch that doesn’t involve an ipad. 

The thing I liked most about making the snowman mosaics was the chance to chat. We were both industriously beavering away on our snowmen, chatting away about school, Christmas and his recent birthday, and occasionally bursting into happy song. It was a fun half hour on an otherwise grim November day.

Crafts: Make Your Own Christmas Cards

I don’t know about you, but I almost weep at the cost of Christmas cards. I’m sure that and the cost of postage are one of the reasons why fewer people seem to be sending cards. In a attempt to cut some costs, and impressed by the handmade cards we were sent last year, I was determined to try my hand and make your own Christmas cards.

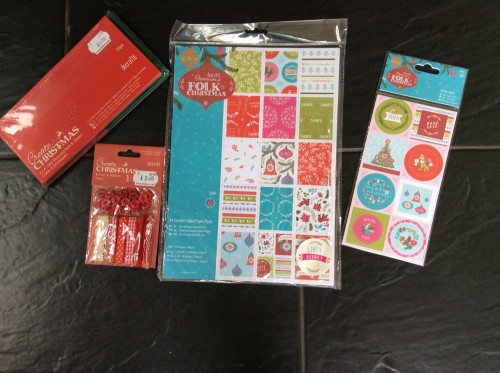
Back in September I visited the Brookside Garden Centre near Poynton in Cheshire, while I was there I popped into their craft shop. The shops stocks lots of docrafts products, knowing I already had some bits and pieces at home I just bought the few extra things I needed to make the cards. It’s a lovely craft shop and worth visiting if you’re in the area.

For my cards I used:
Red and Green Christmas Cards and envelopes (pack of 25)
Red Button & Ribbon Pack
Folk Christmas A4 Double Sided Paper Pack
Folk Christmas Linen Sticker Sheet Pack
A tube of Tacky Glue 60mls

The above items cost £13.95 in total for 25 Christmas cards, although there is plenty of paper and other bits and pieces left to make more cards than that. These cards cost approximately 56p each to make, plus my time.

make your own Christmas cards

My plan was fairly simple, use the Folk Christmas paper, cut it into squares, stick it onto the Christmas cards and decorate with the stickers, ribbons and buttons. Once I got started I realised what a difference the ribbons and buttons made, and slightly regretted not buying a bigger selection.

make your own christmas cards

I played about with different designs and colours and I think one or two of the cards I’ve made are pretty good really, so I’ll be using the better ones as templates for the rest of my pack.

I really love the look of the Folk Christmas range, it’s full of hand drawn traditional style Christmas illustrations and sentiments in contemporary colours. The 32 pack of papers features 16 different designs to use for card making.

make your own christmas cards

docrafts card making supplies are available from a large range of retailers and specialist craft shops. Homemade cards are always nice to receive because you know people have put their time and love into making them.

Note: We were sent the Folk Christmas Papers and Stickers free of charge for review purposes. I purchased the other items myself and all images and opinions are our own.

Christmas Crafting at The Ministry of Craft Manchester

One of the best things about Christmas is it gives me an excuse to get my craft box out and create wonky rustic homemade items for our home. A few years ago I made cross stitch cards for everyone, I often think about making my own cards and presents but I lack both confidence and time, so it was nice to sneak off for an afternoon at The Ministry of Craft in Manchester, to indulge my crafty side and have a little bit of pre-Christmas me time.

We arrived at The Ministry of Craft in the basement of the Fred Aldous store in Manchester’s Northern Quarter. I’d never been before but it is heaven for crafters of all kinds. The Ministry of Craft is a lovely, peaceful room, fully kitted out for all of their craft classes. We were there to decorate Christmas stockings, drink coffee, eat cake and have a natter. Sunday afternoons don’t get much better than that.

The lovely Ministry of Craft team gave us a quick run through of what we were going to do. We were given basic Christmas stockings and we were going to decorate them with fabric and bondaweb, with optional hand stitching, buttons, gems and anything else we could throw at it.

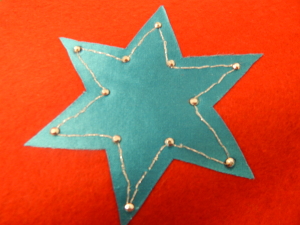
I opted to cut out and stick on three blue stars, the larger of the three I spent some time hand sewing some detail on with silver thread, then I used some adhesive gems to pick out the corners of the star, I was really pleased with how it looked, even if it did look a bit wonky rustic.

Ministry of Craft

Throughout the afternoon the Ministry of Craft team were on hand to talk us through whatever we were attempting. They were very patient and encouraging and made me really want to go back and try my hand at something else.

Proudly displaying our finished stockings

It was a really restful afternoon in a too busy month, it was so lovely to take some time out to spend focusing on a nice task, drinking coffee and chatting. We were invited guests of the Ministry of Craft and Growing Up Milk Info and I think we all had a really lovely crafty afternoon.

Christmas Crafts: Make Your Own Snow Globes

As a child I collected snow globes and I was fascinated by them, shaking them and watching the snow or glitter fall. I’ve always fancied making my own. I’ve seen a million craft tutorials online about how to make your own snow globes, so I thought I’d give it a go. It was remarkably simple.

I’m keen to reuse and recycle our household waste as much as we can. For years all our jam jars have been washed out and used for a range of other uses, such as, storage jars, re-filling with homemade jams, chutneys and pickles and for various crafts. This time I put one of my empty jars to a more creative use. I made my own festive snow globe.

To make your own snow globes you will need…

1 clean jar with a metal lid
1 figure which will fit in the jar
Glitter
A few drops of glycerine
Superglue
Water

snow globes

To make your snow globe…

Using the superglue carefully glue the figurine to the inside of the lid (make sure the lid is clean and dry), leave this for several hours, or overnight if you can. Once it’s stuck firmly to the lid you can continue making your snow globe.

snow globes

Tip around half a teaspoon of glitter into your empty jar, top the jar up with water and add half a teaspoon of glycerine. The glycerine helps the “snow” fall more slowly in the globe.

Once you’re happy and the jar is as full as it can be, dot superglue around the inside rim of the lid and screw it on the jar tightly. Leave it to dry properly for a few hours and then shake it up and enjoy your snow globe.

snow globes

It really is that easy, it looks really effective too. I suspect that this is a festive craft we’ll be doing again and again.