Recipe: Healthy & Hearty Double Bean Soup

I’ve been making this soup for the last couple of years, it doesn’t have an especially inspiring name, but it is so flipping lovely. I make it when I’m starting to feel rundown, or when the weather is changing for the worse and I need a winter warmer. It’s a simple soup, but one even my teenager really loves.

I call it double bean soup because I use two tins of beans in it, usually butter beans or cannellini, sometimes white kidneys beans or occasionally I’ll throw in a tin of chickpeas. My favourite combo is butter beans and cannellini though.

It’s got a hearty vegetable base, and it’s so packed with good stuff, you can stretch it out a little if need be by adding more stock and seasoning, but it makes a big pot, a really big pot, perfect for lunch for a crowd or freezing for future rainy days.

Double bean soup

This simple soup is pretty quick to throw together, but it does benefit from a gentle simmer once you get going. There’s a fair amount of chopping, but once that’s done and dusted, the hardest part is opening the tins of beans.

Double Bean Soup

Ingredients:

1 tablespoon of olive oil
1 large onion, finely diced
3 sticks of celery, finely diced
2 or 3 medium carrots, finely diced
1 courgette, finely diced (optional)
3 large cloves of garlic, more if you fancy it
1 tin of butter beans
1 tin of cannellini beans, or whatever white beans you like
2 tablespoons of tomato purée
500mls of vegetable stock
Salt & pepper
Dried Italian herbs, about a heaped teaspoon
Paprika, about half a teaspoon
1 teaspoon of red wine vinegar
Pesto to serve
Optional additions – chopped fresh or frozen spinach, chopped fresh parsley

How to make double bean soup –

Swirl some olive oil to a large pan or soup pot. Add your finely diced onions, celery, carrots and courgettes, cook until they’re soft but not brown, this might take around 20 mins.

Throw in your crushed garlic and cook that out for a few minutes. Add your two tins of beans, tomato purée and hot stock. You can always add more stock later, but 500mls should be enough to get the soup party started.

Set your soup pan to a gentle simmer and add salt and pepper, dried herbs, paprika and the red wine vinegar. Leave it to simmer for about half an hour. At this point, add a generous spoon of your favourite green pesto and stir through.

Now is the time to have a taste to check you’re happy with the seasoning. If you’re not, please add more of whatever you think it needs. Occasionally I might add a pinch of sugar if it feels too acidic, but usually I end up adding more pepper and that’s about it. If you’re adding chopped spinach, throw that in now and stir until it’s wilted and it all looks good.

To serve, pour into soup bowls, top with a bit more pesto and/or chopped parsley and serve with crusty bread.

It’s a big bowl of health and vitality, and just the thing to serve on a chilly autumnal day.

If you enjoyed this recipe, you might also like this Norwegian inspired cauliflower cheese soup.

Double bean soup

Recipe: Easy Veggie Mince Sloppy Joes

During those long lockdown days, I fell deeply out of love with cooking. Having a house full of people who weren’t legally allowed to go out meant that I was head chef for rather longer than I liked. As a result, the meals I produced became lazier, which is not always a bad thing.

My now 12 year old had discovered American YouTube at around that time, so my need to cook less often happily coincided with him making requests for simpler, American style food, like Sloppy Joes.

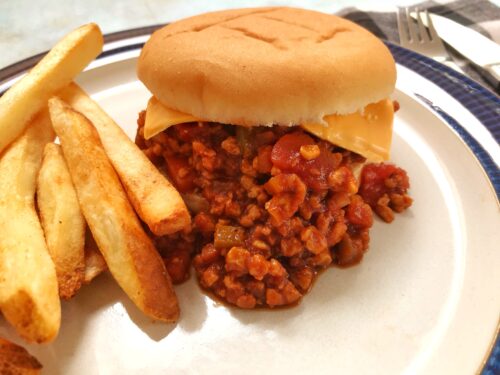
If you’re not sure what a Sloppy Joe is, it’s essentially savoury mince served in a burger bun, sometimes with a slice of processed burger cheese, sometimes not. It does sound a bit odd, but actually it turns out it’s a great way to launder extra veg into our family without them realising. It’s also pretty cheap to make and very quick to throw together after a long day of toil.

It’s now a pretty regular treat meal. My son goes nuts for it. I think it’s quite nice, but often prefer to top a jacket spuds with the mince than eat it like a burger, but that’s also fine.

Easy Veggie Mince Sloppy Joes

I’m vegetarian, so I make our version with veggie mince, and you can very easily make it vegan if you want to. My meat eating son never notices that it’s fake meat, but if meat is what you need, then just swap the veggie mince for lean beef mince and that would work really well too. Just make sure you brown it separately before adding it to the veg mix.

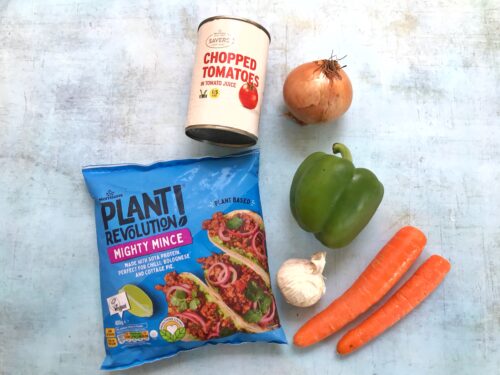
Although I’ve not yet made this in the slow cooker, it is the kind of recipe that would work well I think. I always think veggie mince gets more flavour in the slow cooker. I tend to use the Morrisons Plant Based Mince, it holds its texture pretty well and has a good flavour which works well in tacos and Sloppy Joes, but use whatever your preferred veggie mince brand is.

Easy Veggie Mince Sloppy Joes

Ingredients:

1 tablespoon olive oil
2 medium carrots, finely diced, or grated
1 pepper, finely diced
1 finely chopped medium sized onion
A stick of celery, finely chopped
2 cloves minced garlic
400g veggie mince
1 tin of chopped tomatoes
200mls passata
1 tablespoon of tomato purée
1 tablespoon mushroom ketchup (this is optional)
Generous splash of red wine vinegar
1 teaspoon of sugar
1 teaspoon of dried mixed herbs
1/2 teaspoon dried thyme
1 veggie stock cube
Salt and pepper to taste
Chilli or hot sauce, optional
Burger buns, oven bottom rolls work well for this
Burger cheese slices, optional

Easy Veggie Mince Sloppy Joes

How to make your veggie mince Sloppy Joes

In a deep frying pan with a lid, heat your oil and cook your diced vegetables, but not your garlic, gently until soft. Stir often and add a splash of water if you feel the pan is too dry. Once the veg is soft, add the garlic and stir in.

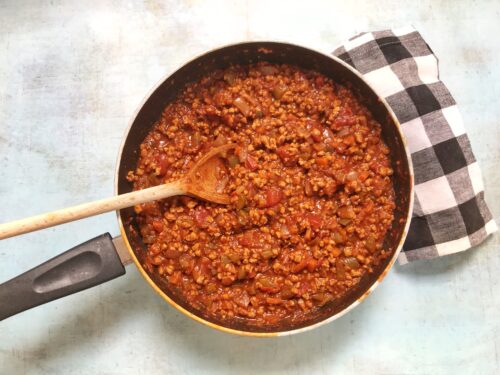
Add the veggie mince, chopped tomatoes, passata and the rest of the seasonings, stir well and put the lid in your pan leaving it to simmer gently for half an hour. Check if you’re happy with the seasoning, you can add more salt, pepper or whatever until you’re happy.

I like to use mushroom ketchup, as it adds a real depth of flavour to veggie mince dishes. It can be hard to get hold of, so you can maybe try Worcestershire sauce or soy sauce instead.

We like our Sloppy Joes to have a little bit of warmth, so you might want to add some of your favourite chilli sauce to give it a kick. It’s fine if not though, we don’t go wild with the hot sauce, but it is better for a little bit of it.

Easy Veggie Mince Sloppy Joes

Sloppy Joes are quite messy to eat, so before you serve it’s worth checking to see how wet your mixture is. You don’t want it too liquid, it’s best and less messy to eat when it’s a fairly dry consistency. I usually remove the lid towards the end of cooking just to let some of the liquid evaporate off. Likewise, if it’s too dry for your tastes, you can always add a splash of water to loosen it up.

To serve, split your burger buns, pile in a respectable amount of the Sloppy Joe mixture and if you like, top with a cheese slice. Serve with fries, or salad, or both!

Like I said earlier, savoury mince dishes are great for hiding veg in. I usually dice a carrot and then finely grate a carrot into the mix. You can add more peppers if you like, or mushrooms and courgettes work well too.

It’s a simple meal, but a popular one for good reason. This panful makes a hearty amount for three and there’s always enough for lunch the next day. It also freezes like a dream, so it’s worth doubling up and freezing some for a rainy day!

Recipe: Easy Veggie Mince Sloppy Joes

Vegetarian Recipe: Aubergine Bruschetta

AD/Complimentary ingredients. Aubergine is probably one of my favourite vegetables. Admittedly it took me a while to warm to it, if it’s not cooked properly it can be pretty disgusting. These days I am probably cooking with aubergine once a week. My recipe for imam bayildi is a firm family favourite, as well as the delicious dip, ikra, but I’ve also added Aubergine Parmigiana to my repertoire.

If I’m cooking a casual lunch for friends, I like to make a few simple things to go with a big salad. One of my favourite things to make are these tasty aubergine bruschetta. They’re packed full of vegetables, they’re pretty healthy and they always go down a storm.

Vegetarian Recipe: Aubergine Bruschetta

This week I ordered a Local Box from Creamline Diaries. With the Creamline Best of Local Box scheme, you can get brilliant locally produced food from independent producers delivered to your door. The meat is from my local butchers, the bread is from a fantastic local baker and fresh fish from the fishmongers. The fruit and veg are fresh from the market each day and you can even stock up your store cupboard. 

Vegetarian Recipe: Aubergine Bruschetta

My Creamline box was brilliant and contained pretty much everything I needed to make this delicious aubergine bruschetta. It’s just the thing if you want to shop local, but don’t really have the time to visit all your local shops, or if you just can’t carry all your shopping home. 

Aubergine Bruschetta

Ingredients:

1 large aubergine
1 medium onion, finely diced (I prefer red, but a white onion works too)
2 cloves of garlic
1 pepper, finely diced. It’s traditional to use green, but I used red for colour
Olive oil
12 ripe cherry tomatoes, quartered
Big handful of chopped parsley
Tomato purée, if you think it needs it
1 teaspoon of sugar
Salt & pepper
Ciabatta bread
A ball of mozzarella cheese.

Method:

I find it best to chop all the veg before I start cooking, so finely dice your onion and pepper, quarter your cherry tomatoes and put to one side while you prep the aubergine. Cut the aubergine in half lengthways and finely dice one half. With the other half, slice lengthways it in thick, 1cm slices.

Add a generous glug of olive oil to a deep sided frying pan, add the onions, pepper and aubergine and begin to soften the veg. This should take around half an hour on a low heat, stir occasionally. Add a splash of water to help the veg soften. After you’ve been cooking this for around 15 mins, add your tomatoes, garlic and a generous amount of salt and pepper. It’s cooked when all the veg are soft and the aubergine is melty and isn’t woolly. Once cooked, throw in a handful of chopped parsley and stir.

Vegetarian Recipe: Aubergine Bruschetta

As ever, taste the aubergine and add more seasoning if you think it needs it. I sometimes add a little bit of chilli sauce to add a bit of spice, but that’s up to you.

Meanwhile, take your aubergine slices and put them on a baking tray, add a very generous amount of olive oil and cook in a 200c oven, loosely covered in foil until they are soft and floppy, this will take about half an hour, turn them over about half way through.

To assemble your aubergine bruschetta, toast or griddle thick slices of ciabatta brushed with olive oil, top with your aubergine and veg mix, then artfully decorate with your slices of aubergine, some torn mozzarella and a sprinkle of chopped parsley. You can eat this hot or cold, though I like them still warm, but not piping hot.

For more information about Creamline Dairies, visit their website.

Vegetarian Recipe: Aubergine Bruschetta

Note, we were sent this box in exchange for a blog post mentioning the box scheme. 

Frugal Food: Cheesy Leek Gratin

The start of the year is always the longest, leanest time for me. There have been many evenings lately that I have peered into the fridge and wondered what I could cobble together for tea.

A few days ago I picked up some leeks from the greengrocers for not many pence, and being leek fans, I decided to throw together a lovely, comforting cheese leek gratin. It’s remarkably simple and fairly frugal vegetable dish and even my fussy about veg 9 year old asked for seconds!

Frugal Food: Cheesy Leek Gratin

Cheesy Leek Gratin

Sliced leeks, I used six, but you can use more if you want
A little butter for frying
50g butter or margarine
50g plain flour, or sauce flour if you have it
1 pint of milk (maybe a little more, maybe a little less)
100g mature cheddar cheese
30g Parmesan cheese
Salt, pepper and dried chilli flakes
Breadcrumbs

Method
Slice your leeks and fry gently in a bit of butter until they are soft.

Whilst your leeks are softening, melt the butter in a saucepan, once melted, tip in the flour and mix well with a wooden spoon. Mix until it’s a paste and then cook the flour out for a minute. Add a splash of milk and stir until it turns into a paste again. Keep adding milk in splashes and mixing until it starts to turn into a silky sauce. The amount of milk will vary, but I’d say you need at least a pint of milk. If it looks lumpy and unpromising, just use a whisk until it turns into a lovely smooth sauce.

Grate your cheese and add it to your sauce. Set aside about 30g of the cheese to top your bake with. Stir, stir, stir your sauce and season with salt and pepper. I also like to add ground chilli flakes for a bit of a gentle kick, but you can leave that out if you prefer. Taste the sauce to check the seasoning; if it’s not cheesy enough for you, now is a good time to add more cheese. Now is also a good time to pre-heat your oven to 220°.

Once your leeks are soft and your sauce is cheesy and smooth, tip them both into an ovenproof dish and mix together. Smooth the top with the back of a spoon and sprinkle over your reserved cheese. I usually top bakes and gratins with breadcrumbs. It gives a lovely texture and makes it look extra tasty. If I can be bothered I something whizz up some stale bread in the food processor and use that, but I have a tub of ready made breadcrumbs in the cupboard because sometimes life it too short to make your own. I sprinkle whatever I have over the top, use as much or as little as you want.

Frugal Food: Cheesy Leek Gratin

Put your cheesy leek gratin in the oven and bake for 30 minutes until the top is brown and the sauce is bubbling beneath. I’ve made this several times now and it’s a regular veg dish as part of a winter roast. It’s great with chicken or sausages, or even on its own with a crusty piece of bread.

If you enjoyed this, you might like my recipe for slow cooker vegetable stew.

Frugal Food: Cheesy Leek Gratin

Frugal Recipe: Vegetarian Pork and Beans

A few weeks ago I published a recipe for pork and baked beans. It’s a brilliant recipe, really frugal and tasty but not suitable for vegetarians, obviously. The clue is in the word “pork”. Anyhow, as a vegetarian I was a bit jealous of this homely dish and decided to make a version I could enjoy. I made a few changes and I was so pleased with how it turned out, I’ve decided to share my recipe for vegetarian pork and beans.

The basic recipe is much the same, but having considered my options, I swapped out the diced pork for Quorn cocktail sausages and the smoked bacon for Quorn bacon. If I’m honest, I didn’t love the Quorn bacon in the dish. It didn’t add any flavour, the texture was a bit meh and next time I make it I’ll probably leave it out entirely, or cook it separately and drape it artistically over the top. If you’re missing a bit of the smoky flavour, you could add a bit of barbecue sauce to the mix.

This recipe for Vegetarian Pork and Beans is so simple, it’s the kind of thing you can throw together and leave to bubble away gently in an oven for a few hours. Once it’s cooked, you can eat it straight away or divide it up into portions and freeze it.

Frugal Recipe: Vegetarian Pork and Beans

It makes a great lunch on thick toast, or would be great with a pile of buttery mash. I’m looking forward to having it later with a crispy fried egg on top!

This recipe is easy to make vegan, just swap out the Quorn cocktail sausages for your favourite vegan sausage and enjoy!

Vegetarian Pork and Beans

Ingredients:

500g dried haricot beans, soaked for 24 hours
1 tablespoon oil, I used vegetable, but use what you have
2 packets of Quorn cocktail sausages
2 tins of chopped tomatoes
1 tablespoon tomato puree
2 tablespoons tomato ketchup
1/2 tablespoon sugar
2 teaspoons of dried mixed herbs
Salt and pepper
1 pint of stock, made with a stock cube
4 rashers of Quorn bacon, chopped (optional)

How to make your Vegetarian Pork and Beans:

The day before you want to cook your Vegetarian Pork and Beans, soak your dried haricot beans in plenty of water, following the instructions on the back of the packet. Once they’ve soaked for 24 hours, change the water and boil them for half an hour, or until they’re not chalky inside. Drain and set aside.

Put all of the ingredients into a lidded casserole dish, don’t add the salt at this stage, the economy stock cubes I used were pretty salty, so it’s worth waiting until near the end to taste and see if you need to add more salt. Stir the pot gently and put into an oven at 160° for 2-3 hours. Make sure you give it a stir every half hour or so.

Ideally the sauce should be thick and it should look, smell and taste good. It might only take two hours for your beans to get to the right consistency, it might take nearer 3 hours. Just keep an eye on it and use your judgement. The beans should be tender and creamy inside. If the sauce gets too thick, you can always add a splash of water to loosen it.

Taste the sauce. Add more of whatever you think it needs, now is the time to add the salt if you think it needs it. Serve it however you like, it’s great on toast for lunch or piled on top of mashed potato. It’s a hearty dish, perfect for a winter warm up and ideal if you’re feeling frugal.

If you enjoyed this, you might like to try these vegetarian recipes:

Frugal Recipe: Vegetarian Pork and Beans

Stocking Fillers: Vegetarian and Vegan Sweets

I’ve been a vegetarian since 1989, which is quite a long time. One of the questions I get asked the most is what do I miss? I miss my Nan’s beef chilli and her corned beef hash. I also miss my Nan but that’s a subject for another day perhaps. One of the things I did miss was sweets, because back then a lot of sweets contained gelatine.

Thankfully in the last 30 years things have moved on. Sure, pop to your local sweet shop and their shelves will be heaving with cheap jelly sweets, but Swizzels Matlow have produced a range of their trademark sweets which are suitable for vegetarians and vegans.

Stocking Fillers: Vegetarian and Vegan Sweets

Their Drumstick Choos and lollies contain five double flavour combinations which include peaches and cream and strawberry and banana. Their Refreshers Choos (my favourite) include pineapple and apple and have that fizzy sherbet centre which I love. Both kinds of Choos are vegetarian and vegan and are available in Tesco, Asda and Morrisons.

Other vegan sweets made by Swizzels Matlow which are suitable for vegetarians and vegans include Love Hearts, Fizzers, Fruity Pops, Double Lollies, Parma Violets and Rainbow Drops.

Some of these are among my favourite sweets. I adore Parma Violets and have used them to make Parma Violet shortbread biscuits. I also really love Rainbow Drops, which is a slightly less well-known sweet, but one I really love. They’re something about them, maybe it’s because they’re like a naughty breakfast cereal, but I love them.

Stocking Fillers: Vegetarian and Vegan Sweets

My husband isn’t a fan of chewy sweets (he fears for his teeth) but he can’t resist a packet of love hearts. My son who is 8 just likes sweets. He’s very good at sharing them, so it’s better if we choose veggie or vegan sweets.

Whatever sweets are your favourite, it’s reassuring to know that vegetarians and vegans in 2018 have considerably more choice in the sweet-shop than they did 30 years ago! Thanks Swizzels.

I was sent a selection of sweets in exchange for this blog post.

Recipe: Greek Style Aubergine and Feta Filo Pie

I love making and eating filo pastry pies. They’re much lighter than traditional shortcrust or puff pastry pies and they somehow seem a bit more summery because of it. I often throw together a spinach and feta filo pie for a weekend lunch, they’re easy and absolutely delicious, a winning combination!

This week I was sent some Greek goodies from Olive Branch. They sent me a selection of their new salad dressings and some of their Greek mezze range. This had filo pie and a lovely Greek salad written all over it. I pulled a packet of filo pastry out of the freezer and set to work.

Greek Style Aubergine and Feta Filo Pie

The gift tube containing three jars of mezze I was sent included; Aubergine & Basil Paste with Extra Virgin Olive Oil, Kalamata olives with fig and mint and Sweet Olive, Fig & Almond Relish. I’m a big fan of aubergine and I knew the paste would work well in my filo pie.

Olive Branch are an award winning UK based producer who use only the very best Cretan olive oil in their products. Their olive grove is situated outside the city of Ierapetra and is part of a co-operative of traditional olive farmers. They grow the Koroneiki variety of olive, harvested and cold pressed at the same community co-operative that has been at the heart of the community for generations.

Greek Style Aubergine and Feta Filo Pie

I made a small filo pie which was enough for a hearty lunch for one, but you could make a bigger pie in a bigger tin, just double up the ingredients. I used a 12.5cm loose bottomed tart tin. Loose bottomed tins are the best tin to use for filo pies.

Greek Style Aubergine & Feta Filo Pie

Ingredients:
2 sheets of filo pastry, fresh or frozen
100g feta cheese
2 tablespoons of Aubergine & Basil Paste with Extra Virgin Olive Oil
Olive oil
Fresh black pepper
Dried oregano

Method:
Pre-heat your oven to 180° grease your tart tin with olive oil and put it on a baking sheet.

Take your two sheets of filo pastry and cut them in half. You will now have four squares of filo. Take one square and lay it in your tin, be careful as the pastry tears easily. Dab your first layer with olive oil and place the next layer over the first, do this so the corners are placed differently. Keep doing this until all four squares of filo have been used. It doesn’t have to be neat, it’s meant to look a bit rustic.

Put a tablespoon of the Aubergine and Basil Paste on the bottom of the pie, spread it around a little. Chop your feta cheese into cubes and fill the pie with it, add a few twists of black pepper and a large pinch of oregano. Top with another tablespoon of the Aubergine and Basil Paste.

Working layer by layer, fold the corners of each layer over the pie, dab each sheet of filo with olive oil as you go. The corners of the pastry should cover the pie filling and give you a nice scrunched up pie topping. Brush the pie with more olive oil and bake for 20 minutes or until golden brown on top.

Once cooked and golden brown, remove from the oven and carefully take it out of the tart tin. Serve with a big pile of salad (mine was dressed with Olive Branch orange balsamic dressing with extra virgin olive oil and it was the business!) and whatever Greek treats you fancy. Olive anyone?

Greek Style Aubergine and Feta Filo Pie

If you enjoyed this recipe, you might also like to try…

Halloumi & Caramelised Onion filo rolls

Greek Salad and Tzatziki

Bifteki – Cretan Style Lamb Burger with Feta

Armenian Red Cabbage Salad

Greek Style Aubergine and Feta Filo Pie

We were sent a selection of products from Olive Branch for this recipe. All images and opinions are our own.

Recipe: Slow Cooker Vegetarian French Onion Soup

One of the things I miss as a vegetarian is the rich beefiness of French Onion Soup. It is in my opinion the king of soups and perfect for cold days when you’re craving a rich broth. I once lamented my French Onion Soup regrets to a wonderful chef who used to work at Greens, Simon Rimmer’s vegetarian restaurant in West Didsbury. The next day she’d whipped me up a batch of French Onion Soup which was entirely vegetarian. I was in awe.

She gave me a few top tips for making my own French Onion Soup at home, but she sadly passed away before I could share with her my triumphs. So my version of this recipe is for Shona, my old friend who I miss terribly.

Recipe: Slow Cooker Vegetarian French Onion Soup

This is vegetarian, but you could easily make it vegan by swapping the butter for a vegan spread or oil.

Slow Cooker Vegetarian French Onion Soup

Ingredients:
30g of butter
4 or 5 large white onions
3 cloves of garlic
2 tablespoons of plain flour
3 tablespoons of sherry
1 litre of vegetable stock made with Essential Cuisine liquid concentrate
2 tablespoons of mushroom ketchup
1 tablespoon of sherry vinegar
1 tablespoon of sugar
Half a tablespoon of tomato puree
2 bay leaves, fresh or dried
Salt & pepper
1 baguette
A handful of grated cheese, Gruyere is preferable but Cheddar is also fine.

Method:
Switch your slow cooker onto high and peel and slice your onions into rings. Add the butter and onions to the slow cooker and leave them to soften for an hour or so. You might prefer to do this stage in a frying pan, softening the onions gently. This would speed up the process if you can.

Once the onions are soft, add the crushed garlic and stir. Then add the plain flour, stir again and then add your sherry. Pour in a litre of vegetable stock and then add the mushroom ketchup, sherry vinegar, sugar, tomato puree, bay leaves and some salt and pepper. Cook on high for an hour or so, stirring occasionally.

Taste your soup and add more seasoning and sugar if it needs it. Turn your slow cooker down to low and it can happily sit for several hours. The longer you cook it, the richer and deeper the flavour.

When you’re ready to serve, slice your baguette up into rounds and grill on one side to your liking. Flip your sliced over and top with cheese, grill until it’s melted and bubbling. Ladle your soup into bowls and then float your cheesy baguette slice on top and enjoy.

Recipe: Slow Cooker Vegetarian French Onion Soup

French Onion Soup is such a delicious treat, rich and warming and all the better for being made with a good quality stock. For this recipe I used Essential Cuisine stock.

There are four concentrated liquid stocks in the range – vegetable, beef, lamb and chicken. They’re bursting with flavour and just the thing for this soup which relies upon a good quality stock to bring it to life.

Recipe: Slow Cooker Vegetarian French Onion Soup

In collaboration with Essential Cuisine.

Recipe: Delicious Armenian Red Cabbage Salad

For our wedding anniversary a few weeks ago, my husband and I went to the Armenian Taverna in Manchester for dinner. We used to go there a lot in the days before we became parents, partly because the food was absolutely fantastic and partly because my husband is half Armenian and it’s good to celebrate those roots. Together we feasted on the beautiful mezze plates and chatted like the old days. We both fought over the small but delicious portion of Armenian Red Cabbage Salad, a dish I’ve decided to recreate at home because it was that good!

Mezze is always my favourite part of any Armenian meal. I love piling my plate with little heaps of good salads and sides, with dollops of rich hummus served with still warm lavash bread. Delicious.

Recipe: Delicious Armenian Red Cabbage Salad

This Armenian Red Cabbage Salad is and always has been one of my favourite dishes. The salad is really simple to make and keeps for a few days in the fridge. I like to make a big bowl of it and serve it with almost anything. We had it this week with lamb koftas with a little salad and some lavash bread. It was so good I polished the rest of the bowl off for lunch.

It is better if you can make it the day before you need it as it really allows the flavours to develop. It’s so simple and I think a really flavoursome and slightly healthier alternative to coleslaw.

Armenian Red Cabbage Salad

Ingredients
1 small red cabbage, or half a large one
1 dessert spoon of caster sugar
2 dessert spoons of Balsamic vinegar
1 dessert spoon of good olive oil
A handful or sultanas or craisins
A good handful of fresh flat leaf parsley, finely chopped
Salt & pepper
Walnuts, optional

Method
Finely slice your red cabbage and toss in a bowl to separate all the slices. In a small jar add your sugar, balsamic vinegar, olive oil and some seasoning. Put the lid on the jar and shake it hard until it is well combined.

Pour the dressing over the red cabbage, add in your handful of sultanas or craisins and stir. Give the salad a taste and add more seasoning if you think it needs it. Cover the bowl and put in the fridge overnight.

Before serving, remove from the fridge and leave it out for an hour or so to bring it up to near room temperature. Stir through the chopped parsley and taste again to check the seasoning, adjust if you think it needs it. If I have any walnuts I sometimes like to chop them up a little and throw them into the salad too.

Recipe: Delicious Armenian Red Cabbage Salad

Serve however you want. We like our Armenian Red Cabbage Salad served with a mezze lunch or it’s great with lamb or this traditional Armenian Imam Bayildi recipe. This Armenian Red Cabbage Salad hits so many delicious sweet, sour and crunchy notes, I’m sure it’ll become a family favourite of yours too!

Recipe: Delicious Armenian Red Cabbage Salad

Recipe: Rich and Creamy Fennel & Potato Gratin

Have you ever had a veg box delivered, looked at its contents and thought what on earth am I going to make with that? Last week I looked in my veg box and discovered a large and lovely fennel. What on earth was I going to make with that? After a big think I decided to make an experimental Fennel & Potato Gratin. Was my experiment a success or a failure?

I’ve eaten fennel many times, but never cooked with it. I do like fennel but it can be an acquired taste. It’s got a gentle aniseed flavour which reminds me of sambuca (yes I did have a misspent youth, thank you for asking). I thought it would work well in a potato gratin and it did.

Recipe: Rich and Creamy Fennel & Potato Gratin

It is really easy to put together and fairly quick to prepare. This Fennel & Potato Gratin would be a lovely side dish for almost any hearty, wintery meal. I made a pie to go with it and served it with a big pile of veg (from my veg box). It was a roaring success. We all fought fiercely over the crispy bits and we all had seconds. I will be making this again and again and again, veg box permitting of course!

In my recipe I’ve slightly pre-cooked the fennel and potatoes before they go into the oven. I’ve been caught out by undercooked gratins before and giving everything a little head start helped ensure everything was properly cooked. I’ve also not peeled my potatoes, partly because I like the skin and partly because I’m a little bit lazy.

Fennel & Potato Gratin

Serves 4 as a side dish

Ingredients
1 fennel
3 medium potatoes, finely sliced
1 clove of garlic, crushed
1/2 teaspoon of butter
200mls double cream
Salt & pepper
Parmesan (optional)

How to make your Fennel & Potato Gratin
Put boiling water into a pan and put it on low. Finely slice your potatoes. I don’t have a mandolin so I slice them by hand. I leave the skin on because I like the skin, but peel them if you prefer. Put your slices in the pan, you don’t want to cook them, just get them started a little. If you have a mandolin and have wafer thin slices you can skip this part.

Next prepare your fennel. Slice into pieces about an inch in length and no more than an inch wide. I put them into a microwavable dish with a drop of water and microwaved for 3 minutes, again just to get it started.

In a pan, melt your butter and add your crushed clove of garlic, stir for a moment  to take the raw garlic edge off it and remove from the heat. Pour in your double cream, season and stir. You are now ready to assemble your Fennel & Potato Gratin.

Pre-heat your oven to 220°. In an ovenproof dish, layer potatoes, then fennel, then potatoes and fennel and last potatoes. You can season between layers if you like. Once you have filled your dish and there is a layer of potatoes on the top, gently press down to help the layers settle.

Put your ovenproof dish on a baking sheet (this will catch the creamy dribbles in the oven) and carefully pour over the garlic cream mixture. Do this in dribs and drabs until the dish is full. If you’ve got some, grate some Parmesan over the top and put in the oven. Bake for 20 minutes or until bubbling, golden and looking gorgeous.

This was such a hit with my family with everyone diving in for seconds. It’s a real winter warmer dish and one I’ll be making regularly.

Looking for a perfect match? This would be great with my delicious slow cooked beef stew with red wine.

Recipe: Rich and Creamy Fennel & Potato Gratin