Win a “Hey Duggee Game Show” game worth £25

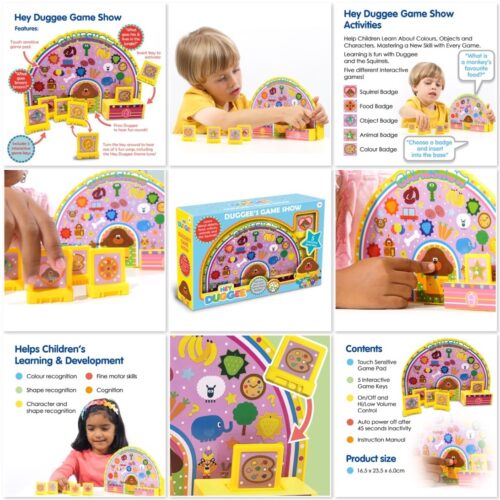
This exciting electronic learning toy recreates the popular Hey Duggee TV episode involving a game show. The child answers questions to win 5 different topics of Squirrel badges, get them all right to earn your ‘Game Show Badge’!

Win a "Hey Duggee Game Show" game worth £25

The Hey Duggee Game Show encourages learning about letters, numbers, objects, sounds & colours. To play, you just insert one of the 5 interactive game keys to access the quiz questions. Let your child learn while having fun with Duggee and the Squirrels.  With five games to encourage learning about shapes, numbers, objects, sounds and colours. The touch sensitive screen feature makes exploration fun and easy to follow.

  • Let your child learn while having fun with Duggee and the Squirrels.
  • With five games to encourage learning about shapes, numbers, objects, sounds and colours.
  • The touch sensitive screen feature makes exploration fun and easy to follow.

For more information, or to purchase the Hey Duggee Game Show, visit the Argos website.

Hey Duggee

Win a “Hey Duggee Game Show” game worth £25

To be in with a chance to win a “Hey Duggee Game Show” game worth £25, simply complete the Rafflecopter widget below. Good luck!

a Rafflecopter giveaway

Terms & Conditions:
1. The competition is open to residents of the UK only aged (18) and over.
2. The prize is non-transferable and no cash alternative is offered.
3. To enter, please use the Rafflecopter widget above, complete any mandatory entries and any optional entries you would like.
4. The winner will be chosen at random from all valid entries.
5. The winner will win a “Hey Duggee Game Show” game worth £25.
6. The closing date for entries is 11.59pm GMT on 2nd April 2023.
7. The winner will be contacted within 7 days of the closing date.
8. The winner will be asked to provide a full UK postal address with postcode for delivery purposes.
9. The winners address, contact details and email address only be shared with the PR to enable to prize to be sent to the winner.
10. The winners name will be available on request.
11. Entry to this giveaway confirms that participants have read, understood and agree to be bound by these Terms and Conditions.
12. HodgePodgeDays decision is final in all matters relating to this giveaway.

For more giveaways, visit our competitions page!

How to make a Warhammer Purity Seal Cake

I’ve been a mum for 12 years now, and for about ten of those years, I’ve asked my son what kind of cake he would like for his birthday. I’m no Mary Berry, but I can knock up a good sponge cake, and I’m happy to give pretty much anything a go. Over the years we’ve had a volcano cake, a train cake, a Minecraft block and a Pokémon cake, amongst others. This year he asked me to make him a Warhammer purity seal cake, so I gave it my best shot.

Whilst not wanting to diminish my son’s latest obsession, Warhammer is basically painting tiny figures and then having a ruckus with your mate who also has some painted tiny figures. It’s a world I don’t fully understand, but I don’t need to understand it, I just need to continue to fund it.

How to make a Warhammer Purity Seal Cake

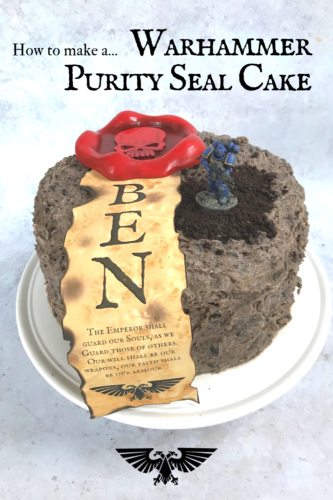
In essence the cake is three layers of Oreo sponge, with Oreo frosting between the layers and all over it, which make it look like a muddy battlefield. After tapping into the expertise of a Warhammer loving adult, we brainstormed some ideas. My friend did the hard work, the painting and his painted creations would also double up as birthday gifts for the birthday boy. My role was to make the cake, and the paper scroll for the purity seal.

To make the purity seal

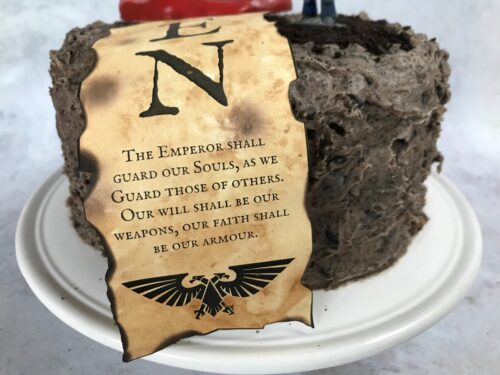
This was a two part job, with my friend ordering a 3D printed purity seal coaster off Etsy and painting it up accordingly, and me creating the scroll. I did this using an app called Canva, which is free and I use it quite a lot for various design things. I added his name and some appropriate Warhammer words and logos, then printed it on cream paper. The font I used was IM Fell English SC, which was as close as I could get to authentic. Aging the scroll meant dabbing the paper with a damp teabag, which worked well.

purity seal

Once dry, I lit a candle and carefully (VERY CAREFULLY) held the paper above the flame to give extra colour and raggedy edges to the scroll. Be careful not to actually burn the paper. I made sure I was doing this on a flame proof chopping board, so if it did go up in flames, I could put them out quickly. Together with the appropriately painted seal, it looked pretty darn good.

If you want to read more about the painting of the purity seal, you can do here.

How to make a Warhammer Purity Seal Cake

To make the Oreo cake

For his birthday, I made two of these cakes as he was having a family party and a party with friends. Click here to go to the recipe for the Oreos cake. You can make the sponge layers in advance. As long as they are well wrapped up, they will be fine for a day or two. The vanilla frosting is meant to look like a muddy, gritty battlefield, the kind a troop of Space Marines might find themselves on. The trick is to not overmix it, or it just becomes a dirge colour and not speckled. Don’t forget to save an Oreo or two to crumble up as extra dirt on top of the cake.

Follow the instructions on how to put the cake together, once you’ve got your Oreos cake built, it’s time to decorate it!

How to make a Warhammer Purity Seal Cake

To decorate your Warhammer Purity Seal Cake

You will need a couple of toothpicks to hold some of the decorations in place, so don’t forget they’re there when it comes to serving your cake! Decide where you’re going to place your purity seal and using half a toothpick, pin the paper scroll in place. Using some of the Oreo frosting as glue, stick the purity seal down, on top of the cake, at the top of the scroll.

We also had a painted Space Marine to top off the cake. His base had been sculpted at the bottom so you could stick a toothpick in and anchor him into place, which was a stroke of genius. Around his feet I sprinkled some crushed up Oreos, which made him look like he was wading through mud.

How to make a Warhammer Purity Seal Cake

As it was a birthday cake, I ordered some black candles, which finished it off nicely. My son absolutely loved his birthday cake and was impressed by how good it looked. If you’re into Warhammer and Oreos, then this is a relatively simple cake to put together, if you’ve got someone doing the painting for you that is!

It’s a brutal looking cake, but it really was delicious!

How to make a Warhammer Purity Seal Cake

Recipe: Macaroni Cheese American Style Pancakes

Macaroni cheese American style pancakes. Yes, you read that right. We like pancakes of all kinds in this house, they’re a quick meal and great for jazzing up leftovers into something new and exciting.

With Shrove Tuesday just around the corner, and half a leftover macaroni cheese waiting to be used up, I decided to combine two of our favourite things into one delicious and rather hearty meal. Topped with bacon (or facon, if you’re veggie like me) and with some good tomatoes on the side, it’s a great family meal and really filling too!

Recipe: Macaroni Cheese American Style Pancakes

Macaroni Cheese American Style Pancakes

Ingredients: 
200g self-raising flour
1 tsp baking powder
2 or 3 spring onions, finely chopped
200ml milk
3 eggs
25g butter, melted, plus extra for frying

For the topping-
Leftover macaroni cheese
Good Cheddar cheese, grated
Salt, pepper and dried chilli flakes

Recipe: Macaroni Cheese American Style Pancakes

How to make your macaroni cheese American style pancakes:

In a large bowl or jug, whisk all of the pancake ingredients together with some seasoning until smooth. See how it looks, you might want to add more spring onion, or maybe some tinned sweetcorn, which works well, or some herbs like parsley if you have any. These savoury pancakes really lend themselves to being bulked out like this. We like a bit of spice, so we add dried chilli flakes, and you might like to too.

Put a small knob of butter in a large non-stick frying pan over a medium-low heat and cook until the butter has melted. Once the pan is hot, pour around 2 tablespoons of the mixture into the pan. While the first side is cooking, put some of your leftover macaroni cheese over the top of the pancake and sprinkle over some of your grated cheese and press down all over with the back of a spoon. You’ll know when your pancake is ready to flip when you can start to see bubbles forming in the batter.

Once your pancake is ready to turn, use a spatula and carefully flip it over. Cook until the cheese has melted and is crispy. Once you’re happy, turn it out onto a plate and serve however you like. In our house, bacon and tomatoes are the favoured accompaniments, but it would be great with all kinds of things!

Note: Don’t cook your pancakes on too high a heat, you want them to cook all the way through without burning them.

Recipe: Macaroni Cheese American Style Pancakes

If you enjoyed this recipe, you might also like to try –

Macaroni Cheese American Style Pancakes

Recipe: Swedish love cake, or Kärleksmums

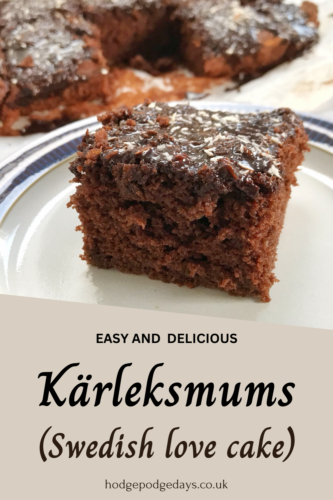
A little over a year ago I started learning Norwegian, so I’ve taken an interest in all things Scandinavian ever since. With Valentine’s Day approaching, and my friends at work in need of a little cheer up, I decided to make a Kärleksmums cake, also known as a Swedish love cake. It’s a surprisingly easy bake, but a delicious and incredibly light one to share with your one true love, or just your friends in the office.

Essentially, it’s a light chocolate sponge traybake, topped with a lovely fudgy chocolate, coffee and coconut sauce. It feels indulgent, but that’s only because it is. But, importantly for busy people, or people less confident in their ability to decorate a pretty cake, it’s just a slap it on and go kind of decoration, which I think we can all get on board with.

Recipe: Swedish love cake, or Kärleksmums

It’s not designed to win any beauty contests, but for a mid-morning pick me up, or a simple expression of love, it’s a winner!

I tend to bake my traybakes in a small roasting tin lined with baking parchment. My bakes in this tin are great for cutting into 15 pretty decent cake portions, so it’s good for feeding a crowd. Kärleksmums also freezes incredibly well. I know there are people who I won’t see for a while who also deserve a piece of cake, so I just wrap up a slice, pop it in a suitably sized plastic container and into the freezer it goes.

I’ve made chocolate cake traybakes before, but the coffee and coconut topping really elevates it from nice cake, to very, very nice cake.

Swedish love cake, or Kärleksmums

Ingredients:
50g cocoa powder
100ml recently boiled water
100ml milk
200g butter or margarine, such as Stork
225g golden caster sugar
3 medium eggs
225g self raising flour
1 teaspoon vanilla essence
1 teaspoon of baking powder
A good pinch of salt

Recipe: Swedish love cake, or Kärleksmums

For the topping:
150g icing sugar
50g butter
1 large tablespoons of cocoa powder
½ teaspoon of vanilla essence
2 tablespoons of coffee granules
3 tablespoons of hot water
50g desiccated coconut, plus extra to sprinkle on top

How to make a Swedish love cake, or Kärleksmums:

Pre-heat your oven to 180°c and line your cake tin, or small roasting tin if you’re me.

Mix together the cocoa powder and hot water and leave to cool a little. Once it is cooler, add the milk to the cocoa mixture.

Using a hand mixer, cream the butter and sugar until pale and fluffy. Add the eggs one by one, taking care they are completely incorporated into the batter.

Sift the dry ingredients into a separate bowl – that’s the flour, a pinch of salt and the baking powder.

Add the flour and the milky cocoa mixture to the butter and sugar mixture, whilst beating the batter, taking care to ensure everything is well incorporated. As with all cakes, take care to make sure it’s all incorporated, but don’t over beat it.

Pour the batter into your lined tin and bake in the middle of the oven for approx. 20-25 minutes or until a skewer comes out clean. My over is a little on the slow side, so mine took 25 minutes.

Once baked, remove your Kärleksmums cake from the oven and leave to cool on a cake rack. While it is cooling, you can make your simple topping. The topping is ridiculously easy, you just put all the ingredients into a saucepan and warm gently, stirring regularly until it’s all combined and a lovely glossy sauce. Pour the topping over the cooled cake and sprinkle with a bit more desiccated coconut, or some other sprinkles if you like. It’s your cake, your rules!

Recipe: Swedish love cake, or Kärleksmums

Leave the topping to set in before serving. You can speed this up by popping it in the fridge if you’d like. Serve with a lovely pot of coffee. It doesn’t need anything else, but it would also be good with a scoop of vanilla ice cream!

If you enjoyed this, you might like to try;

Recipe: Swedish love cake, or Kärleksmums

Things to do for Lent: Saving money each day!

Each year I try to give up something, or take up something for Lent. 40 days is a doable period of time to cope without chocolate or crisps, or even gin. This year, with money being a little tighter than usual, I’ve decided to combine the giving up of something with something positive, like saving money each day to give myself and my son a nice treat.

Since I started working in an office again, it’s become very much my custom to pop into a coffee shop for a brew on my way in. It’s a way of making the early starts a little bit more bearable. However, my morning treat does add up over the course of a week, so I’ve decided to spend two minutes each morning having some quality time with my kettle, and saving the money I would normally spend on my morning coffee in a big jar.

Things to do for Lent: Saving money each day!

I figured out if I put the £2.50 a day I would normally spend on a coffee into a jar, by the end of Lent I’d have £100 to spend on something nice for myself. There’s a part of me that wants to do some good with some of that money, so I’m also thinking of making a charitable donation with a portion of it too.

I know that being able to spend £2.50 a day on a coffee is a privilege. Realistically, it’s not one I can afford long term. I suppose giving it up for Lent and incentivising myself by saving the money is my way of weaning myself out of my coffee shop habit.

For good measure, I’m also going to try and knock chocolate on the head, because I’ve been using it as foodie comfort during the tough times I’ve waded through recently.

So, that’s no bought coffee, no chocolate and hopefully saving myself a minimum of £100, less a charity donation. Wish me luck!

If you also want to try saving money for Lent, I’ve made a little chart to show you how quickly those pennies can add up.

Things to do for Lent: Saving money each day!

It soon adds up!

  • Saving up 50p a day, adds up to £20.
  • £1 a day rises to £40 for Lent.
  • £1.50 comes to a £60 total.
  • £2 a day means you’ll save £80.
  • £2.50 each day means you can save up £100 over the Lenten period!

If you too decide to save some money this Lent, please let me know how you get on, and what you’re going to spend you savings on. I’ll give an update on my progress too!

If you like the idea of doing something else for Lent, I have 40 acts of kindness or I have 40 ideas for things to give up, or take up for Lent too!

Things to do for Lent: Saving money each day!

Easy Recipe: Biscoff Crispy Ice Cream Cake

Christmas was a time for feasting, but it was also a time for bugs, viruses and once again, Covid. This meant that plans to spend time with some friends and family had to be put on the back burner. Last weekend we invited family round for a belated Christmas meal, and having eaten too many rich festive puds, I opted to make something lighter but still very indulgent – a Biscoff Crispy Ice Cream Cake, and boy, it was good!

Almost everyone loves Biscoff. It started off as a mildly addictive biscuit and when they launched Biscoff spread a few years ago, it turned Biscoff into the new salted caramel. It was everywhere, and Biscoff puddings are going nowhere, something I’m personally very glad about.

Easy Recipe: Biscoff Crispy Ice Cream Cake

Biscoff spread looks a bit like a soft peanut butter, but it is made of speculaas biscuits. Speculaas are a buttery, brown sugar and spice-flavoured biscuit. The brand that make the popular biscuits and spread is called Lotus and you will probably have seen them in your local supermarket. I daren’t buy them very often as they disappear so quickly!

My Biscoff Crispy Ice Cream Cake is so simple, uses few ingredients and takes no time at all to put together. Plus you can make it ahead, so it’s ideal for busy people. This recipe makes enough for six people.

Biscoff Crispy Ice Cream Cake

Ingredients:
Most of a jar of Biscoff spread
50g of Rice Krispies (own brand is fine)
500g good vanilla ice cream
Some Lotus biscuits to decorate

Easy Recipe: Biscoff Crispy Ice Cream Cake

How to make Biscoff Crispy Ice Cream Cake:

You can either make one large cake, or six smaller ones in ramekins. If you’re making a large cake, line a loaf tin with cling film, for individual  servings, line six ramekins with cling film.

Take your ice cream out of the freezer to soften.

In a microwave proof mixing bowl, put around 250g of Biscoff spread and microwave until it is looser, this took me about 45 seconds. Once it is loose enough so it’s easy to work with, tip in your 50g of Rice Krispies and stir well. When it’s well combined, put a heaped dessert spoon of the mixture in each ramekin and gently press down into place with the back of a spoon. Try not to use all the mixture, as you’ll need a few Biscoffy crispy bits for your ice cream.

In the same mixing bowl, tip in your soft ice cream and stir through. You want the ice cream to have a bit of the Biscoff flavour, but not too much. You also want there to be a few Biscoff covered crispy bits in there, so if there isn’t quite enough for your liking, feel free to add a bit more.

Once your ice cream is soft and dollopable, divide it between your ramekins. Press the ice cream with the back of a spoon to eliminate any air pockets. Pull your overhanging cling film over the ice cream, so it’s covered and then put in the freezer for at least an hour to chill. You can make this days in advance if you need to. Your Biscoff crispy ice cream cakes will happily sit in the freezer until they’re needed.

Easy Recipe: Biscoff Crispy Ice Cream Cake

When you’re ready to serve, take them out of the freezer and leave them to sit for ten minutes to warm up slightly. Tip your Biscoff crispy ice cream cakes onto a plate. I served them Biscoff side up, but you can serve it however you’d like. Decorate the cakes however you want. I opted for a smear of Biscoff and a lotus biscuit. But I also warmed some Biscoff in the microwave until it was runny, and drizzled it all over the top of the cakes. Some biscuit crumbs would also work well. Or serve them as they come, they’re so delicious and easy, no one is going to complain!

If you enjoyed this, you might also like my Speculaas hot chocolate recipe.

Easy Recipe: Biscoff Crispy Ice Cream Cake

FREE Printable: Chinese New Year – Year of the Rabbit

In 2023, Chinese New Year falls on Sunday 22nd January. Chinese New Year is a glorious, colourful celebration of the New Year, just when I feel the year is at its darkest and gloomiest. This year is the Chinese Year of the Rabbit.

In Manchester the Chinese New Year celebrations are legendary. There is usually a big parade, Chinese crafts exhibition, a big celebration in Albert Square and a fantastic street food market.

2023 is the Chinese Year of the Rabbit. The Rabbit is the fourth of the 12-year cycle of animals which make up the Chinese zodiac in the Chinese calendar. People born in the Year of the Rabbit include; 1927, 1939, 1951, 1963, 1975, 1987, 1999, 2011 and 2023 will celebrate their Zodiac Year.

FREE Printable: Chinese New Year – Year of the RabbitTo celebrate Chinese New Year and the Year of the Rabbit, I’ve created these colouring sheets for children, or indeed adults. It’s a simple sheet which you can print out on A4 paper. All you need are some felt tips or colouring pencils and it should keep the kids entertained for a little while. If you want to extend the fun, you could also try making a Chinese drum, or some traditional red envelopes for Chinese New Year.

Download your free Year of the Rabbit printable colouring sheets here.

FREE Printable: Chinese New Year – Year of the RabbitIt’s pretty cute isn’t it? They’re both A4 sized, so just print off however many you need. Give the kids a million coloured pencils or felt tips and let them go wild with them. Adults who enjoy colouring in might also like to get in on the action too.

I’d love to know what you’ll be doing to celebrate Chinese New Year. Let me know in the comment box below. Gong hei fat choy!

If you enjoyed this, you might also like to try –

FREE Printable: Chinese New Year – Year of the Rabbit

Days Out: Luminate Cheshire at Walton Hall Gardens

Every year, we meet up with family and spend an evening, wrapped up against the cold, enjoying one of the Christmas light trails in the North West. This year, because we’d heard good things, we visited Luminate Cheshire at Walton Hall Gardens near Warrington.

We arrived on the first very cold evening of the winter, there was a sprinkling of snow on the ground and we were all well bundled up against the cold. Entry is timed, and the trail takes around 90 minutes to walk around. Although the car park is small, there was a brisk turnaround and we managed to find a couple of spaces and parking is free.

Luminate Cheshire at Walton Hall Gardens

The Walton Hall Gardens Christmas light trail – Luminate Cheshire is approximately 1.4km long. The trail isn’t entirely flat, it is pretty even and was suitable for buggy pushers and people who aren’t always so great on their feet, like me. There are stewards around every corner, so if you get stuck, you’re never far from help if you need it. It feels very accessible and there is matting down at potentially muddy points. It’s always best to wrap up warm for these things and wear sensible boots of shoes.

You begin the trail at the riding stables, which was a lovely start. There were some refreshment stalls and a couple of little Christmassy shops to look around. Since it was very cold, we decided to fortify ourselves with some mulled wine to drink on our walk, which was the very best idea.

Luminate Cheshire at Walton Hall Gardens

Luminate Cheshire at Walton Hall Gardens

This beautiful illuminated trail has new and exciting displays around every corner. I’ve been to a fair few Christmas light trails over the years. I thought I’d seen everything, but Luminate managed to have so many surprising and lovely elements, we loved it. From the enchanted fairy garden, with little cages with a dancing Tinkerbell inside. To the drum pavilion where you and your family can drum away and watch a giant rabbit on a big screen mirror your musical rhythms.

We stopped approximately half way for a toasted marshmallow break. We all huddled around the fire pits, toasting giant marshmallows and gobbling them down greedily. Beyond the fire pits was a “Make a Wish” wall, where you were invited to write your wish on a tag and hang it up. I hope at least some of those wishes come true!

Luminate Cheshire at Walton Hall Gardens

My lad really liked the searchlights which you can control with a joystick. I had a go too and enjoyed making the light dance in the sky. There were several Instagramable light tunnels to walk through, and there was a glitterball forest which we all loved. The talking tree which told terrible jokes and the field of rainbow lights. The Hall was the backdrop to a breath-taking Christmas projection and it just felt like there were so many wow moments and amazing displays to enjoy.

Luminate Cheshire at Walton Hall Gardens

Our group ranged from some giddy 4 year olds, to some equally giddy retirees. Every one of us was dazzled by the displays and impressed with how innovative and interesting some of them were. We really loved it and although there’s no Father Christmas, there is an awful lot to impress and astonish. We were lucky with the weather, though whilst cold, it was clear and bright, with my son pointing out constellations in the night sky!

Luminate Cheshire at Walton Hall Gardens

There is limited availability, and early booking is advised. Admission tickets cost: Adult £19.50, Child £14.50 (age 3-16). Family £62 (2 adults and 2 children). Parking is free. You can book via the Luminate Cheshire website.

Luminate Cheshire at Walton Gardens will run nightly from Thursday 24th November 2022 until Friday 24th December 2022. Tickets must be pre-booked online in advance.

Walton Hall Luminate

If you enjoyed this, you might like to read our round up of Christmas Light Trails in the North West.

Note: We paid for our tickets in full.

Christmas Recipe: Norwegian Juleskinke, or Christmas Ham

I received a box of Christmas foods from Creamline Dairies and I was asked to cook nice things with it, this Norwegian Juleskinke, or Christmas Ham is one of the nice things.

I’ve always had something of a fascination with all things Nordic, but in January I decided to put my money where my mouth is and learn Norwegian. It’s quite a fun thing to do, quietly learn a language by yourself. I’m confident that I could now tell you that a wolf is on the table and that the cook has several knives. I don’t think for one second that I yet capable of holding a whole conversation in Norsk, but it’s fun to try.

Alongside the language, I’ve been trying to watch Norwegian films and TV and given my slightly greedy interest in food, I’ve been reading up on that too. Each Christmas I usually make a ham for Christmas Eve, and it does us for cold cuts for many days after. This year I decided to give my Christmas a bit of a Norwegian twist and make Juleskinke – Norwegian Christmas ham.

Norwegian Juleskinke, or Christmas Ham

Last week I received a Christmas food box from Creamline Diaries. I chose a selection of foods from their Christmas range and it was delivered direct to my door, with no queuing or faff of any kind. The box is packed with brilliant locally produced food from independent producers. The meat is from my local butchers, the bread is from a fantastic local baker and fresh fish from the fishmongers. The fruit and veg are fresh from the market each day and you can even stock up your store cupboard. 

My Creamline box was brilliant and contained pretty much everything I needed to make this lovely festive Norwegian Juleskinke. It’s just the thing if you want to shop local, but don’t really have the time to visit all your local shops, or if you just can’t carry all your shopping home. It’s also a boon at Christmas, saving you slogging around a supermarket, or queuing up for ages in the cold outside the local independent shops you love best, who are all part of this scheme anyway!

I ordered the gammon half joint (1.5kg). Gammon has already been salted or brined, so if you buy gammon instead of pork, you can skip the first stage of the recipe. If you want to do the whole thing from scratch, then you’ll need to buy a boneless leg of pork!

Because we are a small household, we used a small joint of meat. This recipe is fine for up to 2kg of meat, any more than that and you’ll need to be doubling your recipe.

Norwegian Juleskinke, or Christmas Ham

Norwegian Juleskinke, or Christmas Ham

Ingredients
1 boneless leg of pork
150g salt
250g dark brown sugar
Dark beer, 2 bottles
Coriander seed, 1 tablespoon
Fennel seed, 1 tablespoon
Black peppercorns, 1 tablespoon

For the glaze
60g dark brown sugar
2 tablespoons of dry mustard
1 teaspoon of smoked paprika
1/2 teaspoon ground cinnamon
1 satsuma, or some fresh orange juice
Whole cloves
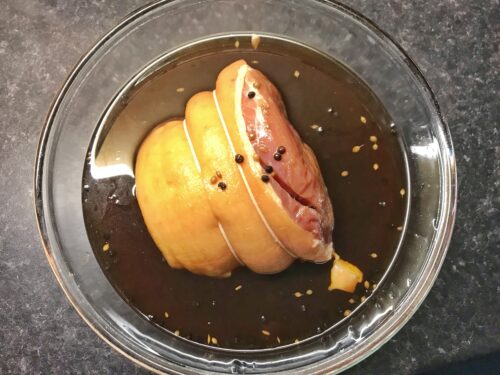
Norwegian Juleskinke, or Christmas Ham

To make your Norwegian Juleskinke, or Christmas Ham

Skip this step if using gammon instead of pork. Rub the leg of pork with 3 tablespoons of salt and 2 tablespoons of sugar. I put the meat in a large mixing bowl and covered it in the fridge, leaving it for 24 hours.

In a large pan, put the beer, sugar, salt, coriander seed, fennel seed and peppercorns and bring to the boil. Leave the liquid to cool fully. It’s best to do this the night before you need it, so it’s fully cool.

After 24 hours, take the meat and rinse some of the salt and sugar rub off. Once rinsed, place the meat in the spiced beer mixture. Pop this in the fridge and leave it for at least 24 hours. It will be fine for up to two weeks, making sure you turn it every day. I left mine for three days.

When you’re ready to cook the ham, put the meat in a large pan of unsalted water and simmer for around 4 hours.

Once cooked through, remove it from the heat and leave it to cool slightly so you can touch it without burning your fingers. Using a sharp knife, carefully cut a diamond pattern into the fat. Pre-heat your oven to 180°.

In a small bowl, mix the brown sugar, dry mustard, paprika and cinnamon together. Juice your satsuma (or use a few drops of orange juice) into the spices and combine so it makes a thick paste which you can spread. Rub the paste all over the meat until it’s well covered. Place the meat into a roasting tin or oven proof dish and push a whole clove into each cross section of the diamond pattern.

Put the ham in the oven for 30-40 minutes, until you’re happy with the colour of the ham. It should go dark and the glaze should be a little bit crispy and nice.  Once cooked, remove from the oven, slice and serve.
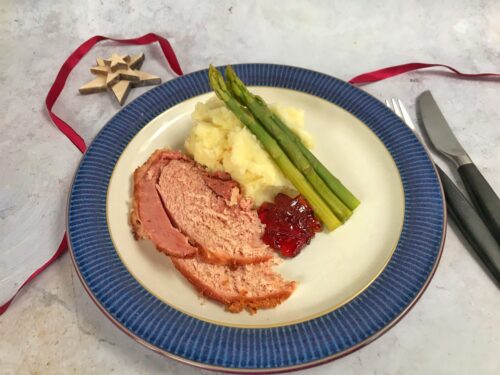
Norwegian Juleskinke, or Christmas Ham

You can eat it hot, which we do with buttery mash and vegetables, or it’s great cold with pickles and crusty bread. It keeps for up to two weeks in the fridge. We sometimes slice it and put it in portions in the freezer for a rainy day too.

Merry Christmas, or as they say in Norway, God Jul!

Creamline also offer a £10 credit for new customers which can be redeemed by visiting creamline.co.uk/register and adding the code GLASS10.

If you enjoyed this recipe, you might also like to try my Norwegian Inspired Cauliflower Cheese Soup.


Norwegian Juleskinke, or Christmas Ham

Christmas Recipe: Luxury Gingerbread Trifle

I received a box of Christmas foods from Creamline Dairies and I was asked to cook nice things with it, this gingerbread trifle one of the nice things.

Growing up, Christmas wasn’t Christmas without a sherry trifle made with so much sherry you’d fail to pass a breathalyser test on the way home. Trifle was always sponge fingers soaked in about half a pint of sherry, jelly with tinned fruit in, custard, cream and sprinkles. It’s a classic, and a classic for a very good reason.

These days, as much as a hanker for a traditional trifle, sometimes I like to mix things up a bit. The year of the black forest trifle was exceptional, but this year I’ve decided to serve up a gingerbread trifle. With all new things, it’s good to do a test run so you can tweak it to perfection on the big day. I have to say, there’s very little I’d change about this.

Christmas Recipe: Luxury Gingerbread Trifle

This week I received a Christmas food box from Creamline Diaries. I chose a selection of foods from their Christmas range and it was delivered direct to my door, with no queuing or faff of any kind. The box is packed with brilliant locally produced food from independent producers. The meat is from my local butchers, the bread is from a fantastic local baker and fresh fish from the fishmongers. The fruit and veg are fresh from the market each day and you can even stock up your store cupboard. 

My Creamline box was brilliant and contained pretty much everything I needed to make this delicious gingerbread trifle. It’s just the thing if you want to shop local, but don’t really have the time to visit all your local shops, or if you just can’t carry all your shopping home. It’s also a boon at Christmas, saving you slogging around a supermarket, or queuing up for ages in the cold outside the local independent shops you love best, who are all part of this scheme anyway!

creamline dairies

Gingerbread Trifle

Ingredients:
4 Christmas Morning Muffins, or Jamaican ginger cake
Gingerbread syrup, approx 50mls
2 pints of custard, cooled
500mls Jersey double cream
Half a packet of ginger nuts, crushed
Some gingerbread men to decorate
Optional – a drop of rum, spiced is nice!

How to make your gingerbread trifle:

This is quite quick to make once you have everything assembled in front of you. So before you begin, make you custard an chill it thoroughly, whip your cream and crush your ginger nuts. Find a nice trifle dish or glass bowl and roll your sleeves up.

Take your Christmas Morning Muffins out of their wrappers and cut into three equally thick slices. You’ll need two muffins for each layer. If you can’t get hold of Christmas Morning Muffins, then a good substitute is slices of Jamaican ginger cake. Arrange them in the bottom of the dish and drizzle approximately 25mls of the gingerbread syrup. If you’re also using rum, now is the time to drizzle over some of that too!

Christmas Recipe: Luxury Gingerbread Trifle

Spoon over half of your cooled custard and smooth the surface. Give the bowl a gentle shake so it can fall into the gaps between the cake layer. Next, carefully spoon over half of the whipped cream and smooth that layer out too.

Next take about 4 biscuits worth of crushed ginger nuts and sprinkle them evenly over the top of the cream. It’s now time to repeat the process.

Lay another layer of Christmas muffins or ginger cake and drizzle over the with remaining gingerbread syrup and a bit of rum if you’re using that. Then spoon over the remaining custard, then the cream and make sure your top cream layer is nice and even. Sprinkle over some more crushed gingernut biscuits and then decorate with your little gingerbread men. I used three and propped them up together on the top. Feel free to let your imagination and creativity run wild at this point!

Christmas Recipe: Luxury Gingerbread Trifle

I left my gingerbread trifle to sit in the fridge for a few hours before serving and by gosh, it was delicious. If you really love ginger, you might want to be a bit more generous with the syrup, but it’s a great trifle. It’s rich, its delicious and it’s a real crowd pleaser! Everything you need this Christmas!

Big thanks to Creamline Diaries who saved me having to carry a heap of shopping home, for supporting local businesses and for having an excellent selection of great quality, locally produced food.

Christmas Recipe: Luxury Gingerbread Trifle