Our Mexican Feast – food from Old El Paso

As a family one of our favourite quick and easy evening meals is fajitas. Usually our fajita evenings consist of an Old El Paso fajita kit, some potato wedges, and as much salad, avocado and guacamole we can lay our hands on. I’m a veggie so we usually load the fajitas up with really well cooked vegetables and some sliced up soya burgers for a bit of protein. It’s a popular, sociable meal which we will all happily eat, it feels like a bit of a treat, but with all those veggies it’s a pretty healthy one.

I was sent a box of things to try from Old El Paso, and with Mexican food being a casual, social affair, we invited some friends around to join us for a fiesta feast!

Old El Paso

I’d never seen the “Stand ‘N’ Stuff” soft taco kit before, it contains boat shaped soft tortila shells which you fill up with whatever you want. It also contains a packet of salsa style sauce and a sachet of flavour powder. All you do is brown some mince (I used Quorn), add a drop of water and stir through the flavour powder, it is ridiculously quick and really tasty. It had a really lovely smoky BBQ flavour which would I imagine work even better with minced beef. I really, really liked these and would definitely have these again instead of our usual fajitas.

The pack also included a packet of chilli flavour mix. We are big chilli fans and I’ve been eating chilli since my fairly exotic Nan started giving it to us for our tea in the early 1980s. I love chilli and know a good one from a bad one,  this was lovely. I followed the instructions on the packet to the letter, but again used Quorn instead of minced beef. I would use this flavour packet again, maybe next time I’d add more chopped tomatoes for a slightly wetter chilli and cook it for longer to allow the flavours to develop further. 

Old El Paso

We also tried a jar of salsa – a store cupboard staple for us, and this was a lovely accompaniment to our tacos, likewise the guacamole, it’s nice to have an ambient one for the times when you just can’t make your own. Hubs who likes  a bit of heat enjoyed most of the jar of jalapeños. I wasn’t brave enough to try them and I don’t think the small boy is ready for chillies just yet. 

Old El Paso

It was a fine feast, we all ate and ate well. The shape of the soft tacos was a bit of a game changer for me, it worked really well for the small boy too, there was less food down his top than usual which is always a good sign. Old El Paso seem to have really expanded their range recently, with more taco and flavour options, I’ll be keeping an eye out for new things to try from them. 

As a family we can’t really go wrong with Mexican food, it’s so easy to eat and secretly healthy and a great way to get veg into the boys without any fuss. All that was missing were the margaritas! 

Note: We were sent a selection of Old El Paso products to try for review purposes. All images and opinions are our own.
Degustabox September 2015

We’ve been receiving our monthly Degustabox for 5 months now, and I really look forward to seeing what goodies I’m sent each month. We’ve discovered some pretty good stuff through getting the Degustabox, and this month was no exception. There were some familiar favourites and some new things we’ll be looking out for. 

If you don’t know what a Degustabox is, it’s a box of food and drink goodies you get sent every month. It costs £12.99 but the contents are usually worth more than that, plus you get to try new things that you might not have tried otherwise.

Degustabox September 2015
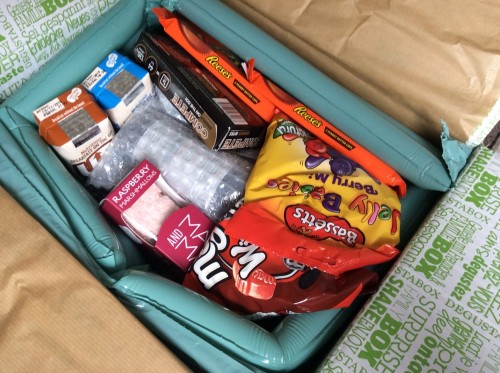
My September 2015 Degustabox, well packed, the bottles all individually bubble wrapped and the whole box protected from bumps etc.

In the September 2015 Degustabox there was…
– Reese’s Peanut Butter Cups, 2 packets, 85p each
– Mallow & Marsh mini box of raspberry marshmallows, £2
– Maynards Red and Black Wine Gums, £1.50
– Bassets Jelly Babies Berry Mix, £1.50
– The Olive Shop Extra Virgin olive Oil, £5 (Db Discovery)
– The Good Cider of San Sebastian, 2 bottles, £1.50 each
– Kent’s Kitchen Spicy Szechuan Posh Noodles, £1.86 (Db Discovery)
– Up & Go (nutritious breakfast drink) 2 cartons, £1.39 each
– COMPLETE Energy Bites £4.49
– Sweet Sally Tea, £2.40

I thought this month was quite an interesting box, with a hefty nod towards sweet treats (Reese’s are the very best thing in the world. Fact.) and some useful kitchen staples (how did they know I was down to my last drizzle of olive oil?).

Between us we shared out the sweet treats, the small boy loved the Mallow & Marsh raspberry marshmallows and hubs went a bit bonkers for his favourite childhood sweets, Jelly Babies which have been given a modern update with the berry flavours.

A surprise hit were the Up & Go breakfast drinks which the small boy had and we will have to buy these again. I like to have a drink to give him when I pick him up from school, slurping a drink also encourages him to walk nicely, so it’s not altogether an altruistic move on my part.

This month the DB Discoveries were The Olive Shop Extra Virgin Olive Oil and Kent’s Kitchen Spicy Szechuan Posh Noodles. These were two of my favourite things in the box, I love a good extra virgin olive oil and I slosh it on almost everything, and the posh pot noodles were a lovely lunchtime treat I’ll be looking out for in the future. 

Degustabox September 2015

Hubs enjoyed the cider, we are not big cider drinkers, but he said it was both fruity and refreshing, I had a sip and thought it’d be nice over ice. He also liked the COMPLETE Energy Bites, he loves mocha flavoured things and they’ve helped to pep him up in the mornings ready for work.

I can’t wait to see what’s in next months box!

Grab your discount! If you’d like to try Degustabox for yourself, you can get £6 off your first box with this discount code BLDEG15. You can find out more about Degustabox on their website.

Note: I was sent this Degustabox free of charge for review purposes. All images and opinions are our own.

Parenting: Why I won’t shame my son online

Yesterday my over-tired 4 year old spent most of the afternoon screaming and crying. He was in a foul mood and was really hard to be around. Together my husband and I spent the long hours until bedtime tagteaming him. Trying to gently entertain him, soothe him and keep him happy. He was hard work, and we felt every second of those six hellish tantrummy hours we endured before he went to bed.

But you know what. I didn’t bitch about him to a soul. I didn’t go on Twitter and call him a dick and do the old #freetoagoodhome hashtag. There was no *sad face* Facebook status update and I didn’t Instagram him mid-meltdown. I didn’t shame him online because I have so much respect for this little human being I carried around, birthed and have lovingly nurtured up to this point.

We all use social media to vent. I know this because I vent all over it. Sometimes it feels like it would help to post a little ranty status update about the little person who loves you unconditionally and relies on you for 100% of their care and attention. I get it. I couldn’t tell you if I’ve ever publicly been a bit nasty about my own child, I might’ve been, but it seems quite unlike me. I’m not in the shame business.

Parenting is bloody hard. Bloody hard. You’re knackered. All. The. Time. You lack the freedom you had pre-children, you can’t do what you want, when you want. Money is tight, there is rainbow covered crap all over your once tastefully decorated house and you have to take a personal interest in the bowel movements of another human. It is hard and it is gross. I get it.

I won’t shame my son online.

We’ve all seen those “reasons my son is crying” memes. The ones where it says “he’s crying because I wouldn’t let him lick fire” and stuff like that. There was a counter meme which struck a chord with me. My son is crying because he’s tried. He’s crying because he’s confused by what’s going on. My son is crying because he has no frame of reference for this new experience he’s having and is clearly terrified of. Yes. Nailed it.

My child is not being difficult just to piss me off, or stop me watching my favourite TV programme. He is crying and being difficult because for him life is all new, confusing, difficult, stressful, whatever. My son doesn’t need me losing my temper with him for this. He doesn’t need me to shame him online. He needs me to understand that having a tantrum, for most of the time at the very least, is evidence of the gap between his existing skills, experience and knowledge and what is happening to him right here, right now.

What he doesn’t need is to look back when he’s old enough, scroll through my tweets or Facebook posts and see for himself how hateful I was towards him. Parenting isn’t easy, I don’t think I ever gloss over it. When I started blogging it was in a way an online diary which we could look back on as a family, or when I’m gone, warty bits and all.

It goes back to the old saying “if you can’t say anything nice, don’t say anything at all”. Be real, be honest, be truthful, but don’t be a dick. After all, this child you’re bitching about now will be picking out your retirement home soon enough. Parenting is hard, but the actual child rearing bit is comparatively short and they’ll be off to uni before you know it. It’s hard, but temporary. So be nice.

Parenting: Why I won't shame my son online
I love that boys face, and I’ve grown to love all the rainbow coloured crap that moved in when he did.
You can read more of my posts about parenting here.

My Sunday Photo 4.10.15

super blood moon

This is the super blood moon eclipse which happened this week. I dutifully set my alarm for 3am and grumpily got out of bed to see this rare eclipse. I tried to take some snaps with my ipad but it was useless, but I had my proper camera on hand and took this. It was my first ever attempt at a detailed picture of the moon, and I was pretty pleased with the result.

There was no special trick to this, I leant out of my bedroom window, pointed my camera at the moon and zoomed in as far as I could. I was wobbling the camera all over the place, so I pulled on the neck strap on the camera and held it taut, it worked briefly and I fired off a few shots before I got the shakes again. Next time I would use a tripod and maybe a slightly better camera.

I use a Nikon Coolpix L820, which isn’t a DSLR but it’s easy to use and I’ve managed to take some pretty nice pictures with it. 

So that’s my super blood moon. Not bad for a half asleep grumpy woman with the shakes.

Halloween Crafts – Making Spooky Lanterns

It has become something of a tradition that we have a little Halloween party each year. We schedule it during half term so it gives the kids a chance to get together and have fun, and us mums get to catch up with each other. I provide the house and some basic drinks and snacks, the other mums bring extra snacks, craft activities and games, one even taught a dance routine last year! In preparation for the party we’ve started doing some Halloween crafts at home and making some things to decorate the house with for the party.

We were sent a pack of four Halloween lanterns to make from Baker Ross. They have a really interesting selection of Halloween crafts to make and I particularly like the “day of the dead” themed crafts which might be more enjoyable for older children.

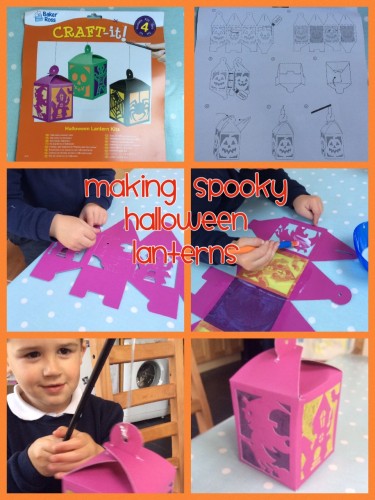
There were four different designs of spooky lanterns in the pack on different coloured card. The designs were punched out of the card and we needed to push out the design and glue the “stained glass” tissue paper on the inside of the lantern windows. This was really easy and good practice for little fingers doing a semi-fiddly job.

My top tip would be to fold the creases of the spooky lanterns where they have been scored before you start gluing and sticking, if you pre-fold them so they’re ready it makes things much easier later on.

halloween crafts

Once you’ve glued the tissue paper stained glass into place you should leave it to dry for a few hours. Then the instructions say to glue the flap on the lantern in place to create the box shape. We glued ours, but in the future I’d probably use double sided sticky tape – much easier, quicker and less sticky. 

Once the glue is dry, following the instructions, fold the lantern together and affix the stick and glittery string. You can pop an LED tea-light in if you like, but I think it looks rather fab on its own. We’ll make the rest of the lanterns and hang them from the ceiling for our party! 

The boy really enjoyed making these with me. The instructions were clear, but he did need a grown up to help guide him and to do some of the tricky folding. He loved the result though and proudly showed off his lantern to everyone who would look. This was a great Halloween craft activity, something different for us to do which we both enjoyed!

Recipe: Fig, Honey & Cinnamon Sponge Pudding

I love figs, they still seem like a decadent kind of fruit, a rare globe of loveliness, rich, versatile and hard to come by. I like to have a tin of figs in syrup in my cupboard to bake a form of Birnenpfannkuchen with, but fresh figs are a rare and wonderful treat. I was shopping in Aldi this week when I noticed they had 4 figs for 59p in their super 6 offer, and at that price it’s rude not to, so I slipped a couple of boxes into my basket and started plotting a pudding.

Fig, Honey & Cinnamon Sponge

I couldn’t find a recipe for what I wanted to make, so I experimented a bit instead. What I wanted was a honey baked fig in some light sponge spiced with cinnamon, and ideally some sultanas soaked in tea, but we didn’t have any, we’ll add those next time. That’s how I came up with this recipe for Fig, Honey & Cinnamon Sponge.

Fig, Honey & Cinnamon Sponge

Fig, honey and cinnamon sponge puddings

Serves 6
A lovely, quick little pudding, gently spiced with cinnamon and making the most of fresh seasonal figs.

Ingredients
3 fresh figs
6 teaspoons of runny honey
4 oz butter or margarine
4oz of caster sugar
1 teaspoon baking powder
1 tablespoon of ground cinnamon
2 eggs
4oz self raising flour

Instructions
Pre-heat your oven to 190. Grease six ramekins. Halve the figs and place one half in a ramekin and drizzle round a teaspoon of honey.

Beat the butter or margarine and the sugar together until light and fluffy. Add the baking powder, cinnamon and eggs and mix together. Once combined gently stir in the flour and equally divide between the six ramekins.

Bake in a pre-heated oven at 190 for 20 minutes, or until the sponge is cooked through.
Once cooked, run a knife around the edge of the ramekin and tip out.

Notes
Serve with custard, ice cream or cream. Best eaten when warm.

It’s a really, really simple little pudding to make and takes less than half an hour. If I can get my hands on more figs these Fig, Honey & Cinnamon Sponge puddings will be a regular treat for us until the fresh fig season is over.

Fig, Honey & Cinnamon Sponge

I love the way the honey and fig juices soak into the sponge and make it sticky and unctuous, without making it too sweet. Next time I make these Fig, Honey & Cinnamon Sponge puddings I would throw in some soaked dried sultanas, but it works really well without them. This is a glorious pud and I had to fend off request for seconds (because I wanted them). Give it a try and let me know what you think.

Recipe: Fig, Honey & Cinnamon Sponge Pudding

My Sunday Photo 27.9.15

This week I went to River Cottage in Devon with a group of food bloggers. We had a fantastic time, learnt a lot, laughed a lot and stood about in awe a lot. I took approximately 3 million photographs, some of them were pretty ok too. But my favourite was this, the pigs tails. It also seemed slightly topical (*coughs* David Cameron *coughs*). So here you go, two curly pigs tails wiggling in the sunshine.

River Cottage

Born Survivor 2015 – How Team Didsbury Triumphed

This morning my little family went on an adventure. At 8.30am we clambered bleary-eyed and slightly grumpily into the car and set off for Capesthorne Hall about a half hour drive away from home. My husband, generally a stranger to exercise, had joined a team of friends to take part in Born Survivor, a 10k, 30 military obstacle course. It was all for a good cause and having hit 40 this year he was up for a challenge.

Way back in the spring, a brave group of 29 men and women signed up for Born Survivor. When Matt (hubs) signed up it seemed an age away, he started training but quickly managed to knacker his knees and a physio told him to take it easy, so he did. His preparation for this military style beasting was a few visits to the gym and losing a stone on the 5:2 diet. But was it enough?

Born Survivor

The brave 29 were doing Born Survivor in memory of Lizzie Lowe and to raise money for the Didsbury Youth Cafe at St James & Emmanuel. It’s a great cause, it’s a lovely safe place for school kids to hang out on a Friday night and gets around 60 local kids in every week. 

The team were a range of ages and fitness levels, but all were well up for it, determined and smiling. They were ready for mud, sweat and tears. They had a plan and were sure no one would be left behind. 

Born Survivor

I managed to catch up with them at some of the obstacles, I was incredibly proud to count these people as my friends as they leapt over barriers, climbed sheer walls, dove into deep muddy pits, crawled under barbed wire and smiled through every minute.

Born Survivor

There was fantastic teamwork going on from start to finish, with everyone helping each other and each playing their part. The large group did naturally split into three smaller groups, with about 15 minutes between them. Matt was in the middle group and did remarkably well for a bloke who’d done comparatively little training and wasn’t very well prepared. 

And they all said they’d do it again next year!

Born Survivor


Review: Orchard Toys Shopping List Game

One of the most popular games we have at home is the Orchard Toys Shopping List game which we’ve had for about a year now.  It’s been all over the place with us and has kept us entertained during family meals out or quiet afternoons at home. The Orchard Toys Shopping List game was probably the best money we’ve ever spent on a game.

We first discovered it in the school nursery, where the children played with it with the teachers to help develop a range of skills including matching and memory, personal and social skills as well as observational skills. I think it’s also really good for language development, as we always use it to talk about going shopping and what we are putting in our basket or trolley.

orchard toys shopping list game

I was really pleased to see that Orchard Toys have recently released an updated version of the game,the rules are the same as ever,  but there are a few different items to put in your trolley and some different, modern shopping list options. It’s not vastly different, but it’s different enough, so much so that we all got excited about the new game.

Orchard Toys shopping list game

As you can see from the photo above the Orchard Toys Shopping List game has had a bit of an update – I love the shopping list on the smartphone, because that’s how I shop!

Orchard Toys Shopping List game

Playing the game is really easy. You just select a shopping list and a trolley or basket, turn all the shopping cards over so you can’t see what they are (each one has something from the shopping lists). Then you take it in turns to pick a card and see if it’s on your list, if it is you put it in your trolley, if it isn’t you put it back and whoever does have it has to try really hard to remember where you put it when it’s their go. Everyone takes it is turns to turn over a card and whoever fills their basket or trolley first is the winner!

We couldn’t wait to get the box open and get playing, Grandad joined in too and we played three games in quick succession and have played it every day since! The Orchard Toys Shopping List game is as good as, if not better than it ever was! We love it!

Review: TioTina Oven Gloves

I am a keen cook, and like most keen cooks I have the scars to prove it. My usual method for removing hot stuff from the oven and grill is a bunched up tea towel, which is fine until you burn yourself, which I manage to do at least once a week. I was given the chance to try out some TioTina oven gloves to see for myself how effective they are.

TioTina oven gloves, or rather gauntlets are heat resistant to 350 degrees C 662 Fahrenheit with Aramid/Paramid. Bullet proof vests and racing driver fire protection suits are made from similar material, so they’re pretty tough. They’re super-thick and have long cuffs which help protect your arms, which for me is great because my arms and wrists are the bits of me most often burnt.

TioTina Oven Gloves

The gloves have silicone on the palm and fingers which stops hot trays and pans from slipping out of your grip. The gloves are flexible, so if you need to fiddle about with something hot, you can easily do that.

TioTina Oven Gloves

You get two gloves and each glove can go on either hand. I tend to casually whip things out of the oven with one hand, so for me a pair of these TioTina oven gloves will probably last me forever (I’m a bit more cautious with roasting tins full of hot fat though).

We put the TioTina oven gloves to the test. Although we were sent a large pair of gloves and I have the dainty hands of an elegant lady, they still fit me loosely, but I felt confident using them thanks to the silicone grips. Hubs who has hands like shovels tried them out too, and the gloves fit him perfectly . Because I have a cruel streak I made him hold a blisteringly hot oven tray for a good five minutes and he was fine. The gloves passed the test!

TioTina oven gloves

I think it’s important to use proper oven gloves when you’re taking things out of the oven. I’ve lost count of the burns I’ve had over the years and I don’t think it sets a very good example to my son to be so laissez faire about this aspect of kitchen safety, especially when I can’t give him his lunch without issuing at least three warnings about blowing on hot food etc.

The TioTina Oven gloves are robust and make getting things out of the oven very safe. They work fantastically well and will be a key part of my kitchen for some time to come.