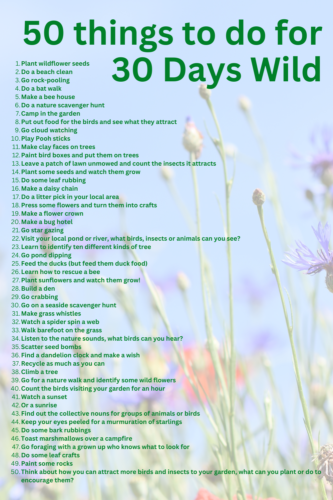
50 things to do for 30 Days Wild

Several years ago, the Wildlife Trusts launched 30 Days Wild, where in the month of June, you’re encouraged to explore and enjoy all the wildness and wonderfulness of nature. You can read more about it and order your free pack on their website. It’s something we like to dabble in, we’re a nature loving bunch and we are lucky enough to live in an area close to a river, woodlands, meadows and small patches of nature reserves. But even if you’re slap-bang in the middle of a busy city, there are always places where nature thrives.

50 things to do for 30 Days Wild

If you’re tempted to take part in 30 Days Wild, I’ve got 50 lovely ideas for exploring nature which will hopefully inspire you.

50 things to do for 30 Days Wild

  1. Plant wildflower seeds
  2. Do a beach clean
  3. Go rock-pooling 
  4. Do a bat walk 
  5. Make a bee house
  6. Do a nature scavenger hunt
  7. Camp in the garden
  8. Put out food for the birds and see what they attract
  9. Go cloud watching
  10. Play Pooh sticks
  11. Make clay faces on trees 
  12. Paint bird boxes and put them on trees
  13. Leave a patch of lawn unmowed and count the insects it attracts
  14. Plant some seeds and watch them grow 
  15. Do some leaf rubbing
  16. Make a daisy chain
  17. Do a litter pick in your local area
  18. Press some flowers and turn them into crafts 
  19. Make a flower crown
  20. Make a bug hotel 
  21. Go star gazing 
  22. Visit your local pond or river, what birds, insects or animals can you see?
  23. Learn to identify ten different kinds of tree
  24. Go pond dipping
  25. Feed the ducks (but feed them duck food)
  26. Learn how to rescue a bee 
  27. Plant sunflowers and watch them grow!
  28. Build a den
  29. Go crabbing 
  30. Go on a seaside scavenger hunt
  31. Make grass whistles
  32. Watch a spider spin a web
  33. Walk barefoot on the grass
  34. Listen to the nature sounds, what birds can you hear?
  35. Scatter seed bombs
  36. Find a dandelion clock and make a wish
  37. Recycle as much as you can 
  38. Climb a tree
  39. Go for a nature walk and identify some wild flowers 
  40. Count the birds visiting your garden for an hour
  41. Watch a sunset
  42. Or a sunrise
  43. Find out the collective nouns for groups of animals or birds
  44. Keep your eyes peeled for a murmuration of starlings
  45. Do some bark rubbings
  46. Toast marshmallows over a campfire
  47. Go foraging with a grown up who knows what to look for 
  48. Do some leaf crafts 
  49. Paint some rocks 
  50. Think about how you can attract more birds and insects to your garden, what can you plant or do to encourage them?

50 things to do for 30 Days Wild

Have you got any ideas to add to the list? Comment below what you’re doing for 30 Days Wild this year.
50 things to do for 30 Days Wild

Father’s Day Gifts for Music Loving Dads

As a mum, one of the many things I do it help facilitate the buying of suitable Father’s Day gifts. In the past we’ve given socks, or hampers of goodies, but as my son is getting older, father and son are spending more and more time listening to music together. It’s nice that they can spend time together enjoying this shared interest, so it makes sense to find a gift they can enjoy together. Here are some ideas for Father’s Day gifts for music loving Dads.

Father’s Day Gifts for Music Loving Dads

Slipmats and retro record prints

Gail Myerscough is a renowned surface pattern designer and illustrator. Her mid-century inspired designs are utterly beautiful and would look amazing in any home. Gail’s recent collaboration with Tim Burgess, lead singer of The Charlatans brought her work to a whole new audience, together they created some exiting record prints and a gorgeous and highly collectable turntable. Her online shop features a number of gifts suitable for music loving Dads, including this colourful slipmat. Slipmats are the best way to customise your turntable setup, and this turntable upgrade is available for just £15.

records slipmat copyright Gail Myerscough

If you liked the look of that, she has a whole collection of record inspired products, including prints, cushions, phone cases and notebooks.

Get him some gig tickets

Live music is always a bit of a treat. Is one of his favourite bands touring? There are thousands of venues, large and small, up and down the UK who have live music on, there’s bound to be something which will appeal. Here in Manchester we have an annual tribute festival, featuring loads of brilliant tribute acts at a fraction of the price of seeing the real deal. If you’re local to Manchester, you need to check out Festwich 2023!

Upgrade his headphones

Dad’s music isn’t always appreciated by everyone in the house, so treating him to a decent set of headphones for him to listen to his favourite tunes on, is a great idea. Beats headphones are some of the most popular headphones on the market, available in a range of colours with lots of different features to choose from, there are headphones to fit all budgets. We liked these Studio 3 Wireless Over Ear Headphones, which are a bit top of the range, but worth it if you wear headphones a lot. They’re designed for comfort, have a long lasting battery life and deliver a really clear, high quality sound.

Father's Day Gifts for Music Loving Dads

Big up the band t-shirt

Every self respecting music loving Dad has at least a couple of band t-shirts lurking in their wardrobe. Whether they’re the originals from the 90’s, or more recent purchases, there’s always room for another t-shirt. Band t-shirts are widely available, but if you’re looking for something a little different, Etsy has a good and varied collection to choose from.

Music mugs

The Manchester Bee Company make all kinds of great things, but their collection of music mugs could be just what your music loving man needs in his life. Choose from; Northern Soul, Music Snob, Put the needle on the record, or my personal favourite, Choose Vinyl. They also have a selection of music inspired keyrings available to order too!

Father's Day Gifts for Music Loving Dads

Records from the local record store

Despite all the promises in the 90s that CDs were the future and vinyl records just needed putting on a bonfire, vinyl has gone from strength to strength. There’s a brisk trade in original vinyl records, re-issues and newly pressed records. If your Dad loves a bit of vinyl, I’d encourage you to seek out your local record store and either take him on a shopping trip, or buy him a voucher so he can choose what he wants in his own time. My local record store is (Mr) Sifters Records, you might have heard of him?

Is a smart speaker a smart choice?

It might not be everyone’s cup of tea, but a smart speaker is an easy way to listen to music. We have a couple of Alexa smart speakers around the house. We find them handy to have for when we want to listen to something quickly, without having to search for the CD or record in the house.

Whatever you choose to give the music loving Dad in your life this Father’s Day, I’m sure he will love it.

Days Out: Deva Roman Discovery Centre, Chester

Over Easter, the boy and I had a couple of days in Chester. Keen to fill our boots with some history, we visited the Deva Roman Discovery Centre. The Deva Roman Discovery Centre is an interactive museum showcasing life in Roman Chester. It’s aimed at families and is filled with stories from across the empire.

Days Out: Dewa Roman Discovery Centre, Chester

Deva is tucked away down a side street, just off the main shopping area in Chester. It took us a couple of minutes to find it, but google maps is your friend here. We arrived mid-morning and had just missed the start of a tour, so we bought our tickets and nipped off for a quick coffee with instructions to return at 11am for the next tour. The tours are really regular, so if you can either take a chance, or book your slot in advance.

You are taken around the discovery centre by a Roman soldier, and in small groups you’re led around this experience. You begin by setting sail on a Roman ship, heading to the shores of Britain, and you’re soon embarking on your new life as a Roman soldier.

Days Out: Dewa Roman Discovery Centre, Chester

Learning about Roman life at the Deva Roman Discovery Centre

Once you’re off the boat, you get to walk through the recreated Roman streets of Chester. As well as finding out about Roman life, you also learn about the food they ate and how they prepared it. Roasted dormouse, anyone?

The Romans were famous for their bath houses and cleaning rituals, and at Deva Roman Discovery Centre, you learn about Roman baths and their communal toilets, and their toilet sponges! All of the information it pitched to a family audience and riddled with facts and information they can delight (or horrify) their teacher with when they are back at school. I am a bit of a domestic history geek, so I loved learning about everyday Roman life.

trying on a gladiator helmet

Trying on a Gladiator style helmet!

Once you’ve visited the baths, your Roman soldier tour guide takes you to the armoury where you can learn more about armour and Roman weapons. You end up in a colosseum, where if you’re lucky, you can dress as a gladiator and learn about how the Romans enjoyed these brutal entertainments.

Moving on, you’re invited to watch a short film about Roman Chester. Learning how archaeologists dug and discovered the history beneath your feet. You can then take your time to explore the hands on exhibits, trying Roman clothes on and learning more about archaeology. It’s a small, but interesting museum. We really liked the tour with the Roman soldier guide, who was brimming with knowledge. It was a great way for both my son and me to absorb the information. Once the official tour was over, we were able to try on costumes and have a go at archaeology, as well as looking at and reading about Roman finds in our own time was great.

Days Out: Dewa Roman Discovery Centre, Chester

Dusting down his archaeology skills.

I did wonder if my 12 year old might have found it a bit young, but he loved every second. They got him grinding wheat to make flour, wielding swords and finally dressing up as a fearsome gladiator. He really enjoyed it and in the days since our visit has spent time reading more about the Romans in Chester.

I believe that during school holidays on certain days you can also book a place at the Soldier School. This is where the Roman soldiers teach you how to wield a weapon and drill you in the art of marching like a true Roman soldier. Something we will be booking to do over the summer!

Days Out: Dewa Roman Discovery Centre, Chester

Tickets to Deva Roman Discovery Centre are currently £8 per adult and £4 per child. They are bookable in advance on the website. We spent just under two hours there, and we learned a lot!

DEVA Roman Discovery Centre is on Pierpoint Lane Chester CH1 1NL

Deodorant Review: Wild Natural Deodorant

We were sent some Wild Natural Deodorant to try for review purposes. All images and opinions are our own.

A little while ago, I tried giving up deodorant altogether. It was fine in January, but as the weather warmed up, it became clear I needed some kind of product. Now, I have incredibly sensitive skin, so I have to be a bit choosy about what I use. Even products specifically marketed to people with sensitive skin can make mine feel hot, red and tight. This month I was sent a vegan, sustainably produced natural deodorant to put to the test. Here’s how I got on.

Deodorant Review: Wild Natural Deodorant

Wild Natural Deodorant is tailor-made for people like me. It’s made with natural products and doesn’t contain any nasties you might be trying to avoid, like aluminium. It’s a deodorant rather than an antiperspirant, so it won’t stop you sweating. It will leave you feeling and smelling fresh. On top of that, it’s a sustainable solution, so you’re not buying cans and cans each month, or throwing heaps of plastic into landfill. You have an aluminium case (available in a range of styles) and you simply pop your refill into the the case, twist the bottom and it’s good to go.

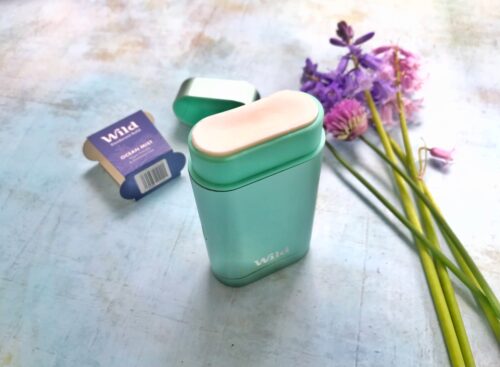
I was sent an aqua coloured case and an ocean mist scented deodorant to try out. It comes in a neat little box with some instructions. It was easy to put together and replacing the deodorant when I’ve finished it will also be a piece of cake! The instructions are very easy to follow, and not at all complicated, even for someone as easily confused as I.

Deodorant Review: Wild Natural Deodorant

Is it suitable for sensitive skin?

Now, given I’ve been stung before in terms of sensitive skincare, I cautiously applied the deodorant on the back of my hand. I wanted to be sure my skin wouldn’t react. It did not. Emboldened by this, I swiped the more sensitive inside of my elbow, and a few hours later, I was feeling confident that all would be well. So after my next shower, I applied a few swipes of the Wild Natural Deodorant to my underarms, and all was well. What a relief!

The ocean mist deodorant has a really fresh scent, which is neither too feminine or masculine. It’s really subtle and I like that it’s not overwhelming at all. There are a number of different scents to choose from. You know yourself and your preferences best, so you’re bound to find one which fits the bill. I really liked the sound of the fresh cotton and sea salt one. There is also a range of deodorants designed for extra sensitive skin, which I’ll be looking into when it’s time to order my next refill.

Deodorant Review: Wild Natural Deodorant

Wild Natural Deodorant is free from nasties (no aluminium or sulphate). They are the world’s first deodorant that has compostable, plastic free refills, so it’s good for your body and the planet! I really love that the refill casing is made of bamboo, which absorbs 35% more carbon and produces 30% more oxygen than trees. It’s all recyclable and really well thought out. You can even get smaller sizer ones to travel with!

I’ve been using Wild National Deodorant for a few weeks now. Stopping using an antiperspirant altogether took a little bit of getting used to, but I’m really happy with this product. It feels like I’m doing my skin a favour. It feels kinder and softer and I know that I’m not adding a pile of deodorant cans each year to landfill. If you’re thinking of making a change to something more natural, or something kinder to the planet, then I would suggest taking a look at Wild.

Deodorant Review: Wild Natural Deodorant

Where can you buy Wild Natural Deodorant?

There are bundles to get you started, but on the website. A case costs from £10 (and this will likely last you for years) and the refills cost £6 each. Once you’ve got your case, then you just need to buy a refill every so often. Simple and sustainable. I’m a big fan already!

If you fancy giving Wild Natural Deodorant a try, you can get a discount if you use this link. Don’t forget to enter the code HODGEPODGE at the checkout.

7 things to do with Wild Garlic

I love cooking with wild garlic, and it’s a nice thing to do with my son, both collecting it and making delicious things with. Over the years we’ve made many tasty things, so I thought I’d share some of our favourite things to make with wild garlic. They’re in no particular order, some are quick and simple to make, some take a few hours, but all of them are very tasty indeed.

When you go foraging it’s important not to pick too much of anything. Take just what you need and save the rest for the wildlife or other foragers. If you’re foraging for wild garlic, you don’t need much anyway. It’s pretty pungent and a few leaves go quite a long way. I tend to try to pick the younger leaves in spots where I think (hope) dogs haven’t been. I always wash my wild garlic leaves before I use them anyway. You can find out more about wild garlic here.

Recipe: Wild Garlic and Parmesan Scones

7 things to do with Wild Garlic

Wild garlic and parmesan scones

These wild garlic and parmesan scones are so delicious. They’re everything you want from a savoury scone. I sprinkle a pinch of sea salt on the top which makes them extra delicious. This is such a great recipe, we can’t get enough of these simple scones, which are great for a quick lunch, or warmed with soup.

Wild garlic hummus

This simple hummus recipe is a real treat. Gently garlicky and full of good stuff. My son really loves this and gets me to make it a couple of times a week during wild garlic season.

Easy Recipe: Quick Wild Garlic Hummus

Wild garlic macaroni cheese

This is a really simple recipe. It’s my standard go to macaroni cheese recipe, but with shredded wild garlic leaves scattered through it. It’s a really simple way of making something fairly basic into something fantastic.

Cheesy wild garlic quiche

This is a lovely quiche. Cheese and onion quiche is my favourite, but the addition of wild garlic really makes it something special. It’s a fine thing to serve to guests over for lunch, or just to keep to yourself if you’re a massive quiche fan, which I am!

Cheesy wild garlic quiche

Easy wild garlic pesto

Pesto is such a versatile thing to have in the fridge. This gentle wild garlic pesto is great stirred through pasta, or drizzled on pizza. Or in any way you’d normally use pesto.

Wild garlic pesto twists

If you’ve got a couple of tablespoons of wild garlic pesto going spare, then these cheese and wild garlic pesto twists are a simple but excellent way to use this lovely pesto.

Recipe: Wild Garlic and Parmesan Focaccia

Wild garlic and parmesan focaccia

This is the most delicious bread I’ve made. If you can get your hands on some lovely fresh wild garlic, it’s well worth making yourself. It’s like the best garlic bread you’ve ever had. I love this recipe!

Wild garlic is such a fantastic ingredient. It’s getting easier to come by now, many shops and deli’s are now stocking it in springtime. I hope this had given you some ideas about how to use any wild garlic you come across. Happy cooking!

Recipe: “Let Them Eat Swede” Coronation Cake

It’s a rare day I get political on this blog. But we live in financially tough times, and I can’t in all good conscience be totally fine with spending millions on a coronation, when thousands of people in the UK are choosing between heating and eating. While children go to bed hungry, I think it’s rather obscene to spend so much money giving a very rich man a golden hat. Not everyone will share my views on that, and that’s fine. It’s not worth falling out over.

In February, Conservative Environment Secretary, Thérèse Coffey declared “let them eat turnips”, as a more local answer to the empty shelves we’ve been finding in our supermarkets this year. Whatever the cause, the effect has been obvious when we’ve visited our local shops. Shortages of salad veg, peppers and tomatoes have had our government urging us to eat the root veg we grow here in abundance. Whilst I’m very keen on eating local and the fewer food miles the better, it’s still a tone-deaf, Marie Antoinette style statement from our government and an unwelcome diversion from the real issues.

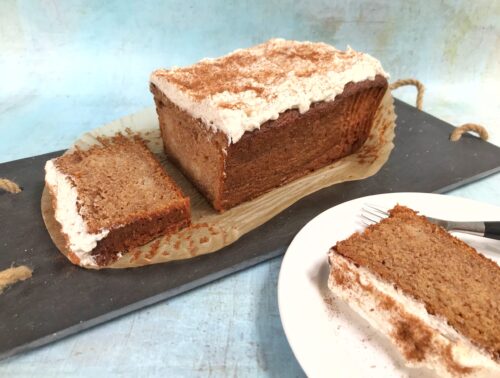
In response to both of these recent pieces of news, I decided to bake a “Let Them Eat Swede” Coronation Cake. It’s like the carrot cake we all know and love, but made with the most humble of root vegetables, the swede. Personally, I really love swede. I like it best in carrot and swede mash, it’s cheap and really helps to bulk out a meal and bump up the amount of veg you can get into your family. It’s no substitute for a tomato though, that much is obvious.

Recipe: "Let Them Eat Swede" Coronation Cake

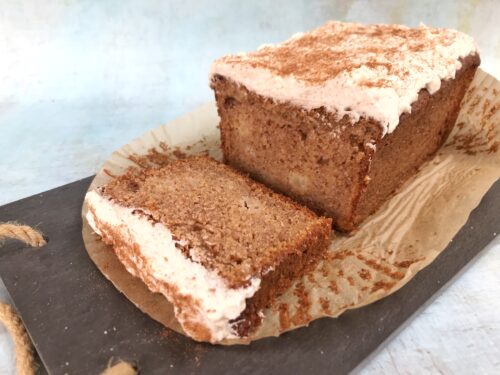
The great thing about swede is, it cooks quite quickly for a root vegetable. Once the cake is baked, the swede sort of melts into it, so I don’t think anyone would easily guess the secret ingredient. If you try it, let me know if you could tell it had swede in it.

“Let Them Eat Swede” Coronation Cake

Ingredients
150ml vegetable oil
200g soft brown sugar
3 medium eggs
1 lemon, finely grated and zested
200g coarsely grated swede
2 tablespoons of apple sauce
2 heaped teaspoons of ground cinnamon
250g self-raising flour
1 level teaspoon bicarbonate of soda

For the frosting
50g unsalted butter, softened
85g icing sugar, sifted
Half a teaspoon of ground cinnamon
180g soft cheese
Cinnamon sugar to dust the top with (optional)

Recipe: "Let Them Eat Swede" Coronation Cake

Method

Preheat oven to 180°c or gas mark 4. Grease and line a large loaf tin, I use loaf tin liners which are so much easier. In a large mixing bowl, beat the oil, soft brown sugar, and eggs until smooth. I used my hand mixer, but a wooden spoon works just as well.

Stir in the lemon zest, lemon juice, cinnamon, apple sauce and the grated swede. Tip in the sifted flour and bicarbonate of soda and fold in gently until it’s all mixed together well. Pour the cake batter into the prepared tin and bake for around one hour until risen and golden. If you’re not sure, insert a skewer into the centre of the cake and if it comes out clean, then it’s cooked.

Leave the cake to cool fully on a wire rack for a few hours, or overnight. The cake has to be fully cool before you pile the frosting on top, or it’ll melt.

Recipe: "Let Them Eat Swede" Coronation Cake

To make the frosting –

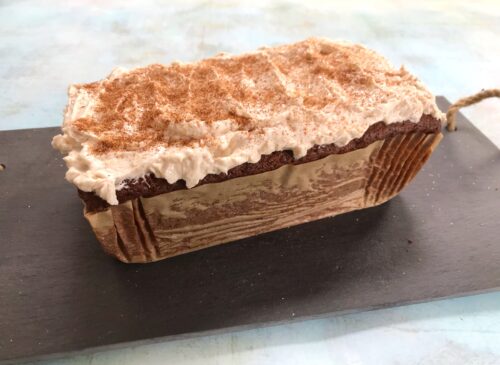
With an electric whisk, beat together the unsalted butter, cinnamon and icing sugar until it comes together and is smooth. This will take a little while, so persist with it. It will look unpromising and like breadcrumbs for a while. Once it is smooth, add the cream cheese and beat quickly until it’s soft and smooth. Do not over-beat the frosting, or the cream cheese may split and become runny. Spread over the top of the cake with a palette knife or an offset spatula. I’ve sprinkled cinnamon sugar over the top, but it might be mice to sprinkle chopped nuts, or more lemon zest if you like. I just made some decorative ripples, then popped the cake in the fridge for the frosting to firm up.

The swede cake without frosting would happily keep in a tin for a few days. With the frosting it’ll need to be kept in the fridge, or the cream cheese frosting might go off.

Recipe: "Let Them Eat Swede" Coronation Cake

It’s a really simple cake to make. To be honest, I made it mostly to amuse myself, but it turned out so well, I decided to share the recipe here too. It’s got to be better than a broad bean quiche, right?

If you liked this, you might also like to try this courgette cake.

Easy Recipe: Quick Wild Garlic Hummus

Over the weekend I visited Whalley Abbey for a walk. The grounds were covered in spring flowers and the trees were starting to blossom. Amongst the daffodil and crocus were some newly sprouted wild garlic, and once we came across an especially abundant patch, I decided to pick a few handfuls to make something nice with once I’d got home. The something nice turned out to be a batch of wild garlic hummus, and it’s a recipe I’m sure will become a firm favourite this spring.

As an aside, I’ve been slightly confused for several years now about the spelling of hummus. Is it hummus or houmous? Apparently hummus is the most common spelling, which is for more Arabic style hummus. But houmous is for humous with a more Mediterranean vibe. See, every day is a school day!

Easy Recipe: Quick Wild Garlic Hummus

Anyway, back to the wild garlic hummus. I made this delicious batch, partly thinking that it wouldn’t be popular with my 12 year old, but he tucked into it as soon as he got home from school. Thankfully there was enough left to have with our evening meal (aubergine filo pie and salady bits, if you’re interested), but I’m already fielding requests for more!

As you’re using wild garlic in your recipe, you don’t need to add the usual garlic cloves to your hummus. It is a bit gentler than your standard hummus, which I like. I’d be tempted to throw in a bit of parsley next time, if I have any. I am a bit mad for fresh parsley though, and there are very few things which can’t be improved by a generous sprinkle of fresh parsley leaves.

Recipe: Wild Garlic Hummus

Ingredients:
50g Wild Garlic, well washed and patted dry
1 tin of chickpeas, drained, but do save a couple of tablespoons of the liquid
1 lemon, zested and juiced
2 tablespoons of tahini (you can add more if you want to)
3 tablespoons of olive oil
Salt and pepper to taste

Easy Recipe: Quick Wild Garlic Hummus

How to make your wild garlic hummus:
Make sure you wash your foraged wild garlic well and pat it dry. I tend to make hummus in my Nutribullet, because it’s just the right size and does the job really well. If you don’t have one, then your usual food processor is absolutely fine too.

Put everything in the food processor and blend it. You might need to stop it and poke it down with a spoon so the blades can blend it all evenly. You might need to add a little of the chickpea liquid you set aside if it’s too firm, or a bit more olive oil if you like.

Taste it and check if it needs any more salt or pepper and add more if you think it needs it. Once it’s fully blended, it’s ready to serve. If you like, you can add a little drizzle of olive oil over the top of your hummus, just to give it a bit of extra shine.

We ate it greedily on toast, but also dipped crackers into it and had a large dollop on our salad. It will keep for a few days in the fridge in an airtight container, but if your house is anything like my house, it’ll disappear in a matter of hours!

If you liked this, you might also like to try these other wild garlic recipes –

Easy Recipe: Quick Wild Garlic Hummus

How we brightened up our home with an Elesi table lamp

We were sent an Elesi table lamp for review purposes. All images and opinions are our own.

Now that the clocks have gone back, like many people, I’ve thrown my curtains open and the fresh spring light has shown my house to be in need of a spring clean, and if I’m honest, a bit of a spruce up. Although it’s tempting to throw everything out and start again from scratch, I often find that a few new key accessories are enough to make a living space feel refreshed and renewed. A new rug, some fresh house plants, or a new lamp can really make a home feel transformed.

We gave our living room a real spring clean. Together we dusted, scrubbed and vacuumed the dark corners. We buffed the windows clean, steam cleaned the curtains and then turned our attention to the accessories. A couple of new house plants breathed life into a dark corner, some fresh flowers in a vase and a new table lamp were all it took to take our living space from cosy and dark winter, to fresh spring sunshine.

Elesi table lamp

Choosing from the range of beautiful floor and table lamps on the Elesi website, I opted for the Covaleda Black and Gold Tripod Table Lamp, a stylish statement lamp with real flair. It is gorgeous and it’s really caught the eye of everyone who has visited over the last few days. It’s had admiring glances from everyone!

The Covaleda table light has a large pivoting black lampshade with a gold lining, this sits on top of a black wooden, height adjustable tripod base, finished with brushed brass details. The round black metal element in the centre of the lampshade provides a cosy dispersed light when illuminated, and the lamp is easily be switched on and off using the easy to reach switch.

Elesi table lamp

Ordering online from Elesi was easy. The website was easy to search and navigate and my lamp arrived really well packed and wrapped in bubble-wrap. When it arrived, it was very simple to put together. All the parts are supplied, apart from the lightbulb, which was an E27 LED bulb, and they are very widely available.

If you’re enamoured with the styling, and I really am, a companion floor lamp is also available on the website.

The Elesi table lamp is a beautiful lamp, which looks great in my living room. It’s a beautiful lamp to sit by of an evening, with a book and a nice cuppa. It gives a lovely warm light, which doesn’t dazzle, but does throw plenty of light to read by.

Elesi table lamp

The Elesi website is full of beautiful electrical accessories and other items to make you home beautiful. From sockets and switches, to indoor and outdoor lighting, and a full range of LED bulbs. The Elesi website has everything electrical you’ll need, if you’re doing a full renovation, or just a small spring refresh. Plus it’s full of beautiful things, like my new lamp!

Recipe: No Churn Irish Coffee Ice Cream

I’m not sure there are much better ways to finish a meal than with a nice Irish coffee. That warming whiskey laced coffee drink is just caffeinated perfection. We were given a bottle of whiskey for Christmas, but we’re not the whiskey drinking house we once were, so it’s sat looking forlorn for weeks now. It was time it got used, so this week I whipped up a batch of deliciously creamy Irish Coffee Ice Cream. It’s a no-churn recipe, it takes all of five minutes to throw together and it is so simple. What’s not to like?

Recipe: No Churn Irish Coffee Ice Cream

This Irish Coffee ice cream is so deliciously rich and creamy, a little goes a long way! If you’re tempted to slosh a bit more whiskey in, you do this at your peril, as adding too much alcohol could prevent it from freezing. Better to stick to 3 tablespoons in the ice cream and drizzle a bit of extra whiskey over the top of your scoop if you think it needs a bit more kick.

Irish Coffee Ice Cream

Ingredients:

500ml double cream
1 tin of sweetened condensed milk
3 heaped teaspoons of instant coffee dissolved into 1 tablespoon of hot water, left to cool
1 teaspoon of vanilla extract
3 tablespoons of whiskey, whatever you have to hand

Recipe: No Churn Irish Coffee Ice Cream

How to make Irish Coffee Ice Cream:

Before you start making the ice cream, make your coffee solution. You need a tablespoon of boiling water and three heaped teaspoons of instant coffee. Mix them together and leave them to cool fully. You can speed this up by popping it in the fridge for a little while.

To make the ice cream, whip the cream in a bowl until it forms stiff peaks, this will take a few minutes with an electric whisk, if you’re doing it by hand, it might take a little while. Once you have achieved stiff peaks, gently fold in the condensed milk, vanilla extract, coffee and whiskey until it is well combined. Whip the mixture for 30 seconds to make sure it’s mixed properly.

Recipe: No Churn Irish Coffee Ice Cream

Pour into a loaf tin, smooth the top and pop it in the freezer for 6 hours, or overnight if you can.

To serve, remove it from the freezer about ten minutes before you want to serve it. It should scoop pretty well once it’s been at room temperature for a short while.

Recipe: No Churn Irish Coffee Ice Cream

Serve it however you like. I like to serve it in a pretty glass, or as an affogato style pudding, with a shot of espresso and a shot of whiskey poured over the top. Just the right kind of dessert for St Patrick’s Day, or any day really. Why limit ourselves?

Recipe: No Churn Irish Coffee Ice Cream

If you enjoyed this recipe, you might also like to try –

Recipe: No Churn Irish Coffee Ice Cream

Recipe: School dinner style Tottenham Cake

I’m a big fan of the sponge cake traybake. They’re really quick and easy to make, they cut into equal size pieces, so no one squabbles about portion sizes, and they’re almost always delicious. This recipe for Tottenham Cake is as simple as it gets really, and the bright pink icing doesn’t have an artificial colour anywhere near it, which is a good thing indeed.

Recipe: School dinner style Tottenham Cake

The first Tottenham Cake was made by a local baker, Henry Chalkley who was a Quaker. His affordable and easy to make treat quickly became popular. The colourful pink icing was originally made using mulberries which grew in the grounds of the Quaker Meeting House in Tottenham. Mulberries are a little hard to come by these days, so the pink colour is often achieved using fresh raspberries, or food colouring.

When Tottenham Hotspur Football Club won the FA Cup in 1901, the cake was given free to local children in celebration of this historic win. Tottenham Cake is still popular today and is available in local bakeries in London, and also London branches of Greggs bakers. If you’re not local to London, I can assure you that the recipe is ridiculously easy, and it’ll save you making a trip to the big smoke for a slice of cake!

Tottenham Cake was featured on The Great British Bake Off on 17 September 2013. You can watch the video here.

This Tottenham Cake is a cousin to the school dinner classic – the sprinkle cake. Lovely light sponge, topped with a sweet simple icing that’s always going to be a winner for children and adults alike. It’s definitely going to make it onto my regular baking round, and this is the recipe that’s finally made me order a proper traybake tin, rather than my usual small roasting tin. My future is full of traybakes, and I’m not sad about that!

Recipe: School dinner style Tottenham Cake

This recipe makes 15 (ish) squares of cake. You can add a bit of lemon zest if you like, as the icing is flavoured with raspberries, the hint of lemon works really well with it.

School dinner style Tottenham Cake

Ingredients:
200 g caster sugar
200 g softened butter or margarine (I use Stork)
4 eggs, beaten
1 tsp vanilla extract
1.5 tbsp milk
200 g self-raising flour
1 tsp baking powder
Zest of 1 lemon, finely grated (optional)

For the icing
200g icing sugar, sifted
100g fresh raspberries
Desiccated coconut (optional)

Recipe: School dinner style Tottenham Cake

How to make your cake:

Heat your fan oven to 180c. Line a 20 x 30cm cake tin with baking paper. I use a medium sized roasting tin. In a large bowl, beat your butter and sugar together until fluffy (I used a hand mixer). Add the eggs, milk and vanilla and combine, then add the flour and baking powder and mix together until you have a smooth batter. If you’re adding lemon, stir that though now.

Pour your cake batter into your prepared tin. Bake in your pre-heated oven for around 40-45 mins until golden and cooked. Leave to cool on a cooling rack.

While your cake is cooling, sift your icing sugar into a bowl to remove the lumps. Lumpy icing isn’t the best, so it’s worth taking a minute to do this. Pop your fresh raspberries in a microwavable dish and cook for around 90 seconds, or until they’ve collapsed and are soft and pulpy. Push the raspberries through a sieve, so you’re removing the raspberry seeds. Pour the juice into your icing sugar and mix well.

Once all the icing sugar is incorporated, pour over the top of your cake. Spread the icing evenly, be aware that it will spread a little of its own accord. Once the top of the cake is covered in the icing, sprinkle over the desiccated coconut until you’re happy with how it looks. If you’re not a fan of coconut, you could use sprinkles, or just leave it as it is. Let the icing set for an hour or two and once the icing is firm to the touch, you can cut it into squares and share it with friends.

If you enjoyed this recipe, you might also like to try a cornflake piechocolate cake with chocolate custard or peppermint crunch slices.

Tottenham Cake