How to strengthen your Pelvic Floor in your 40s

When I get together with some of my closest mum friends, the conversation generally lurches from holidays and skin care, to things we wouldn’t discuss with anyone else. One of these hot topics is incontinence, apparently trampolines are the trigger for most of my friends. It’s a fate I am keen to avoid. I’m not at that stage yet, but I’m keen to keep my pelvic floor in good health.

When I was pregnant, my pregnancy yoga teacher really drummed into us the importance of doing our pelvic floor exercises. She used to suggest we did them while waiting for traffic lights to change, or when certain adverts came on. Eight years later I’m still doing them when I hear the Go Compare advert. The trouble is, I’ve never been sure if the pelvic floor exercises I’ve been doing were correct, or if they were effective.

How to strengthen your Pelvic Floor in your 40s

Now I’m in my early 40’s I’ve started to make a few changes to try to keep myself healthy and fitter than I have been in recent years. The menopause will hit within the next ten years, so I want to try to make sure my reproductive health is as good as it can be. Part of that is having a stronger than strong pelvic floor. I decided my usual exercises weren’t enough, so I ordered a set of Kegel balls from Sent to Thrill.

Sent to Thrill was set up by a mum of 3 young children. She struggled to find products that would help her. Sent to Thrill began as a search for a product to help improve pelvic floor strength and they realised that good pelvic floor is the first step on a journey to increased body confidence and improved sexual health.

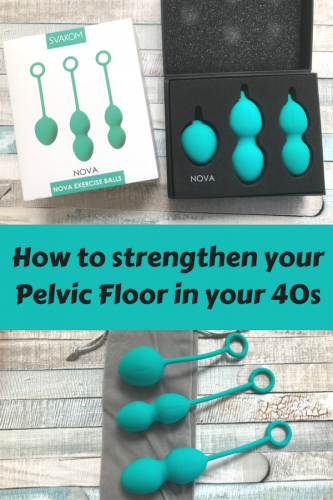
The Svakom Nova Kegel Balls cost £36 and include full instructions and a velvet bag to keep them safely stored away. There are three kegel balls included in the set; a single ball (49gm), a double ball (75gm) and another double ball (95gm).

They are made from body-safe silicone and they are phthalate-free and they are 100% waterproof. I chose them because they had a silicone “string” attached which I felt would make them easy to insert and remove after use.

How to strengthen your Pelvic Floor in your 40s

The instructions are very clear. They suggest using them for half an hour a day while you are active; that is stood up and doing something. They will be considerably less effective if you’re sat down or lying down. I decided to start with the smallest ball and to wear it for the half an hour it takes for me to shower, brush my teeth, blow dry my hair and sort my clothes out for the day.

The instructions suggest using the smallest ball for 30 days; then increasing the size for another 30 days and then moving onto the heaviest Kegel ball. I have used this set for a couple of weeks now. I’m still using the smallest ball but it’s very comfortable and I doesn’t feel intrusive. I wear it for around half an hour a day and it’s not until I’ve removed it that my pelvic floor muscles ache gently and let me know they’ve done some work.

Your pelvic floor muscles support your bladder, bowel and womb; keeping your muscles in good condition can help prevent prolapse and incontinence. Having a strong pelvic floor can also help to improve your sex life and can give you stronger orgasms.

How to strengthen your Pelvic Floor in your 40s

There’s no bad time to start exercising your pelvic floor. You are usually advised to exercise during pregnancy and afterwards. But the sooner you start, the stronger your pelvic floor will be. If we all did our pelvic floor exercises, or used Kegels, then we could stave off the threat of incontinence for much longer, maybe even forever.

For more information about pelvic floor exercisers, visit the Sent to Thrill website.
How to strengthen your Pelvic Floor in your 40s

Disclosure: I was sent this set of Kegels for review purposes. All images and opinions are my own.

BlogOnX – Who is HodgePodgeDays?

BlogOnX is taking place during the first weekend in May and I’m super excited to be going. I’ve been going to BlogOn for years and it’s always a weekend which inspires me and fires me up. The last one in September lit a fire under me and changed the way I blog and I’m hoping BlogOnX will have a similar positive impact.

Before each BlogOn there is a get to know you linky, so here are my answers, feel free to ask questions and if you’re going, please come and say hello if you spot me!

Share a recent photo of yourself

Here is my face…

HodgePodgeDays

What’s your favourite pizza topping?

I’m picky. I like a thin crust cheese and tomato pizza topped with black olives, fresh rocket and Parmesan shavings.

You can have dinner with any three guests dead or alive, who do you choose and why?

I need a really good laugh, so it would be Les Dawson, Eric Morecambe and Ernie Wise. And my Dad, because I miss him and he’d love that dinner party! I know that’s four and I’m not even sorry.

Up to now what would you consider being your biggest life achievement?

Being a mum. I never really wanted a family and didn’t think I could get pregnant, but when I did it tipped my world upside down and every day I am delighted to have produced my gorgeous, funny, kind, loving boy.

If you woke up tomorrow as a character from any Disney film or book who would you be and why?

I’ve never been a Disney fan. I’ve never really watched Disney films, so Disney is a mystery to me really. Star Wars is Disney isn’t it? I’ll go with Rey then, because she’s so strong. Though I’ve been told I’m more of a Princess Leia because I’m all about the snark.

What is the first thing you do when you wake up in the morning?

Take pain killers and hug my son.

If you won the lottery what would be the very first thing you would buy and why?

A holiday. A holiday somewhere really nice. Somewhere warm but not too hot. Somewhere private but not isolated.

What is your favourite quote from a movie?

Less of a quote, more of a whole scene, but it’s beautiful.

If you were a superhero what would your super power be?

Invisibility. I just think it would be interesting to be a fly on the wall and see what people are really like and what they are saying and doing behind closed doors.

What is the best piece of advice you have ever been given?

Trust your own instincts and follow your gut. It applies to almost every aspect of my life equally well, from being a parent, or a blogger, or one of the million other roles I have in life.

Which emoji do you use the most?

This one.

heart eyes emoji blogonx

I guess I must look at a lot of pretty things on Twitter.

If you could go back in time and tell yourself anything what would it be?

You’ll be a great mum, you can get pregnant, maybe start earlier and have more than one.

Also, eat fewer biscuits.

What do you currently have set as the wallpaper on your phone?

It’s an old picture of my son sat in a pub watching TV taken when were on holiday three years ago. It just makes me smile.

If you could do anything in the world as a legitimate job what would you do?

Spy. I’d be an International Woman of Mystery. I don’t want a real job, I like the one I’ve got.

Where is your favourite place in the world?

Boringly I’m going to say Manchester. I was born and raised here. It’s the best place on earth, I can’t imagine being anywhere else for more than a fortnight.

That’s it! Any questions at the back?

To find out more about other people who are going to BlogOnX, visit the linky here.

Recipe: Salted Peanut and Caramel Cookies

For a number of years now salted caramel flavoured everything has been all the rage. I love salted caramel, probably a little too much. I’m a little bit afraid of attempting to make my own caramel from scratch, but I came up with a bit of a cheat and made these seriously delicious salted peanut and caramel cookies. Yes you read that correctly, the peanuts are salted but the caramel isn’t, but they’re probably my favourite cookie at the moment.

Recipe: Salted Peanut and Caramel Cookies

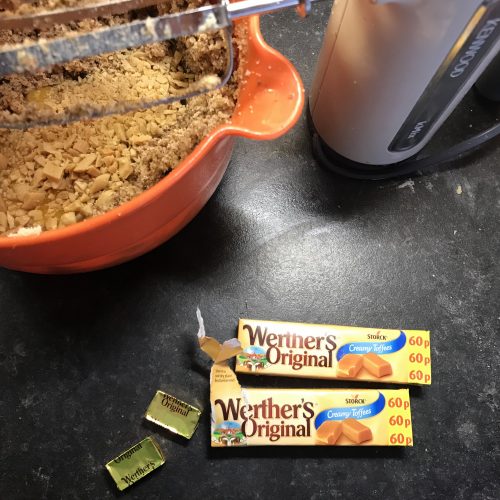
In this recipe I used Werther’s Original Creamy Toffees for the caramel in the cookies. I wanted a soft caramel toffee and these were what were in my local shop. I chopped each toffee up into eight little pieces. Once baked inside the cookie, the caramels either go soft and squidgy or the ones on the outside of the cookie go crunchy. I love the difference in textures the caramel makes in these salted peanut and caramel cookies.

Salted Peanut and Caramel Cookies

Ingredients (makes 15 cookies)
125g butter, softened
100g soft brown sugar
125g caster sugar
1 egg
1 teaspoon of vanilla extract
50g salted peanuts, chopped
50g Werther’s Original Creamy Toffees, chopped
225g self-raising flour

Recipe: Salted Peanut and Caramel Cookies

Method
Preheat your oven to 180°C.

In a large bowl cream your butter and the two sugars. Once they are well combined, add the egg, chopped peanuts and chopped up pieces of toffee. Tip in the flour and keep mixing until it forms your cookie dough.

Take a baking sheet and either grease the sheet well or cover with a piece of baking parchment (I used baking parchment). Using a set of scales, take the dough and weigh into 40g balls, this helps ensure all your cookies are the same size.

Place the dough balls on the baking sheet making sure there is room for them to spread out. You might need to use two or more baking sheets. Squash each dough ball down a little with the back of a fork.

Bake the cookies in your pre-heated oven for 10 minutes until they’re just turning golden round the edges. Remove from the oven and leave them on the baking sheet to firm up for a few minutes before putting them on a wire cooling rack.

Recipe: Salted Peanut and Caramel Cookies

It’s traditional to have milk with your cookies, but these are really good with a cup of really good coffee.

If you enjoyed this recipe, you might also like to try these delicious spiced Apple Pie Cookies.

Recipe: Salted Peanut and Caramel Cookies

Kids Craft: Super Easy Woolly Sheep Pencil Topper

One of my favourite sights in spring is new-born lambs, we often pay our local community farm a visit, just so we can take a turn feeding the orphan lambs. Recently we’ve been doing quite a lot of spring themed crafts, so it felt natural to make something a bit sheepish, so we made this really simple Woolly Sheep Pencil Topper. It’s so cute we might make a herd of them to top all the pencils in our pencil pot.

Kids Craft: Super Simple Woolly Sheep Pencil Topper

Like I said, they really are incredibly simple to make. All you need are a few bits and pieces and no more than ten minutes of your time. If you don’t have a circular cotton wool pad (the type usually used to remove make up) then you could use a circle of plain white card instead. I think the cotton wool makes the woolly sheep pencil topper extra woolly though.

How to make a Woolly Sheep Pencil Topper

You will need:
One circular cotton wool pad
A small piece of black card for the face
Two googly eyes
A pair of scissors
PVA glue
A pencil

Kids Craft: Super Simple Woolly Sheep Pencil Topper

To make your Woolly Sheep Pencil Topper:
Take your cotton wool pad and fold it in half. Cut a slit about a centimetre from the top and another one about a centimetre from the bottom. This is to thread your pencil through.

Take your black card and draw the shape of a sheep’s head on it. Carefully cut it out. Using glue, stick the googly eyes into place, leave to dry if need be.

Using more glue, stick the sheep’s head onto the cotton wool pad body. Again, leave this to dry before threading the pencil through. Your Woolly Sheep Pencil Topper is now complete. Ewe can now use your pencil topper with pride!

If you enjoyed this, you might also like these other spring Crafts:

Kids Craft: Super Simple Woolly Sheep Pencil Topper

Crafternoon Tea at Elizabeth Gaskell’s House

Here in Manchester we are lucky enough to have a large number of historic buildings and houses. Hidden in plain sight on one of the busiest roads leading to the city centre is Elizabeth Gaskell’s House. The house is the former home of the famous author and her family. Her novels include Mary Barton, Cranford, North and South, Ruth and Wives and Daughters. I went along to enjoy a “crafternoon tea” session in the Servant’s Hall. Craft, tea, cake and a beautiful historic house – what’s not to like?

Crafternoon Tea at Elizabeth Gaskell's House, Manchester

Elizabeth Gaskell’s House have been running Crafternoon Tea sessions for the last few months. I’ve really wanted to go to them but I was a bit worried that my sewing skills were not good enough; but I need not have worried. I went along to try my hand at some Victorian Crazy Patchwork; a craft I’ve never heard of  before but one which is ideal for people like me who have fairly basic sewing skills.

The Crafternoon Tea sessions are run by talented volunteers. The Victorian Crazy Patchwork class was run by Margot, a very experienced and helpful teacher who provided everything we needed to create our own crazy patchwork. Margot began by talking us through, step by step through the process. One of the best things about Victorian Crazy Patchwork is if your sewing isn’t especially neat, it doesn’t matter because the stitching is covered by the fabric, making it ideal for beginners.

Crafternoon Tea at Elizabeth Gaskell's House, Manchester

Victorian Crazy Patchwork, Margot explained, was a style of patchwork which fine Victorian ladies would do to occupy themselves. They usually used scraps of silk from old dresses or from dressmaking to create colourful patchworks. I remember my husband’s Grandma having what I now know to be a Victorian Crazy Patchwork cushion.

Margot gave us all a pack including a template, a piece of calico and a notebook we could cover with our patchwork. There was a large bag of silk pieces on the table and we all selected a few pieces for our patchwork. We cut out our hexagon shaped centre pieces and stitched them onto our calico; then we cut pieces of contrasting silk and stitched them on. Sewing them so the stitches are underneath (this is hard to explain but hopefully you can get the idea from the photo below).

Crafternoon Tea at Elizabeth Gaskell's House, Manchester

Around half way through the session we stopped and made our way into the tea room for a pot of tea and a slice of really good cake. The tea room is a lovely airy space with the original stone floors from Elizabeth Gaskell’s days at the house. It was the hottest day of the year so far and it was the perfect place for some cool respite from the temperature outside.

Crafternoon Tea at Elizabeth Gaskell's House, Manchester

After we’d been fueled by tea and cake, we returned to the Servants Hall to carry on with our crazy patchwork. It soon became clear that despite my best efforts, I wouldn’t be able to finish it in the two and a half hour craft session. Thankfully Margot let me take everything I needed to finish it at home. In fairness, it was ambitious of me to try to finish within the time. But I left armed with the skills and knowledge to finish off my work at home.

The Crafternoon Tea at Elizabeth Gaskell’s House costs £19 and includes everything you need to create your craft as well as a hot drink and cake. Keep an eye on their website for more craft and literary events. I do know they have a few limited places left on their Crochet Afghan Squares Crafternoon Tea on 17th May and Paisley Woodblock Printing Crafternoon Tea on 21st June 2018.

Crafternoon Tea at Elizabeth Gaskell's House, Manchester
My not quite finished Victorian Crazy Patchwork.

I had the most lovely relaxing afternoon. Even though I went by myself, the rest of the crafters around the table were all very nice and chatty. It was lovely to switch off and concentrate on sewing the patchwork and enjoy the peaceful and historic surroundings of Elizabeth Gaskell’s House.

Elizabeth Gaskell’s House is located at 84 Plymouth Grove, Manchester, M13 9LW

Toy Review: Kinetic Rock 3-in-1 Loader Set

Kinetic sand has been incredibly popular for a few years now. It’s great stuff, kinetic sand is 98% sand and 2% silica oil and behaves a bit like playdough but without the sticky horror if it gets walked into your carpet. We play with our box of kinetic sand regularly, it’s really tactile and great for building and moulding. But what about the newly released kinetic rock? We got our hands on the new Kinetic Rock 3-in-1 Loader set to see what it was like.

Toy Review: Kinetic Rock 3-in-1 Loader Set

Kinetic Sand is the leading sand brand in the UK. It’s a perennial favourite and kids and adults love the feel and texture of the magical mouldable sand and rock. You just can’t stop playing with it!

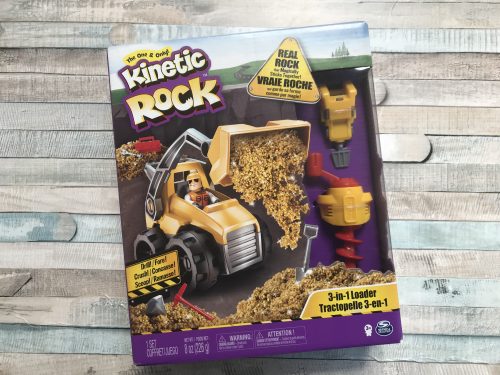
The Kinetic Rock 3-in-1 Loader set is suitable for children aged 3+. When I gave it my 7 year old he went completely nuts for it. The set comes with a loader with three changeable attachments (a bucket loader, a jackhammer and a drill), it also comes with a poseable construction figure and shovel, pick, wrench, lunchbox and a bag of the gold kinetic rock too.

The set itself is great, really well thought out with lots of tools included. The way you can change the attachments by clipping them on and off the front of the loader is very clever and really simple for children to do. The construction figure is about the same size as a Lego minifigure and slots together easily.

Toy Review: Kinetic Rock 3-in-1 Loader Set

Kinetic rock and kinetic sand are great for hands-on, imaginative play. My son has played with it very happily every day since we opened the box. He creates all kinds on construction scenarios and plays them out. He’s got a lot of construction toys, so sometimes extra diggers come along and join in the fun!

The kinetic rock is made from natural rock and it somehow, magically stick together. It’s really tactile and mouldable, so great for this construction site. We use a plastic tray with a deep lip to keep everything together, it helps to stop accidental rock spillages. Though even though the rocks will stick together, they won’t stick to your carpets, you can pick them up or vacuum them if you need to.

If I were to criticise anything, the bag of kinetic rock included is a little on the small side. If I were buying this again I would buy an extra bag of the kinetic rock to go with it, especially if more than one child will be playing with the set.

The Kinetic Rock 3-in-1 Loader is a great play set with the potential for lots of creative, imaginative play. My son really enjoys playing with the set and I actually prefer it to the kinetic sand, I think I prefer the slight chunkiness of the rocks. The small boy thinks it’s brilliant!

The Kinetic Rock 3-in-1 Loader Set costs £16.99 and is available at all good retailers nationwide. For more information, visit their website.

Toy Review: Kinetic Rock 3-in-1 Loader Set

Disclosure: We were sent this kinetic rock set for review purposes. All images and opinions are our own.

Book Review: The Children’s Meditations In My Heart

When I was pregnant I really got into yoga and meditation; although I no longer attend sessions, I do some stretches at home and I meditate when I can. Recently I’ve been reading the heart meditations from The Children’s Meditations In My Heart book to my son before bed; both of us have benefited from sharing these lovely meditations.

The Children’s Meditations In My Heart is a book by Gitte Winter Graugaard, a Danish writer and mindfulness instructor. The book has four heart meditations for you to read to your child, or children, as well as advice on how to make the most out of the meditations in the book. The meditations are designed to help your child unwind and drift happily off to sleep.

Book Review: The Children's Meditations In My Heart

My son has always struggled to fall asleep and he’s recently started taking part in a stretch and relaxation class after school. After the classes he is very relaxed and happy, which can only be encouraged. As part of the sessions, the children take part in a meditation and because of this, I knew he would respond well to the heart meditations in the book.

Before you read the meditations to your child, it’s worth sitting down and reading the introductions so you know the idea behind them. There are also instructions on how to read it and what you can do to encourage mindfulness at home. Nothing is more calming for your child before bed than listening to your familiar voice reading a story about your great love for your family.

The first meditation guides your child into their heart to teach them to fill their heart with love. In the following meditations, you teach your child to send and receive love at a distance, to catch love from a little love cloud, and to send love into the universe. It’s a special feeling sending your child to sleep with their heart full of love. 

What we do is snuggle down at bedtime and he closes his eyes. Then using a calm voice, I read the meditation to him; pausing when indicated and using his name when there is a space in the text for his name.

Book Review: The Children's Meditations In My Heart

Each meditation is completely lovely. As well as filling him up with love, they fill me up with love too. This book is a wonderful way to verbalise your feelings for your child and to encourage them to love themselves; which in turn helps to grow in confidence and resilience. The meditations take them off into a calm faraway land and helps them to visualise their heart and see and feel it being filled by love. It really is a special book and an equally special thing to do with your child.

The book and the meditations within it are suitable for all ages of child and adults too. The Children’s Meditations In My Heart by Gitte Winter Graugaard was an immediate hit in Denmark. Graugaard’s book has since been translated into English and is now available in the UK.

I love this book. It’s beautifully illustrated and easy to read and understand. It really helps my son wind down after a busy and energetic day at school. I really enjoy reading them to him and reminding him gently how loved he is. It’s a wonderful book and a great introduction to meditation for children.

The Children’s Meditations In My Heart is available from Room For Reflection for £14.95 for an illustrated hard-back copy.

Win a copy of The Children’s Meditations In My Heart

To be in with a chance to win a copy of The Children’s Meditations In My Heart, simply complete the Rafflecopter widget below. Good luck!

Check out our other giveaways over on our competitions page.

a Rafflecopter giveaway

Terms & Conditions:
1. The competition is open to residents of the UK only aged (18) and over.
2. The prize is non-transferable and no cash alternative is offered.
3. To enter, please use the Rafflecopter widget above, complete any mandatory entries and any optional entries you would like.
4. The winner will be chosen at random from all valid entries.
5. The winner will be sent a copy of The Children’s Meditations In My Heart.
6. The closing date for entries is 11.59pm GMT on 13th May 2018.
7. The winner will be informed by email within 7 days of the closing date.
8. The winner will be asked to provide a full UK postal address with postcode for delivery purposes.
9. The winners name will be available on request
10. Address details will be passed onto an agency to post the prize out to the winner, and is therefore beyond my control. I cannot be held responsible for prizes being lost in the post although I will endeavour to liaise with the agency.
11. Entry to this giveaway confirms that participants have read, understood and agree to be bound by these Terms and Conditions.
12. HodgePodgeDays decision is final in all matters relating to this giveaway.

Recipe: Popcorn Cupcakes – perfect for movie night!

Popcorn is one of the most popular snacks in the UK. It’s considered to be a lighter, healthier snack option. Whether is really is or not is up for debate, but it is a movie night essential. These days you can get all kinds of different flavours of popcorn. I’m a traditionalist and I like sweet popcorn, or that toffee covered popcorn which makes my teeth tingle.

A little while ago I received a bottle of Monin Popcorn Syrup. It’s the kind of thing you might use in coffee or cocktails, but I had different ideas. I really fancied making some popcorn cupcakes.

Recipe: Popcorn Cupcakes - perfect for movie night!

My popcorn cupcakes turned out really well. They had a good popcorn flavour but were not overpowering. They were a big hit with the boys too and I know I’ll be making these again and again.

Popcorn Cupcakes

Ingredients:
4oz butter or margarine
4oz caster sugar
2 eggs (large)
4oz self raising flour
1 teaspoon baking powder
1 tablespoon of Monin Popcorn Syrup

For the buttercream:
250g icing sugar
250g butter (softened)
1 teaspoon of Monin Popcorn Syrup
Bag of your favourite popcorn

Method:
Pre-heat your oven to 180° and put paper cases in a bun or a muffin tray.

Cream your butter and sugar in a large mixing bowl. Add the rest of the ingredients and using a hand mixer combine until the batter is smooth and airy.

Dollop a large dessert spoon of the cake batter in each case and bake in the oven for 20 minutes. Once cooked remove from the oven and leave cool on a rack.

While your cupcakes are cooling, sift your icing sugar and beat together with the softened butter. Add your Popcorn syrup and beat it in thoroughly. Taste your buttercream, you might want to add a bit more syrup if you want a stronger flavour. You can always add more, but you can’t take it away!

Once your cupcakes are cool, put your popcorn flavoured buttercream in a piping bag with a star piping nozzle – I used a Wilton 2D nozzle. I did a standard buttercream swirl, if you’re not sure how to do it, watch this short video.

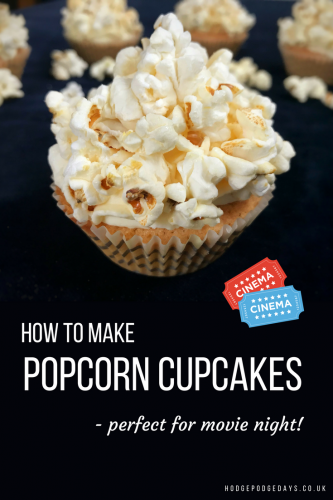
I then covered the buttercream swirl with popcorn. If you start around the bottom of the swirl and made sure as much of the buttercream is covered in popcorn. Gently press the popcorn into place on the buttercream and your cupcake is done and ready to be enjoyed on movie night!

Recipe: Popcorn Cupcakes - perfect for movie night!

If you enjoyed this recipe, you might also like my tangy marmalade cupcakes.

Recipe: Popcorn Cupcakes - perfect for movie night!

Learning: The Very Hungry Caterpillar Alphabet Game

The Very Hungry Caterpillar has always been a firm favourite of ours. It’s the classic story of a hungry caterpillar who munches its way through all kinds of healthy and unhealthy foods. He then gets a tummy ache and eventually turns into a beautiful butterfly. With it being such a favourite, it is the perfect base for a bit of educational play. I put together a little game to help to really cement the alphabet into the heads of little ones, so here’s my The Very Hungry Caterpillar Alphabet Game.

Learning: The Very Hungry Caterpillar Alphabet Game

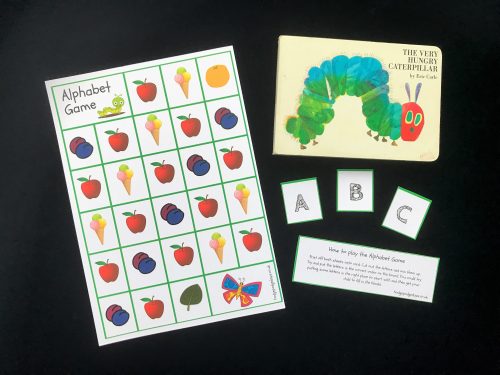
The alphabet game is really simple to play. Just print out the two sheets which you can download for free here. If you can, print the game onto card, it’ll last longer that way.  Once it’s printed out, take the card with the letters on and cut them all out. There’s a little card with instructions on there too if you need them.

You can either work with your little one to put them in the right order on the board, or you could put some of the letter cards in the right places and get them to fill in the gaps. It’s a really good way of helping to get the alphabet fixed in their heads.

Learning: The Very Hungry Caterpillar Alphabet Game

It’s ideal for younger children, but my 7 year old couldn’t resist having a play with the alphabet game too. It was a good confidence builder for him. He knew what he was doing and where the cards needed to be. Like many children, he sometimes just needs to do something fairly basic every so often to build confidence in his own ability.

It wasn’t part of my original plan for the game, but once he’d completed the board he moved on to spelling out words with the letters. This can only really be encouraged, it’s all good learning and reinforcement of what he knows already.

Not only was he practicing his alphabet, he was also exercising his hand eye coordination and his fine motor skills. We also had a good chat about The Very Hungry Caterpillar and talked about how a caterpillar turns into a butterfly, it’s all good learning and pretty fun too!

Download The Very Hungry Caterpillar Alphabet Game for free here.

If you enjoyed this, you might also like my Squash and a Squeeze Story Book Bag.

Learning: The Very Hungry Caterpillar Alphabet Game

This post contains an affiliate link.

Five Books about the Environment for Earth Day

Taking care of our environment and doing our bit to look after our planet is something we’ve always talked about with our son. We’ve always been keen recyclers and I’m known for being a bit frugal with the gas and electricity. Over the last few months the boy has been learning more about the environment both at school and at Beavers. It doesn’t hurt to reinforce the message at home too, so we’ve been doing some reading about the subject. We’ve got lots of great books about he environment and with Earth Day just around the corner, here are our five favourites.

Five Books about the Environment for Earth Day

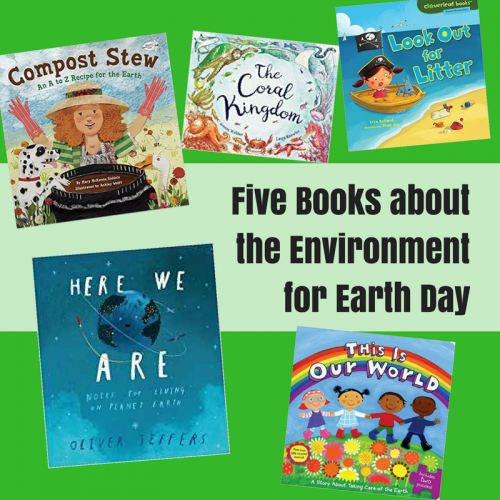
Here We Are: Notes for Living on Planet Earth by Oliver Jeffers. Like all of Oliver Jeffers’ books Here We Are is a beautiful, heartfelt story, it’s about the wonder of our planet and about how we should love it and care for it. It’s a simple story with a big message and one which children will enjoy reading and sharing with you. It’s a book about kindness and respect and care.

Five Books about the Environment for Earth Day

Compost Stew: An A-Z Recipe for the Earth by Mary McKenna Siddals. Composting is one of the first environmentally friendly things I learned to do as a child. It’s a really easy introduction to learning more about the environment and climate change. How do you start a compost pile? What’s safe to include? This book is perfect for Earth Day reading and provides answers for children and families looking for simple, child-friendly ways to help the planet.

The Coral Kingdom by Laura Knowles and Jenny Webber celebrates the beauty, diversity and fragile ecosystem of the coral reef. This visually stunning picture book has a strong ecological message about the need to protect this most precious environment. Follow and explore the life cycle, diversity and colour of the coral reef ecosystem; learn about the threats the reef faces and what we can do to save it. Each beautifully illustrated page is packed full of delightful sea creatures to discover and enjoy. A beautiful book with a powerful message.

Look out for Litter by Lisa Bullard is part of the “Planet Protector” series. This Look out for Litter book shows how little pieces of litter and rubbish can become a big problem. Find out how to deal with litter responsibly and learn how to reduce, reuse and recycle.

This is Our World by Emily Sollinge. This lovely board book for smaller children is printed on recycled board and uses vegetable ink! Take little ones on a fun interactive journey learning to clean the air, reduce pollution, recycle, and much more. It’s never too early to learn to care for the environment!

Do you have any favourite books about the environment you like to read with your children? 

If you enjoyed this, you might also like my Five Superb Books About Science.

Five Books about the Environment for Earth Day

This post contains affiliate links.