Meal Planning Monday w/c 16th October 2017

Although I meal plan every single week, I rarely blog about meal planning. I thought I’d share what we’re having for dinner this week at Casa HodgePodgeDays. Our evenings are busy; husband runs, the boy has after school things and homework. Plus I am often finishing off work or going out to things.

Dinner needs to be quick, easy, fairly well-balanced and tasty enough for us all to eat without complaint. It usually falls to me to prepare and serve dinner. I’m trying to persuade my husband to cook once a week for us. I’ve told him it doesn’t need to be fancy. It just needs to be tasty and not something I’ve had to think about or prepare.

To his (sort of) credit, he did go out and buy the ingredients for hot dogs for last Saturday night, he just never got round to actually cooking them, which I ended up doing. The dream would be to have someone do meal prep and delivery every night, but my fairy godmother hasn’t come up trumps with that yet.

Meal Planning Monday – What’s on our menu this week…

Meal Planning Monday w/c 16th October 2017

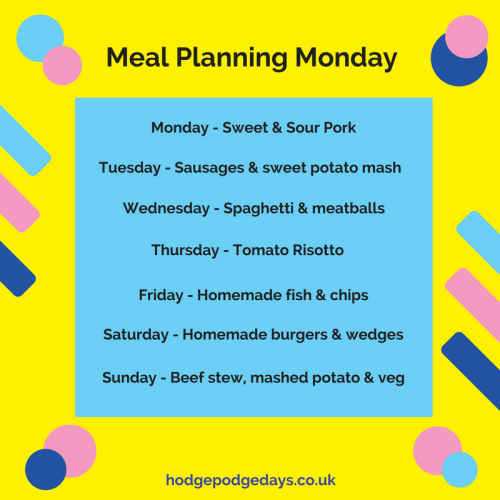
It’s all pretty simple fayre this week. It’s meals like beef stew or sweet and sour pork which can sit bubbling away gently in the slow cooker for the afternoon. Or quick to cook meals like spaghetti or risotto which I can have on the table in half an hour.

I am a hider of veg, so every meal will contain several vegetables finely chopped or grated into them. Pretty much anything which goes in the slow cooker ends up with a carrot or two finely grated into the sauce. Once it cooks the carrot disappears like magic. Vegetable magic!

I’m also a veggie, so where meat is mentioned, eg pork, then I portion off some sauce before the meat goes in and add a substitute; maybe tofu, paneer, quorn or just my favourite chunky veg. Sometimes we all eat the veggie alternative, quorn meatballs are brilliant and we have them a lot!

The menu is a little potato heavy. I’ll mix things up with sweet potato mash, or pile extra veg onto their plates and put fewer chips on there. What do you think of my menu?

Is meal planning something you would like to read more about on my blog? Let me know in the comments box if you think I should do this more often. Thanks for reading!

Craft Kit Review: Out Of The Box Pebble Painting Kit

We were sent the Out Of The Box Pebble Painting Kit for review purposes. All images and opinions are our own.

It’s weird how some craft trends seem to come out of nowhere. Over the summer you couldn’t move for people painting pebbles, so I knew I needed to give it a try for myself. Despite pebble painting being a pretty simple craft, having a craft kit to get you started is always a good idea.

We tried the Out Of The Box Pebble Painting Kit (rrp £8). The kit is suitable for ages 3+ and contains everything you need to transform ordinary pebbles into beautiful characters or creatures.

Craft Kit Review: Out Of The Box Pebble Painting Kit

The Out Of The Box Pebble Painting Kit contains –

  • 5 x pebbles
  • Paint
  • Googly eyes
  • Felt
  • Glue
  • Gems
  • Pipe cleaners

The kit is well thought out with lots of decorations for your pebbles. It’s worth noting that once you’ve painted your pebbles you need to let them dry properly before you can decorate them. We painted them one day, left them to dry and then decorated them the next day.

You can paint and decorate them however you want. I wanted to copy a couple of the examples on the box; specifically the whale and the ladybird. My son wanted to do his own thing and make up his own magical creatures.

Craft Kit Review: Out Of The Box Pebble Painting Kit

These days I’m a complete glu dot convert because they are so quick and easy to use and you don’t have to wait for the glue to dry. So I put aside the glue which came with the kit in favour of some glu dots. This meant we could instantly stick on eyes, gems, pipe cleaners and felt pieces.

Pebble painting is a lovely, easy craft for people of all ages. It’s great for encouraging creativity, developing their imagination and developing hand – eye co-ordination. My son really liked painting and decorating the pebbles and was really enthusiastic about the whole process. I really enjoyed it too. Pebble painting is really good fun. We just need some more pebbles now!

The Out Of The Box Pebble Painting Kit is a great starter kit for this craft. My six year old approved of it and as it’s currently available for just £5 I think that’s excellent value for money and would make a great Christmas present for a crafty kid (or adult like me).

Craft Kit Review: Out Of The Box Pebble Painting Kit

Crafts: Spooky Halloween Pom Pom Spiders

Pom poms are a pretty easy thing to make and with a little imagination you can turn them into all kinds of different creatures and characters. This month I was tasked by Craft Merrily to create a Halloween craft. I’d been wanting to master my new pom pom maker, so I decided to make some pom pom spiders. They’re easier than you think and an easy craft to do with children.

Crafts: Spooky Halloween Pom Pom Spiders

We’ve all made pom poms before using two rings of cardboard you laboriously wind wool around, then cut, tie and you’re done. I’ve bought a set of pom pom makers on the recommendation of my friend Lucy – an expert pom pom maker. She is right, they really are a pom pom game changer!

Lucy showed me how to use the pom pom maker. You wind your wool around two semi-circles of the maker, then wind it around the other two semi-circles, clip them together, cut them and the tie them around the middle and you’re done. Easy. Not just easy, but quick and easy.

Crafts: Spooky Halloween Pom Pom Spiders

You can make your pom pom spiders as big or as small as you want (if you’re not sure how to make pom poms, there’s a video you can watch here). Use whatever colours you think would work best.

How to make Pom Pom Spiders

You will need –
Pom pom makers (or make your own cardboard rings)
A ball of wool
Scissors
Pipecleaner
Googly eyes
Bostik Glu Dots

How to make your Pom Pom Spiders –
Wind your wool around your pom pom maker, make sure you are generous with the winding. The more wool you use, the fuller your pom pom will be.

Before you cut and tie your pom pom, cut your spider legs out of the pipecleaners. I used four identical lengths of pipecleaner (which make 8 spiders legs). Twist the pipecleaners together in the middle and put them through the centre of your pom pom.

Cut the wool around your ring and tie you pom pom together tightly with a long length of wool. You should have a pom pom now, it may need trimming up slightly so it is even all over.

Using the Bostik Glu Dots and the googly eyes, stick eyes onto your pom pom spider. Bend its legs to make spiders legs. You pom pom spider is now complete. You can leave the long piece of wool on him or cut it off if you prefer.

Your pom pom spiders are ready for Halloween. Hang them around the house, make a pom pom spider garland out of them or decorate your Halloween party table with them. How would you use your pom pom spiders?

Crafts: Spooky Halloween Pom Pom Spiders

I am a Bostik craft blogger and I was sent the materials to create this craft from Craft Merrily. 

Check out my other craft tutorials here!

October Half Term Craft Workshops in Manchester

During October half term the Manchester Craft & Design Centre have teamed up with the Manchester Science Festival to let you get up close and personal with the chemicals, reactions and elements artists use in their art in a series of interactive craft workshops.

From Monday 23rd until Saturday 28 October 2017 the Manchester Craft & Design Centre will throw open the doors to their public workshop for a week of craft workshops and hands-on experiments.See a range of weird, wonderful and fascinating processes in action as artists create everything from jewellery to vessels sculptures and artworks.

You’ll also be invited to get stuck in yourself, getting to grips with craft workshops that’ll show you just how much science underpins everything in the art world. All the craft workshops are free of charge and there’s no booking required.

October Half Term Craft Workshops in Manchester

October Half Term Craft Workshops in Manchester

Monday 23 October, 2-5pm
Be inspired by glassmaker and jeweller Charlotte Verity and use the rare lampworking technique to melt glass to make your own bead to take away.

Tuesday 24 October, 2-5pm
Join artist Nell Smith to experiment with two methods of printmaking. Firstly using a small modern etching press to print a lino illustration and secondly using a 1950s Adana letterpress to overprint lettering.

Wednesday 25 October, 2-5pm
Give pewtersmithing a bash with Ella McIntosh of This Is Pewter. Test the boundaries of pewter by combining textures, pewter (a very soft metal), and the rolling mill to make your own keyring.

Thursday 26 October, 2-5pm
Gemma Scully specialises in water casting. This is heating different metals until they melt and then dropping them into different volumes of water. You’ll be able to try this fun process where the results are different every time.

Friday 27 October, 2-5pm
Learn about the properties of thermoplastics with Julia Roy Williams of Wonderhaus. We’ll be working with heat guns and perspex, learning how to heat and shape plastic to create wearable art jewellery.

Saturday 28 October, 2-5pm
Have a go at plique a jour enamelling with glass artist Helen Tiffany. Have a go at grinding the enamel and filling your own metal charm. Your charm will be fired for you to take away.

October Half Term Craft Workshops in Manchester

The Manchester Craft & Design Centre is located in the heart of Manchester’s creative Northern Quarter. This former Victorian fish and poultry market is home to 18 independent studio shops. Over 30 talented artists and designer-makers are based there and create and sell their handmade work direct to the public.

All of these craft workshops are free of charge and there’s no booking required.

Review: SJ WORKS Smart phone bicycle First Aid Kit

Ever since my days as a Brownie I’ve always carried with me a few first aid basics in my bag just in case. In the car we have a small first aid kit and we’ve got a kit which lives with our camping gear too. We are always prepared for scrapes and mishaps. SJ Works have created a handy first aid kit just for cyclists. Their Smart phone bicycle first aid kit is designed for regular cyclists. But is it any good?

Review: SJ WORKS Smart phone bicycle First Aid Kit

The Smart phone bicycle first aid kit straps onto the crossbar of your bike with adjustable velcro straps. It has a waterproof section where you can keep your smart phone and there’s a rubber headphone port for your headphone lead. This means you can use your phone (carefully obviously) hands-free when cycling.

The kit itself is comprehensive and well thought out. It contains pretty much everything you could need in a minor bump or scrape.

The bicycle first aid kit includes…

  • An American Red Cross First Aid Guide
  • 6 Antiseptic Towelettes
  • 5 Easy Access Bandage 3*1″
  • Easy Access Bandage x5 3/4*3″
  • 5 Junior Easy Access Bandage 3/8×1.5″
  • Butterfly Wound Closures x5
  • 2 Sterile Non-Adherent Pads 2″x3″
  • 2 Sterile Non-woven sponges2″x2″2pcs/pk 4ply
  • A Sterile Eye Pad
  • 1 Pressure Bandages 2″x2″
  • 1 Pressure Bandages 3″x3″
  • A1 Triangular Bandage 42″x42″x59″ nonwoven
  • 1 Tape Roll 1/2″x10yds.
  • 1 Emergency Blanket 38″x60″
  • A 3.5mm Headphone Extention Cord M/F
  • 1 SJ Works Reflect strip
  • 1 Security Seal

The kit is CE & FDA Approval and meets the ISO13485 International Standard required for kits of this nature. All of the medical components are sterile ready for use.

Review: SJ WORKS Smart phone bicycle First Aid Kit

As with all kits you should regularly check and update the contents so everything is in date and ready for use should you need to use any of the plasters, dressings or other components. The SJ WORKS Smart phone solution bicycle first aid kit is currently available for £33 from Amazon.

What do I think? I think if you are a regular cyclist, maybe for commuting or for going long distances on weekends, then a first aid kit is an essential you should carry with you. I like how it keeps your smart phone safe and dry while you’re out cycling. Knowing that you have a comprehensive kit close to hand gives you peace of mind if an accident happens.

Note: We were sent this product for review purposes. All images and opinions are our own.

Skincare: A Little Lift Serum from Angela Langford

I’m constantly searching for a miracle lotion or potion that will whisk away my wrinkles and leave me with the dewy skin of a 20 year old. I’m also a realist and I know nothing like that exists this side of a surgeon’s knife, and that’s a road I don’t want to go down. I will happily settle for good skincare products. No, great skincare products. Which is why I found myself trying a firming face serum from Angela Langford.

Angela Langford is a former Masterchef finalist who has branched out into making organic skincare products. The range is extensive and I think pretty much all skin types and needs are covered. If you’re not sure what you need, you are encouraged to contact them for a chat, which is nice.

Skincare: A Little Lift Serum from Angela Langford

I put the ‘A Little Lift Serum’ (£31) to the test. It is described as a plumping and lifting serum for when your skin is losing elasticity or tone. The pump-action bottle contains 30mls of the serum, is made in Britain and is 99% natural.

The ‘A Little Lift Serum’ from Angela Langford contains a range of “botanical super ingredients”, specifically spilanthes acmelia flowers, otherwise known as electric daisies. These are mixed with frankincense, pumpkin seed, argan and hyaluronic acid to nourish, refine and hydrate your skin.

I have the most sensitive skin on my face. Even products marketed for people with sensitive skin often make the skin on my face tight, red and rashy. I have to be really careful with what I use and because my skin flares up so easily I tend to stick with one or two basic brands. My sensitivity means I’m less likely to splash out on an all singing, all dancing serum or cream without trying it for a few days first.

To use the ‘A Little Lift Serum’, I used two pumps of the serum and smoothed it onto my clean face and neck, let it sink in for a few moments and then moisturised normally afterwards. You can use it morning and night.

Skincare: A Little Lift Serum from Angela Langford

I was worried that the ‘A Little Lift Serum’ would leave me red faced and itchy, even organic and natural products are a risk. I had nothing to worry about. The serum and my skin got on fine, really well in fact. The serum was soaked up by my thirsty skin each time I used it. My face felt tighter, but the good kind of tight and it looked brighter.

One of the nicest things for me was the smell. It smelt like the very high-end products they use in good spas. Every time I smoothed it on it felt like I was giving myself a little pamper. The scent of the serum lingered for a while afterwards and it’s quite a nice calming aroma.

I was really very impressed with this serum from Angela Langford. It’s a good product that makes my skin feel great and the smell is gorgeous too. I’m already compiling an Angela Langford wish list for Christmas!

For more information about skincare products from Angela Langford visit her website.

Note: I was sent this serum for review purposes. All images and opinions are our own.

What to do when your ipad home button is broken

My iPad very rarely leaves my side. I use it from the moment I wake up; to the moment I turn the light off to go to sleep. It’s my work, my social life and my lifeline. But when my ipad Home button broke and I had several days to wait until it went off to repair, how could I keep using it without this essential function? The answer is pretty simple, not to mention ingenious.

What to do when your ipad home button is broken?

Well first off, find yourself an Apple certified iPad repair place and get your iPad booked in. While you wait for your repair slot, you can still use your iPad without ever needing to touch your Home button again, or at least very minimally. Here’s how to do it…

Go to Settings and select General. Go to Accessibility and then scroll down until you see Assistive Touch and select On.

What to do when your ipad home button is broken

A smallish square with a circle in it will appear somewhere on your screen. This is your new Home button. You can move it around the screen to put it wherever you prefer. I preferred it next to my broken Home button as my brain seemed more likely to remember it was there and accept it than anywhere else.

When you tap the button the menu (pictured below) pops up offering a number of touch screen options including your Home button. Using the touch screen Home button does require an extra tap than your usual Home button, but it’s easy to get used to, especially if it’s only temporary.

What to do when your ipad home button is broken

To wake your iPad up, press the Sleep/Wake button, or the On button as I call it. Press that and tap the touch screen Home button, enter your passcode and you’re in. Easy yes?

I’ve been using my iPad like this for a few days now. It’s not a perfect fix, but it will do until my iPad can be properly repaired. There are lots of handy little tricks and fixes in the Accessibility menu, which is worth a look and a play with if you have some time on your hands.

Hope you get your iPad fixed soon. Good luck with your new touch screen Home button!

What to do when your ipad home button is broken

Celebrate #ThunderbirdsDay with a #FAB Costume

This year Thunderbirds Day is on 30th September 2017 and fans all over the world will be celebrating their favourite show. My 6 year old son is just getting into Thunderbirds and loves to dress up. What better way to enjoy Thunderbirds Day than to dress up as Scott Tracy!

Thunderbirds Celebrate #ThunderbirdsDay with a #FAB Costume

Thunderbirds have been part of the national psyche since 1965. I remember watching the original series when it was repeated in the 1980’s and being in turns slightly terrified of the puppets and transfixed by their adventures. It’s incredible that the series is still going strong after all these years.

As the series has grown and changed, so have the costumes. This Scott Tracy costume is a fully printed all in one suit made from 100% Polyester all in one suit with velcro fastening at the back. It comes with a pair of gauntlet forearm accessories which you just velcro on and a detachable printed satin sash.

Thunderbirds Celebrate #ThunderbirdsDay with a #FAB Costume

The satin sash features a sound chip which when pressed plays the “FIVE…FOUR…THREE…TWO…ONE…” blastoff sequence. The costume is machine washable, but you need to remember to remove the sound chip before you put it in the washing machine.

You can see the Thunderbirds sound chip in action in the short video below…

The sound chip is a brilliant addition, my son loved pressing it and as you can see in the video, he likes to strike a hero pose when the blast off noise is played.  The costume has a nicely printed front and a plain back. The detail is excellent and the accessories make this well worth the money.

This Scott Tracy costume is easy for my son to get on and off by himself. We ordered size 7-8 and I’d say it was true to size. My son is nearly 7 and fairly tall for his age. It fits him well and there’s still some room for him to grow. I like that the sash and gauntlets are detachable and he liked that too. This Scott Tracy Thunderbirds costume is a hit!

Pretend to Bee stock a good range of kids costumes, including Thunderbirds favourites like Scott Tracy, Virgil Tracy and Alan Tracy. The costumes are priced at £19.95, which I think is a about right for a costume of this quality with the sound chip included.

We were sent this costume for review purposes. All images & opinions are our own.

Recipe: Rich and Creamy Fennel & Potato Gratin

Have you ever had a veg box delivered, looked at its contents and thought what on earth am I going to make with that? Last week I looked in my veg box and discovered a large and lovely fennel. What on earth was I going to make with that? After a big think I decided to make an experimental Fennel & Potato Gratin. Was my experiment a success or a failure?

I’ve eaten fennel many times, but never cooked with it. I do like fennel but it can be an acquired taste. It’s got a gentle aniseed flavour which reminds me of sambuca (yes I did have a misspent youth, thank you for asking). I thought it would work well in a potato gratin and it did.

Recipe: Rich and Creamy Fennel & Potato Gratin

It is really easy to put together and fairly quick to prepare. This Fennel & Potato Gratin would be a lovely side dish for almost any hearty, wintery meal. I made a pie to go with it and served it with a big pile of veg (from my veg box). It was a roaring success. We all fought fiercely over the crispy bits and we all had seconds. I will be making this again and again and again, veg box permitting of course!

In my recipe I’ve slightly pre-cooked the fennel and potatoes before they go into the oven. I’ve been caught out by undercooked gratins before and giving everything a little head start helped ensure everything was properly cooked. I’ve also not peeled my potatoes, partly because I like the skin and partly because I’m a little bit lazy.

Fennel & Potato Gratin

Serves 4 as a side dish

Ingredients
1 fennel
3 medium potatoes, finely sliced
1 clove of garlic, crushed
1/2 teaspoon of butter
200mls double cream
Salt & pepper
Parmesan (optional)

How to make your Fennel & Potato Gratin
Put boiling water into a pan and put it on low. Finely slice your potatoes. I don’t have a mandolin so I slice them by hand. I leave the skin on because I like the skin, but peel them if you prefer. Put your slices in the pan, you don’t want to cook them, just get them started a little. If you have a mandolin and have wafer thin slices you can skip this part.

Next prepare your fennel. Slice into pieces about an inch in length and no more than an inch wide. I put them into a microwavable dish with a drop of water and microwaved for 3 minutes, again just to get it started.

In a pan, melt your butter and add your crushed clove of garlic, stir for a moment  to take the raw garlic edge off it and remove from the heat. Pour in your double cream, season and stir. You are now ready to assemble your Fennel & Potato Gratin.

Pre-heat your oven to 220°. In an ovenproof dish, layer potatoes, then fennel, then potatoes and fennel and last potatoes. You can season between layers if you like. Once you have filled your dish and there is a layer of potatoes on the top, gently press down to help the layers settle.

Put your ovenproof dish on a baking sheet (this will catch the creamy dribbles in the oven) and carefully pour over the garlic cream mixture. Do this in dribs and drabs until the dish is full. If you’ve got some, grate some Parmesan over the top and put in the oven. Bake for 20 minutes or until bubbling, golden and looking gorgeous.

This was such a hit with my family with everyone diving in for seconds. It’s a real winter warmer dish and one I’ll be making regularly.

Looking for a perfect match? This would be great with my delicious slow cooked beef stew with red wine.

Recipe: Rich and Creamy Fennel & Potato Gratin

Review: Schleich Dinosaurs Collection Skull Trap

If you live with a wannabe paleontologist who has virtually every kind of plastic dinosaur in the world, yet wants more, what on earth can you get them that they haven’t got already? Is the answer to their Jurassic dreams the Large Skull Trap play set from the Schleich Dinosaurs collection? We shall see.

The Large Skull Trap play set from the Schleich Dinosaurs collection is indeed large. It comes in a nice big box which alone brought gasps of excitement. It’s well packaged inside and most of the packaging can be recycled.

Toy Review: Schleich Dinosaurs Collection Skull Trap

Inside the box is a large dinosaur skull, a velociraptor figure, a compsognathus and a bearded dragon. I’m going to stop right here and say if you like dinosaurs then this is cool.

The dinosaur skull is hinged which means you can move the jaw and make it snap shut when you press the nose. The velociraptor has movable arms and jaw, you have to make your own dinosaur roars, but that’s all part of the fun!

It does come with three dinosaurs so you can start playing with it straight away. But if you’ve already got a large and comprehensive selection of dinosaurs, then this would fit seamlessly into your collection.

Toy Review: Schleich Dinosaurs Collection Skull Trap

As with anything made by Schleich, everything has been beautifully hand-painted and the modelling and attention to detail is excellent. The movable parts on the skull and velociraptor are particularly well done and lots of fun to play with.

The Large Skull Trap play set is priced at £24.99 which I think is really good value for a set of this size. It’s suitable for ages 4+. My six year old absolutely adored it and quickly gathered all of his dinosaurs together for a big dino-war.

This set would make a brilliant Christmas or birthday gift. It’s a little bit different to your average dino toy, which I like and it has lots of imaginative play potential. it’s a hit!

Toy Review: Schleich Dinosaurs Collection Skull Trap

The Schleich Large Skull Trap With Velociraptor is available at www.schleich-s.co.uk or from other retailers including Amazon.

Note: We were sent the Schleich Dinosaurs Large Skull Trap for review purposes. All images and opinions are our own.