Days Out: Exploring the Lakes Alive Festival

We spent last weekend glamping near Keswick in the Lake District. On our way home to Manchester, we stopped in Kendal so we could spend an afternoon at the Lakes Alive Festival. We were very glad we stopped because it finished off our weekend with a flourish and we were only sad we didn’t get there earlier!

Lakes Alive is a free festival of contemporary arts and making. Three days of unique art in the unique landscape of Kendal.

We went primarily to go and see our favourite storyteller, Ian Douglas. We’ve followed him to three festivals this year and each time he has been a delight to listen to. Ian had pitched his storytelling canopy in Abbot Hall Park, which was filled with stalls, street food trucks and a huge marquee with a lively series of events booked in it.

Days Out: Exploring the Lakes Alive Festival

During the afternoon we watched Cloud, a pair of contemporary dancers drifting through space like weightless clouds which was quite beautiful to watch. People walking by almost always stopped and were captivated by the dreamy dance.

Days Out: Exploring the Lakes Alive Festival

The Fellowship Chorus and the Virtual Reality Choir were in residence, belting out a series of singalong classics you couldn’t help but join in with.

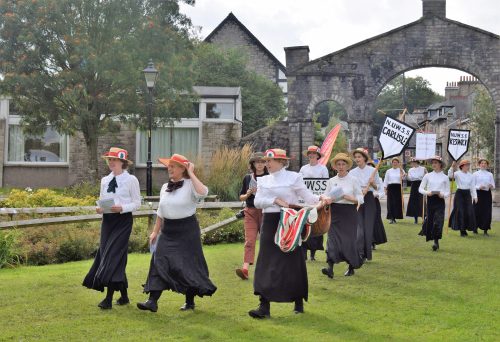
Marching through Abbots Hall Park and beyond were Walking Watling Street – a celebration to remember the 50,000 women who marched from Carlisle to London in 1913 to fight to win the vote for women. There was a great crowd of women dressed as Suffragettes and members of the public were all invited to join the march, and march they did. It was a wonderful sight!

Days Out: Exploring the Lakes Alive Festival

Throughout the Lakes Alive Festival there were a number of weird and wonderful things just popping up. Once of them was Peddlers Pack – four fantastical cycle-powered contraptions. Peddlers Pack was a colourful and a little bit crazy group of people peddling their imaginary wares.

Days Out: Exploring the Lakes Alive Festival

I’m not sure what my son thought of the Peddlers Pack, but he stood back for quite some time taking it all in. If there’s one thing an arts festival does for children, it gives them permission to explore the outer reaches of their own experiences and brings life and colour to their own imaginations.

There were some things I was sad to miss (but better luck next year). It’s amazing that this is a free arts festival; there are so many weird, wonderful and downright creative things happening. I’d not heard about it until a week or so before and I was very glad we stopped by for the afternoon. Lakes Alive is something I’ll be looking out for again next year. Hopefully we’ll be able to spend more time exploring what’s on offer.

For more information about the Lakes Alive Festival, visit their website.

Days Out: Exploring the Lakes Alive Festival

My husband would like me to give a special mention to the man barbecuing sausages on a converted steam train.

Glamping at Inside Out Camping, Keswick

The last few months have felt pretty hectic for our family. We’ve been here, there and everywhere; almost always in a rush and not spending enough time just enjoying being together. Over the weekend we packed up the car and headed off to Inside Out Camping in the small village of Seatoller in the Borrowdale valley. Seatoller is near Keswick in the Lake District and we were glamping for two nights, staying in a Yurt. There was no electricity, no WiFi, no phone signal; just us and the great outdoors and it was nothing short of wonderful.

Glamping at Inside Out Camping, Keswick

I’ve wanted to go glamping for a while. The idea of not having to put up or take down a tent and not having to carry every single thing we’d need for the weekend was very appealing. I also liked the idea of a little bit of luxury in the middle of nowhere; in this case, a woodburner and a comfy futon to sleep on. There’s something quite luxurious about just being able to turn up without a car full of camping gear which takes a few hours to set up. Glamping is still camping, but with more of the comforts of home.

We arrived at Seatoller near Keswick, and spotting some of the yurts from the main road, made our way down the track to the small campsite. There are six yurts available to book and space for other campers in their own tents too. The site runs alongside the River Derwent, which when we arrived was a gentle, shimmering river which babbled alongside the yurts.

Glamping at Inside Out Camping, Keswick

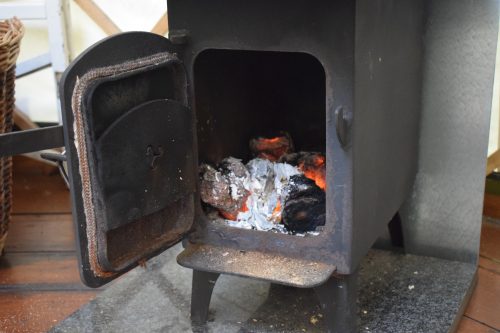
We walked down to our yurt at the far end of the site. It stood right next to the river. Outside was a wooden picnic table and two wooden steps to the door of the yurt. Inside was a clean and well-equipped space. There was one double futon and two single futons with clean, crisp bedding. There was a gas stove and a kitchen area, plus a woodburner with a bag of logs to get us started.

We unpacked, got settled in and did what all English people do; we made a cup of tea. The boy ran about exploring the site, he crossed the bridge several times and scrambled down the banks of the river. On a warmer (or braver) day we might have all gone for a paddle, but we didn’t. The site is like a fairy glen and although it’s small, there’s a lot to explore.

Glamping at Inside Out Camping, Keswick

You do need a torch when you’re walking through the campsite at night back to the yurt. The site is unlit and without electricity, though the yurts have solar-powered lights and fairy lights too.

At night the yurt is really cosy. The beds have feather duvets and pillows and I’d forgotten just how snuggly they were. Tucked up in bed with the woodburner flickering away in the corner; a mug of cocoa and the fairy lights on, it’s a little piece of heaven. After a busy day walking and exploring the Lake District, we’d all fall into bed, talking and laughing together until we drifted off to sleep. With the stars shimmering through the skylight, it was truly magical.
Glamping at Inside Out Camping, Keswick

Inside Out Camping is located on Seatoller Farm which is a sheep farm near Kewsick. The campsite is surrounded by fields of Herdwick sheep (my favourite breed of sheep, yes I have a favourite breed). You can walk up to the farm and buy Herdwick sausages and burgers to take home or cook in your yurt. We had a busy weekend planned and we didn’t end up making anything more adventurous than breakfast and endless cups of coffee.

Although the site feels like it’s really out in the sticks, it’s very well served by regular public transport from Keswick. Just over a mile up the road, the Langstrath Country Inn serves good food. There are more pubs dotted along the road to Keswick, and once in Keswick there are more places to eat and drink than you can shake a stick at!

Glamping at Inside Out Camping, Keswick

I confess I did have a slight wobble on the first night about there being no internet. I had a word with myself and just embraced it. There’s no better place for me than being beside my 7 year old when he’s on an adventure; climbing trees, scrabbling over rocks, defending the bridge from imaginary marauding pirates. You don’t need the internet or electricity for that.

It’s a small site with a basic but clean toilet block. Showers are available at the farmhouse a ten minute walk up the road.

Glamping at Inside Out Camping, Keswick

The Inside Out Camping yurts are an absolutely ideal base for visiting the Lake District. Whether you’re on a walking holiday, or exploring with the family. The area was wild and rugged enough to feel like you’ve really stepped away from the hustle and bustle of life at home; but close enough to Keswick to not be too far from the home comforts a city girl appreciates (Booths. I mean Booths).

Seatoller is a magical place. The Borrowdale valley is very beautiful and with autumn beginning to make itself known, it was a valley of mists and mellow fruitfulness. We were sad to pack up and leave after our two days of yurt life. It hadn’t taken long to settle into a rhythm there. I liked the home comforts and the peace. The boys liked exploring and we all really liked just chilling out together. It’s unusual for us all to agree on something, but we all really enjoyed our taste of yurt life and beautiful Borrowdale has a way of getting under your skin.

Glamping at Inside Out Camping, Keswick

We all want to go glamping again, we all want to stay in a yurt too; and I think a return visit to Inside Out Camping will be on our list for next year.

Yurts at Inside Out Camping at Seatoller Farm start from £285 for a three night weekend stay. For more information about glamping in the UK, visit the Campsites.co.uk website.

Glamping at Inside Out Camping, Keswick

We were invited guests of Inside Out Camping. All our images and opinions are our own.

Toys: Introducing SuperZings Series 2 Collectibles

Back in January we received a pack of SuperZings Series 1 to unbox and review. Little did I know that for the next 6 or 7 months SuperZings would become almost as important to my son as breathing. Our local Co-op stocked them, and as they are very reasonably priced, they became something he would be given regularly for good behaviour or trying hard at something. Soon we had pretty much all of the SuperZings Series 1 and we began to wonder when SuperZings Series 2 might be released. The answer to that question is now. Right now.

SuperZings are everyday objects (like a tiny hairdryer or cheese grater with a face, a body and a cape) brought to life as heroes or villains. The SuperZings all live in Kaboom City. There are so many fun, colourful characters and accessories to collect; each with a matching rival which you can collect and swap.

Toys: Introducing SuperZings Series 2 Collectibles

SuperZings are aimed at children aged 4-8, My son is 7 and is a real SuperZings Super-fan!

Like Series 1, there are 80 new multi-coloured characters to collect, each with a matching ‘rival’ including an ultra-rare character, 2 gold and 6 silver, to collect.

Toys: Introducing SuperZings Series 2 Collectibles

The Hideouts and vehicles have had a makeover too. Series 2 Hideouts have a new cylindrical shape which is divided into two chambers. The SuperZings Series 2 vehicles are a new range of SuperJets – collect a motorbike, boat, helicopter and quad bike. There are eight SuperJets to collect in a variety of different colours.

SuperZings Series 2 has some exciting new features including a brand new ‘SuperCrystal’ finish to some of the SuperZings. One of the biggest changes is the addition of a new ultra rare character, ‘Professor K’ – the inventor of ‘Krystaline’, a special substance that creates the SuperCrystal SuperZings. There are 24 ‘SuperCrystal’ characters to collect.  new style hideouts and a new range of playsets so kids can create their very own SuperZings world.

Toys: Introducing SuperZings Series 2 Collectibles

There are a number of playsets to go with the series. The Secret Lab Playset costs £20 and has a secret compartment; a lift to the roof and an exclusive SuperZings character with blaster. The Kaboom Race is also £20 and comes complete with two premium vehicles, a launch pad, barrels and a finish line. There’s also the Police Station Playset which costs £25. The set includes a police car, jail, cannon and lots of interactive elements. These would make great Christmas presents for SuperZings super-fans!

Toys: Introducing SuperZings Series 2 Collectibles

The SuperZings Series 2 collectible range is very reasonably priced and is at pocket money prices. The blind bags which contain one SuperZing are 80p each. The hideouts bags which also include one SuperZing are £1.50 each and the SuperJets including one SuperZing are £2.50 each. There is also a Starter Pack (£5) and a Blister Pack (£10) containing four SuperZings; two hideouts and an exclusive SuperDisc Blaster.

I know from how much my son loved Series 1 that Series 2 will be just as popular, perhaps even more so. They’ve added a lot of new and interesting elements to extend the play further. They’re so collectable and I know once they really hit the shops my son will be busy swapping SuperZings Series 2 characters with his friends. I love how inexpensive they are and how much joy SuperZings bring my son.

Are your kids into SuperZings yet?

SuperZings are available from a wide range of shops including The Entertainer, Tesco, Asda, Co-op and Spar. For more information and activities, visit the SuperZings website www.superzings.com.

We were sent these products for review purposes. All images and opinions are our own.

Easy recipe: Homemade Chocolate Jazzies

A few weeks ago I was mooching around one of my local charity shops when I spotted a silicone baking mold for a pound. They can be quite expensive, so I snapped it up and took it home. I think it was originally designed for small cupcakes or muffins, but this had homemade chocolate jazzies written all over it.

As a working from home mum I am often called upon to help entertain a child or two for the odd day during the school holidays. I don’t mind this as for me it’s probably easier to entertain two seven years olds, than one seven year old who is just so “boorrEDDD” of my company. I like to have a few crafts, activities and bakes up my sleeve to entertain any young visitors we may have; so I thoroughly cleaned my silicone mold and tucked it away for a rainy day.

Easy recipe: Homemade Chocolate Jazzies

As a keen baker I always have a good variety of sprinkles in my cupboard. For some reason kids love sprinking almost as much as eating the sprinkles. I had quite a few little jars which probably needed using up. Making homemade chocolate jazzies is a really good way of using them up. You could give each child a different kind of sprinkle so they know which jazzies are theirs, or they can mix and match.

I made some sparkly chocolate cups for Mother’s Day back in the spring, they are very similar to those, but slightly smaller and with billions more sprinkles.

Homemade Chocolate Jazzies

Ingredients:
250g of milk chocolate
Cake decorating sprinkles, stars, silver balls, whatever you fancy

You will need:
A saucepan, a glass bowl which will sit in the pan, but so it doesn’t touch the bottom; a metal spoon, silicone baking molds.

How to make your chocolate jazzies:
Boil some water and pour the water into your pan so it’s about 3cm deep. Carefully place the glass bowl in the pan making sure the bottom of the bowl doesn’t touch the water. This is called a bain marie.

Break your chocolate up into small pieces and put it in the glass bowl. The water in the pan needs to be at a gentle simmer, not bubbling and boiling. Stir the chocolate until it is melted.

Easy recipe: Homemade Chocolate Jazzies

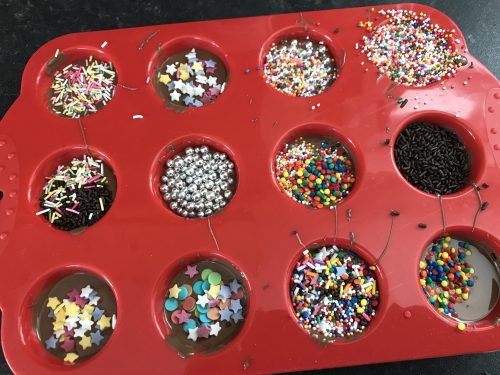
Once the chocolate is melted, with a spoon scoop out some melted chocolate into each of the molds. Try and put an equal amount in each. If you’re good at this there might be just enough left over for some spoon licking afterwards. Gently shake the silicone tray so the chocolate settles.

Once you’ve used all of your chocolate, take your chosen sprinkles and sprinkle as much or as little as you like over the top of each chocolate. Leave them to cool for at least two hours. If you need them to set a bit faster for impatient boys, pop them in the fridge.

Easy recipe: Homemade Chocolate Jazzies

To serve, make sure they are properly set and carefully pop them out of the molds. You might want to be careful and tip them out onto a tray or over a dish to catch any excess sprinkles. We had many excess sprinkles because the boys were very enthusiastic about the sprinkling.

Easy recipe: Homemade Chocolate Jazzies

The homemade chocolate jazzies went down an absolute storm. The boys really enjoyed making them. They’re incredibly simple to do and they also really enjoyed eating them and sharing them too. My chocolate jazzie experiment was a success!

PS. If you’re wondering they they’ve got blue hands, we played with blue slime while the jazzies set and the slime coloured their hands for the day. They do have clean hands, I promise!

Easy recipe: Homemade Chocolate Jazzies

Crafts: Make Your Own String Art Greeting Cards

Last year I went to a string art craft class and properly fell in love with this kind of craft. We took blocks of wood, nailed a pattern into it and wove coloured thread around the nails. I loved it and promised myself I’d try it at home. More than a year later I still haven’t done it. Instead I’ve been dabbling in a smaller kind of string art. I’ve been making little greetings cards with them.

They’re quite simple to do and I’m usually really pleased with how they turn out. This week I needed a get well soon card for a family friend, so I got my kit out and set to work. An hour of pretty restful sewing later, I had a nice card to send to a nice person.

Crafts: Make Your Own String Art Greeting Cards

Make Your Own String Art Greeting Cards

You will need:
One blank card and envelope
A pin
Coloured embroidery thread
A template shape
One pencil
A needle
Sellotape
Coloured paper
A glue stick

How to make your own String Art Greeting Cards:
Take your blank card and think about what shape you want to make with your string art. I chose a star shape and used a star shape cookie cutter I had. Using my pencil I drew around the cookie cutter on the inside of the card so the pencil wouldn’t show on the outside.

Crafts: Make Your Own String Art Greeting Cards

Once I was happy with my shape, I took my pin and pierced the card around the edge of my pencil shape at regular intervals. I went with about half a centimetre intervals.

The next step is the thread your needle with your chosen embroidery thread. Although I originally chose yellow, I eventually chose purple thread. Embroidery thread is usually made up of six strands, I separated a length so I threaded two strands onto my needle.

With a small piece of sellotape, I stuck the end of my thread to the inside of the card and started sewing the star.

It’s better if you choose a regular pattern of holes to sew, rather than just doing it randomly. For this card I went almost diagonally across and moved two holes clockwise each time I moved across the star (if that makes sense). After a while my star started to take shape and I was happy with the pattern it was making.

Once you come to the end of each thread, sellotape the end to the inside of the card and start a new thread. Use as much or as little embroidery thread as you need and think is best. It just depends how it looks and if you think it needs more.

Once you are happy with how the string art looks, turn your card over and make sure any loose ends are taped down. The back might look a bit messy, which is why we cover it with some coloured or patterned paper.

Cut the coloured paper to size and stick it over the back of the string art star (or other shape) you’ve made with the glue stick. Leave it to dry and it’s ready to be written and sent to the lucky recipient.

Crafts: Make Your Own String Art Greeting Cards

String art greeting cards are really easy to do and great for doing when you just need to sit and do something without having to think too hard about it. Sting art was so big in the 1970’s and it’s really due a revival. It’s a brilliant craft and I urge you to give this mini version a try.

If you liked this, you might also like to try these crafts –

Crafts: Make Your Own String Art Greeting Cards

Children’s Books: Midnight Monsters by Helen Friel

Everyone loves a spooky story don’t they? This week we’ve been taking a look at Midnight Monsters by Helen Friel and getting really spooked out. Midnight Monsters is an amazing book. It’s a pop-up shadow search book and it’s perfect for reading after dark.

To enjoy this book, turn the lights off, get your torch out and shine it through the pop-up scenes in the book to learn more about the monsters who lurk in the shadows.

Children's Books: Midnight Monsters by Helen Friel

In Midnight Monsters, you travel through a series of pop-up scenes; the wild woods; creepy caves; mysterious mountains; a misty lagoon and a haunted castle. Each page has five creepy creatures to spot. This is best done in a dark room; put the book on a table or flat surface and shine a torch or the light from a mobile phone through. This will cast a shadow on the wall behind, revealing the spooky scene.

Each of the five creatures has a description to help you understand more about them. All of the creatures are rooted in folklore. We spotted a Yeti, a Griffin, a Cyclops and a vampire, in among all the other characters. I can’t help but feel that Midnight Monsters would be the best thing to bring out at a children’s Halloween party. Shine a light through and tell creepy stories about the characters in this book, it’s got such great bedtime ghost story potential.

Children's Books: Midnight Monsters by Helen Friel

It’s written and designed by Helen Friel, a freelance paper engineer and illustrator who has also written Midnight Creatures: A Pop-Up Shadow Search, Midnight Monsters is the follow-up to that book.

Midnight Monsters is not actually scary enough to lose sleep over. It’s a great novelty of a book, beautifully designed and almost too good to share with the kids. It takes shadow art up to the next level. It’s superb.

Children's Books: Midnight Monsters by Helen Friel

If you’re looking for something a bit different to read, explore and enjoy with the kids this autumn, Midnight Monsters by Helen Friel is almost certainly that book.

Midnight Monsters by Helen Friel costs £16.99. It’s published by Laurence King and it is available from a wide range of bookshops including Amazon.

For details of more children’s books published by Laurence King, visit their website.

Disclosure: We were sent a copy of Midnight Monsters for review purposes. All images and opinions are our own.

Saying goodbye to Brookside Miniature Railway

Over the past six years or so we’ve been making regular visits to Brookside Miniature Railway with our son. Several months ago we read their announcement on Facebook that after 38 years of service they would be closing.

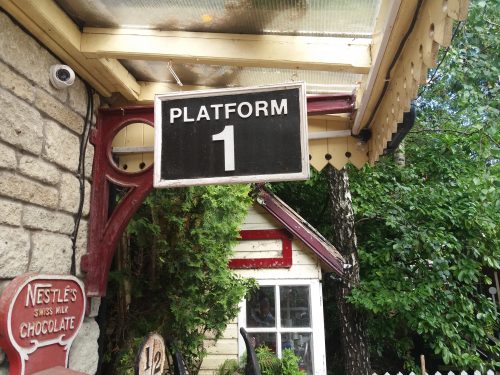
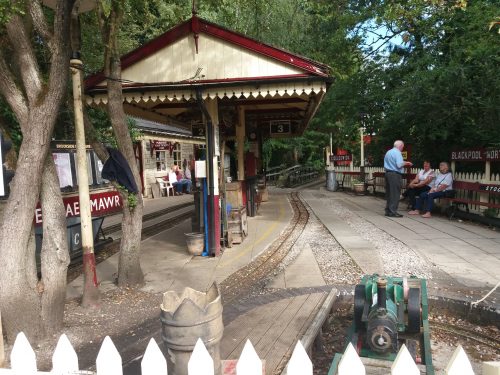
Brookside Miniature Railway was located at Brookside Garden Centre in Poynton and it seems the new owners of the garden centre gave the railway notice to quit. The last day trains ran on the line was Sunday 2nd September 2018. We visited for one last time to ride the rails and say goodbye to this wonderful little railway.

Saying goodbye to Brookside Miniature Railway

Brookside Miniature Railway opened in 1980 and was a great place to visit if we wanted to do something fun, which needed next to no planning and could be done pretty cheaply. You could buy a ten ride ticket for £12 and the whole family could have a few rides for not much money.

The great thing about Brookside Miniature Railway was that the route was pretty interesting. It went through lots of tunnels, over bridges, alongside streams, around a vintage fun fair and through the grounds of the garden centre itself. There was always something new to look at, and each season through up new and interesting things to admire. The Santa Specials were also legendary, though we never managed to book on one – they really were that popular!

Saying goodbye to Brookside Miniature Railway

We did have my son’s fourth birthday party there, which was probably my favourite of all his birthday parties. Everyone had two rides of the train, party games and table heaving with party food. The kids loved it almost as much as the parents.

We were very lucky on the last day that we arrived later on in the afternoon. There were queues to get on the platform and queues to get on the trains. We had two last rides on the last two remaining trains. Ben and I stopped to watch the very last ride and wave them off; then we were given the chance to ride half way around the track on the Union Pacific Locomotive. We climbed aboard for its final journey to the shed for the night, before it finds a home at another miniature railway.

We got off and my son sobbed “I’m going to miss this place” and he’s not wrong. We’re going to miss it too. It’s been a regular part of our family fun times together. I bet thousands and thousands of people have enjoyed spending time on the greatest little railway in Cheshire these last 38 years.

Saying goodbye to Brookside Miniature Railway

Goodbye Brookside Miniature Railway, we’re missing you already! Thanks for all the wonderful memories.

Watch this video of one of the last trains to run at Brookside Miniature Railway –

Days Out: Dartington Crystal Visitor Centre and Tour

On our recent holiday to North Devon, we spent a rainy morning at the Dartington Crystal Visitor Centre and we also did the factory tour. My son had been learning about how glass was made at school, so seeing it happen before his very eyes was high on his list of things he wanted to do on holiday.

We set the satnav for the Dartington Crystal factory in Torrington and arrived early in the day. Glass production starts very early in the morning, so early that the glass blowers break for their lunch mid morning, which closes down the factory tour. Nevertheless there’s plenty to do at Dartington Crystal besides the factory tour.

Days Out: Dartington Crystal Visitor Centre and Tour

We arrived to find a large car park with plenty of parking. We walked around the building to the visitor centre and paid for our tickets. You can buy them online before your visit and save a few pounds if you want. I paid £9 per adult ticket (£7 in advance) and children under 16 go free.

We were warned the factory workers would be breaking for lunch in half an hour, so we began the factory tour. You can linger as long as you want in the factory, it’s very informative with the whole process from the glass making process to blowing and finishing the glass all explained in simple terms.

Days Out: Dartington Crystal Visitor Centre and Tour

It’s very warm in the factory and all the glass workers wear shorts and t-shirts. Each has his own job to do; a small part of the process and it’s really interesting (and almost relaxing) to watch. They take a molten lump of glass out of the furnace and slowly transform it into something beautiful.

The tour took us around half an hour, mostly because the boy was getting too hot and wanted to get outside. I could have stayed for longer watching these skilled craftsmen at work.

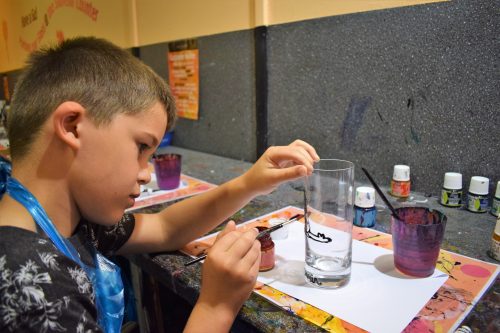
The factory tour ends with you back in the visitors centre. There we decided we wanted to try our hands at some glass painting, which cost us just £6. We also spent some time reading about the history of the Dartington Crystal factory and watching a film. There are lots of things of interest if you want to know more about glass making.

Days Out: Dartington Crystal Visitor Centre and Tour

Once we’d enjoyed all that the visitor centre had to offer, there is a large outlet where you can find some lovely glassware to take home. There are a few other outlet stores to explore too. I did end up spending an absolute fortune on really gorgeous things. I have no regrets.

Days Out: Dartington Crystal Visitor Centre and Tour

If you are planning on visiting, you can save a few pounds by booking your tickets in advance online. You can also book in for creative sessions; like glass hand casting for kids (which was fully booked when we visited which was a shame). You can also try your hand at glass blowing or jewellery making. There are lots to see and do if you plan ahead and book the things you’d like to try, otherwise you might be disappointed.

I really liked that children go free. I feel my son learned quite a few things about glass making and blowing that he didn’t know before. It’s always good to see how things actually work rather than just reading about it and imagining the process. He really enjoyed the glass painting, we both did. There were a few other activities for creative kids too. I’d say it’s well worth a visit if you’re in the area. This was my second visit and I’d happily go back again.

For more information about visiting Dartington Crystal Visitor Centre visit their website.

We paid for our visit in full.

Beautiful Maxi Dresses for this Autumn

This summer I have properly fallen for the charms of the maxi dress. We’ve had weeks of wonderful sunshine and a real heatwave. It’s been such a treat, but I’ve found it even a little bit hot for my usual wardrobe of shorts and t-shirts. Wearing a floaty maxi dress on the hottest days had helped me keep cool and look pretty smart and stylish too.

Although the temperature is starting to drop a little as we move towards autumn, I’m loathe to put away my maxi dresses for good, in fact I’m planning on investing in a couple more to see me through autumn and maybe an especially smart one to wear out at Christmas. I’ve fallen for the maxi dress, they hide some of the lumps and bumps I’m less keen on, without looking like I’m trying to hide anything at all.

Simply Be is a great place to start with shopping for Maxi Dresses, they have a great range of styles and something for all budgets.

I love the look of this Mela London Curve Floral Maxi Dress, it’s just £30 and would look just as home at work with a smart jacket as it would on holiday. I love the cut around the bust which would be super flattering.Beautiful Maxi Dresses for this Autumn

The oriental style neckline and the small gather on the waist on this lovely Joanna Hope Multi Print Maxi Dress really catches my eye. It’s currently reduced to £49.50 on the Simply Be website and it would be the thing to wear on a nice night out, perhaps with a cosy wrap. Beautiful Maxi Dresses for this Autumn

In the run up to Christmas you need a good dress or two in the wardrobe. This Together Beaded Maxi Dress is simply stunning. With an elasticated waistband, mesh netted skirt and cap sleeve, this dress falls beautifully and creates a gorgeous silhouette. It’s also jersey lined for comfort. If that’s not enough, it’s currently reduced to just £52.25.

Beautiful Maxi Dresses for this Autumn

Lastly, I absolutely love this Coast Macie Maxi Dress. It has striking contrasting monochrome panels with an asymmetric neckline, fitted bodice and sweeping skirt for an eye-catching evening dress. Love, Love, love this.

Beautiful Maxi Dresses for this Autumn

What do you look for in a maxi dress? Do you just wear them in the summer or do you wear them year round?

This is a collaborative post.

Recipe: Spinach, Pesto and Mozzerella Pinwheels

Pinwheels are such a simple thing to make, and they’re ideal for a picnic or for a simple lunch. They can be quite hearty, depending on what you fill them with. This week I peered into my fridge and found some spinach which needed using, I grabbed a few other ingredients and set to work making a batch of Spinach, Pesto and Mozzerella Pinwheels.

Pinwheels are sheets of puff pastry, filled with a tasty filling, rolled up with a tasty filling and baked in the oven. They’re really simple to make; especially if you decide life is too short to make your own puff pastry and you buy the ready made stuff. It usually costs about £1 for a sheet so it’s quite economical.

Recipe: Spinach, Pesto and Mozzerella Pinwheels

Spinach, Pesto and Mozzerella Pinwheels

Makes 15

Ingredients
1 pack of ready-made puff pastry
Half a jar of your favourite pesto, I used tomato pesto
2 large handfuls of baby spinach, chopped
One ball of mozzerella cheese
Fresh black pepper
75g finely grated Cheddar cheese

Instructions
On a large board unroll the sheet of puff pastry, leave it on the paper it comes wrapped in. Spread the pesto all over the pastry leaving a bare edge along one of the long sides of the pastry. Spread it out as evenly as you can.

Recipe: Spinach, Pesto and Mozzerella Pinwheels

Scatter the chopped spinach and torn mozzerella as evenly as you can over the top of the pesto and season with black pepper. You can add a little salt if you like as mozzerella isn’t a salty cheese. Scatter about 25g of the finely grated Cheddar cheese over the top, this will melt and help it all stick it all together.

Roll the pastry up along its long side; roll it us as tight as you can, as if you were making a Swiss roll. Wrap it in the paper in came in and put it in the fridge for 10 minutes or so. Meanwhile, pre-heat the oven to 200 degrees.

Remove the pastry from the fridge and carefully cut into rounds approximately 1.5cm thick. You should get around 15 pinwheels from this.

Recipe: Spinach, Pesto and Mozzerella Pinwheels

Place each round on a greased baking tray and top each one with a little of the finely grated Cheddar cheese. Bake for 18-20 minutes or until golden brown.

Remove from the oven and leave to cool on a rack for 15 minutes or so. Leave them to cool a little before serving, though they’re great cold too.

Ideal for a picnic, or for a weekend lunch; these Spinach, Pesto and Mozzerella Pinwheels are delicious served with a big salad and a nice cold glass of white wine.

If you enjoyed this, you might also enjoy these Super Speedy Cheese and Onion Pinwheels or these Greek Inspired Olive, Spinach and Feta Pinwheels.

Recipe: Spinach, Pesto and Mozzerella Pinwheels