STEM Toys: Brainstorm Outdoor Adventure Range

Living next door to a nature reserve we often find we have unexpected visitors in our garden. We try to do our bit to encourage and support wildlife and we’re always on the lookout for interesting birds or insects to learn more about. Brainstorm Toys have recently launched an Outdoor Adventure range designed especially for junior explorers. We put a few of them to the test.

Toy Review: Brainstorm Outdoor Adventure Range

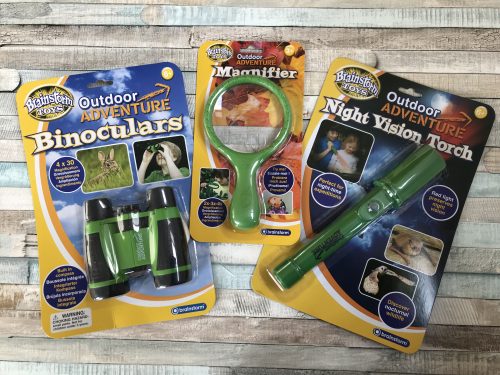
The Outdoor Adventure Magnifier is a handheld 2x-3x-4x magnifier which is ideal for on-the-go explorations, field trips and outdoor adventures. We put it to the test in our garden, taking a closer look at some plants and flowers and having a good look at some tiny aphids we found feasting on my rose bush. The magnifying glass is a pretty essential bit of kit and has so many uses. It costs around £12.99 and although that may seem a little pricey, it’s much better quality than cheaper kids magnifying glasses.

STEM Toys: Brainstorm Outdoor Adventure Range

The Outdoor Adventure Binoculars were a real hit. They are pocket-sized and light weight and have 4x magnification; 30mm glass lenses and they have a break-away lanyard for safety. We especially liked the built-in compass on the top, which helped us to talk in greater depth about navigation skills and North – South – East – West (or Never Eat Shredded Wheat as we’ve been teaching him).

He sat for some time in the garden listening out for birds and looking to see them in the trees. We will definitely be taking these on holiday with us, he will really enjoy nature hunts in the woods! These Outdoor Adventure Binoculars are an ideal first pair of binoculars for children and cost around £9.99. A solid investment for nature loving kids!

STEM Toys: Brainstorm Outdoor Adventure Range

Lastly we tried the Outdoor Adventure Night Vision Torch. The night vision torch has a bright red LED light which works with your natural adapted night vision to help you see more easily in the dark. It’s perfect for night hikes and map reading and would be great for taking on camping trips.

Unfortunately once we’d set it up and put batteries in it, it got dropped and we can’t get it to work again. So it remains untested, which is a shame because my son was super-excited to take it camping with us in a few weeks.

Despite dropping the night vision torch, we’ve had lots of fun with the Brainstorm Outdoor Adventure range. We will definitely be packing the magnifier and binoculars to take camping in the woods with us later this year. If you’ve got nature loving little ones, these Outdoor Adventure products are well worth a try.

For more information about the Brainstorm Outdoor Adventure range, visit their website.

Disclosure: We were sent some items from the Brainstorm Outdoor Adventure Range for review purposes. All images and opinions are our own. This post contains affiliate links.

Recipe: Lemon and Elderflower Surprise Cupcakes

Last week I made a really, really lovely lemon and elderflower gin meringue pie and I had a little bit of the lemon filling left over. Usually I save this to spoon over ice cream, but as I was in a baking mood, I thought I’d make some Lemon and Elderflower Surprise Cupcakes. My son who loves to bake got in on the action too, so he can vouch that they’re great to bake with kids.

If you don’t happen to have some lemon and elderflower gin meringue pie filling left over, you could use some lemon curd instead. If you opt for the lemon curd option, but feel you’re missing out on the elderflower gin, you could always pour yourself a refreshing Lakes Distillery gin to have on the side.

Recipe: Lemon and Elderflower Surprise Cupcakes

I would normally ice my cupcakes with a buttercream swirl, but I had a squeezy pouch of Cake Angels Zingy Lemon Frosting in the cupboard, so I thought I’d use that. I thought it would swirl like buttercream, but I couldn’t get it to pipe the way I wanted it to. In the end I put enough frosting on each of the lemon and elderflower surprise cupcakes to cover the top and let in run so it was more of a glaze than a cupcake topping. If you don’t have this, I think these cupcakes would be lovely with a lemon drizzle topping.

Recipe: Lemon and Elderflower Surprise Cupcakes

To make the cupcakes, I used my fail-safe sponge recipe which worked an absolute treat. The recipe is enough for 12 good-sized cupcakes. Here’s how we did it.

Lemon and Elderflower Surprise Cupcakes

Ingredients:
150 g caster sugar
150 g softened butter or margarine (I use Stork)
3 eggs, beaten
1 tsp vanilla extract
1.5 tbsp milk
150 g self-raising flour
1 level tsp baking powder

Leftover Lemon and Elderflower Gin Meringue Pie filling  – or – half a jar of lemon curd

Cake Angels Zingy Lemon Frosting – or – lemon drizzle icing

Method:
Heat your fan oven to 190c. In a large bowl, beat your butter and sugar together until fluffy (I used a hand mixer). Add the eggs, milk and vanilla and combine. Add the flour and baking powder and mix together until you have a smooth batter.

Put 12 cupcake cases in a muffin or bun tin, divide the mixture generously between the 12 cases and bake in the oven for 15 minutes. Once bakes, remove and leave them to cool.

Once cool, using a sharp knife cut a deep circle out of the top of the cake, remove the circle and fill the hole with leftover lemon and elderflower gin meringue pie filling or lemon curd. Cut some of the cake off the cupcake lid and put the lid back on top of your cupcake.

Recipe: Lemon and Elderflower Surprise Cupcakes

Cover with the Cake Angels Zingy Lemon Frosting or a spoon or two of the lemon drizzle icing if you’re using that. Leave to set and then serve with a nice cup of tea, or a large G&T.

Oh, and the surprise? The lovely, slightly runny lemony loveliness in the middle of the cupcake.

Recipe: Lemon and Elderflower Surprise Cupcakes

If you enjoyed this you might also like…

Recipe: Lemon and Elderflower Surprise Cupcakes

Kids Crafts: Aquabeads Hanging Decorations

A few weeks ago we were sent an Aquabeads Deluxe Studio to craft with. As you know I love crafting. I was interested to see what the Aquabeads would be like to craft with. I’m a firm believer in getting to grips with the basics of a craft before letting my imagination run wild with things; so I sat down and followed the instructions faithfully. I made some lovely Aquabeads hanging decorations using the templates in the Aquabeads Deluxe Studio.

Kids Crafts: Aquabeads Hanging Decorations

The Aquabeads Deluxe Studio costs £29.99 and contains everything you need to get started with Aquabeads crafts including 1300 jewel and solid beads in 24 colours. The set includes a tool case with bead palette; 1 bead peeler, 5 easy trays in a range of shapes, a rainbow bead pen so you can arrange your beads easily and a sprayer to set them. The instruction booklet is really useful and worth reading a couple of times before you get started.

Kids Crafts: Aquabeads Hanging Decorations

I began by unpacking the whole set and filling the bead tray with the beads included. You can buy extra beads if you need to, but there are plenty of beads included to get you started. It’s quite simple to use, it’s be designed to be used by children, so it should be within my capabilities.

I decided to start with the star shaped easy tray, which I just filled with coloured beads using the rainbow bead pen. This was really quick and easy to use and I completed the star within a couple of minutes. I sprayed it liberally with water and left it to set and dry. The instructions say to leave it for an hour to set. It was still a bit sticky so I left it a while longer before removing it from the tray.

Kids Crafts: Aquabeads Hanging Decorations

I then used one of the templates to make a crown, which seemed quite topical since it’s the Royal Wedding this coming weekend. I used some of the jewel beads in the crown and they’re lovely. The light shines through them and they’d be perfect to use in sun-catchers and Christmas crafts. The easy peeler makes it so easy to remove the beads from the board.

Kids Crafts: Aquabeads Hanging Decorations

I wasn’t sure what to do with my finished creations; but I liked the way the light shone through the jewel beads, so I decided to make them into Aquabeads hanging decorations. This is really simple to do, all you need is a needle and thread. The beads don’t all melt together and there are small gaps between them where you can thread a fine needle through.

To turn my Aquabeads creations into hanging decorations, all I did was thread a needle and cotton through the topmost gap and knot the ends of the thread together. It’s as simple as that really.

Kids Crafts: Aquabeads Hanging Decorations

I enjoyed playing about with the Aquabeads Deluxe Studio set and getting to grips with it. I will definitely be putting together some more Aquabeads crafts, so watch this space!

Kids Crafts: Simple Aquabeads Hanging Decorations

If you enjoyed this, you might also like to try making these button decorations.

Disclosure: We were sent the Aquabeads Deluxe Studio to craft with in exchange for this blog post. All images and opinions are our own.

Children’s Books: Five brilliant books about dragons

Dragons are one of our favourite mythical beasts. Some are scary, some are friendly, some are just plain misunderstood. From George and the Dragon to Norbert the Norwegian Ridgeback from Harry Potter, dragons have long been a feature in songs, stories and fairy tales. A few weeks ago we made our own egg box dragon, and it’s had us reading more about dragons at bedtime.

We’ve picked out five brilliant books about dragons which we enjoy and you might too.

Five brilliant books about dragons

King Jack and the Dragon by Peter Bently, illustrated by the wonderful Helen Oxenbury. King Jack and the Dragon is a magical, rhyming bedtime picture book featuring the heroic King Jack and his band of faithful knights. It’s  a great story of camaraderie, den building and fighting dragons, the perfect dragon story for the under 5’s.

Children's Books: Five brilliant books about dragons

Zog by Julia Donaldson, illustrated by Axel Scheffler is the story of Zog, the keenest dragon in school. He’s also the most accident-prone. Thankfully, a mysterious little girl always comes by and patches up his bumps and bruises and helps him along the way. But will she be able to help him with his toughest test yet – capturing a real princess?

Where the Mountain Meets the Moon by Grace Lin is a book for slightly older primary aged children. It’s the story of a young girl named Minli who lives in a ramshackle hut with her parents. Her father tells her the story of the Jade Dragon and the Old Man in the Moon. Inspired by these stories, Minli spends one of her precious copper pennies on a beautiful goldfish, which brings about a change in the fortune of the owner. Minli is eventually joined by a dragon who can’t fly; together they set out to find the Old Man of the Moon to ask him to fulfil their dreams. It’s a wonderful story for 9-12 year olds.

The Reluctant Dragon by Kenneth Grahame is the classic retelling of the St George and the Dragon story from the author of The Wind in the Willows, Kenneth Grahame. Everyone knows St George has to do battle with the dragon, but what happens when the dragon simply doesn’t want to fight St George? A lovely story for dragon fans aged 8 and over.

How to Train Your Dragon by Cressida Cowell is the hilarious books which inspired the film – How to Train Your Dragon. Suitable for readers aged 9+; How to train Your Dragon is the  story of Hiccup, a fairly ordinary boy who must lead ten novices in their initiation into the Hairy Hooligan Tribe. They have to train their dragons or be banished from the tribe forever! Can Hiccup save the tribe – and become a Hero?

There are dragon stories for all ages here and lots to spark little imaginations. Who is your favourite dragon? Have I missed any seriously special dragon stories?

If you enjoyed this, you might also like our five books about dinosaurs or five books about bears.

Children's Books: Five brilliant books about dragons

How to store logs and keep them dry for winter

When we moved into our house in 2011, one of the things I loved the most about it was our open fire. It’s such a cosy feature and we love to sit round it in the winter; we sometimes even toast marshmallows on it. Most of our friends have had log burners or open fires put into their homes, so talking about how to store logs and season them is a surprisingly regular topic of conversation.

Our open fire is a relatively cheap source of heat. We get most of our logs from a gardener friend and all we need to do is season them before they’re put on the fire. Seasoning wood just means you need to dry it out. You don’t need to do anything more exciting to it than chop it up into the size you need, stack it up somewhere to dry out and then leave it for around two years. The amount of time you need to leave it depends on the kind of wood it is, but two years is a decent length of time.

How to store logs and keep them dry for winter

For the last seven years our wood has been stacked up in a small shed which came with the house. About a year ago the roof collapsed and the sides rotted and so it was time for a new place to store logs while they dried. We were keen to get something specifically designed to store logs, something which would allow the air to circulate around the wood and dry it out, whilst looking neat and tidy too.

When you’re buying a log store of your own, it’s important to make sure it has slatted sides and a raised slatted floor to allow the air to flow freely through the log pile. Good dry wood will give you a higher heat output and the wood will leave less tar and residue in your stove or chimney. We get our chimney swept every year and our sweep always compliments us on the lack of tar build up. If you burn wood which isn’t dry enough, the build up of tar could be a fire hazard. The tar could also make your chimney or log burner smoke inside the house, which isn’t great either.

How to store logs and keep them dry for winter

We’ve replaced our rotten old shed with a lovely solidly built log store. It’s from Gardensite and is made in Dorset from Swedish Redwood. The log store is guaranteed against rot for 15 years. We opted for the Melbury log store, it’s a nice classic design which would look unobtrusive in the garden. You can choose to have it delivered ready made, or flat-packed. We chose the flat-pack option and it took less than half an hour to put together.

We’ve put ours in our side yard and it takes up less space than the old shed, but somehow manages to hold more wood. We have given the log store a couple of treatments with creosote; we will make sure to treat it regularly to keep the wood in good condition. I am so pleased with the quality of the log store, we’ve already filled it with logs to dry out for this winter.

How to store logs and keep them dry for winter

Once our wood has been seasoned for at least two years, it is ready to burn. What we do is we have two baskets for wood in the house; one by the fire ready for burning and one in the pantry, so it gets to dry out inside the house a little more before burning. We know this two basket arrangement isn’t really necessary, but it does mean that if it’s raining there is extra wood in the house and no-one needs to get rained on to fill a basket.

How to store logs and keep them dry for winter

  • Stack logs neatly making sure they are raised off the ground a little.
  • Make sure air can flow in and out of your log pile, a log store with slatted sides is ideal for this.
  • Locate your log store in a sheltered spot, somewhere out of the wind and sheltered from the elements a little.
  • Think ahead. You can either buy seasoned or unseasoned wood. If you’re buying unseasoned wood, you will need to store it and season it yourself for a couple of years. Seasoned wood will still need to be stored appropriately to stop it getting too wet again.

If you’ve got a log burner or an open fire, it’s important to put some thought into where and how you will store and season your logs ready for winter. Where do you store your logs and kindling?

How to store logs and keep them dry for winter

Disclosure: We were sent the Melbury log store from Gardensite for inclusion in this blog post. All images and opinions are our own.

Review: Marvel Avengers: Infinity War Nerf Iron Man Assembler Gear

With the recent release of the Marvel Avengers Infinity War film, everyone including my son is once again talking about the Avengers. Like previous Marvel films, they have released lots of products to tie in with the film. My son already has two Marvel Avengers Nerf blasters – the Marvel Avengers Iron Man Slide Armour and the Captain America Civil War Blaster Reveal Shield and we’ve just added the Infinity War Nerf Iron Man Assembler Gear to his collection. But what do we think of this new style Nerf blaster?

Review: Marvel Avengers: Infinity War Nerf Iron Man Assembler Gear

The  Infinity War Nerf Iron Man Assembler Gear is part of a collection of sets which you can collect and combine, then build customisable blasters. There are over 100 combinations of blasters with multiple sets. Nerf blasters to collect in the series are – Star-Lord, Hulk, Captain America, Iron-Man and Spiderman (Iron-Spider) blaster.

Each Assembler Gear set features different blaster combinations and can be combined with other Assembler Gear sets. The Infinity War Nerf Iron Man Assembler Gear set is unmistakably an Iron Man design and includes a gauntlet, two connectors, three darts and a set of instructions.

Because there are three pieces of blaster in the set, you can slot them together in several different combinations. If you want to mix and match your Nerf blaster with another one in the Infinity War range, this is easily done, but you will have to buy more blasters to do this.

Review: Marvel Avengers: Infinity War Nerf Iron Man Assembler Gear

The Nerf blaster comes with 3 darts, which is never really enough. Plus, there’s a slightly different mechanism for loading the dart. The blaster is both single shot and front-loading and you can only prime the blaster after the dart has been inserted. This is really different to the other Nerf blasters we’ve had, and for a little while my son thought he had broken it. You do need to make sure you insert the dart before you prime it and pull the trigger.

It’s solidly built and easy to slot together. I don’t think it’s quite as fun on its own as the other Marvel Nerf blasters we already have. Though I think it might come into its own if you have a few different blasters from the Infinity War range.

The Marvel Avengers: Infinity War Nerf Iron Man Assembler Gear is sutable for ages 5+, costs around £23.99 and is available from good toy shops and online.

Review: Marvel Avengers: Infinity War Nerf Iron Man Assembler Gear

Disclosure: We were sent the Marvel Avengers: Infinity War Nerf Iron Man Assembler Gear for review purposes. All images and opinions are our own.

Recipe: Lemon and Elderflower Gin Meringue Pie

With the wedding of Prince Harry and Meghan Markle just over a week away, I’ve been reading all about their plans for their wedding cake. The cake will be made by pastry chef Claire Ptak, owner of the Violet Bakery in London. Claire has been asked to create a lemon elderflower cake that will incorporate the bright flavours of spring. I love lemon and elderflower, so inspired by those flavours, I’ve made a delicious Lemon and Elderflower Gin Meringue Pie. 

Lemon Meringue Pie is a family favourite. It’s my brother’s favourite pudding, so we ate it quite a lot growing up. I had a lovely bottle of The Lakes Distillery Elderflower Gin Liqueur which I thought might be just the thing to take a very good lemon meringue pie up to the next level, it turns out I was right.

Lemon and Elderflower Gin Meringue Pie

The Lakes Distillery Elderflower Gin Liqueur is made with 14 carefully selected botanicals, all combined with Elderflower extract to make this vibrant and floral Elderflower Gin Liqueur. It’s a lovely summery drink and it the perfect tipple to use in my Lemon and Elderflower Gin Meringue Pie.

For me, the best Lemon Meringue Pies are mostly meringue. My brother fundamentally disagrees with me, he likes the lemony pie base. But the pastry has to be light and crisp. What’s your favourite part of a Lemon Meringue Pie?

Lemon and Elderflower Gin Meringue Pie

Ingredients:

For the pastry –
114g plain flour
56g butter, cubed
A pinch of salt
2-3 tablespoons of cold water
-or- a packet of ready rolled shortcrust pastry
-or- a bought shortcrust pastry case

For the filling –
200g caster sugar
2 level tablespoons of plain flour
3 level tablespoons of cornflour
Pinch of salt
50mls The Lakes Distillery Elderflower Gin Liqueur
350ml water
2 lemons, zested and juiced
30g unsalted butter
4 egg yolks

For the meringue –
4 egg whites
75g caster sugar

Lemon and Elderflower Gin Meringue Pie

Method:
Put the flour and butter in the mixing bowl and rub the flour and butter together with your finger tips until they look like breadcrumbs. Add the water but do not make it wet or sticky. Knead gently together and wrap the dough in clingfilm and chill in fridge for about 20 minutes.

Roll out your pastry and line a greased tart tray with the pastry and trim the edges. Prick the pastry all over and bake blind (with baking beans if you have them) for around 20 minutes at Gas Mark 6/400’F/200’C/180 Fan.

Whilst your pastry case is baking, make the lemon filling. In a saucepan, over a medium-high heat, whisk together 200g caster sugar, flour, cornflour and salt. Stir in the water, Elderflower Gin Liqueur, lemon juice and the lemon zest. Keep whisking until the mixture comes to the boil and starts to thicken.

Once the lemony mixture is pretty thick, whisk in the unsalted butter. Do not be tempted to use margarine instead, it will be horrible.

Put the egg yolks in a small bowl and whisk. Add a spoon of the hot lemony mixture and beat it in, gradually add about 8 more spoons, whisking each time. Tip the egg yolk mixture into the pan with the lemon filling and bring to the boil, whisking all the time. If you just tip the yolks straight into the hot pan they will scramble and it will be grim.

Cook for a few more minutes until the mixture is thick and glossy, remove the lemon filling from the heat and carefully pour it into the pastry case. I like to leave it to cool in the case for a ten minutes or so before I top with the meringue.

Now for the fun part. In a large and squeaky clean glass bowl, whip the egg whites. Gradually add the caster sugar and whip the egg into stiff peaks. If you’re doing this by hand it could take some time, I use an electric whisk and it only takes a few minutes to get to stiff peak perfection.

Lemon and Elderflower Gin Meringue Pie

Dollop the meringue over the pie making sure it covers the pie and seals the edges so no lemon is showing. I like to use a spoon to try to make some peaks on the pie before baking it in the oven for 15 minutes, or until meringue is golden brown.

You can either eat it hot from the oven, or chilled from the fridge; either is good. No, either is bloody lovely.

Tip: If you’ve got any of the lemon filling left over, it’s excellent spooned over vanilla ice cream.

If you enjoyed this recipe, you might also like to try this Cornflake Pie or these love heart jam tarts.

Recipe: Lemon and Elderflower Gin Meringue Pie

Disclosure: I was sent a bottle of The Lakes Distillery Elderflower Gin Liqueur to use in a recipe. 

Crafts: How to make an Egg Box Dragon

Egg boxes have long been used for all kinds of kids crafts. They lend themselves to so many things, so this month we’ve turned one into an egg box dragon.

Dragons are our favourite mythical creatures. In our world they’re mostly friendly and none of them need slaying. Of course dragons have been figures in fiction for hundreds of years but only recently they’ve developed a friendlier reputation. We’re very fond of our bright green dragon, we’ve called him Dave and he’s a bit sparkly.

Crafts: How to make an Egg box Dragon

Our egg box dragon took a couple of craft sessions to make. We painted him first and left him to dry overnight. The next day we decorated him and made him look all fierce and fancy.

How to make an egg box dragon

You will need:
One egg box
Green, red or orange paint
String or wool
Googly eyes
Sequins
Pipecleaners
Blu Tack Glitter Pens or glitter
Bostik Glu Dots
Red and yellow card
Black felt tip

Crafts: How to make an Egg box Dragon

How to make your egg box dragon:
Using whichever coloured paint you choose, paint your egg box, making sure it’s well covered with paint. Put the box to one side to dry, preferably overnight.

Once dry, cut the egg box up. we cut our six egg box into thirds, so each section had two egg spaces. You can do them individually if you prefer. Using a skewer carefully poke through holes where you want to thread your sting through and tie your dragon parts together. We also poked some holes through to thread pipecleaner horns and a ridge on it’s back. A grown up will probably need to help with the tricky cutting, poking and threading.

Crafts: How to make an Egg box Dragon

Thread the string though the holes and tie the ends together. Thread through your pipecleaner horns and using the glu dots, stick on the dragon’s eyes. Then you can go crazy decorating it. We added sparkles and sequins along its body and dabs of glitter from the glitter pens. I can’t sing the praises of glitter pens enough, all the sparkle of glitter but without the mess!

Crafts: How to make an Egg box Dragon

Draw on some details with your black felt tip, I added a snout detail on his face and leave the glitter to dry. While your glitter is drying, cut out some red and yellow flames and stick them to your egg box so it looks like your dragon is breathing fire. Your dragon is now ready for some dragon action.

If you enjoyed this blog post, you might also like to try some jelly bean architecture.

Review: Totally Amazing, Fact-Packed, Fold-Out Atlas of the World

My son loves maps, he can study them for hours. He has maps on his bedroom wall and he loves an atlas. His love of geography and geology come from his Dad’s side of the family and it’s something I am very happy to encourage. He has a couple of atlases already; but I knew he would love The Totally Amazing, Fact-Packed, Fold-Out Atlas of the World by Jen Green.

The Totally Amazing, Fact-Packed, Fold-Out Atlas of the World is for children aged 7+. It includes three big gatefold maps showing the major continents in detail, with facts about people, places, cultures, cities, landmarks and wildlife. It’s fact-packed and features lots of landmarks. We think it’s a really good atlas for provoking interesting conversations about the world, its people and the environment.

Review: Totally Amazing, Fact-Packed, Fold-Out Atlas of the World

The atlas is illustrated by Christiane Engel and the illustrations are colourful and informative. There is lots of detail on the maps, with enough to pique the interest of a child, but not too much that they get bogged down in it. There is even a flags of the world section at the back.

Since giving my son The Totally Amazing, Fact-Packed, Fold-Out Atlas of the World he has been engrossed in it. One of his favourite things to do is to spend 20 minutes or so each night looking at the atlas while he winds down for sleep. Sometimes we will look at it together and he is brimming with questions. I love this part of our day; exploring a map together and talking about all the things to see and do in that country or continent. It’s also very handy for planning our holiday later this year.

Review: Totally Amazing, Fact-Packed, Fold-Out Atlas of the World

The atlas is divided by continent. There are maps that show biomes and terrains as well as wildlife; and other maps that show people, places and political boundaries. Discover more about our diverse and wonderful planet and find out how every part of our planet is important and connected.

If you’ve got a child who like mine loves maps, or if you want to explore more about geography and geology at home, then The Totally Amazing, Fact-Packed, Fold-Out Atlas of the World would be a brilliant resource to start exploring with. Up to date and perfectly pitched at 7+ year olds; I know we will be enjoying this book for a long time to come.

The Totally Amazing, Fact-Packed, Fold-Out Atlas of the World is available in paperback from all good bookshops and online for £9.99.

Disclosure: We were sent The Totally Amazing, Fact-Packed, Fold-Out Atlas of the World for review purposes. All images and opinions are our own.

Blogger Board Game Club: My First Bananagrams

I am part of the Asmodee UK Blogger Board Game Club run by Playtime PR. Each month 50 bloggers are sent a board game to play and put to the test. This month we were sent the My First Bananagrams game to play.

My First Bananagrams is suitable for children aged 4+ and for 1-4 players. The banana shaped bag contains 80 single tiles, 13 combo-letter tiles and a set of instructions. The game is really simple to play. You tip the tiles out and turn them face down, each player picks 15 tiles at random and when someone shouts “split!” everyone turns their tiles over.

Blogger Board Game Club: My First Bananagrams

Each player individually races to arrange their letters in their own word grid. At any time during the game you can say “Swap” and put one tile back face down and take a new one. You can rearrange your grid at any time and as many times as you like, there are no limits to the number of times you can swap tiles. The first person to use all of their tiles, or failing that, the most tiles wins.

Each game is quite short, probably between 10 – 15 minutes and it’s probably about the right level for my son. He can find words without too much of a struggle, so it’s still lots of fun and does stretch him a little bit. I think it’s a nice fun game to help build confidence around finding words from a collection of letters.

It’s a lot of fun to play and really great for helping him to think more creatively about words. He started off with three letter words, but was soon confidently finding five letter words. It’s a bit like Scrabble, but with fewer rules and therefore easier to play.

Blogger Board Game Club: My First Bananagrams

My First Bananagrams is a real winner for us. It’s nice and compact, so you can throw it in your bag and play it anywhere with a flat surface. This will be hugely popular on holiday, I know it!

My First Bananagrams costs around £15.99 and is widely available in toy shops and online.

We were sent the My First Bananagrams game for review for the Asmodee UK Blogger Board Game Club. All images and opinions are our own.
Find other board game and toy reviews here.