Recipe: Easy Baileys Irish Cream Cupcakes

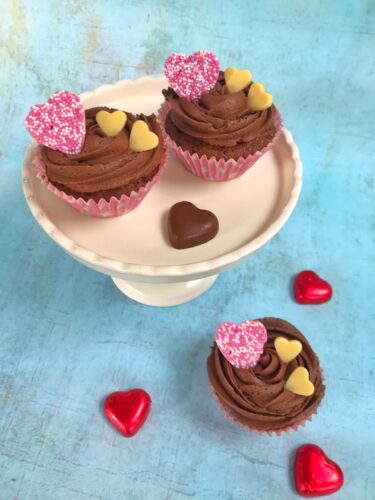
As Valentine’s Day approaches, my thoughts turn to little bakes I can do to gift to my loved ones. When I was younger, Valentine’s Day was reserved for the one special person in your life, but these days anything goes. I tend to make a slight fuss of my boy, he’s a bit too young for actual romance, but he’s never to old to be told his mum loves him. One of the ways I express my love for him and others is in the kitchen, so I whipped up a batch of these Baileys Irish Cream cupcakes and decorated them in a manner fit for Valentine’s Day!
Easy Baileys Irish Cream Cupcakes

These cupcakes are really easy and decorating them is pretty simple too. I piped buttercream roses into mine, and they’re a lot easier to do than you’d think. If you’re not sure how to do it, watch this short video. You can add sprinkles, chocolates, drizzles of sauce, whatever you want. I went for some simple heart shaped sweets I got from a local shop and some chocolate hearts I spotted which I thought might fit the bill.

This recipe makes about 24 cupcakes and if you’re quick, you can have them baked, decorated and ready to it in about an hour. I love quick and easy bakes, I’m a busy mum and finding loads of time to bake these days is a bit difficult at times.

Easy Baileys Irish Cream Cupcakes

Ingredients
225g soft butter or baking margarine like Stork
225g caster sugar
200g self-raising flour
25g cocoa powder
1 tsp baking powder
1 tsp vanilla essence
4 large eggs
6 tablespoons of Irish cream, I used Baileys

For the Irish cream buttercream
150g soft butter
300g icing sugar
1 tsp vanilla essence
20g cocoa powder
6 tablespoons of Irish cream, I used Baileys

Easy Baileys Irish Cream Cupcakes

Method
Preheat the oven to 190c. Grab a couple of bun trays and put a paper cupcake case in each of the holes. You need to have 24 paper cases ready.

Beat the butter (or margarine) and sugar together until pale and fluffy. I used an electric hand whisk, but you can use a wooden spoon if you prefer. Add the eggs, cocoa powder, vanilla and Irish cream and mix together. Gently tip in the flour and baking powder and combine until it’s all smooth.

Using a spoon, drop the mixture evenly into the cases. If you were feeling like being precise, you can weigh each one to make sure they are more or less the same weight. This will help them look more uniform, it’s not essential, measuring by eye also works.

Bake in the preheated oven for about 18 minutes or so, until they are cooked through and risen.

Turn your cupcakes out onto a wire rack and leave to cool fully. If you’re in a rush, you can pop them in the fridge for half an hour or so.

Easy Baileys Irish Cream Cupcakes

While you’re waiting for your buns to cool, it’s time to make the buttercream icing. Sift the icing sugar and mix with your softened butter in a mixing bowl until smooth. Beat in the Irish cream and cocoa powder with the vanilla essence.

Once your cupcakes are cool, put your Baileys buttercream in a piping bag with a star piping nozzle – I used a Wilton 2D nozzle. Starting in the middle of the cupcake, swirl your buttercream around until you’ve got a buttercream rose shape. If you’re not sure how to do it, watch this short video.

It’s really simple, and if you’ve not happy with your first few efforts, you can scrape the buttercream back into the piping bag and start again. Once you’re happy with your cupcakes, feel free to embellish them however you want, with sprinkles or hearts or whatever you fancy.

Tip: Once you’ve finished decorating your rose cupcakes, you could pop them in the fridge for an hour so the buttercream firms up a little before serving.

These Baileys Irish Cream Cupcakes are really pretty and very easy to bake. The icing is much easier that you’d think. I’m no expert cake decorator, but with a little bit of practice and patience, you’ll be piping buttercream roses like a pro!

if you enjoyed this, you might also like to try my simple Baileys Irish Cream cake, or these simple heart shaped Danish Butter Cookies.

Easy Baileys Irish Cream Cupcakes

Recipe: Heart Shaped Danish Butter Biscuits

Valentine’s Day is the ideal opportunity to show off your baking prowess to any potential or existing beau. During these long lockdown days, we’ve been baking a lot more than usual, so we needed to come up with a romantic treat which is a bit different to our usual bakes. Step forward, heart shaped Danish Butter biscuits.

Danish Butter Biscuits are a real classic. I remember tins of them around my Grandmother’s house at Christmas time. They seemed so fancy and posh at the time, and so different to the hard biscuits of my childhood. Danish butter biscuits are soft and short and crumbly in all the right ways. They’re also pretty easy to make, the hardest part is piping them out; but if you don’t fancy doing that, you can just bake dollops of them and they still taste as good.

Recipe: Heart Shaped Danish Butter Biscuits

Heart Shaped Danish Butter Biscuits

Ingredients:
375g butter, room temperature
250g caster sugar
1 egg
2 teaspoons vanilla essence
500g plain flour
Milk (entirely optional)
Glacé cherries

Method:

In a large mixing bowl, beat the butter and sugar until light and fluffy. Add the egg and vanilla essence and mix in thoroughly.

Beat in the plain flour, I tend to do this in batches so the kitchen doesn’t get covered in a flour cloud. Once it’s all mixed in, you need to decide if your mixture is loose enough to pipe, or if it needs letting down a bit. My hands are a bit arthritic, so I added a couple of tablespoons of milk and beat the mixture again.

Heat the oven to 180° and line some large baking sheets with parchment paper. If you’re choosing to pipe your biscuits, select a wide piping nozzle and put in your piping bag. I prefer to use disposable piping bags and a Wilton 1M nozzle, but you use whatever you’re comfortable with.

Carefully pipe heart shapes onto your parchment paper. I used a knife to help poke them into shape as my piping was a bit rusty. Once you’ve piped a tray (leaving room for them to spread a little), pop a glacé cherry in the centre of each one and sprinkle them with a little extra sugar. Put them in the oven to bake for 12-15 minutes. You don’t really want them to get brown, because like shortbread, these Danish Butter biscuits are supposed to be pale and interesting.

Once you’ve removed them from the oven, leave on a cooling rack until they are properly cool. Resist the urge to eat them all, as you’ve baked them for your paramour, but maybe you could sneak one or two for yourself.

Recipe: Heart Shaped Danish Butter Biscuits

If you’re gifting them, wrap them in tissue paper and pop them in a box for your intended. If you’re keeping them all for yourself, they keep very well in a tin for a couple of weeks; though I doubt they will last that long.

If you enjoyed this, you might like to try;

Recipe: Heart Shaped Danish Butter Biscuits

FREE Valentine’s Bookmark Colouring Printable

Express yourself and your love of reading this Valentine’s Day with this FREE Valentine’s Bookmark Colouring Printable for children.

Children often like to give little tokens of affection to the important people in their lives. My son is always writing me sweet little notes and bringing home pretty leaves and pebbles he’s found. On special occasions he likes to make his own cards. He’s a creative kid and it’s a very lovely thing and only to be encouraged.

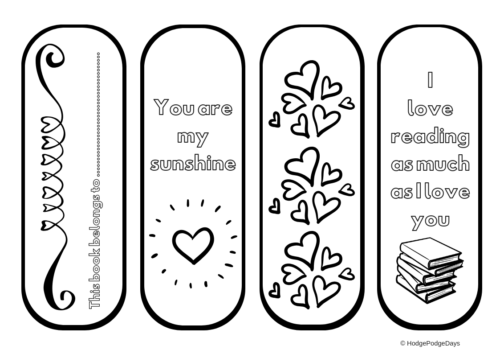
He’s now part of a junior book group with some of his friends from school, they’re all avid readers and what to avid readers need? Book marks! I’ve put together a Valentine’s Bookmark Colouring Printable for those who just love to read.FREE Valentine's Bookmark Colouring Printable

Download your FREE Valentine’s Bookmark Colouring Printable here.

Print them out onto card, colour them in, cut them out and give them to the special people in your life. If you’re feeling fancy you can punch a hole in the top and thread through some ribbon to give your bookmarks a bit of finesse.

Modern bookmarks are available in a wide variety of materials in a range of designs and styles. Many are made of card, but you can also find bookmarks made from paper, ribbon, fabric, felt or plastic.

Some bookmarks can be very ornate and expensively made, some people use bus tickets, post-it notes or scraps of paper to mark where they are up to in a book. If you know someone who uses an old bus ticket, why not make them a pretty bookmark they can treasure and enjoy using forever.

To make your coloured bookmarks last forever, you could cut them out and laminate them. They really do make lovely little gifts and sweet tokens of affection for keen readers.

Check out my other Valentine’s Day crafts here –

FREE Valentine's Bookmark Colouring Printable

Crafts: Celery Rose Print Valentine’s Cards

Make hearts flutter this Valentine’s Day with these Celery Rose Print Valentine’s Cards and gift wrap!

Crafts: Celery Rose Print Valentine's Cards

The first Valentine’s cards were sent in the 18th century. These were handmade cards, covered in romantic symbols of the age, such as flowers and love knots. The cards often included riddles and poetry. Cards were slipped secretly under the door of your beloved.

These days, although cards and poetry are often emailed to those who have made your heart flutter, a handmade card is still a lovely thing to give and to receive and in so many way, infinitely more preferable.

With Valentine’s Day just around the corner, we had a weekend of painting and experimenting with printing with various things. I’d seen people printing roses with celery stalks on Pinterest and decided to give it a try – it really works!

How to make Celery Rose Print Valentine’s Cards

You will need:

Some blank cards
The root end off a bunch of celery
Red paint
Blue paint
A nice black pen
A plastic plate, or somewhere to blob your paint

Crafts: Celery Rose Print Valentine's Cards

How to make your Celery Rose Print Valentine’s Cards:

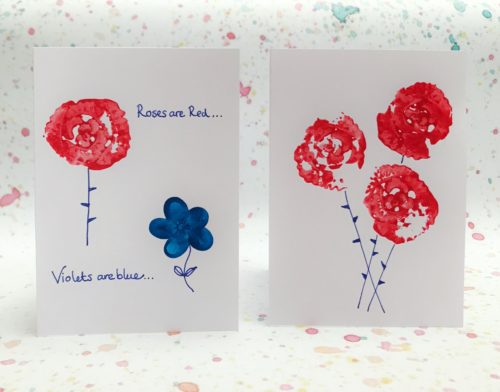
Tidy the end of your celery with a sharp knife so that it’s flat. Put a dollop of red paint on your plastic plate, dunk your celery in it, scrape off any excess paint on the edge of the plate and practice printing your roses on some scrap paper until you get the right effect. I found not having too much paint on my celery was best.

Once you’re happy with your printing, take your blank greetings cards and print your roses on them. I did two designs, a bouquet of roses on one; and a roses are red, violets are blue on the other. To print the violets I get my son to dip one of his fingers in blue paint and showed him where to press his fingers to make petal shapes.

Crafts: Celery Rose Print Valentine's Cards

We hung the cards up to dry for a few hours, whilst they were drying we took some brown packing paper and he set to work printing roses and violets in a repeating pattern until the paper was covered. The effect is really very good, and ideal for wrapping Valentine’s gifts. Leave your gift wrap for a few hours to dry, when it’s dry you can wrap your gifts.

Once the cards were dry, I grabbed a nice inky pen and drew thorny stems and embellished the violets with leaves and a stamen. All that was left to do was for us to write romantic messages to the people we secretly, or not so secretly admire.

If you enjoyed this, you might also like to try these other Valentine’s Crafts:

Crafts: Celery Rose Print Valentine's Cards

Easy Recipe: Love Heart Jam Tarts

Jam tarts are most people’s introduction to baking. I remember standing on a stool in my Grandma’s kitchen watching her roll the pastry out, I’d help her cut out pastry rounds and I’d spoon jewel coloured jam into the tarts. Waiting for the jam tarts to cool once they’d come out of the oven was torture.

I still love jam tarts today. These days I usually bake them with my son; him stood on the stool, spooning jam and waiting impatiently. They’re one of the easiest things to bake and are ideal if you’re baking with kids or if you’re a novice wanting to take your first steps into baking.

Easy Recipe: Love Heart Jam Tarts

I’ve jazzed these simple tarts up for Valentine’s Day. The addition of a heart makes these jam tarts whimsically romantic. Of course your tarts will be perfectly delicious without the pastry heart, but if you can’t push the boat out a bit for Valentine’s Day, when can you?

Love Heart Jam Tarts

Ingredients (makes 12 -15 tarts)

4oz plain flour
2oz butter, cubed
A pinch of salt
2-3 tablespoons of cold water
-or- a packet of ready rolled shortcrust pastry

Half a jar of strawberry or raspberry jam
Milk or a beaten egg to brush your pastry with
Extra butter for greasing your baking tray

Method

Put the flour, salt and butter in a large mixing bowl. Using your fingers, rub the butter into the flour until it looks like breadcrumbs. Use a knife and stir in just enough cold water to bind the dough together. Do this gradually as you don’t want your pastry to be too wet. Once you’ve made the dough, cover the bowl and chill it in the fridge for 15 minutes or so before using.

Or if you’re using shop bought, ready rolled pastry, take it out of the fridge half an hour before you want to use it. 

Pre-heat your oven to gas mark 5 or 190°

Take your pastry and roll it out to the thickness of a pound coin. You can either roll it out on a floured surface, or between two pieces of baking parchment. I find the baking parchment method quicker and a lot less messy.

Grease your bun or muffin tin with butter and cut your pastry into rounds. Gently press each round into the tin and prick the bottom of each one with a fork. With the remainder of the pastry, cut out enough heart shapes to top each of your tarts.

Carefully put a spoon of jam in each tart. Do not over fill the tarts as the jam will bubble up and ruin your hard work.

On a separate baking sheet, place a piece of baking parchment and lay your heart shapes flat, brush them with a little milk or beaten egg and put your hearts and your tarts in the oven for 12-15 minutes.

Once cooked and your hearts are golden, remove from the oven and quickly but carefully place a heart on the top of each tart. Gently press it in place taking care not to touch the hot jam with your fingers. Leave to cool for a few minutes before removing the tarts from the tray and putting them on a wire rack to cool.

Easy Recipe: Love Heart Jam Tarts

As you can see, my jam tarts didn’t come our perfectly round this time; but a rustic, imperfect looking jam tart is still a delicious jam tart.

These jam tarts with a heart are a simple way to share the love this Valentine’s Day. Who will you bake with love for this year?

Easy Recipe: Love Heart Jam Tarts

Learning: Take the Valentine’s Lego STEM Challenge

We are getting quite into STEM crafts and activities at home now. We’ve been busy with jellybean architecture, made a sponge house to grow cress on and this week we’ve been using the Valentine’s Lego STEM Challenge Cards from Mrs Mactivity and seeing what we could create.

Lego play is well known for having all kinds of great developmental benefits, these include –

  • Promoting fine motor skills
  • Encouraging team work
  • Improving creativity
  • Developing problem solving and mathematical thinking
  • Improving communication skills
  • Developing lateral thinking and planning skills

Crafts: Valentine’s Lego STEM Challenge Cards

Developing STEM (Science, technology, Engineering and Maths) skills and encouraging an interest in these areas is so important for all children. I’m lucky that my son is very keen on science and engineering; not so much maths, but we’re working on that. He absolutely loves playing with Lego too, so these Valentine’s Lego STEM Challenge Cards were absolutely perfect for him.

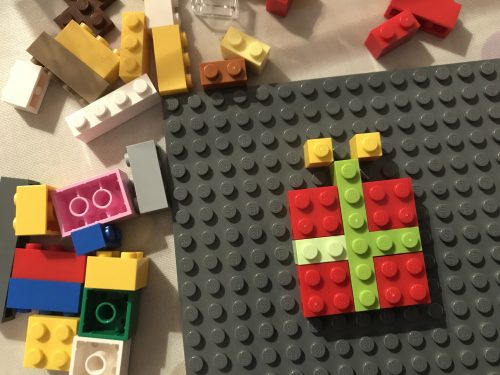
We printed out the Valentine’s Lego STEM Challenge Cards and gathered a few boxes of Lego together. We each chose a challenge and got to work. I made the heart, the present and spelled out the word LOVE. He did an arrow, a heart and he also wrote the word LOVE in Lego.

Learning: Valentine’s Lego STEM Challenge Cards

It was really interesting for us to do something a bit different with our Lego and nice to build something which wasn’t a Lego City or Ninjago set. I can see how it worked his problem solving muscles, trying to find the right piece to go in the right place, picking and choosing colours and carefully following the visual instructions on the cards.

I think it’s also helped to show him that he doesn’t just have to build the sets, that he can be a little more creative with his Lego. He especially enjoyed writing with it and went on the write his name and mine. This is definitely something we can build on together at home.

Learning: Valentine’s Lego STEM Challenge Cards

This was most definitely a fun thing to do together and the learning is obvious to me, but it’s just fun for him!

The Valentine’s Lego STEM Challenge Cards are available to download on the Mrs Mactivity website. You can also find a good selection of other activity sheets there – all designed to be fun and educational too!


Learning: Valentine’s Lego STEM Challenge Cards

Recipe: Showstopping Turkish Delight Cake

Turkish Delight is one of those things people love or hate. I am firmly in the love camp. For me, it’s always had a hint of the exotic about it, those romantic Laurence of Arabia style adverts from the 80’s mean that this rose (or lemon) scented sweet is wonderfully evocative. What could be a more romantic tea-time treat than this showstopping Turkish Delight Cake?

I love Turkish Delight in all its forms; from the chocolate covered Fry’s version, to the sugar dusted boxes of these jellied fancies you get at Christmas. During my weekly shop I spotted a box of Turkish Delight thins from Morrison’s and I knew exactly what I’d do with them. My Turkish Delight Cake was born!

Recipe: Showstopping Turkish Delight Cake

It’s a stunning looking (and tasting) cake. It looks fancier and harder to bake than it really is. If you can bake a sponge cake and mix up some buttercream, then you’ve got all the skills needed to make this cake.

Showstopping Turkish Delight Cake

Ingredients:
8oz butter or margarine
8oz caster sugar
4 eggs (large)
8oz self raising flour
1.5 teaspoon baking powder
Zest of two lemons

For the buttercream:
250g icing sugar
250g butter (softened)
3 drops of Holy Llama Rose Extract Spice Drops
Red food colouring

To decorate:
Turkish Delight Thins (or similar)
Traditional Turkish Delight pieces

Method:

Pre-heat your oven to 180° and grease three 9 inch cake tins.

Cream your butter and sugar in a large mixing bowl. Add the rest of the ingredients and using a hand mixer combine until the batter is smooth and airy.

Divide your cake batter equally between the three tins (I weigh my filled tins to make sure they’re roughly equal) and bake in the oven for 20-25 minutes until an inserted skewer comes out clean. Leave to stand for 5 minutes before turning on to a wire rack to cool.

While your sponge cakes are cooling, sift your icing sugar and beat together with the softened butter. Add your drops of rose extract, beating thoroughly and tasting as you go. You can always add more, but you can’t take it away!

Once you’re happy with the flavour, add a few drops of the red food colouring and mix well and add more colouring until you’re happy with the shade of pink you’ve got. Make sure your buttercream is well combined and smooth.

On a cake stand or cake board (or wherever your cake is going to sit) put a heaped teaspoon of butter cream in the middle and position your first sponge cake on top of that. This will anchor your cake in place and stop it sliding about.

Cover the top of that sponge layer with a thin spread of buttercream and put your second sponge on top of that. Repeat the process with the third sponge layer.

Now for the slightly time consuming bit; using a palette knife spread the rose buttercream around the sides of the cake. I found it easier to plaster on more buttercream than I needed and then smooth it off. It doesn’t have to be a perfect finish, but cover it as best you can, this is easier if your buttercream is soft. If if’s too hard, give it another beating.

Once the sides of the cake are covered, spread a thick-ish layer of buttercream on the top. I usually ripple the buttercream with the knife, but you can do a smooth finish if you’d prefer. Cut the Turkish Delight Thins in half into triangles and do the same with the Turkish Delight pieces, although they will look more like pyramids.

Arrange the Turkish Delight thins and pieces on top of the cake in whatever way you think looks good. I did haphazard rows of thins with the pieces dotted about.

Recipe: Showstopping Turkish Delight Cake

My Turkish Delight Cake is a real treat. It’s rich and sweet and absolutely packed with the traditional flavours of Turkish Delight; from the light lemon zested sponge, to the sweet rose scented buttercream – it’s a treat and a half for Turkish Delight fans!

If you enjoyed this recipe, you might also like my Romantic Rose Cupcakes.

Recipe: Showstopping Turkish Delight Cake

Valentine’s Day Crafts: 52 Reasons Why I Love You

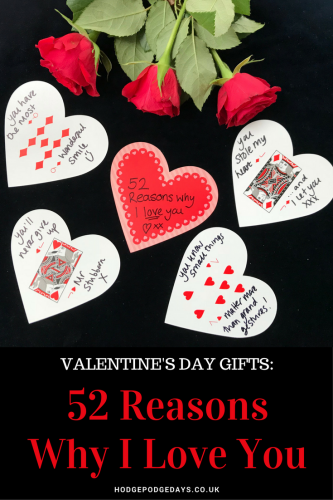
After 23 years of Valentine’s Days with my husband, I’m not saying romance is dead, but the budget has been somewhat slashed. We have for a number of years had a £5 gift and a card policy; which means that Valentine’s Day often requires a bit of creativity. His favourite of the homemade Valentine’s gifts I’ve made for him was the 52 Reasons Why I Love You pack of cards. It’s a favourite of mine too, because it’s so darn cute!

Valentine's Day Crafts: 52 Reasons Why I Love You

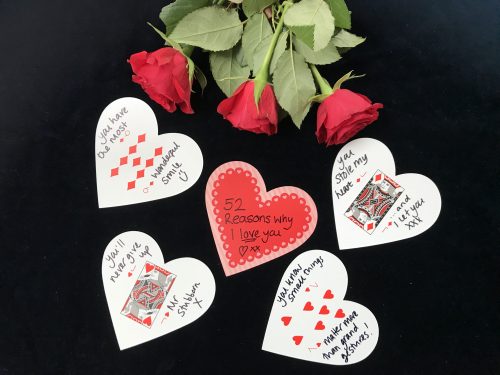
It’s remarkably easy to put together. All you need is a pack of cards, a permanent marker and a list of 52 Reasons Why I Love You. That last one is the tricky one. My advice would be to take a few days to list some of the reasons why you love your partner. I found that I could find 30 or so reasons pretty easily, but then I started to write things like “I love you because you take the bins out”; which is a valid reason but lacks a little romance.

You can use a normal pack of cards. I found a nice heart shaped pack of cards and used them, but you can find a similar pack here on Amazon. Using your list of the 52 Reasons Why I Love You; neatly write a reason on every card in the pack. You may want to write the biggest and best reasons on the heart cards, and make sure you write it on the suit side, not the patterned side of the cards.

Here are a few of my reasons to give you an idea of what I wrote –
  • You cook amazing meals
  • You work so hard for our family
  • You’re ace in every single way
  • You’re generous with everyone
  • I love snuggling with you
  • I’ve known and loved you forever
  • I love the way you tuck me in at night

This 52 Reasons Why I love You gift is such a lovely thing to give someone. I know my husband looks at the cards often. The reasons are full of our shared history, our shared interests, our family and all the special things about him which I love and appreciate.

It’s such a small, inexpensive and simple gift. But it’s something that your partner will probably really appreciate and treasure for many years to come.

See what other Valentine’s Day crafts you could make here.

Valentine's Day Crafts: 52 Reasons Why I Love You

Recipe: Romantic Rose Cupcakes for Valentine’s Day

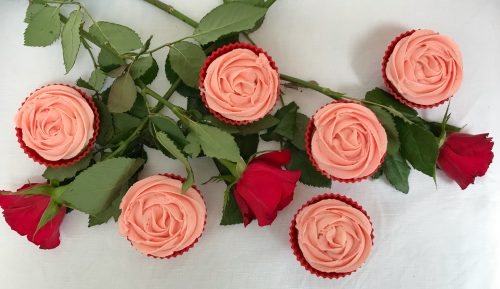
After 17 years of marriage, flamboyant romantic gestures on Valentine’s Day are a thing of the past. It’s not that we don’t do romance, it’s just that we’ve got different things to spend our money on. For many years now Valentine’s Day for us has been about homemade cards and smaller, more meaningful gifts. I usually bake something sweet to share with the boys, this year I’ve made some romantic rose cupcakes, and they’re sure to be a hit.

A little while ago, whilst browsing the reduced yellow stickered items in a deli, I found a bottle of Holy Llama Rose Extract Spice Drops. They were a bargain, so they ended up in my shopping basket and then in my baking cupboard at home. If you don’t have Holy Llama Rose Extract Spice Drops, substitute this with whatever rose extract you have.

Recipe: Romantic Rose Cupcakes for Valentine's Day

I’ve been a bit worried about trying out my Rose Extract. Rose is one of those flavours which if you use too much of, whatever you’ve made will end up tasting like Granny’s soap. If you go easy and add a little at a time, everything should turn out rosy.

Romantic Rose Cupcakes

Ingredients:
4oz butter or margarine
4oz caster sugar
2 eggs (large)
4oz self raising flour
1 teaspoon baking powder
5 drops of Holy Llama Rose Extract Spice Drops

For the buttercream:
250g icing sugar
250g butter (softened)
3 drops of Holy Llama Rose Extract Spice Drops
Red food colouring

Method:
Pre-heat your oven to 180° and put paper cases in a bun or a muffin tray.

Cream your butter and sugar in a large mixing bowl. Add the rest of the ingredients and using a hand mixer combine until the batter is smooth and airy. When you add your rose extract, taste the batter to check the levels of rose flavour. Remember, a fair amount of the rose flavour will bake out of the cupcakes, so bear this in mind. I opted for a not very rose flavoured sponge because I knew the buttercream would be where most of the flavour was.

Dollop a large dessert spoon of the cake batter in each case and bake in the oven for 20 minutes. Once cooked remove from the oven and leave cool on a rack.

While your cupcakes are cooling, sift your icing sugar and beat together with the softened butter. Add your drops of rose extract, beating thoroughly and tasting as you go. You can always add more, but you can’t take it away!

Once you’re happy with the flavour, add a few drops of the red food colouring and mix well and add more colouring until you’re happy with the shade of pink you’ve got. Make sure your buttercream is well combined and smooth.

Once your cupcakes are cool, put your rose flavoured buttercream in a piping bag with a star piping nozzle – I used a Wilton 2D nozzle. Starting in the middle of the cupcake, swirl your buttercream around until you’ve got a buttercream rose shape. If you’re not sure how to do it, watch this short video.

Recipe: Romantic Rose Cupcakes for Valentine's Day

Tip: Once you’ve finished decorating your rose cupcakes, you could pop them in the fridge for an hour so the buttercream firms up a little before serving.

These Romantic Rose Cupcakes are really pretty and very easy to bake. The icing is much easier that you’d think and you can also scrape off and re-do any which you’re not happy with. I’m no expert cake decorator, but with a little bit of practice and patience, you’ll be piping buttercream roses like a pro!

If you enjoyed this recipe, you might also like my tangy marmalade cupcakes.

Recipe: Romantic Rose Cupcakes for Valentine's Day

Crafts: Easy Valentine’s Paper Heart Wreath

This month Craft Merrily have set the Bostik Bloggers the task of creating a craft for Valentine’s Day. Last year I made a lovely découpage candle holder for Valentine’s Day, but this year I thought I’d make a Paper Heart Wreath.

I really like making paper wreaths, we have a place in the kitchen where I like to hang the seasonal wreaths I make. This is a little different to my usual style, this Paper Heart Wreath is put together with easy to make 3D hearts. It’s really quite easy to make, it looks very effective and it’s a lovely Valentine’s decoration.

Crafts: Easy Valentine's Paper Heart Wreath

How to make a Paper Heart Wreath

You will need
Colourful paper, A4 size
Scissors or a craft knife
A ruler
Bostik Glu Dots
A length of ribbon

How to make your Paper Heart Wreath

Using a ruler measure the long side of your piece of paper and divide that length by 7. Measure out 7 equal widths of paper and carefully cut into strips using a pair of scissors or a craft knife. If you’re doing this with children then you may want to be in charge of this bit.

Fold each strip in half, make sure you’ve got a neat, crisp fold here, this will be the pointy bottom of your heart shape.

Crafts: Easy Valentine's Paper Heart Wreath

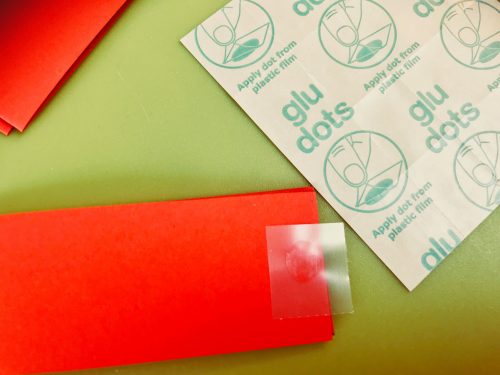
Using a glue dot, stick a dot at the end of your strip and bend the edges together to create the heart shape. Press the paper together so the glu dot is holding the shape firmly in place. Do this with all 7 hearts.

Crafts: Easy Valentine's Paper Heart Wreath

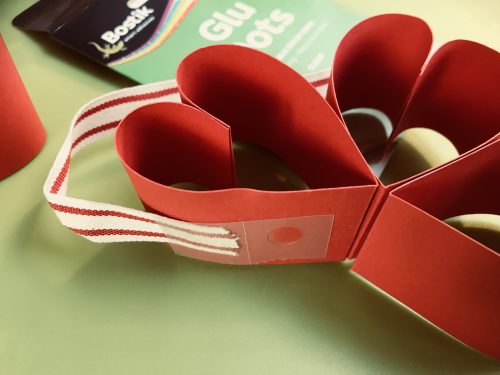
Take two hearts and stick them together using the glu dots. Then take your ribbon and using the glu dots stick the ribbon to either side of the two hearts. Make sure the ribbon is positioned so the ends will be hidden between the hearts. Using the glu dots, carry on sticking the hearts together until all 7 hearts are stuck together.

Crafts: Easy Valentine's Paper Heart Wreath

Your paper heart wreath is now finished and you just need to find somewhere to hang it!

I am a Bostik Craft Blogger and I was sent the materials to create this craft from Craft Merrily. 

Check out my other craft tutorials here!

Crafts: Easy Valentine's Paper Heart Wreath